
Mochi Donuts with Vanilla Glaze: Your New Favorite Chewy, Gluten-Free Treat!
Hey there, friend! Come on in, grab an apron, and let’s get something sweet started. If you’ve ever bitten into a mochi donut and experienced that magical, uniquely chewy, bouncy, and utterly delightful texture, you know it’s a moment of pure joy. And if you haven’t? Oh, you are in for the most wonderful treat. Today, we’re ditching the fancy bakery lines and making our very own batch of Mochi Donuts with Vanilla Glaze right at home.
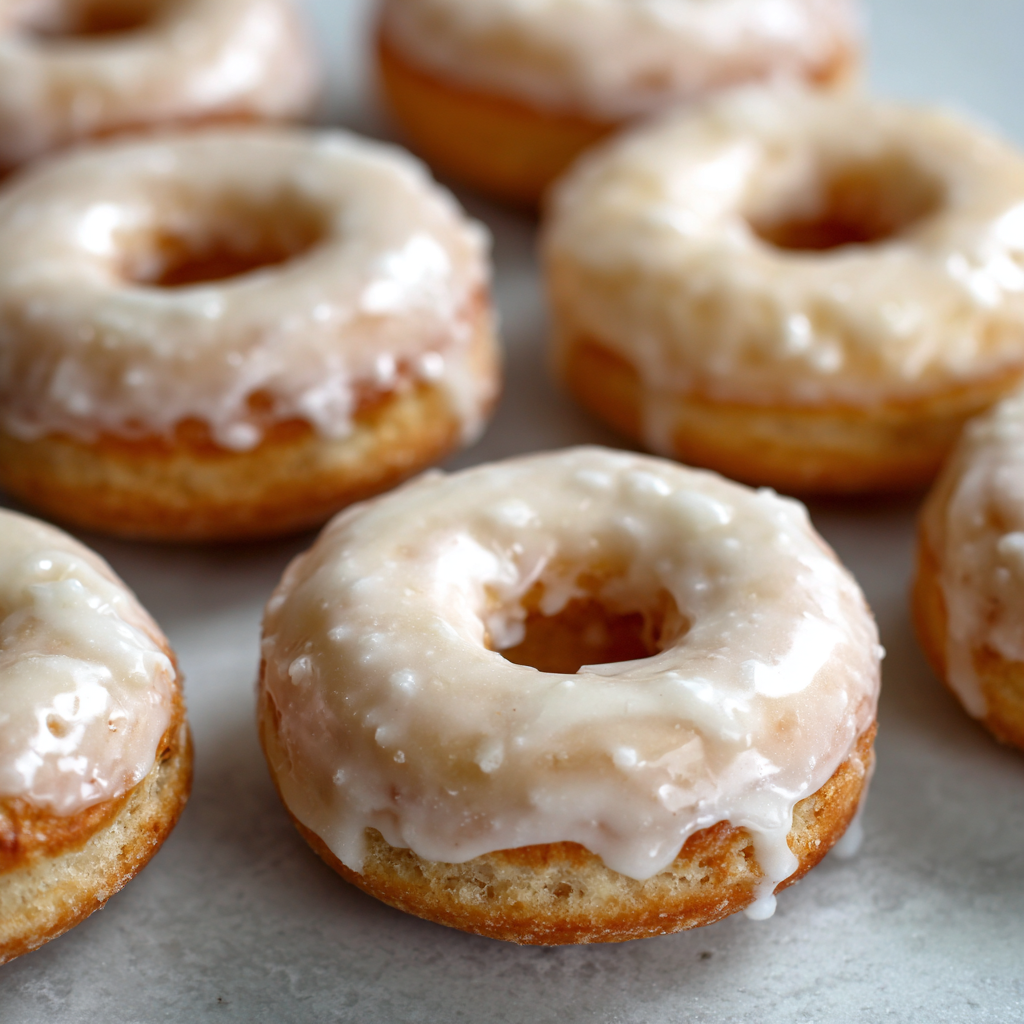
These aren’t your average cake or yeast donuts. The star here is sweet rice flour (or mochiko), which gives these gorgeous rings their signature soft-yet-chewy, slightly stretchy quality that is downright irresistible. They’re naturally gluten-free, incredibly fun to make, and topped with a simple, shimmering vanilla glaze that cracks perfectly with every bite. Whether you choose to bake them for a slightly lighter feel or fry them for that classic, golden-brown indulgence, I promise you, these donuts will disappear faster than you can say “seconds, please!” So, let’s turn up the music, preheat the oven (or the oil!), and create something truly special together.
The Day I Fell in Love with a Donut
I’ll never forget my first mochi donut. It was a rainy Saturday, and my best friend dragged me to a new pop-up market across town, promising me “life-changing pastries.” I was skeptical—I’m a from-scratch gal, and most trendy treats don’t live up to the hype. But then I saw it: a beautiful, glossy, perfectly round donut covered in a pastel pink glaze. It looked like a piece of art. I took one bite, and my entire concept of what a donut could be just… shifted.
It wasn’t just sweet; it was an experience. The texture was the star—chewy, soft, and Substantial with a satisfying pull. It was fun to eat! We stood there in the drizzle, laughing as we tried to gracefully eat these wonderfully bouncy donuts without getting glaze everywhere (we failed miserably, by the way). It was one of those perfect, simple moments of friendship and fantastic food. I knew right then I had to recreate that magic in my own kitchen, to share that feeling of discovery and joy with my family, and now, with you.
Gathering Your Mochi Donut Ingredients
Part of the beauty of this recipe is its simplicity. You likely have most of this in your pantry already! Here’s what you’ll need to make about a dozen little rings of happiness.
For the Mochi Donuts:
- 2 cups sweet rice flour (mochiko): This is the non-negotiable star of the show! Don’t try to substitute regular rice flour or all-purpose. Sweet rice flour is ground from glutinous rice (don’t worry, it’s gluten-free!) and contains the starch that creates that famous chewy, stretchy mochi texture. I love the Koda Farms or Mochiko brand for consistent results.
- ¾ cup milk: Dairy milk works beautifully, but this is a fantastic place to use your favorite plant-based milk. Unsweetened almond, oat, or coconut milk will all work like a charm, making this recipe easily dairy-free as well.
- ¼ cup sugar: We’re using just enough to sweeten the dough without making it overly sweet, as the glaze will bring most of the sugar power. I use regular granulated sugar.
- 1 tsp baking powder: Our little leavening agent that gives the donuts a bit of lift and a softer, cakier crumb alongside the chew.
- 1 large egg: This helps bind everything together and adds richness to the dough. Let it come to room temperature for easier mixing.
- 2 tbsp melted butter (or coconut oil): Butter adds a lovely, rich flavor. For a dairy-free version, refined coconut oil is my top choice—it melts beautifully and keeps the flavor neutral.
For the Vanilla Glaze:
- 2 cups powdered sugar: The base of our simple, sweet, and crackly glaze. Sift it if it’s lumpy for an ultra-smooth finish.
- ½ tsp vanilla extract: Use the good stuff! Pure vanilla extract makes a world of difference. Or, for a fun twist, try vanilla bean paste to get those gorgeous little speckles.
- 3–4 tbsp milk: Start with 3 tablespoons and add the fourth only if you need it to reach a thick but dippable consistency.
- 1 drop food coloring (optional): This is where you get to play! A drop of pink, yellow, or blue can make these donuts look utterly professional and so joyful.
Let’s Make Some Magic: Step-by-Step Instructions
Ready? This comes together so quickly. Let’s walk through it together—I’ve got plenty of tips to share along the way!
Step 1: Combine Your Dry Ingredients.
In a large mixing bowl, grab your whisk and vigorously whisk together the 2 cups of sweet rice flour, ¼ cup sugar, and 1 teaspoon of baking powder. You want to ensure the baking powder is evenly distributed throughout the flour so every bite is perfect. This is also your chance to break up any little clumps in the flour—a few seconds of whisking now saves you from lumpy batter later!
Chef’s Hack: If you’re a perfectionist (like me!), you can sift these ingredients together. It’s not strictly necessary, but it guarantees an incredibly smooth batter.
Step 2: Mix Your Wet Ingredients.
In a separate, medium-sized bowl, combine the ¾ cup milk, 1 large egg, and 2 tablespoons of melted (and slightly cooled) butter or coconut oil. Whisk it until the egg is fully incorporated and the mixture looks smooth and homogenous. If your butter re-solidifies when it hits the cold milk, don’t panic! Just whisk a little more energetically; it’ll be fine once mixed with the dry ingredients.
Step 3: Bring It All Together.
Now, pour your wet ingredients into the bowl with the dry ingredients. Using a spatula, gently fold and stir until you no longer see any dry streaks of flour. You’ll end up with a thick, smooth, and slightly sticky batter. It should be pourable but hold its shape—think a thick pancake batter or a very soft cookie dough. If it seems too thick to pipe, add a teaspoon of milk at a time until it’s workable.
Chef’s Hack: Don’t overmix! Once it’s combined, stop. Overmixing can sometimes make the gluten in the rice flour tough, and we want tender, chewy donuts.
Step 4: Shape Your Donuts.
You have two fantastic options here: baking or frying.
For Baking (My Easy Go-To): Grease a donut pan generously with non-stick spray or butter. Spoon the batter into a large piping bag or a sturdy zip-top bag with a corner snipped off. Pipe the batter evenly into the prepared donut cavities, filling each about ¾ of the way full. Smooth the tops with a damp finger.
For Frying (The Classic Method): Pipe or spoon 3-inch rings onto small squares of parchment paper. This makes them easy to handle. Heat neutral oil (like vegetable or canola) in a heavy-bottomed pot to 325°F (165°C). Carefully lower the parchment squares into the oil. The donuts will release after a minute, and you can fish out the parchment with tongs. Fry for 2-3 minutes per side until puffed and light golden brown.
Step 5: Bake or Fry to Perfection.
To Bake: Preheat your oven to 350°F (175°C). Bake for 12-15 minutes. They’re done when the tops are set and spring back lightly when touched. The edges might get just the faintest hint of gold.
To Fry: Maintain your oil at 325°F. Fry for 2-3 minutes per side until golden brown. Don’t crowd the pot—fry in batches.
Whichever method you choose, let the donuts cool completely on a wire rack before glazing. This is crucial! A warm donut will melt the glaze and make a messy (though still delicious) puddle.
Step 6: whip Up The Glaze & Decorate!
While the donuts cool, make the glaze. In a medium bowl, whisk together the 2 cups of sifted powdered sugar, ½ teaspoon of vanilla extract, and 3 tablespoons of milk. Whisk until it’s completely smooth and silky. If it’s too thick, add the remaining tablespoon of milk, a teaspoon at a time, until it’s a thick but dippable consistency. Add a drop of food coloring if you’d like!
Now for the best part: dip the top of each cooled donut into the glaze, twist slightly, and lift straight up. Let the excess drip off for a moment, then place it back on the wire rack. Immediately add any sprinkles or toppings before the glaze sets. The glaze will firm up into a beautiful, crackly shell in about 15 minutes.
How to Serve Your Masterpieces
These donuts are best served the day they are made, when their chewy texture is at its prime. Pile them high on a beautiful cake stand for a serious “wow” factor at your next brunch or gathering. They pair wonderfully with a hot cup of coffee, a glass of cold milk, or a delicate green tea. Honestly, there’s no wrong way to enjoy them—standing over the kitchen counter is a perfectly acceptable method, too!
Get Creative: Recipe Variations
The fun doesn’t stop with vanilla! This recipe is a blank canvas for your creativity.
- Matcha Magic: Whisk 1-2 teaspoons of high-quality matcha powder into the dry ingredients for the donut batter. For the glaze, use matcha powder instead of food coloring for a beautiful green hue and earthy flavor.
- Chocolate Dream: Add 2 tablespoons of cocoa powder to the dry ingredients. For a double chocolate hit, make a chocolate glaze by mixing 2 tbsp of cocoa powder into the powdered sugar before adding the milk.
- Citrus Zing: Add the zest of one lemon or orange to the batter. For the glaze, substitute the milk for fresh citrus juice and add a bit of zest for a bright, sunny flavor.
- Fun Toppings: Immediately after glazing, shower your donuts with sprinkles, shredded coconut, crushed freeze-dried strawberries, or a drizzle of melted chocolate.
Olivia’s Chef Notes & Kitchen Stories
This recipe has evolved so much in my kitchen! My first attempt was… a learning experience. I didn’t let the donuts cool and my beautiful glaze just slid right off, creating a delicious but very abstract pastry puddle. My husband, always the optimist, called it “deconstructed donut parfait” and ate it with a spoon.
I’ve also learned that the batter thickness can vary slightly based on your specific brand of flour and the humidity in your kitchen. If it feels too stiff, that extra teaspoon of milk is your best friend. Don’t be afraid to trust your instincts and adjust. Cooking is a conversation between you and the ingredients! These donuts also freeze beautifully (unglazed) for up to a month. Just let them thaw at room temperature and glaze them fresh.
Your Mochi Donut Questions, Answered!
Q: My donuts turned out dense and gummy. What happened?
A: This usually means the batter was overmixed. Remember, once the wet and dry ingredients are combined, stop stirring! Overmixing develops the starch in the rice flour and can lead to a denser texture. Also, ensure your baking powder is fresh for proper lift.
Q: Can I make the batter ahead of time?
A: I don’t recommend it. The baking powder will begin to activate once it hits the liquid, and you want all that power for when the donuts hit the heat. For the best texture, mix and bake/fry right away.
Q: My donuts are sticking to the pan terribly! Help!
A: Grease, grease, grease! Donut pans need a very generous coating of non-stick spray or butter. If you’re frying, the parchment paper trick is essential for easy handling. If a few still stick, just run a small offset spatula or knife around the edges while they’re still warm to loosen them.
Q: Are these donuts supposed to be so chewy?
A: Yes! That’s the magic of mochi. They are meant to have a delightful, bouncy, and pleasantly chewy texture that’s completely different from a standard cake or yeast donut. Embrace the chew!
Print
Mochi Donuts with Vanilla Glaze
Description
Hey friend! If you’ve ever wanted to recreate that magical, chewy, bouncy bite of a mochi donut at home—today’s your day. These beauties are naturally gluten-free thanks to sweet rice flour (mochiko), and they’re topped with a crackly vanilla glaze that’s as fun to make as it is to eat. The best part? You can bake them for a lighter version or fry them for full-on indulgence. Either way, they’re destined to disappear fast!
Ingredients
For the Donuts:
-
2 cups sweet rice flour (mochiko)
-
¾ cup milk (dairy or plant-based)
-
¼ cup granulated sugar
-
1 tsp baking powder
-
1 large egg (room temp)
-
2 tbsp melted butter (or coconut oil)
For the Vanilla Glaze:
-
2 cups powdered sugar, sifted
-
½ tsp vanilla extract
-
3–4 tbsp milk
-
1 drop food coloring (optional)
Instructions
-
Mix dry: In a bowl, whisk mochiko, sugar, and baking powder.
-
Mix wet: In another bowl, whisk milk, egg, and melted butter.
-
Combine: Fold wet into dry until smooth and slightly sticky. Don’t overmix.
-
Shape:
-
Bake: Pipe batter into greased donut pans, filling ¾ full.
-
Fry: Pipe small rings on parchment squares. Fry in 325°F oil, 2–3 min per side.
-
-
Cook:
-
Bake: 350°F for 12–15 min, until set and springy.
-
Fry: Until golden brown, flipping halfway.
-
-
Cool & glaze: Let donuts cool completely. Whisk glaze ingredients until smooth. Dip tops, let excess drip, then set on a rack. Add sprinkles if desired.
Notes
-
Cool first: Glaze only cooled donuts, or it will slide off.
-
Chewy is good: The bounce is the magic of mochi—different from cake donuts.
-
Get creative: Add matcha, cocoa, or citrus zest to the batter or glaze.
Nutrition
- Calories: 210 cal Per Serving
- Carbohydrates: 38g
- Protein: 2g
Quick Nutritional Info
Prep time: 15 min | Cook time: 15 min | Total time: 30 min
Per donut (approx.): 210 calories, 2g protein, 38g carbs, 6g fat
Please note: This is an estimate provided for informational purposes only. Exact values can vary based on specific ingredients used and any substitutions.
Final Thoughts: Your Homemade Happiness
And there you have it! What began as a simple bowl of sweet rice flour has transformed into a batch of incredible, chewy, gluten-free donuts that are truly something special.
I hope this recipe brings a little extra joy and fun into your kitchen. Whether you baked them for a lighter treat or fried them for a truly indulgent moment, you’ve created more than just a dessert—you’ve created an experience. That uniquely satisfying texture, the sweet crack of the vanilla glaze, the pride of making something beautiful from scratch… that’s the real magic.
So, the next time a craving for something wonderfully chewy and sweet strikes, you know exactly what to do. Skip the bakery line and create your own moment of joy. I have a feeling these mochi donuts will become a new favorite in your home, just as they have in mine.


