

Welcome to My Kitchen: Where Comfort Meets Crunch!
Hey there, friend! Olivia here, apron probably stained with a bit of today’s experiment, ready to share one of my all-time favorite kitchen hacks. Ever have one of those days where everyone is hungry right now, the clock is your nemesis, and you need something that feels like a hug on a plate? Or maybe you’re staring down a lunchbox that needs filling with something that won’t come home untouched? I see you. And I have the answer, sizzling away on a baking sheet: Mini Tuna Melts.
This isn’t just a recipe; it’s a little edible magic trick. We take a few humble ingredients—the kind you likely have in your pantry right now—and in under 25 minutes, transform them into warm, crispy, cheesy bites of pure joy. They’re the perfect blend of nostalgic comfort (hello, childhood lunches!) and smart, grown-up cooking. With a whopping 19 grams of protein per serving, they’re satisfying enough for a light dinner, perfect for a quick lunch, and absolutely legendary as an after-school snack that even the pickiest tiny critics will devour.
So, preheat that oven, and let’s make your kitchen smell amazing. This is about more than just food; it’s about creating a moment of easy, delicious connection. No fancy skills required, just a craving for something good. Let’s get toasty!
The Little Lunch That Could: A Nostalgic Bite
My love for tuna melts is deeply rooted in my grandma’s sun-drenched kitchen. She wasn’t a “fancy” cook, but she was a great one. Her secret weapon? A well-stocked pantry and an unwavering belief that any problem could be solved with a warm, cheesy snack. I can vividly remember sitting at her checkered tablecloth, feet dangling, watching her assemble these open-faced wonders under the broiler. The anticipation as the cheese bubbled and the edges of the bread crisped was a special kind of childhood torture (the good kind!).
She’d always let me sprinkle a little extra paprika on mine, making me feel like a master chef at age seven. That first bite—the crunch giving way to the creamy, tangy filling—felt like the definition of safety and love. My version today is just a miniaturized, streamlined homage to her. By using English muffins, we get more crispy nooks and crannies in every bite, and the individual portions mean everyone gets their own perfect, personal little feast. It’s my way of keeping that warm, sunny afternoon feeling alive in my own kitchen, and now, I hope, in yours.
Gathering Your Flavor Crew: Ingredients & Insights
Here’s the beautiful part: this recipe is all about simplicity. Let’s break down each player and why they’re here, plus some easy swaps to make this dish your own.
- 2 cans tuna in water, drained: This is our protein powerhouse! I prefer tuna packed in water for a lighter, cleaner flavor that lets the other ingredients shine. Chef’s Insight: Really squeeze out that water—a fork pressed against the lid of the can works great. For a richer taste, feel free to use tuna in olive oil (just drain off the excess).
- 1/4 cup mayonnaise: Our binder and creaminess creator. It brings everything together into that luscious, spreadable filling. Sub Tip: For a tangier kick, use Greek yogurt or a mix of half mayo, half yogurt. Avocado mash also works for a dairy-free creaminess.
- 1 celery stalk, finely diced: The secret textural hero! That little bit of fresh, aqueous crunch is non-negotiable for me. It cuts through the richness perfectly. Chef’s Insight: If you’re not a celery fan, a few finely diced cornichons or a tablespoon of minced red onion add a different (but delicious) kind of crunch and bite.
- 1 tbsp lemon juice: Brightness! This little splash wakes up all the flavors and prevents the tuna salad from feeling heavy. Fresh is always best here.
- Salt and pepper to taste: The essential flavor enhancers. Don’t be shy—season your tuna mixture well before it hits the muffin.
- 8 English muffin halves (4 muffins, split): Our edible edible “plate.” They toast up crispy on the bottom but stay tender inside, and all those nooks hold the filling beautifully. Sub Tip: Whole wheat, sourdough, or gluten-free English muffins all work wonderfully. For a lower-carb option, try halved mini bell peppers or thick slices of tomato as the base.
- 8 slices cheese (cheddar, Swiss, or mozzarella work well): The glorious, melty crown. Cheddar is classic for its sharpness, Swiss is wonderfully nutty, and mozzarella gives you those epic cheese pulls. Chef’s Insight: Tear or cut the slices to fit the muffin shape—covering the edges means they’ll get extra crispy and golden.
Let’s Build Some Bites: Step-by-Step with Chef Olivia
Ready? Let’s turn these ingredients into golden perfection. I’ll walk you through each step with my favorite little kitchen hacks sprinkled in.
- Preheat & Prep (375°F/190°C): First things first, get that oven heating. A hot oven is key for a good melt! While it’s warming, line a baking sheet with parchment paper. My Favorite Hack: This isn’t just for easy cleanup (though, hallelujah for that). The parchment prevents the bottoms from getting too dark too quickly, letting the cheese melt perfectly before the muffins over-toast.
- Mix the Magic: In a medium bowl, combine your well-drained tuna, mayo, diced celery, lemon juice, salt, and pepper. Grab a fork and mix it all together, breaking up any larger chunks of tuna. Pro Tip: Mix it gently but thoroughly. You want it cohesive, but not mushy. Taste it right now—this is your moment to adjust. Need more pepper? More lemon? This is where you make it yours.
- Build Your Bases: Arrange your English muffin halves on the prepared baking sheet, cut-side up. Now, spoon that delicious tuna mixture evenly onto each half, spreading it gently to the edges. Chef’s Commentary: Don’t be skimpy! A nice mound is good, but keep it within the borders so it doesn’t spill over and burn. We’re building flavor layers here.
- The Cheesy Crown: Place a slice of cheese on top of each tuna-covered muffin. If your slices are big, fold them or cut them to fit. Golden Rule: Try to let a little cheese drape over the edge onto the muffin itself. When it melts and caramelizes on the bread, it creates the most incredible flavor and texture contrast. Trust me on this!
- Bake to Bubbly Perfection: Slide your baking sheet into the preheated oven. Bake for 10-12 minutes. You’re looking for the cheese to be fully melted, bubbly, and just starting to get those gorgeous golden-brown spots. Watchful Eye Tip: Ovens vary, so start checking at 10 minutes. If the cheese is melted but not colored, you can move to the next optional (but highly recommended) step.
- Optional Broil Boost: For that picture-perfect, diner-style finish, turn your oven to broil for just 1-2 minutes. WATCH THEM LIKE A HAWK! This happens fast. You want a beautifully bronzed top, not a charcoal briquette. The broiler gives you that irresistible, slightly crispy cheese edge that takes these from great to legendary.
Plate & Celebrate: Serving Your Mini Masterpieces
The beauty of these melts is in their simplicity. Let them cool for just a minute (that cheese is molten lava!). I love serving them on a big, shareable platter for a casual lunch or snack. For a more composed plate, add a simple side: a handful of crispy potato chips for ultimate crunch contrast, a bright green salad with a lemony vinaigrette, or some baby carrots and cucumber sticks for a fresh pop. They’re fantastic straight off the baking sheet, too—no judgment here!
Make It Your Own: 5 Tasty Twists
- The “Everything Bagel” Melt: Mix 1 tsp of everything bagel seasoning into the tuna salad. Top with everything seasoning and mozzarella cheese before baking.
- Mediterranean Vibes: Swap the mayo for a lemony Greek yogurt. Add 1 tbsp chopped Kalamata olives and a pinch of dried oregano to the tuna. Top with crumbled feta cheese under the mozzarella.
- Spicy Southwest Kick: Add 2 tbsp sweet corn, 1 tbsp diced pickled jalapeños, and 1/4 tsp cumin to the tuna mix. Top with pepper jack cheese and a dollop of salsa or avocado crema after baking.
- Dairy-Free Delight: Use your favorite vegan mayonnaise and a great melting vegan cheese slice (or a sprinkle of nutritional yeast for a cheesy flavor).
- Pizza Party Melt: Add 1 tbsp tomato paste and a pinch of Italian herbs to the tuna. Top with a slice of mozzarella and a few mini pepperoni slices before baking.
From My Kitchen to Yours: Olivia’s Final Notes
This recipe has been my little kitchen workhorse for years. It’s evolved from my grandma’s classic to my weeknight savior. One hilarious kitchen fail early on? I once used the broiler for the entire cooking time. Let’s just say we had “blackened” tuna melts that day. A lesson learned in patience and oven settings!
I also love making a double batch of the tuna mixture and storing it separately in the fridge for up to 2 days. That way, assembly on a busy night takes literally 5 minutes. And don’t limit yourself to lunch—these make a phenomenal, protein-packed breakfast or a crowd-pleasing game-day appetizer. Food this good and this easy is meant to be shared, adapted, and enjoyed without stress. That’s the cozy, homemade heart of it all.
Your Questions, Answered: FAQs & Troubleshooting
Q: Can I make these ahead of time?
A: Absolutely! You can assemble the melts (tuna and cheese on the muffins) up to 4 hours ahead, cover them tightly with plastic wrap, and keep them in the fridge. Bake straight from the fridge, adding maybe 1-2 extra minutes to the baking time.
Q: My muffins got soggy! What happened?
A: This usually means the tuna mixture was too wet. Be sure to drain your tuna extremely well and consider adding an extra tablespoon of finely diced celery or another crunchy veg to absorb moisture. Also, don’t assemble them too far in advance before baking.
Q: Can I use an air fryer?
A: You bet! Air fry at 370°F for 6-8 minutes, checking often, until the cheese is melted and bubbly. They work beautifully and get extra crispy.
Q: The cheese slid off when I took a bite. Help!
A> This is a cheese-to-bread adhesion issue! Make sure your tuna mixture is spread evenly to the edges, acting as a “glue” for the cheese. Also, letting them cool for a full 2-3 minutes after baking lets the cheese set slightly, making them less slippery.
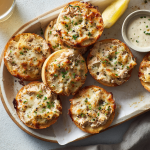
Mini Tuna Melts : High-Protein Bites Even Picky Eaters Love
Description
These mini tuna melts are the ultimate quick lunch, snack, or light dinner. Warm, cheesy, and crunchy, they pack 19g of protein per serving and are perfect for busy weeknights, after-school snacks, or even a cozy breakfast. English muffins get crispy nooks and crannies while holding a creamy, flavorful tuna filling topped with melty cheese.
Ingredients
-
2 cans tuna in water, drained
-
¼ cup mayonnaise (or Greek yogurt for tang)
-
1 celery stalk, finely diced (or cornichons/red onion)
-
1 tbsp fresh lemon juice
-
Salt and pepper, to taste
-
4 English muffins, split into 8 halves
-
8 slices cheese (cheddar, Swiss, or mozzarella)
Optional flavor twists:
-
Everything bagel seasoning, olives & feta, pickled jalapeños & corn, tomato paste & herbs, or dairy-free substitutes
Instructions
-
Preheat oven to 375°F (190°C) and line a baking sheet with parchment paper.
-
Mix tuna filling: In a medium bowl, combine drained tuna, mayo, diced celery, lemon juice, salt, and pepper. Mix gently but thoroughly. Taste and adjust.
-
Assemble melts: Arrange English muffin halves cut-side up on the baking sheet. Spoon tuna mixture evenly onto each half. Top with a slice of cheese, letting edges drape slightly for crispiness.
-
Bake: 10–12 minutes, until cheese is melted and bubbly. Optional broil for 1–2 minutes for golden edges—watch closely!
-
Serve: Let cool 1–2 minutes, then enjoy straight from the tray or on a platter with chips, salad, or fresh veggies.
Notes
-
Drain tuna very well to prevent soggy muffins
-
Spread tuna to the edges to help cheese stick
-
Cool slightly before serving to let cheese set
-
Air fryer alternative: 370°F for 6–8 mins
Nutrition & Prep Info At a Glance
Prep Time: 10 minutes | Cook Time: 12 minutes | Total Time: 22 minutes | Servings: 4 (2 halves per serving)
Per Serving (approximate): 350 Calories | 19g Protein | 16g Fat | 25g Carbohydrates
Final Thoughts
This recipe is more than just a quick meal—it’s a reminder that some of the most comforting, satisfying foods are also the simplest. Mini Tuna Melts carry the warmth of a kitchen memory, the practicality of a pantry meal, and the joy of a crispy, cheesy bite.
They prove you don’t need fancy ingredients or hours of time to create something truly delicious. Whether it’s a busy Tuesday night, a lunchbox surprise, or a snack that brings everyone to the table, these little melts deliver every time.
I hope this recipe becomes a trusted friend in your kitchen, just like it is in mine. Adapt it, make it yours, and share it with someone you love. After all, the best meals aren’t just made with ingredients—they’re made with heart, a little crunch, and a whole lot of melted cheese.
Happy cooking,
Olivia


