
Sunshine on a Plate: My Mini Spring Veggie Quiches
Hey there, friend! Come on in, pull up a stool, and let’s chat. Is there anything better than that first truly warm, sunshine-filled day of spring? The kind where you fling open the windows, hear the birds chattering, and suddenly, your body and your kitchen just crave something light, bright, and fresh. You want to eat the season, you know? That’s the exact feeling that sent me scrambling to the fridge the other day, pulling out every green and lovely thing I could find, and dreaming up these perfect Mini Spring Veggie Quiches.
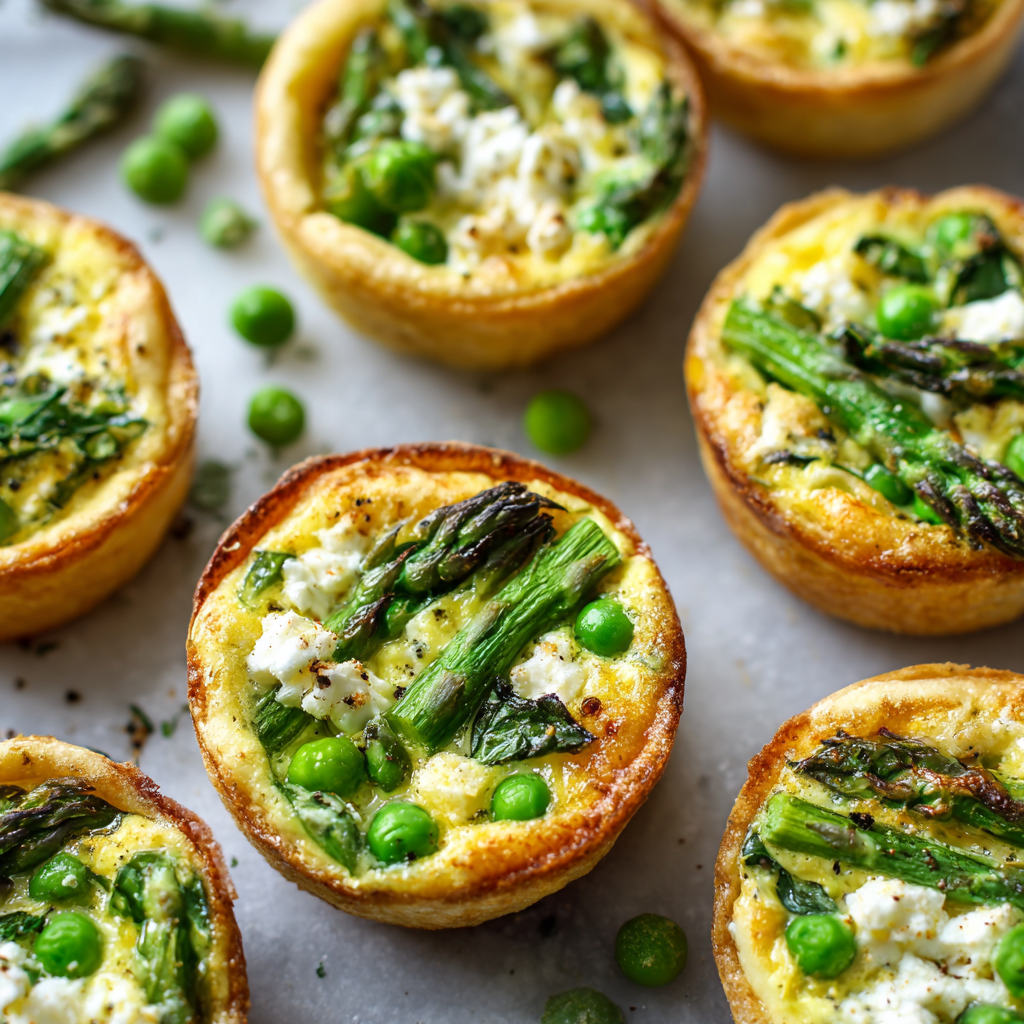
These aren’t just any quiches. They’re the ultimate kitchen hug—a celebration of spring in a perfectly portable, muffin-tin package. We’re talking tender bites of asparagus, sweet pops of pea, flecks of vibrant spinach, all held together by a creamy, protein-rich egg filling and little crumbles of salty, tangy feta cheese. They bake up golden and puffy, filling your kitchen with a smell that’s pure comfort and promise.
The best part? They are so incredibly easy. No fussy pie crust, no stress. Just chop, whisk, pour, and bake. Whether you’re hosting a breezy brunch, need a genius meal-prep solution for busy mornings, or simply want a lunch that feels special without the effort, these little guys are your new best friends. They’re vegetarian, naturally gluten-free, and totally forgiving—the kind of recipe that makes you feel like a kitchen rockstar with minimal cleanup. So, tie on your favorite apron (the messy one with good memories), and let’s make some edible sunshine together!
A Basket Full of Spring & Grandma’s Apron
This recipe always takes me right back to my grandma’s kitchen in April. She had this tiny, wild patch of asparagus that would magically appear by her back fence, and she’d treat those first few spears like absolute gold. “Olivia,” she’d say, her hands covered in earth, “food tastes best when you know where it comes from and you eat it right on time.” We’d hunt for the spears, snap them off at the base, and she’d let me carry them in her old woven basket.
Back inside, she’d wrap me in an apron that was far too big and set me to work shelling fresh peas or washing spinach from the farmer’s market. She never made mini quiches (hers were always big, dramatic pies), but the spirit is exactly the same: taking humble, seasonal treasures and turning them into something shared and wonderful. That basket of our foraged haul felt like a treasure chest. Now, every time I chop asparagus for these quiches, I get a little flash of that feeling—the damp spring air, the smell of dirt and grass, and the excited anticipation of turning our find into a meal. It’s a nostalgia I bake right into every batch.
Your Farmers’ Market Basket: The Ingredients
Here’s the beautiful, simple lineup. This is where we get to play! Don’t be afraid to swap based on what’s in your fridge or looks best at the market.
- 6 large eggs: The glorious, protein-packed base that gives our quiches structure and richness. For an even silkier texture, I sometimes use one or two extra yolks!
- ¼ cup milk or cream: This is our secret for a tender, creamy custard, not a rubbery egg puck. Whole milk is great, half-and-half is luxurious, and for a dairy-free twist, unsweetened almond or oat milk works in a pinch.
- ½ cup asparagus, finely chopped: The star of spring! Look for bright green, firm spears with tight tips. Chop them small so they cook perfectly in the short bake time. No asparagus? Try finely chopped broccoli or zucchini.
- ½ cup fresh spinach, chopped: A powerhouse of color and nutrients. I roughly chop it so it distributes evenly. Kale (de-stemmed and finely chopped) or Swiss chard are fantastic, sturdy substitutes.
- ¼ cup green peas: Little bursts of sweetness! Frozen peas are a brilliant, year-round freezer staple—just run them under warm water to thaw before using. Freshly shelled peas are a divine treat if you have them.
- ⅓ cup crumbled feta cheese: That salty, tangy punch that makes every bite sing. Feta doesn’t melt into a gooey pool; it holds its shape beautifully. Goat cheese or a sharp cheddar would be delicious too.
- Salt and black pepper, to taste: Season with love! I start with ½ tsp kosher salt and a few cracks of pepper, then adjust. Remember, feta is salty, so taste your mix before adding tons more.
- Optional: pinch of garlic powder or nutmeg: My little chef’s hack. Garlic powder adds a subtle savory depth without raw garlic bite. A tiny pinch of nutmeg is a classic French quiche move—it adds a mysterious, warm background note that’s just magical.
- Cooking spray or oil for muffin tin: Non-stick is our friend here. A good spray or a brush of melted butter ensures clean, easy releases.
Let’s Get Baking: Step-by-Step
Ready? Let’s do this. It’s a simple process, but these little tips will take your quiches from good to “can-I-have-the-recipe?” great.
- Preheat & Prep: Fire up your oven to 375°F (190°C). This gives it time to reach a steady, even temperature. While it’s warming, generously grease your muffin tin—every cup, every nook and cranny. I use a baking spray with flour for extra insurance, but oil or melted butter works too. This step is non-negotiable for easy release!
- The Custard Base: In a large mixing bowl, crack in your eggs. Grab a whisk and beat them energetically until they’re completely uniform and a little frothy. This incorporates air for a lighter texture. Now, whisk in your milk or cream, salt, pepper, and that optional pinch of garlic powder or nutmeg. You’ve just made a beautiful, simple custard. Give it a taste! Adjust seasoning now—it should taste a tiny bit too salty on its own, as the veggies will balance it.
- Fold in the Garden: To your custard, add the chopped asparagus, spinach, peas, and crumbled feta. Switch to a spatula or a big spoon and gently fold everything together until it’s evenly distributed. You want every muffin cup to get a little bit of every good thing. Don’t over-mix!
- Portion with Care: Carefully pour or ladle the mixture into your prepared muffin cups. Fill each one about ¾ of the way full. They need a little room to puff up as they bake! Pro-tip: Pouring from a liquid measuring cup with a spout gives you so much control and minimizes spills.
- Bake to Golden Perfection: Slide the tin into the center of your preheated oven. Now, the magic happens. Bake for 18-22 minutes. You’re looking for the tops to be set, no longer liquidy, and lightly golden around the edges. A toothpick inserted near the center should come out clean. They’ll puff up beautifully like little savory soufflés!
- The Patient Finish: This is crucial: let them cool in the tin for at least 5-10 minutes. They will deflate a bit, and that’s okay—it’s normal! This resting time allows them to set fully, making them much easier to remove. Then, run a small offset spatula or butter knife around the edges and gently lift them out.
How to Serve These Sunny Bites
Presentation is part of the joy! For a brunch spread, pile them high on a beautiful platter or in a rustic basket lined with a checkered napkin. Tuck in some fresh herbs like dill or chives around them. Serve with a big, bright salad of mixed greens with a lemony vinaigrette, a bowl of fresh fruit, and maybe some crispy roasted potatoes. For a grab-and-go breakfast, let them cool completely and store them in a container—they’re delicious at room temperature. And for a simple lunch? Two or three quiches with a dollop of garlicky yogurt or a side of soup is pure happiness on a plate.
Make It Your Own: Delicious Variations
- “Everything but the Bagel” Quiche: Swap the feta for cream cheese pieces and stir 1 tbsp of Everything Bagel Seasoning into the egg mix. Top each quiche with a sprinkle more before baking.
- Sun-Dried Tomato & Basil: Use mozzarella instead of feta. Add ¼ cup chopped oil-packed sun-dried tomatoes and 2 tbsp of fresh chopped basil to the veggie mix.
- Dairy-Free Delight: Use your favorite unsweetened non-dairy milk and swap the feta for a dairy-free crumble (like one made from almonds or tofu) or just leave it out and add a few sliced Kalamata olives for that salty bite.
- Meat-Lover’s Twist: Add ½ cup of cooked, crumbled breakfast sausage or diced ham to the veggie mixture for a heartier bite.
- Crust Option (Not GF): Want a *hint* of crust? Use store-bought puff pastry squares, press them into greased muffin cups, par-bake for 5 minutes, then add filling and bake as directed.
Olivia’s Kitchen Notes
This recipe has become my springtime security blanket. I’ve made it for newborn parents, packed it for picnics, and served it at fancy-ish bridal showers. It’s never let me down. Over the years, I’ve learned a few things: First, if your veggies are extra wet (like after washing spinach), give them a quick pat with a paper towel. Too much moisture can make the quiches soggy. Second, don’t skip the “cool in the tin” step—I learned that the hard way when I eagerly flipped a tin and got a pan of delicious but crumbled scramble! And finally, the biggest evolution? I now always double the batch. One for now, one for the freezer. Because future-you will be so grateful on a busy Tuesday morning. Trust me.
Your Questions, Answered!
Q: Can I make these ahead of time and how do I store them?
A: Absolutely! They are a meal-prep dream. Let them cool completely, then store in an airtight container in the fridge for up to 4 days. Reheat in the microwave for 30-60 seconds or in a 350°F oven for about 10 minutes until warm. They also freeze beautifully for up to 2 months. Thaw in the fridge overnight before reheating.
Q: My quiches stuck to the pan! What did I do wrong?
A> Oh, we’ve all been there! It usually comes down to greasing. Be really, really generous with that cooking spray or oil. Using a non-stick muffin tin is a big help. If they do stick, don’t panic. Let them cool a bit more, then carefully slide a thin, flexible silicone spatula all the way around and under to loosen. They might not be perfect, but they’ll still taste perfect.
Q: The centers sunk a lot after cooling. Is that normal?
A> Yes, this is totally normal! As they cool, the hot air inside condenses and they will deflate somewhat. It doesn’t affect the flavor or texture at all. If you want them slightly puffier, you can try adding an extra egg white to the mixture for more structure.
Q: Can I use different vegetables?
A> Please do! This recipe is a canvas. Just keep the total volume of add-ins roughly the same (about 1 ¼ cups). For watery veggies like mushrooms or zucchini, I recommend sautéing them first to drive off excess moisture and prevent a soggy quiche. Bell peppers, caramelized onions, or roasted cherry tomatoes are all fabulous.

Mini Spring Veggie Quiches (Muffin-Tin, Vegetarian & Meal-Prep Friendly)
Description
These Mini Spring Veggie Quiches are light, colorful, and perfect for breakfast, brunch, or meal prep. Packed with fresh vegetables, eggs, and feta, they’re baked in a muffin tin for easy portions. No crust, simple steps, and big flavor — great warm or cold.
Ingredients
-
6 large eggs
-
¼ cup milk or cream
-
½ cup asparagus, finely chopped
-
½ cup fresh spinach, chopped
-
¼ cup green peas (fresh or thawed frozen)
-
⅓ cup crumbled feta cheese
-
½ tsp salt (adjust to taste)
-
¼ tsp black pepper
-
Optional: pinch garlic powder or nutmeg
-
Oil or cooking spray for muffin tin
Instructions
-
Preheat oven to 375°F (190°C). Grease a 12-cup muffin tin well.
-
Mix eggs
In a bowl, whisk eggs, milk, salt, pepper, and optional seasoning until smooth. -
Add vegetables & cheese
Stir in asparagus, spinach, peas, and feta. -
Fill cups
Pour mixture into muffin cups, filling each about ¾ full. -
Bake
Bake 18–22 minutes, until centers are set and tops lightly golden. -
Cool & remove
Let cool 5–10 minutes, then loosen edges with a knife and lift out.
Notes
-
Chop vegetables small so they cook through quickly.
-
Pat wet veggies dry to avoid soggy quiches.
-
Use silicone or non-stick muffin tins for easiest release.
-
Add cooked mushrooms, bell peppers, or onions for variety.
-
Great for meal prep — double the batch and freeze extras.
Nutritional Info (Per Quiche, approx.)
Calories: 100 | Fat: 7g | Saturated Fat: 3g | Carbohydrates: 2g | Fiber: 0.5g | Sugar: 1g | Protein: 7g
Note: Nutritional information is an estimate and will vary based on the specific ingredients and brands you use.
Final Thoughts: A Recipe That Grows With You
As I wipe down the counter, the last of the golden afternoon light catching the crumbs, I’m struck by how a simple recipe can hold so much. These Mini Spring Veggie Quiches are more than just a convenient bite. They’re a feeling—the hopeful, energetic, sun-on-your-skin feeling of spring, made tangible.
They’ve become my seasonal marker. The first time I make them each year, with whatever the early market offers, feels like a quiet celebration. A promise to myself to slow down, to notice the green shoots pushing through, and to nourish my body with the same bright energy bursting forth outside my window.
What I love most is their gentle flexibility. They welcome your creativity and adapt to your life, whether it’s a chaotic weekday or a leisurely weekend. They’re equally at home on a porcelain platter as they are wrapped in parchment paper, tucked into a lunchbox. This recipe isn’t about perfection; it’s about joy. The joy of a colorful, messy mixing bowl. The joy of a kitchen smelling of promise. The joy of sharing something made with your own hands.
So, I hope you’ll make them. I hope you’ll swap in the vegetables that make your heart sing. I hope you’ll double the batch and stash some away for a future self who needs a taste of sunshine. Most of all, I hope they bring you a moment of simple, delicious contentment—a little plate of spring, anytime you need it.
Happy baking, friend.
With love from my kitchen to yours,
Olivia


