
Your New Go-To Party Hero: Mini Quesadillas
Hey there, friend! Come on in, pull up a stool, and let’s get something sizzling on the stove. Is there anything more universally delightful than the sound of a tortilla crisping up in a hot pan, filled with molten, bubbling cheese? I don’t think so. It’s a sound that promises comfort, joy, and a seriously delicious bite just moments away. Today, we’re taking that beautiful, simple concept and turning it into the ultimate party snack, lunchbox superstar, and weeknight lifesaver: Mini Quesadillas.
Now, I know what you’re thinking: “Olivia, a quesadilla is just a folded tortilla with cheese.” And you’re right! But that’s the absolute magic of it. We’re taking that humble foundation and building something incredibly fun, shareable, and customizable. These aren’t just any quesadillas; they’re bite-sized, dippable, and perfectly golden wedges of pure happiness. They’re the first thing to disappear from a party platter and the thing your kids will actually be excited to find in their lunchbox.
Whether you’re hosting a game-day gathering, need a quick after-school snack, or just want a no-fuss dinner that feels a little special, this recipe is your new best friend. You don’t need any fancy equipment or chef-level skills—just a hot skillet, a few simple ingredients, and about 20 minutes. So, let’s toss our aprons on (mine is already covered in a little flour, no surprise there) and create something that’s guaranteed to bring everyone together.
The Quesadilla That Started It All
My love affair with quesadillas started long before this blog, in my grandma’s sun-drenched kitchen. She wasn’t a fancy cook, but she was a genius of comfort. Her secret weapon for feeding a herd of hungry grandkids? A massive cast-iron skillet and a stack of tortillas. I can still see her, humming an old tune, expertly flipping what she called her “confetti quesadillas.” She’d take whatever little bits of leftover roasted chicken, stray corn kernels, or lonely bell peppers we had in the fridge, mix them with a mountain of sharp cheddar, and create these incredible, confetti-filled masterpieces.
The best part was the ritual. She’d let them cool for just a minute before slicing them into neat little wedges with her kitchen shears. Then, she’d arrange them on a platter around a big bowl of her fiery homemade salsa. We’d all crowd around the table, dipping and chatting, and those simple, cheesy triangles made us feel so loved and taken care of. That’s the spirit I want to bring to your kitchen today. It’s not just about the food; it’s about the warm, messy, joyful moments you create while making it.
Gathering Your Flavor Toolkit
Here’s everything you’ll need to make these crowd-pleasing mini quesadillas. I’ve included some of my favorite insights and substitutions so you can make this recipe your own!
- 6 Medium Flour Tortillas: The perfect vessel! Medium (8-inch) tortillas are the ideal size for folding and cutting. Chef’s Insight: If you have a little extra time, warming them for 10 seconds in the microwave makes them much more pliable and less likely to crack when you fold them.
- 1½ Cups Shredded Cheese: This is the glue that holds it all together! I love a blend of Monterey Jack (for its epic meltiness) and sharp cheddar (for that classic, tangy flavor). Substitution Tip: Pepper Jack adds a lovely kick, Oaxaca cheese is authentically stringy and delicious, or a Mexican blend works perfectly.
- 1 Cup Cooked, Shredded Chicken: This adds protein and makes the quesadillas more substantial. Chef’s Hack: A store-bought rotisserie chicken is your best friend here! It’s flavorful, convenient, and a total time-saver. For a vegetarian version, see the swaps below!
- 2 Tbsp Chopped Fresh Cilantro: This is optional but highly recommended for a fresh, bright pop of flavor. If you’re one of those folks who thinks cilantro tastes like soap, just leave it out or swap in some chopped green onions.
- Butter or Cooking Spray: For crisping up the tortillas to golden perfection. Chef’s Secret: I’m Team Butter all the way for that rich, irresistible flavor. But avocado oil spray or a light brush of olive oil works great too!
- To Serve: The dipping station is non-negotiable! Have your salsa, sour cream, guacamole, and hot sauce ready and waiting.
Let’s Get Cooking: Building the Perfect Bite
Ready to see some magic happen? Follow these simple steps, and you’ll have a platter of perfect mini quesadillas in no time. I’ve packed this section with all my best tips and tricks to ensure success every single time.
- Prep Your Station: Before you even turn on the stove, get your mise en place (that’s just a fancy way of saying “get everything in its place”). Shred your cheese, chop your cilantro, and have your chicken and tortillas within arm’s reach. A little organization makes the cooking process so much smoother and more enjoyable.
- Heat the Skillet: Place a large, non-stick or cast-iron skillet over medium heat. Let it get properly warm for a minute or two. A properly heated pan is the secret to a crispy, not soggy, tortilla. Chef’s Test: Flick a tiny drop of water into the pan. If it sizzles and dances, you’re good to go!
- Butter and Place: Lightly butter one side of a tortilla (this will be the glorious, golden exterior) and place it buttered-side down in the hot skillet. Little Hack: You can also melt a small pat of butter directly in the pan and swirl it around.
- The Cheese Foundation: Immediately sprinkle a generous layer of cheese over one half of the tortilla. This is your foundation layer! The cheese directly on the tortilla will melt first, acting like a delicious glue for the other fillings.
- Add the Fillings: Now, layer on your shredded chicken (or beans) and a sprinkle of cilantro over the cheese. Be careful not to overfill! A heaping tablespoon or two of chicken is plenty. Overstuffing is the number one cause of fillings falling out when you flip.
- The Fold and Press: Once the cheese on the bottom has started to melt (this should take about 1-2 minutes), use a spatula to carefully fold the bare half of the tortilla over the filled half. Gently press down with the spatula. You should hear a happy, gentle sizzle.
- Golden Brown Perfection: Cook for 2-3 minutes more, then flip! You’re looking for a beautifully golden-brown, crisp surface with those lovely toasted spots. Cook for another 2-3 minutes on the second side until it’s equally gorgeous and the cheese is fully melted and oozy inside.
- Repeat and Rest: Transfer the cooked quesadilla to a cutting board and repeat the process with the remaining tortillas. Here’s a crucial tip: Let the quesadillas rest for a minute or two before cutting. This allows the cheese to set slightly, so it doesn’t all ooze out when you slice.
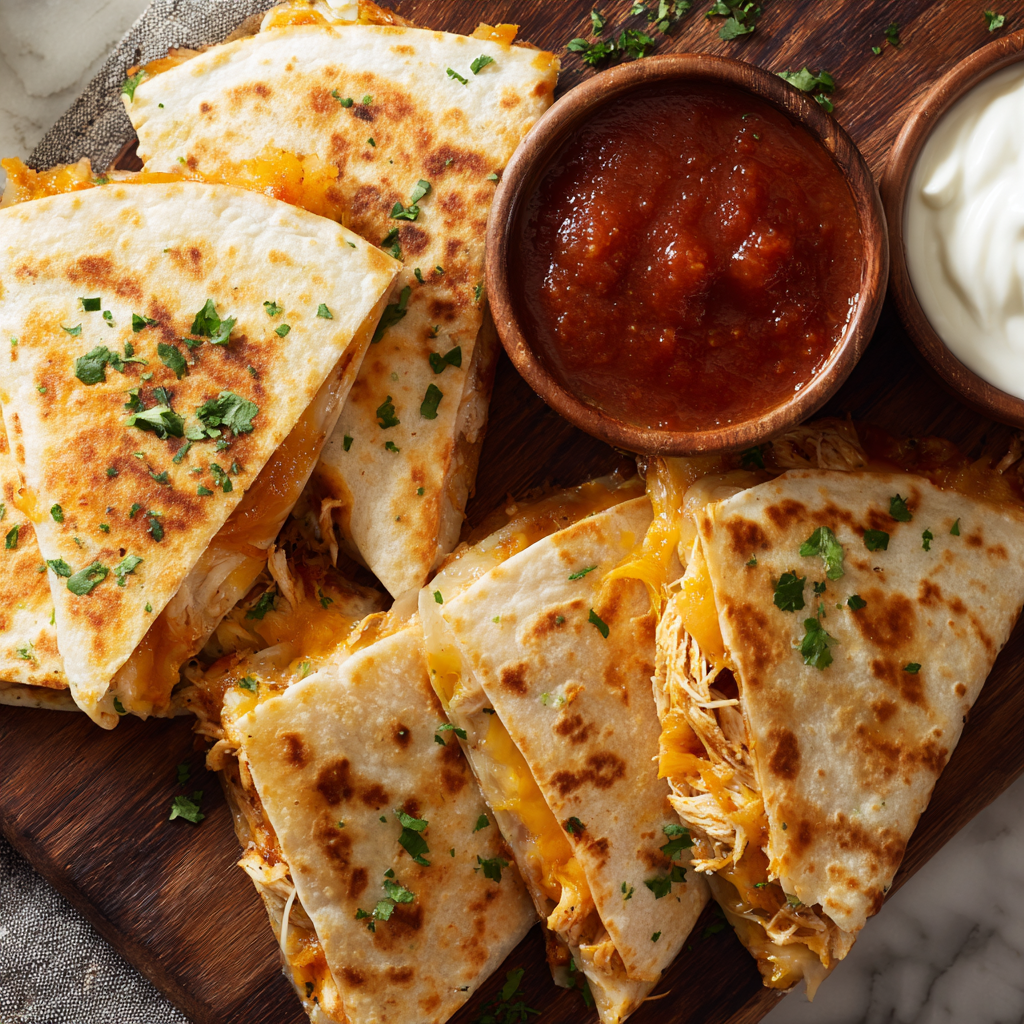
- The Final Cut: Using a sharp knife or a trusty pair of kitchen scissors, cut each quesadilla into 4 wedges (like a pizza!). And just like that, you have a mountain of perfect, dippable, mini quesadillas.
Plating Up the Fun
Presentation is part of the joy! I love arranging the mini quesadilla wedges in a sunburst pattern on a large wooden board or a colorful platter. Place small bowls of your favorite dips—a chunky tomato salsa, a cool and creamy lime-spiked sour cream, a bowl of vibrant guacamole, and a bottle of hot sauce for the brave—right in the center. It’s an interactive, build-your-own-bite experience that invites everyone to dig in and get involved. Don’t forget the napkins!
Mix It Up! Endless Flavor Possibilities
The beauty of this recipe is its versatility. Once you master the basic formula, the world is your oyster (or, more accurately, your taco!). Here are a few of my favorite twists:
- BBQ Chicken: Swap the plain chicken for shredded chicken tossed in your favorite BBQ sauce. Add a little thinly sliced red onion and use a smoked Gouda or cheddar cheese.
- Veggie Lover’s Delight: Sauté some diced bell peppers, onions, and zucchini with a pinch of cumin. Use black beans instead of chicken and a blend of Monterey Jack and cotija cheese.
- Buffalo Chicken: Toss the chicken in buffalo sauce and use a blue cheese crumble along with the Monterey Jack. Serve with a side of ranch dressing for dipping—absolute game-day bliss.
- Breakfast Quesadillas: Fill with scrambled eggs, crispy crumbled bacon or breakfast sausage, and a sprinkle of cheddar. Perfect for a brunch spread!
- Simple Bean & Cheese: For a super-speedy vegetarian option, just spread a layer of refried beans (the secret ingredient for extra creaminess!) over the cheese before adding any other veggies.
Olivia’s Chef’s Notes
This recipe has evolved so much in my kitchen over the years. I’ve learned that the key isn’t perfection; it’s fun. I’ve had quesadillas split open mid-flip, sending cheese cascading into the pan (hello, delicious frico!). I’ve over-zealously spiced a batch that made us all reach for water. But you know what? Those “mistakes” often lead to the best memories and new favorite flavor combinations.
My biggest piece of advice? Don’t be afraid to play. This is a forgiving, friendly recipe. Use what you love and what you have on hand. That little bit of leftover corn? Toss it in. Those few slices of olives about to go bad? Chop them up! The spirit of my grandma’s “confetti quesadillas” lives on in that improvisation. Cooking should feel creative and joyful, not stressful. Now, go make a beautiful, cheesy mess!
Your Quesadilla Questions, Answered!
I’ve gotten so many wonderful questions about this recipe over the years. Here are the answers to the most common ones to help you on your quesadilla journey.
Q: My cheese isn’t melting before the tortilla burns! What am I doing wrong?
A: Ah, the classic dilemma! This usually means your heat is too high. Cheese needs a little time to get gooey. Try turning your burner down to medium-low. This gives the cheese a chance to melt completely while allowing the tortilla to crisp up to a perfect golden brown, not a dark black.
Q: Can I make these ahead of time for a party?
A: Absolutely! You have two great options. 1) You can assemble them ahead of time (without cooking), stack them between layers of parchment paper, and keep them in the fridge for a few hours until you’re ready to cook. 2) You can cook them completely, let them cool, and then re-crisp them in a 350°F (175°C) oven for about 5-10 minutes before serving. They’ll taste just-made!
Q: My quesadillas are coming out soggy. How can I get them crispier?
A> Sogginess is the enemy! First, make sure your pan is properly preheated. A cold pan steams the tortilla instead of searing it. Second, avoid using wet fillings—pat your chicken or veggies dry with a paper towel if needed. And finally, don’t skip the resting step after cooking! Letting them sit on a cutting board for a minute allows steam to escape, which helps the tortilla stay crisp.
Q: Can I use corn tortillas instead of flour?
A> You can, but it’s a bit trickier. Corn tortillas are more fragile and prone to cracking. My tip is to warm them up first to make them pliable, and you might want to use two tortillas per quesadilla (like a tostada) instead of folding one. They’ll be delicious, with a great corn flavor, just handle with a little extra care!

Mini Quesadillas: Bite-Sized, Cheesy & Crowd-Friendly
Description
Hey there, friend! Pull up a chair and let’s get something sizzling on the stove. Few sounds are more comforting than a tortilla hitting a hot pan and cheese starting to melt. Today, we’re taking that simple magic and turning it into the ultimate party snack, lunchbox favorite, and weeknight lifesaver: Mini Quesadillas.
Ingredients
Base Ingredients
-
6 medium flour tortillas (8-inch)
-
1½ cups shredded cheese
-
Monterey Jack + cheddar blend is perfect
-
-
1 cup cooked shredded chicken
-
Rotisserie chicken works beautifully
-
-
2 tbsp chopped fresh cilantro (optional)
-
Butter or cooking spray for the skillet
For Serving (non-negotiable!)
-
Salsa
-
Sour cream
-
Guacamole
-
Hot sauce
Instructions
Shred your cheese, chop your cilantro, gather your chicken and tortillas. A little organization makes everything smoother.
Place a non-stick or cast-iron skillet over medium heat. Flick in a drop of water — if it dances, it’s ready.
Butter one side of a tortilla and place it buttered-side down in the pan.
Add cheese over one half of the tortilla. Layer with chicken and cilantro (don’t overfill!).
Once the bottom cheese begins to melt (1–2 minutes), fold the tortilla in half and press gently with a spatula. Cook 2–3 minutes per side until golden and crisp.
Transfer to a board and rest 1–2 minutes so the cheese sets.
Cut each quesadilla into 4 mini wedges.
Arrange on a platter with salsa, sour cream, guacamole, and hot sauce in the center.
Notes
-
Don’t stress perfection — quesadillas are forgiving and fun.
-
Overfilled quesadillas tend to burst (still delicious).
-
Letting them rest before slicing keeps all the cheese inside.
-
Leftovers re-crisp beautifully in a 350°F (175°C) oven.
Nutritional Information (Approximate, per serving)
This is a rough estimate based on the base recipe with chicken and cheddar cheese. Values will change with substitutions.
- Calories: 230
- Fat: 13g
- Carbohydrates: 18g
- Protein: 12g
Final Thoughts:
And there you have it! Mini Quesadillas: the ultimate proof that the simplest foods, made with a little love, are often the very best. They’re a reminder that great cooking isn’t about perfection—it’s about gathering, sharing, and creating joy, one cheesy, golden wedge at a time. Now, go forth and get that skillet sizzling!


