Mini Egg Nest Brownies: Your New Favorite Easter Tradition
Hey there, friend! Olivia here. Can you feel it? That little hum of excitement in the air? The days are getting longer, there’s a touch of warmth on the breeze, and grocery store aisles are suddenly bursting with the most joyful, colorful little candy eggs. It’s spring, and my baking brain immediately goes to one place: Easter treats that are equal parts delicious and downright delightful.
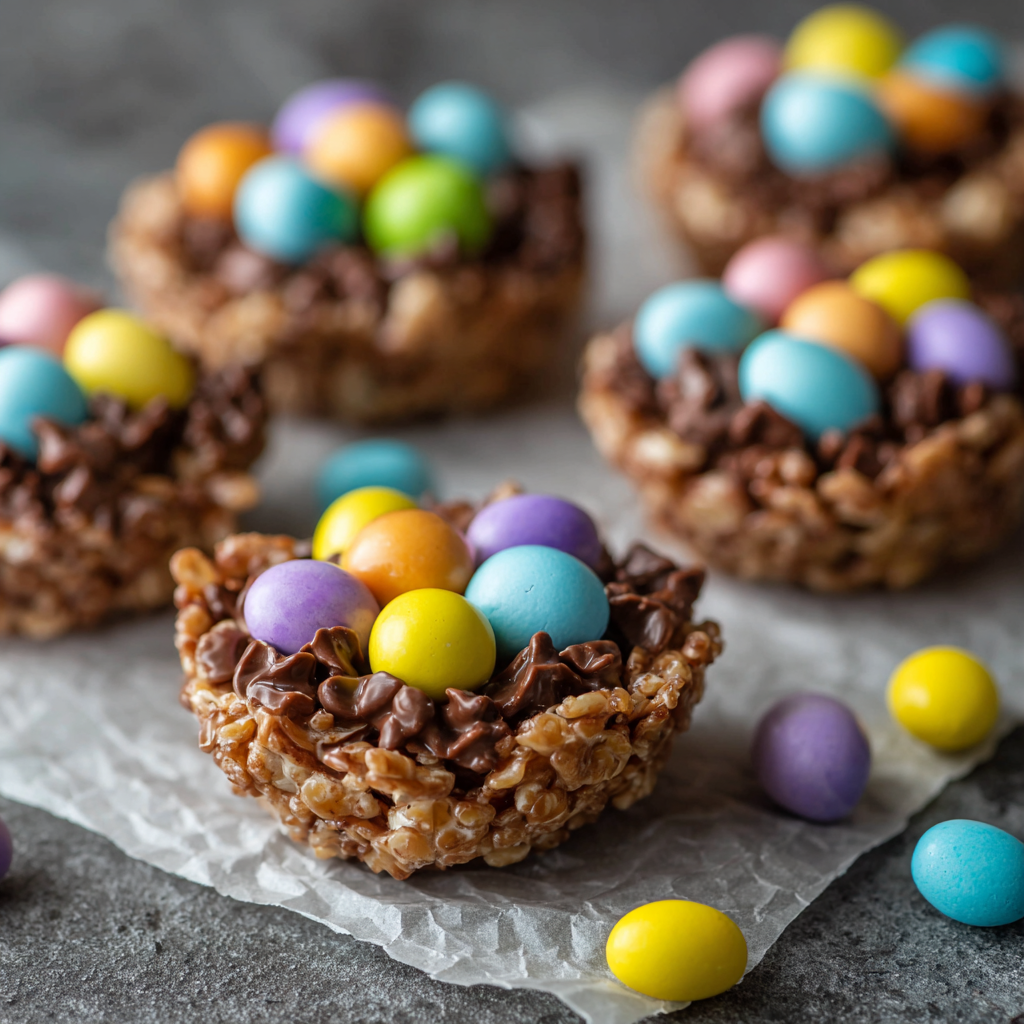
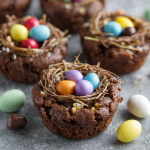
Now, I love a classic chocolate bunny as much as the next person, but there’s something about a dessert you can *create* that feels so much more special. Something that feels like a hug on a plate. That’s where these Mini Egg Nest Brownies come in. Imagine this: a rich, intensely fudgy brownie, baked into a perfect personal-sized cup. On top, a whimsical nest made of crunchy chocolate and crispy noodles, cradling a trio of those iconic pastel mini eggs. They’re not just a dessert; they’re a conversation starter, a centerpiece, and a guaranteed smile-maker.
The best part? These are what I call a “shortcut superstar.” We’re using a brownie mix as our trusty foundation (no shame in my game!), which means you’re about 15 minutes away from having these in the oven. This recipe is for everyone—the busy parent, the enthusiastic beginner, the seasoned baker who just wants something fun and fast. So, tie on your favorite apron (the messy one tells the best stories), and let’s make some magic together. These little nests are about to become the star of your Easter table, your spring brunch, or just your Tuesday afternoon. Let’s get baking!
The Year of the Lopsided Nest: A Sweet Kitchen Memory
This recipe always takes me back to my very first attempt, years ago. I was hosting my first big Easter lunch for both sides of our family. I wanted to impress, to create a spread that said, “Look! I’m a real adult who can host things!” I had visions of a pristine dessert table with these perfect, magazine-worthy nest brownies.
Reality? My first batch of nests looked… abstract. Let’s be kind. One resembled a bird’s nest after a strong wind. Another was more of a chocolate haystack. My then-five-year-old niece wandered into the kitchen, peered at my tray, and said, “Auntie Liv, did the birds forget how to build?” I burst out laughing. Instead of stressing, we grabbed some extra mini eggs and “helped” the birds by strategically placing eggs to cover the, ahem, architectural flaws. Those wonky, love-filled brownies were the first thing to disappear from the table that day. It taught me a beautiful lesson: food made with joy and a dash of imperfection is always the most memorable. Now, I embrace the unique personality of each nest. Yours will too, and that’s what makes them perfect.
What You’ll Need: A Tour of the Ingredients
Gathering your ingredients is the first act of love in any recipe. Here’s everything you need, plus a few of my favorite insider tips to make these brownie cups uniquely yours.
- 1 Box of Your Favorite Brownie Mix (or homemade batter): This is our fantastic shortcut! I adore a dark chocolate or fudge-style mix for maximum richness. Chef’s Insight: The box size typically labeled “family size” or “9×13 pan size” is perfect. It gives us plenty of batter for generous cups.
- Ingredients listed on the brownie mix box (usually eggs, oil, and water): Follow your box’s directions for “fudgy” brownies if there’s an option. Using an extra egg yolk (in addition to what’s called for) can make them even more decadent!
- 1 cup Milk or Dark Chocolate Chips: This is for our nest magic. I prefer semi-sweet for a balanced sweetness, but milk chocolate is a dream with the candy eggs. Substitution Tip: Chopped chocolate bars melt even smoother than chips! Just avoid white chocolate for the nests, as it sets too soft.
- 1 cup Chow Mein Noodles or Shredded Wheat Cereal: The “twigs” for our nest! Chow mein noodles are classic—they’re light, super crispy, and create that authentic nest look. Substitution Tip: If you can’t find them, broken-up shredded wheat biscuits (the plain kind) are a fantastic, whole-grain alternative. Pretzel sticks broken into tiny pieces also work in a pinch!
- 1 bag of Mini Candy Eggs: The jewel-toned finale! You can use the sugar-shelled ones or the mini chocolate eggs. Chef’s Insight: For a truly stunning look, use a mix of colors. Place them on the nests while the chocolate is still soft so they stick perfectly.
Building Your Brownie Nests: Step-by-Step
Ready? Let’s walk through this together. I’m right here with you, offering all the little hacks I’ve learned along the way to ensure your brownie nests are foolproof and fabulous.
- Prep Your Stage. Preheat your oven to 350°F (175°C). Grab a standard 12-cup muffin tin and give it a really good coat of non-stick spray or butter. Don’t be shy! This ensures our brownie cups pop out easily after their bake. Pro Tip: For ultimate non-stick insurance, you can use paper muffin liners. I sometimes skip them because I love the crisp edges you get from the tin, but liners make cleanup a breeze.
- Mix the Brownie Base. In a large bowl, prepare your brownie batter exactly as the box directs for that fudgy texture. Whisk it until it’s just combined and no dry streaks remain, but don’t over-mix. A few lumps are A-okay! Chef’s Hack: Add a teaspoon of instant espresso powder to the dry mix. It won’t taste like coffee—it just makes the chocolate flavor sing a deeper, richer song.
- Portion with Love. Using a spoon or a cookie scoop, divide the batter evenly among the 12 muffin cups. Fill each one about ⅔ of the way full. This gives them room to rise and create a perfect little cup shape. Watchpoint: If you overfill, they might spill over and be tricky to remove. A little less is better than too much!
- Bake to Fudgy Perfection. Slide the tin into your preheated oven. Bake for 15-18 minutes. Here’s the key: you want the edges to look set and maybe have tiny cracks, but the very center should still look a tiny bit soft and not completely dry. A toothpick inserted near the edge should come out with moist crumbs, not clean batter. Biggest Tip: Do NOT overbake! They continue to set as they cool. Overbaked brownie cups lose that divine fudginess.
- The All-Important Cool Down. Take the tin out and let it cool on a wire rack for a full 10 minutes. Then, gently run a butter knife around the edges of each brownie cup to loosen them. Let them cool completely in the tin before removing. Patience here is vital—if they’re warm, the nests will melt!
- Craft the Chocolate Nests. While the brownies cool, make your nests. Melt the chocolate chips in a microwave-safe bowl in 30-second bursts, stirring well between each, until smooth. Or, use a double boiler. Pour the melted chocolate over your chow mein noodles or shredded wheat in a medium bowl. Gently fold with a spatula until every piece is beautifully coated.
- Assemble with Joy. Place your completely cooled brownie cups on a plate or parchment. Using two forks or spoons, scoop a portion of the chocolate-noodle mixture onto the center of each brownie. Gently shape it into a nest with a slight depression in the middle. This is the fun, artistic part—no two will be identical! Immediately press 3-4 mini eggs into the center of each nest.
- Let Them Set. Allow the nests to set at room temperature until the chocolate is firm, about 30-60 minutes. If you’re in a hurry, you can pop the whole tray in the fridge for 15 minutes. Then, they’re ready to serve and devour!
How to Serve These Little Masterpieces
Presentation is part of the fun! Arrange these brownie nests on a simple cake stand or a platter lined with a pastel napkin for instant Easter vibes. They’re a complete dessert all on their own, but for an extra-special touch, offer them with a side of freshly whipped cream or a scoop of vanilla bean ice cream. The warm-cold contrast is heavenly. They’re perfect for a dessert buffet, as a sweet gift boxed up for neighbors, or as the grand finale to your Easter feast.
Make It Your Own: Fun Variations
Once you’ve mastered the classic, play around! Here are a few of my favorite twists:
- Peanut Butter Paradise: Swirl ¼ cup of peanut butter into the brownie batter before baking. Use peanut butter chips in the nest and top with peanut butter cup mini eggs if you can find them!
- Cookie Crunch Nest: Swap the chow mein noodles for roughly crushed pretzel sticks or even broken-up potato sticks for a salty-sweet crunch.
- Spring Berry Bliss: For a fruit-forward version, skip the candy eggs. Once the nests are set, fill the center with a few fresh raspberries, blueberries, or a drizzle of raspberry sauce.
- “Bird Seed” Nest: Make a gluten-free version by using certified GF crisp rice cereal or roasted sunflower seeds and pepitas for the nest texture.
- Caramel Drizzle: After the nests set, add an extra layer of decadence by lightly drizzling the whole tray with warm salted caramel sauce.
Olivia’s Kitchen Notes & Stories
This recipe has evolved so much since that first lopsided year! I’ve learned that letting the brownie cups cool *completely* is the single most important step for a stable nest. I’ve also started adding a tiny pinch of flaky sea salt on top of the chocolate nests right after assembling—it elevates everything.
One year, I was out of muffin tins (how does that even happen?) and baked the batter in a square pan instead. We cut it into squares and built the nests right on top, turning it into a “brownie nest bark” situation. It was a hilarious and delicious save! The moral is: your kitchen, your rules. Don’t be afraid to adapt. These brownies are about joy, not perfection. Now, I’d love to hear from you! Tag me on social media with your creations—especially the wonderfully wonky ones. They’re my favorite.
Your Questions, Answered
Q: My nests are sliding off the brownies! What did I do wrong?
A: This almost always means the brownie cups were still warm. Chocolate melts when it touches warmth! Ensure they are 100% cooled to room temperature. You can even pop them in the fridge for 10 minutes before assembling for a totally cold, firm base.
Q: Can I make these ahead of time for a party?
A: Absolutely! They are a fantastic make-ahead dessert. Bake and cool the brownie cups the day before. Store them in an airtight container at room temperature. Make the chocolate nests and assemble them the morning of your event. They’ll stay perfect and crisp for several hours at room temp.
Q: The chocolate for my nests is too thick and clumpy. Help!
A: This usually means the chocolate got a little too hot or was stirred too vigorously. If it’s very thick, try stirring in a teaspoon of neutral oil (like vegetable or coconut) to loosen it back up. For next time, melt more gently and fold the noodles in carefully.
Q: Can I use a homemade brownie recipe instead of a mix?
A: Of course! Use your favorite homemade fudgy brownie recipe. Just be sure the batter yield is enough for a 9×13 pan, and follow the same portioning and baking instructions. You may need to adjust bake time by a minute or two, so keep an eye on them.
Mini Egg Nest Brownies (Fudgy Easter Brownie Cups)
Description
These Mini Egg Nest Brownies are the kind of dessert that instantly feels like a tradition. You get rich, fudgy brownie cups topped with crunchy chocolate “nests” and colorful candy eggs. They look adorable on a spring table, but they’re also super simple thanks to a brownie mix shortcut. Perfect for Easter, school parties, or a weekend baking project.
Ingredients
Brownie Base
-
1 box brownie mix (9×13 size)
-
Ingredients listed on the box (usually eggs, oil, water)
Chocolate Nests
-
1 cup chocolate chips (milk, dark, or semi-sweet)
-
1 cup chow mein noodles or shredded wheat cereal, lightly crushed
Topping
-
Mini candy eggs (about 36–48 pieces)
Instructions
-
Heat the oven
Preheat oven to 350°F (175°C). Grease a 12-cup muffin tin or line with paper liners. -
Make the batter
Prepare brownie batter according to the package directions (choose the fudgy option if listed). -
Fill the pan
Divide batter evenly into muffin cups, filling each about ⅔ full. -
Bake
Bake for 15–18 minutes until edges are set and centers are still slightly soft.
Cool in the pan 10 minutes, then loosen edges and let cool completely. -
Make the nests
Melt chocolate chips in the microwave in 30-second bursts, stirring between each, until smooth.
Stir in noodles or cereal until fully coated. -
Shape nests
Spoon a small mound onto each cooled brownie cup. Use two spoons or a fork to shape into a nest with a dip in the center. -
Add eggs
Press 3–4 mini candy eggs into each nest while the chocolate is still soft. -
Set
Let sit at room temperature 30–60 minutes or refrigerate 15 minutes until firm.
Notes
-
✅ Brownies must be fully cooled before adding nests or the chocolate will melt.
-
✅ Don’t overbake — soft centers = fudgier cups.
-
✅ Add a pinch of instant espresso powder to the batter to boost chocolate flavor.
-
✅ Stir 1 teaspoon neutral oil into melted chocolate if it feels too thick.
-
✅ A light sprinkle of flaky salt on top makes the flavor pop.
Nutritional Information (Per Brownie Nest)
Please note: This is an approximate estimate based on the ingredients listed and will vary depending on specific brands used.
- Calories: 240
- Total Carbohydrates: 32g
- Dietary Fiber: 1g
- Sugars: 22g
- Total Fat: 12g
- Protein: 3g
This recipe is vegetarian-friendly. For gluten-free, use a GF brownie mix and GF cereal for the nests.
Final Thoughts: A Tradition in the Making
As I brush the last few chocolate crumbs from the counter, I’m already smiling thinking about who will enjoy these next. There’s something about these Mini Egg Nest Brownies that feels like more than a recipe—it feels like the start of a tradition.
They remind us that the sweetest moments often come from the simplest creations. That a little whimsy, a splash of color, and a shared treat can turn an ordinary day into a celebration. They’re proof that you don’t need to be a pastry chef to make something that looks like it came from a bakery and feels like it came straight from the heart.
Whether your nests are picture-perfect or charmingly rustic, what matters is the joy you pour into them. The laughter shared while assembling. The delight on the faces of those you serve. That’s the real magic.
So here’s to new traditions, to shortcuts that feel special, and to desserts that bring people together. May your spring be sweet, your brownies fudgy, and your nests always full of color.
Happy Easter, happy spring, and happy baking, friend.
With love,