
Mini Chocolate Easter Trifles: The Ultimate Joy-in-a-Glass Dessert!
Hey there, friend! Is there anything better than the moment you slide a dessert across the table and watch everyone’s eyes light up? That little gasp of delight, the immediate reach for a spoon… it’s pure kitchen magic. And when that dessert is as cute, customizable, and downright delicious as these Mini Chocolate Easter Trifles, the magic feels even more special.
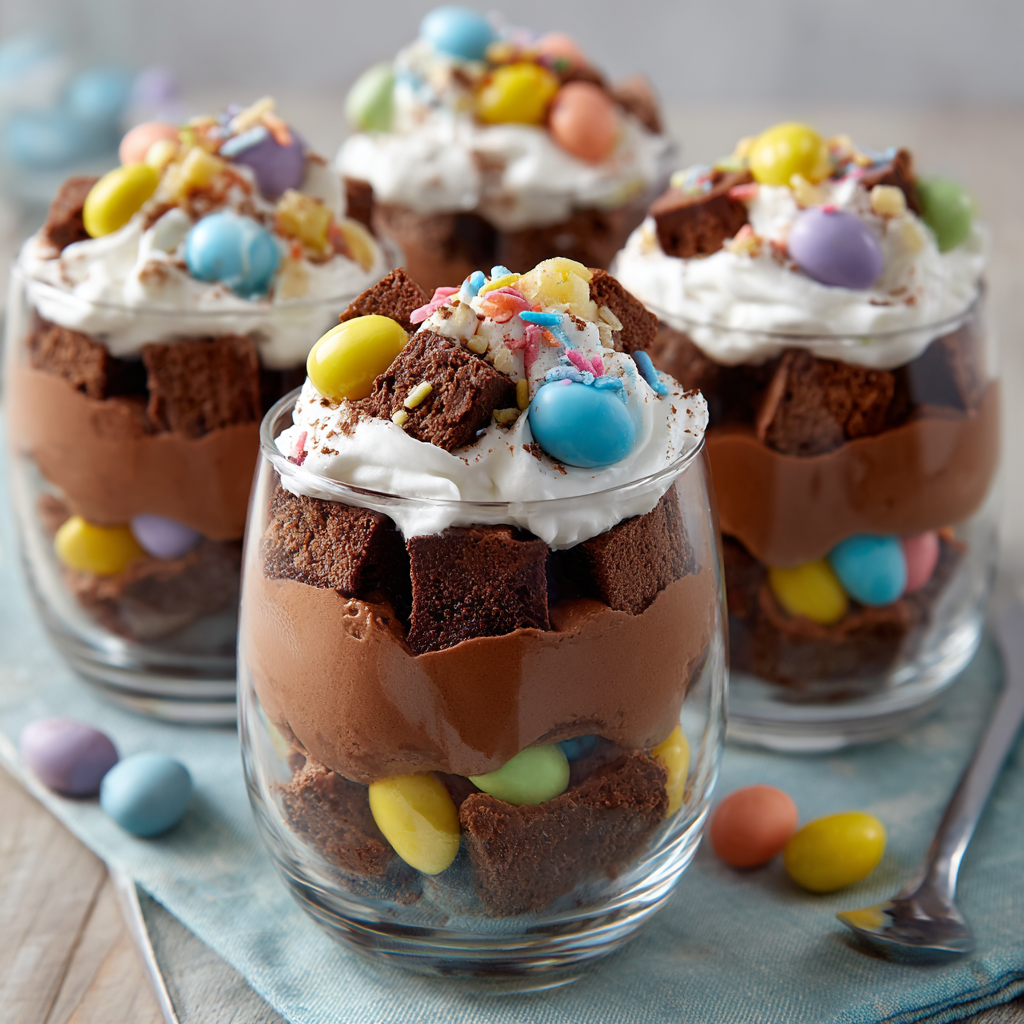
Picture this: layers of dreamy chocolate mousse, fudgy brownie chunks, clouds of whipped cream, and the iconic crunch of pastel candy-coated eggs, all stacked up in a clear glass. Every spoonful is a textural party—creamy, rich, soft, and crunchy all at once. It’s a dessert that looks like you fussed for hours, but the beautiful secret is how wonderfully simple it is to assemble. Whether you’re hosting a bustling Easter brunch, need a show-stopper for a spring potluck, or just want to make a regular Tuesday feel celebratory, these individual trifles are your perfect partner in crime. They’re playful, they’re pretty, and they capture the hopeful, joyful spirit of the season in every single bite. So, tie on your favorite apron (the messy one with all the character!), grab your cutest jars or glasses, and let’s create some edible sunshine together.
A Story in Layers: My First “Trifle” Disaster Turned Triumph
Let me take you back to my very first Easter as the “official” holiday host. I was determined to make a grand, traditional English trifle—the kind with layers upon layers, custard from scratch, the works. Ambition, meet reality. Let’s just say my custard decided to become sweet scrambled eggs, and my attempt at homemade sponge cake… well, let’s not speak of it. With guests arriving in an hour, I was in a full-blown kitchen panic.
But then, I looked at the wreckage and my overflowing basket of Cadbury Mini Eggs (my ultimate weakness). I had brownies in the freezer, some store-bought chocolate pudding, and a carton of heavy cream. In a moment of “what do I have to lose?” energy, I started layering everything into my grandma’s old juice glasses. I crushed those mini eggs with a rolling pin, feeling my stress melt away with every whack. What emerged from the fridge wasn’t the dignified trifle I’d imagined—it was something better. It was fun, whimsical, and an instant hit. My uncle said, “Now THIS is a trifle I understand!” That day taught me a invaluable lesson: the best recipes aren’t about perfection; they’re about personality, using what you have, and sharing joy. These Mini Chocolate Easter Trifles are the delicious, stress-free evolution of that happy kitchen save.
Your Treasure Map: Gathering the Trifle Ingredients
Here’s the beautiful part: you can make every component from scratch or use clever shortcuts. It’s all about what feels good for you today. Here’s what you’ll need for about 6 generous servings:
- 1 batch of brownies, baked and cooled: The hearty, fudgy foundation. Use your favorite box mix or a simple homemade recipe. I love a dark chocolate or fudge brownie here for maximum richness. Chef’s Insight: Bake them the day before so they’re completely cool and easier to cube. For a twist, try brownies with a hint of orange zest or a sprinkle of sea salt in the batter!
- 2 cups chocolate mousse or chocolate pudding: The luxurious, creamy layer. Homemade chocolate mousse (I’ll share my easy 5-minute version below) is divine, but a high-quality store-bought pudding or even a chocolate custard works beautifully. Substitution Tip: For a lighter option, swap in chocolate yogurt or a chocolate avocado mousse. For a nutty flavor, try a chocolate-hazelnut spread thinned with a little whipped cream.
- 1 ½ cups whipped cream: The fluffy cloud of delight. Homemade whipped cream (just heavy cream, a touch of powdered sugar, and vanilla) is shockingly easy and tastes miles better. Chef’s Insight: Whip your cream to stiff peaks so it holds its shape beautifully in the layers. A can of real whipped topping is a fine, time-saving shortcut in a pinch.
- 1 cup candy-coated chocolate eggs (like Cadbury Mini Eggs), crushed: The festive, crunchy confetti! This is where the Easter magic lives. Pro Tip: Don’t crush them all into dust! I like to put them in a zip-top bag and give them a few gentle whacks with a rolling pin for a mix of fine pieces and bigger chunks for texture.
- Optional for topping: Extra whole mini eggs, chocolate shavings, a drizzle of caramel or raspberry sauce, pastel sprinkles, or a fresh mint sprig. This is your chance to make them your own!
Let’s Build Some Edible Rainbows: Step-by-Step Instructions
Now for the fun part—the assembly! This is less of a rigid recipe and more of a joyful, creative process. I like to set up all my components in little bowls, like a dessert mise en place station. It makes layering feel like an art project.
Step 1: The Foundation – Prep Your Components.
Cube your cooled brownies into ½-inch to 1-inch chunks. You want pieces small enough to fit in your spoon but big enough to give a satisfying bite. If you’re making homemade mousse or whipped cream, do that now. (Quick Mousse Hack: Melt 1 cup of chocolate chips with 2 tbsp of milk or cream. Let it cool slightly, then gently fold it into 1 ½ cups of already-whipped cream. Voilà! Instant, stable mousse.) Crush your mini eggs as described above.
Step 2: Choose Your Vessel.
Grab your glasses! Clear parfait glasses, mason jars, vintage coupes, or even wide champagne flutes are perfect. The clear sides are key for showing off those gorgeous layers. Give them a quick wipe to ensure they’re sparkly clean.
Step 3: The First Layer – Chocolate Dream.
Start with a generous spoonful of chocolate mousse or pudding. This first layer anchors everything. Use the back of your spoon to spread it evenly. Think of this as the rich, velvety soil from which our dessert garden grows.
Step 4: The Hearty Middle – Brownie Bliss.
Add a layer of those fudgy brownie cubes. Press them gently into the mousse. Here’s a little chef secret: if your brownies are a bit dry (it happens!), you can lightly spritz or brush the cubes with a simple syrup, milk, or even a coffee liqueur to add moisture and flavor.
Step 5: The Crunchy Confetti – Egg-cellent Texture.
Sprinkle a layer of your crushed mini eggs over the brownies. This is where you get that wonderful color and the signature crackle. Don’t be shy!
Step 6: The Fluffy Cloud – Whipped Cream.
Now, add a dollop of whipped cream. You can pipe it for fancy swirls or just spoon it on for a rustic, homespun look. This layer cuts through the richness and adds a light, airy contrast.
Step 7: Repeat and Conquer!
Repeat the layers! Mousse, brownies, eggs, cream. You can usually get two full rotations in a standard glass. The final top layer should be your whipped cream. This is your blank canvas for the grand finale decoration.
Step 8: The Festive Finish – Top It Off!
This is your moment to shine! Garnish the top with a swirl of more whipped cream, a few whole mini eggs, some chocolate shavings, or a sprinkle of gold dust. Let your inner artist out.
Step 9: The Patient Pause – Chill Time.
Cover your trifles lightly with plastic wrap and pop them in the fridge for at least 30 minutes before serving. This brief rest allows the flavors to cozy up together and the layers to set just enough for that perfect spoonful that goes all the way down to the bottom.
Serving with a Smile: Presentation Ideas
Presentation is the final sprinkle of magic. Arrange your finished trifles on a platter or a cute tray lined with a pastel napkin or some fresh spring greenery. For a big gathering, create a “trifle bar” with all the components and let guests build their own—it’s a fantastic activity for kids (and kids at heart!). Offer long-handled spoons or vintage teaspoons for an extra charming touch. These individual desserts are a complete showpiece on their own, needing only the company of good friends and perhaps a cup of coffee or cold milk alongside.
Make It Your Own: Fun Recipe Variations
- Berry Blast: Add layers of fresh raspberries or macerated strawberries between the brownie and mousse for a chocolate-berry sensation.
- Caramel Pretzel Crunch: Swap the crushed mini eggs for a mix of crushed salted pretzels and dulce de leche or caramel sauce drizzled between layers.
- Gluten-Free & Vegan Friendly: Use your favorite GF brownies, a dairy-free chocolate mousse (avocado or silken tofu-based), and coconut whipped cream. Check that your candy eggs are vegan-friendly or use chopped vegan chocolate.
- Peanut Butter Cup: Swirl peanut butter into the chocolate mousse and use chopped peanut butter cups instead of mini eggs. A true crowd-pleaser!
- Lemon Curd Twist: For a less chocolate-forward option, alternate layers of lemon curd and vanilla pudding with vanilla cake cubes, topped with whipped cream and yellow-and-white sprinkles.
From My Kitchen to Yours: Chef’s Notes
Over the years, this recipe has become my edible mood ring. Feeling classic? I stick to the original. Need to use up leftover cake? In it goes! One of my favorite happy accidents was the time I ran out of mini eggs and used a chopped-up chocolate orange instead—the hint of citrus was a revelation. Don’t stress about the layers being perfectly even or symmetrical. The charming, slightly messy, “homemade with love” look is what makes these so special. I always make one extra trifle in a little jar for the chef (that’s me… and you!) to taste-test immediately. Quality control is very important, you understand. The best part is watching people dig in and discover all the different layers. It’s a dessert adventure in a glass.
Your Questions, Answered: FAQs & Troubleshooting
Q: Can I make these trifles ahead of time?
A: Absolutely! You can assemble them fully, cover tightly, and refrigerate for up to 24 hours before serving. I’d recommend adding the final garnish (like whole mini eggs) just before serving so they stay crisp and pretty.
Q: My whipped cream is getting soft and my layers are bleeding together. Help!
A: No worries! The key is making sure your mousse/pudding is completely cool and your whipped cream is whipped to stiff peaks. Also, avoid overfilling the layers. If your kitchen is warm, a longer chilling time (1-2 hours) before serving will help everything firm up beautifully.
Q: I don’t have clear glasses. What else can I use?
A: Get creative! Ramekins, ceramic mugs, small bowls, or even a large trifle dish for a family-style presentation all work. The clear glass is just for the “wow” factor, but the taste is the same in any vessel.
Q: Any tips for crushing the mini eggs without making a huge mess?
A: My tried-and-true method: place them in a sturdy zip-top plastic bag, press out the air, and seal it. Lay it on a cutting board and use a rolling pin or the bottom of a heavy saucepan. Roll or press firmly. The bag contains all the colorful shrapnel perfectly!

Mini Chocolate Easter Trifles : A Fun and Festive Dessert in a Glass
Description
These Mini Chocolate Easter Trifles are pure fun in a glass—layered with brownie chunks, creamy chocolate mousse, fluffy whipped cream, and crunchy candy eggs. They look impressive, taste rich and playful, and are surprisingly simple to assemble. Perfect for Easter gatherings, spring parties, or anytime you want a cheerful make-ahead dessert.
Ingredients
-
1 batch brownies, baked and cooled (or store-bought)
-
2 cups chocolate mousse or thick chocolate pudding
-
1½ cups whipped cream (homemade or ready-made)
-
1 cup crushed candy-coated chocolate eggs (such as **Cadbury Mini Eggs)
-
Optional toppings: extra whole mini eggs, chocolate shavings, sprinkles, or caramel drizzle
Instructions
-
Prep the Brownies
Cut cooled brownies into small bite-size cubes (about 1-inch pieces). -
Crush the Candy Eggs
Place candy eggs in a zip bag and gently crush with a rolling pin. Aim for a mix of small bits and crunchy chunks. -
Start the First Layer
Spoon a layer of chocolate mousse or pudding into the bottom of each glass or jar. -
Add Brownie Layer
Add a layer of brownie cubes. Press gently so they settle into the mousse. -
Add Crunch Layer
Sprinkle crushed candy eggs over the brownies. -
Add Whipped Cream
Top with a layer of whipped cream. -
Repeat Layers
Repeat mousse → brownies → crushed eggs → whipped cream until glasses are filled, finishing with whipped cream on top. -
Decorate
Garnish with whole mini eggs, chocolate curls, or sprinkles. -
Chill
Refrigerate at least 30 minutes before serving so layers set and flavors blend.
Notes
-
Use fully cooled brownies so layers stay neat.
-
Whip cream to stiff peaks so it holds shape between layers.
-
Dry brownies? Lightly brush cubes with milk or chocolate milk.
-
Make ahead friendly: Assemble up to 24 hours ahead; add final toppings just before serving.
-
No clear glasses? Use small bowls or ramekins—the taste is the same.
Approximate Nutritional Info (Per Serving, based on 6 servings)
Please note: This is a rough estimate and can vary greatly based on the specific brands and ingredients you use. For dietary needs, please calculate with your exact ingredients.
Calories: ~400-450 | Fat: ~22g | Saturated Fat: ~12g | Carbohydrates: ~50g | Sugar: ~38g | Protein: ~5g
Final Thoughts: More Than Just a Dessert
As you place the last Mini Egg on top of your final trifle, take a moment to step back and admire your work. Look at those beautiful, distinct layers—the deep, rich chocolate, the snowy white cream, the pops of pastel color. It’s a picture of joy, isn’t it? But the real beauty of this recipe isn’t just in how it looks; it’s in the feeling it creates.
These little glasses hold more than just brownie and mousse. They hold the promise of a shared moment. They hold the laughter that happens when someone digs in and gets a perfect, layered spoonful. They hold the memory of a kitchen “disaster” that turned into a beloved tradition, reminding us that the best things in life are often unplanned and imperfect.
So, as you serve these trifles this Easter, watch closely. Watch for that first smile, the happy sighs, and the friendly competition over the last one in the bowl. In that moment, you’ll know you’ve given a gift far sweeter than sugar. You’ve created a little bit of edible sunshine, a spoonful of spring, and a memory that will linger long after the last crumb is gone.


