
Welcome to the Coziest Corner of the Kitchen!
Hello, my fellow flavor-seekers and kitchen adventurers! Olivia here, welcoming you back to my cozy little nook on the internet. Is there anything better than the smell of sugar cookies wafting from the oven? It’s a scent that instantly wraps you in a warm hug, promising sweet memories and even sweeter treats. Today, we’re rolling up our sleeves (and probably getting a little flour on our noses) for a project that’s equal parts baking and pure, unadulterated joy. We’re making Melting Snowman Cookies!
If you’ve ever looked out the window at a frosty, magical world and then felt a little sad when Mr. Snowman on the lawn started to droop, this recipe is for you. We’re capturing that wonderfully whimsical moment in cookie form! These aren’t just desserts; they’re tiny, edible stories. They’re the kind of treat that makes kids’ eyes go wide with wonder and brings out the inner child in every adult. They’re perfect for holiday parties, snowy weekend afternoons, or any time you need a dose of playful creativity in your kitchen.
The best part? You absolutely do not need to be a pastry chef to pull these off. We’re using a fantastically simple, no-chill sugar cookie dough as our base (yes, you read that right—no waiting!), and the decorating is all about having fun. No pressure, just pure, sugary fun. So, preheat your oven, grab your favorite mixing bowl, and let’s create some magic together!
A Snowy Kitchen Memory
This recipe always takes me right back to one specific, snowed-in December afternoon when my niece, Maya, was about five years old. We’d been building a truly magnificent, lopsided snowman in the yard, complete with a carrot nose and my favorite scarf. But later, as we sipped hot chocolate inside, we watched our frosty friend begin his slow, graceful surrender to the warmer air.
Maya’s bottom lip started to tremble. “He’s melting, Auntie Liv!” Instead of a lesson on the states of matter, I saw a kitchen opportunity. “What if,” I said, “we make cookies that look just like him? That way, we can always remember how funny and cute he looked today?” Her tears vanished instantly. We raced to the kitchen, pulled out flour, sugar, and a bag of marshmallows, and started experimenting. The first batch was… abstract. The second was better. By the third, we had created our very first melting snowman cookie, complete with a licorice scarf. Her giggles as she gave one cookie crossed-eyes and another a big, frown were the best sound in the world. Now, it’s our yearly tradition. It’s a sweet reminder that sometimes, the most beautiful and delicious things come from a little imperfection and a whole lot of love.
Gathering Your Snowman Squad: The Ingredients
This recipe is in two simple parts: the cookie base and the decorating dream team. I’ve included my favorite tips and swaps for each ingredient to make your baking experience seamless!
For the Sugar Cookies (Makes about 24 cookies):
- 1 cup (2 sticks) unsalted butter, softened – This is the foundation of our rich, tender cookie. Chef’s Insight: “Softened” means your butter should give slightly when you press it but still hold its shape. Too soft or melted, and your cookies will spread too much!
- 1 cup granulated sugar – For that classic sweetness and helps create a slight crispness on the edges.
- 1 large egg – Binds everything together beautifully. Make sure it’s at room temperature to cream smoothly with the butter and sugar.
- 1½ tsp pure vanilla extract – The flavor hero! It adds a warm, comforting depth. For a fun twist, you could use 1 tsp vanilla and ½ tsp almond extract.
- 2½ cups all-purpose flour – The structure of our cookie. Pro Tip: Fluff your flour with a spoon, spoon it into your measuring cup, and level it off. Don’t scoop directly from the bag—it packs the flour down and can lead to dry cookies!
- ½ tsp baking powder – Our little leavening agent that gives the cookies a perfect, slight lift.
- ¼ tsp salt – Never skip the salt! It balances the sweetness and makes all the flavors pop.
For the Decorating:
- 24 large marshmallows – The snowman’s body! Standard white marshmallows work perfectly. For a gourmet touch, you could use homemade marshmallows cut in half.
- 1½ cups white cookie icing – This is the “snow puddle” our snowman is melting into. You can use a good-quality store-bought vanilla or white icing (look for one that sets firm) or make your own simple powdered sugar glaze (I mix 2 cups powdered sugar with 2-3 tbsp milk and ½ tsp vanilla until smooth).
- Black decorating gel – This is ideal for drawing the eyes, coal buttons, and twiggy arms because it’s easy to control. You can also use melted chocolate in a piping bag.
- Orange icing or orange sprinkle bits – For the classic carrot nose! I love using orange sprinkles (the long, cylindrical ones) for a cute, textured look. Orange coloring gel mixed into a small amount of white icing also works.
- Colored icing, candy ropes (like Airheads Xtremes), or even fruit roll-ups – This is where your personality shines! Use these to create tiny, colorful scarves and extra buttons.
Let’s Build a Snowman! Step-by-Step Instructions
Ready to create? Follow these steps, and you’ll have a troop of adorable melting snowmen in no time. I’ve packed this section with all my favorite hacks to ensure your success!
Step 1: Preheat and Prep
Preheat your oven to 350°F (175°C). This is our first and most crucial step for even baking! Line your baking sheets with parchment paper. Chef’s Hack: Parchment paper is a lifesaver. It prevents sticking and makes cleanup an absolute dream. No parchment? A light coating of baking spray works too.
Step 2: Cream the Butter and Sugar
In a large bowl, beat the softened butter and granulated sugar together with an electric mixer on medium speed for 2-3 minutes. Why we do this: We’re not just mixing; we’re creaming. This process incorporates tiny air bubbles into the fat, which helps leaven the cookies and gives them a lighter texture. You’ll know it’s ready when the mixture becomes pale yellow and fluffy.
Step 3: Add the Wet Ingredients
Beat in the egg and vanilla extract until they are fully incorporated and the mixture looks smooth. Scrape down the sides of the bowl with a spatula to make sure everything is homogenous.
Step 4: Combine the Dry Ingredients
In a separate, medium-sized bowl, whisk together the flour, baking powder, and salt. This ensures the leavening and salt are evenly distributed throughout the flour. Chef’s Hack: Whisking = no need to sift!
Step 5: Bring the Dough Together
Gradually add the dry ingredients to the wet ingredients, mixing on low speed just until the flour disappears and a soft dough forms. Key Tip: Don’t overmix! Overworking the dough after adding the flour can develop the gluten and make the cookies tough. As soon as you see no more dry flour spots, stop the mixer.
Step 6: Roll and Cut
This dough is wonderfully workable right away. Roll tablespoon-sized portions of dough into balls and place them about 2 inches apart on your prepared baking sheets. Then, gently flatten each ball to about a ½-inch thick circle. Why? This helps them bake into the perfect round, flat base for our snowman to melt on. You can also use the bottom of a glass dipped in sugar to flatten them for a little extra sparkle.
Step 7: Bake to Perfection
Bake for 8-10 minutes. You’re looking for the edges to be just barely starting to turn a light golden brown. The centers might still look a tiny bit soft—that’s perfect! They will continue to set up as they cool. Chef’s Secret: For perfectly round cookies, take a circular cookie cutter slightly larger than your baked cookie and swirl it around the warm cookie straight out of the oven to “tame” any uneven edges.
Step 8: Cool Completely
This is non-negotiable! Let the cookies cool on the baking sheet for 5 minutes before transferring them to a wire rack to cool completely. If you try to decorate warm cookies, the icing will just melt into a messy puddle (and not the cute kind!).
Step 9: Create the Icing Puddle
Once the cookies are completely cool, spread a generous, uneven circle of white icing on each one. Don’t make it a perfect circle—the messier and more puddle-like, the better!
Step 10: Place the Marshmallow
This is the fun part! Immediately, while the icing is still wet, place a large marshmallow on its side onto the icing puddle. Gently press and squish it down so it looks like it’s melting into the icing. You can angle it, smoosh it more on one side—get creative! The wet icing acts as the glue.
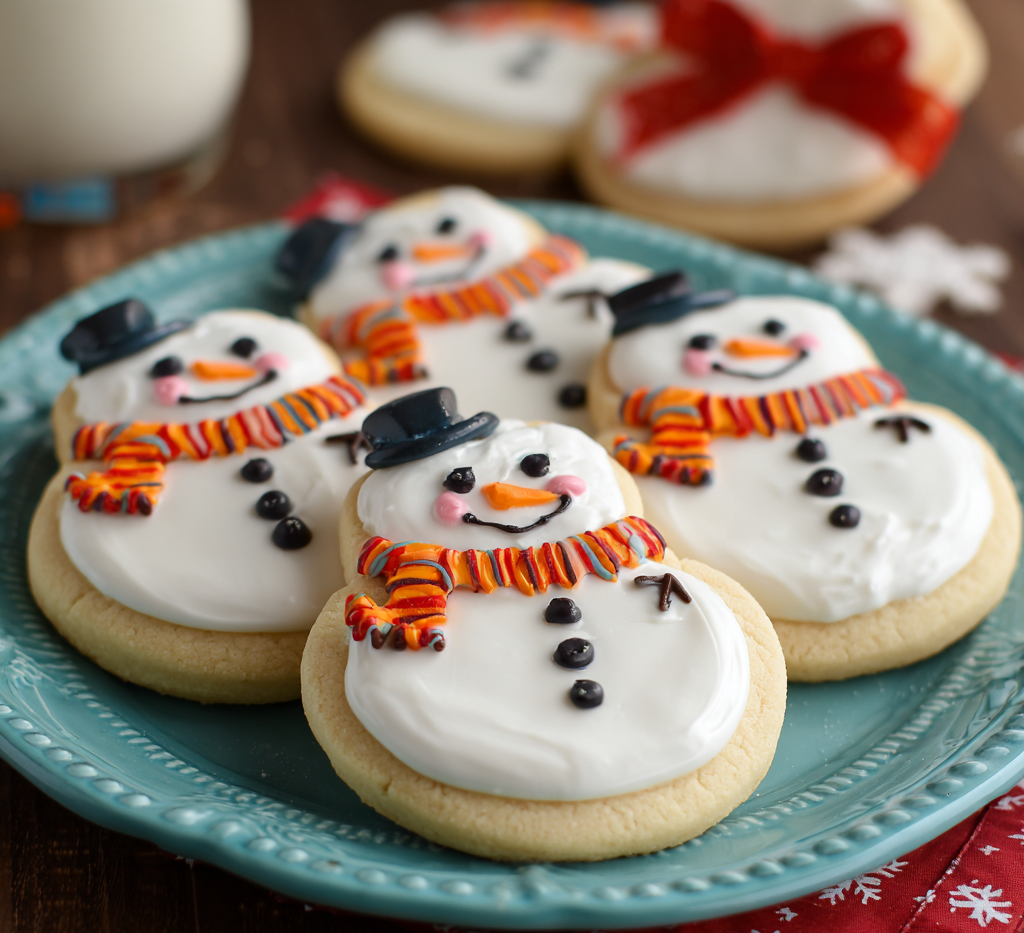
Step 11: Decorate Your Snowman
Allow the icing to set completely (this usually takes about 30 minutes to an hour). Once the marshmallow is securely stuck, it’s time to give your snowman personality! Use the black gel to draw eyes, a smile, and little stick arms. Add an orange sprinkle or a dot of orange icing for the nose. Finally, use your colored icings or candy to draw on a cheerful scarf and some buttons. And voila! You’ve made magic.
How to Serve Your Frosty Friends
These cookies are a showstopper all on their own! Pile them high on a festive platter for a holiday party—they are guaranteed to be the center of conversation. For a cute individual treat, place each cookie in a small cupcake liner before arranging them on a tray. They also make incredible food gifts! Package a few in a clear cellophane bag tied with a ribbon for a homemade gift that comes straight from the heart (and the kitchen).
Make It Your Own! Recipe Variations
The fun doesn’t have to stop here! Let your creativity run wild with these simple twists:
- Chocolate Lover: Use a chocolate sugar cookie as the base for a “muddy” melting snowman!
- Peppermint Twist: Add a ¼ tsp of peppermint extract to the cookie dough and crush some candy canes to sprinkle on the icing puddle for a festive, crunchy touch.
- Gingerbread Snowman: Use your favorite gingerbread cookie recipe for the base. The spiced cookie pairs wonderfully with the sweet marshmallow and icing.
- Gluten-Free: Substitute the all-purpose flour with a 1:1 gluten-free baking blend. Your snowmen will be just as adorable!
- “Snowball” Version: For a quicker version, skip rolling the dough and make drop cookies. Press the marshmallow into the top of a warm cookie right out of the oven—it will get delightfully gooey!
Chef’s Notes: From My Kitchen to Yours
This recipe has evolved so much since that first snowy afternoon with Maya. We’ve learned that kitchen shears are fantastic for snipping candy ropes and fruit roll-ups into perfect little scarf shapes. I also highly recommend enlisting little helpers for the decorating stage—their imaginations are boundless! I’ve seen snowmen with blueberry noses, raisin buttons, and scarves made from every color of the rainbow. One year, a particularly creative nephew gave his snowman a tiny pretzel stick umbrella. It was iconic.
The beauty of this recipe is in its imperfection. No two snowmen will ever look alike, and that’s what makes them special. So don’t stress about making them look “perfect.” Embrace the wobbles, the cross-eyed looks, and the slightly-too-long scarves. That’s where the real charm lies.
FAQs & Troubleshooting: Your Questions, Answered!
Q: My cookies spread too much and lost their round shape. What happened?
A: This is almost always a temperature issue! The most common culprits are butter that was too soft or even melted, or an oven that wasn’t fully preheated. Make sure your butter is just softened and your baking sheets are cool when you place the dough on them. Chilling the dough balls for 15 minutes before baking can also help prevent spread.
Q: My marshmallow won’t stick to the cookie. Help!
A: This means the icing had likely started to set before you placed the marshmallow. The key is to work on a few cookies at a time. Ice 2-3 cookies, then immediately place the marshmallows on them. Then, move on to the next batch. The icing needs to still be wet and sticky to act as glue.
Q: Can I make the cookie dough ahead of time?
A: Absolutely! You can prepare the dough, wrap it tightly in plastic wrap, and keep it in the refrigerator for up to 3 days. Let it sit at room temperature for about 15-20 minutes until it’s soft enough to roll. You can also freeze the dough for up to 3 months. Thaw overnight in the fridge before using.
Q: How should I store the finished cookies, and how long do they last?
A> Store your decorated cookies in a single layer in an airtight container at room temperature. They are best enjoyed within 2-3 days. The marshmallow can start to get a little hard after that. I don’t recommend refrigerating them, as it can cause the cookies to soften and the marshmallow to sweat.
Melting Snowman Cookies
Description
These playful cookies capture the magic of winter in the sweetest way. A soft sugar cookie base becomes the stage for a marshmallow “snowman” sinking into a puddle of icing, complete with scarves, carrot noses, and twiggy arms. They’re whimsical, kid-approved, and guaranteed to bring laughter to your kitchen. Whether for a holiday party or a snowy afternoon activity, these cookies turn simple baking into edible storytelling.
Ingredients
For the Sugar Cookies (24 cookies)
-
1 cup (2 sticks) unsalted butter, softened
-
1 cup granulated sugar
-
1 large egg (room temp)
-
1½ tsp vanilla extract
-
2½ cups all-purpose flour
-
½ tsp baking powder
-
¼ tsp salt
For Decorating
-
24 large marshmallows
-
1½ cups white icing (store-bought or homemade glaze)
-
Black decorating gel (eyes, buttons, arms)
-
Orange icing or sprinkles (noses)
-
Colored icing or candy ropes (scarves & details)
Instructions
-
Preheat oven to 350°F (175°C). Line baking sheets with parchment.
-
Cream butter + sugar (2–3 min) until pale and fluffy. Beat in egg + vanilla.
-
Mix dry ingredients (flour, baking powder, salt), then add gradually to wet. Stop once combined.
-
Shape cookies: Roll tablespoon-sized dough balls, flatten to ½-inch thick, and place 2” apart.
-
Bake 8–10 min until edges set and centers look soft. Cool completely.
-
Ice puddles: Spread white icing in uneven “puddle” shapes.
-
Add marshmallows: While icing is wet, press a marshmallow on its side into each puddle.
-
Decorate: Use gel for eyes, smiles, and arms. Add orange noses and candy scarves. Let set.
Notes
-
Work in small batches when adding marshmallows so the icing doesn’t dry.
-
Chill dough briefly (10–15 min) if cookies spread too much.
-
Use gel food coloring for vibrant details without thinning icing.
Nutritional Information (Estimated Per Cookie)
Calories: ~170 | Fat: 7g | Saturated Fat: 4g | Cholesterol: 25mg | Sodium: 35mg | Carbohydrates: 22g | Sugar: 15g | Protein: 1g
Please note: This is an estimate based on the ingredients used and may vary depending on specific brands and portion sizes.
Final Thoughts: Your Cozy Kitchen Adventure Awaits
And there you have it, my friends—your very own troop of whimsical, wobbly, wonderfully imperfect melting snowman cookies! I hope this recipe has brought a little bit of that magical, snowy-day feeling into your kitchen, no matter the weather outside.
Remember, baking isn’t about achieving flawless perfection. It’s about the flour on your nose, the laughter shared with a little helper, and the sweet, simple joy of creating something with your own two hands. These cookies are a celebration of that spirit. They’re a reminder that sometimes the most beautiful moments come from a little mess and a whole lot of heart.
So, whether you’re carrying on a cherished tradition or starting a brand new one, I’m so incredibly grateful you chose to spend your time here in my cozy corner. I can’t wait to hear about your own kitchen adventures and see the unique personalities your snowmen take on!


