

Spooky, Gooey, and So Much Fun: Halloween Brain Treats Are Here!
Is there anything better than that moment your kitchen fills with the incredible, buttery, sweet smell of melting marshmallows? It’s a scent that instantly transports me back to childhood, to after-school snacks, and to the simple, pure joy of making something delicious with my own two hands. And when you add a dash of Halloween magic to that classic treat? Well, friends, that’s where the real fun begins.
If you’re looking for a show-stopping, conversation-starting, absolutely delicious Halloween snack that requires exactly zero baking skills, you have hit the jackpot. These Marshmallow Rice Bubbles Halloween Brains are my go-to for every spooky soiree. They’re creepy, they’re cute, they’re gloriously messy to make, and they are guaranteed to be the first platter to empty at any party. We’re taking the humble, beloved rice cereal treat and transforming it into a centerpiece worthy of your Halloween spread.
The best part? This is a recipe that welcomes everyone into the kitchen. It’s a fantastic project to do with kids (they love getting their hands buttery and shaping the brains!), it’s quick enough for a last-minute party panic, and it uses simple ingredients you probably already have in your pantry. So, tie on your favorite apron—the one that’s seen a few battles and is stained with memories—and let’s create some edible brains that are as fun to make as they are to eat!
A Messy Apron and a Spooky Tradition
This recipe always takes me back to my very first Halloween in my first apartment. I was determined to host a party, but my “kitchen” was barely a closet and my budget was, well, “creative.” I needed a snack that was affordable, easy, and had a major “wow” factor. I stared at a box of Rice Bubbles and a bag of marshmallows, and a lightbulb went off.
That first batch was… abstract, let’s say. My attempt at brain shapes looked more like lumpy pink aliens. But when my friends arrived, their reactions were priceless. They gasped, they laughed, and they immediately dug in. The combination of that familiar, sweet, chewy taste with the spooky visual was a total hit. It became an instant tradition. Every year since, no matter how elaborate the rest of the menu gets, these brains make an appearance. They’re a reminder that the best recipes aren’t about perfection—they’re about the joy you share and the memories you make, even if your fingers are permanently stained red for a day!
Gathering Your (Mad) Scientist Ingredients
Here’s the beautiful simplicity of it all. You only need a handful of pantry staples to create this masterpiece. Let’s break it down:
- 85 g (6 tablespoons) Unsalted Butter: This is the rich, flavorful base of our operation. I insist on unsalted so we can control the seasoning ourselves. The salt in this recipe isn’t just for taste; it’s a flavor enhancer that makes the sweet marshmallows truly sing! If you only have salted butter, that’s okay—just reduce the added salt to a tiny pinch.
- 6 cups Regular Marshmallows: The glue that holds our brains together! Standard white marshmallows give us a perfect blank canvas for our food coloring. For a even gooier, softer texture, you can use 1 ½ cups of marshmallow fluff instead. Pro Chef Tip: Fresh marshmallows melt much more smoothly than ones that have been sitting open in your pantry for months.
- 4 cups Rice Bubbles (or Rice Krispies®): The iconic crunch! This is the structure and the classic texture we all know and love. Don’t substitute puffed rice cereal here—it’s not the same and won’t hold together properly.
- ½ teaspoon Salt: Don’t you dare skip this! This is the secret weapon that takes these treats from “cloyingly sweet” to “perfectly balanced and addictive.” It cuts through the sugar and highlights the buttery, toasty notes.
- Red Food Colouring: The magic potion! Gel food colouring is my absolute top choice because it provides intense, vibrant color without thinning out our marshmallow mixture. Liquid food colouring works in a pinch, but you’ll need quite a few more drops to get a deep, bloody red, and it might make the texture a touch stickier.
Let’s Make Some Brains! (Step-by-Step)
Ready to get your hands dirty? This process is fast and furious, so have all your ingredients measured and ready to go before you even turn on the stove. This is called mise en place—a fancy French term for “having your stuff together,” which prevents a lot of kitchen panic!
- Melt the Butter: Place your large saucepan over low heat. Add the butter and let it melt gently. We’re not trying to brown it or cook it; we just want it liquid. Low and slow is the key here to prevent any scorching later on.
- Melt the Marshmallows: Add all six cups of marshmallows to the melted butter. Now, keep that heat on low and stir constantly with a wooden spoon or a sturdy silicone spatula. The marshmallows will slowly slump, then melt into a glorious, smooth, white lava. This should take about 5-7 minutes. Chef’s Hack: If the heat is too high, the marshmallows will cook too quickly and become tough and chewy instead of soft and gooey. Patience is your best friend in this step!
- Add Color & Seasoning: Once the marshmallow mixture is completely smooth, remove the saucepan from the heat. Immediately stir in the salt. Now, for the fun part: add your red food colouring. Start with 4-5 drops of gel colour (or 10-12 drops of liquid). Stir it in completely. Want a more gory, deep brain? Add more colour, one drop at a time, until you achieve your perfect creepy shade. Remember, the colour will lighten slightly when we add the cereal.
- The Big Mix: Quickly add all four cups of Rice Bubbles to the marshmallow pot. Using a gentle folding motion, stir and fold until every single cereal piece is thoroughly coated in the red marshmallow goo. Work relatively quickly here, as the mixture will start to set as it cools.
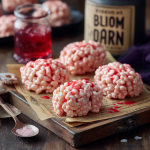
- Shape Your Masterpieces: This is the best part! Spread a little butter on your clean hands—this is non-negotiable unless you want sticky red hands for days. Grab a handful of the mixture (about ½ cup) and gently press it together. Form it into an oval-ish, mound-like shape—think of a small, plump football. This is your brain base. Now, place it on a baking tray lined with parchment paper. Using the side of your thumb or the handle of a butter knife, gently press a line down the center to create the two hemispheres. Then, use your fingertips to create squiggly lines and grooves all over the surface to mimic the cerebral cortex. Don’t overthink it! Brains are wonderfully weird and wrinkly, so there’s no wrong way to do this.
- Let Them Set: Once all your brains are shaped and on the tray, simply let them sit at room temperature for 20-30 minutes to firm up. Do NOT put them in the fridge to speed this up, as it can cause them to sweat and become too hard.
How to Serve Your Spooky Creations
Presentation is everything with these guys! For maximum impact, place your finished brains on a sleek black slate board or a white platter to make the red color really pop. You can nestle them on a bed of shredded green coconut “zombie moss” or place them next to a bowl of “eyeballs” (peeled grapes). For a truly surgical presentation, arrange them on a metal baking tray with a plastic disposable scalpel (clean, of course!) for serving. Watch your guests do a double-take before they can’t resist breaking off a delicious, gooey piece.
Get Creative! Recipe Variations
Feel like experimenting? This recipe is a fantastic canvas for your creepy creativity!
- Zombie Green Brains: Use green food colouring instead of red for a different kind of monster.
- Chocolate Dipped: Let the brains set completely, then dip the bottoms in melted dark chocolate for a decadent twist.
- Berry Brains: Add a teaspoon of raspberry or strawberry extract to the marshmallow mixture along with the food colouring for a fruity flavor.
- “Dirty” Brains: For an extra gross-out factor, gently dust the set brains with a mixture of cocoa powder and powdered sugar for a “dirty” earth effect.
- Gluten-Free: Ensure your Rice Bubbles cereal is a certified gluten-free brand, and you’re good to go!
Chef Olivia’s Final Thoughts
Over the years, this recipe has seen many iterations. I’ve learned that slightly stale cereal actually holds its crunch better than brand-new cereal. I’ve learned that a tiny pinch of cayenne pepper (seriously, just a pinch!) adds a mysterious, warm kick that people can’t quite place. And I’ve learned that no matter how perfect or imperfect the brain shapes are, they always disappear.
One of my favorite kitchen memories is of my niece, covered in red marshmallow, proudly presenting a brain she made that looked more like a heart. “It’s a loving brain, Aunt Liv!” she declared. And you know what? It was perfect. So please, don’t stress about making them look anatomically correct. Embrace the mess, laugh at the lopsided ones, and enjoy the process. That’s what homemade is all about.
FAQs & Troubleshooting Your Treats
Q: My treats turned out really hard and crunchy. What did I do wrong?
A: This almost always means the marshmallows were overheated. Remember, low heat is crucial! High heat cooks the marshmallows too aggressively, making them tough. Also, be sure to measure your cereal accurately—too much cereal will require more marshmallow to bind, leading to a drier, harder texture.
Q: My treats are too sticky and won’t hold their shape! Help!
A: This is usually caused by two things: not enough cereal or using too much liquid food colouring. If you find your mixture is too sticky to handle, you can gently work in a little more cereal, a quarter cup at a time, until it’s manageable. Next time, opt for gel food colouring for more pigment without the extra liquid.
Q: Can I make these ahead of time?
A: Absolutely! These are a great make-ahead snack. Once set, store them in a single layer in an airtight container at room temperature for up to 2 days. For longer storage (up to a week), you can wrap them individually in plastic wrap. They might lose a little softness over time but will still be delicious.
Q: My food colouring stained my hands and my pot. Any tips for cleanup?
A> Welcome to the club! Gel colours are notorious for this. For your hands, a paste made from baking soda and dish soap works wonders. For your saucepan, fill it with hot water and a squirt of dish soap and bring it to a boil. The hot water will melt away the stubborn marshmallow residue, making it much easier to scrub clean.
Marshmallow Rice Bubbles Halloween Brains
Description
These gooey, show-stopping treats are perfect for Halloween! Sweet, chewy, and just a little gross in the best way, they’re fun to make and even more fun to eat.
Ingredients
-
6 tablespoons (85 g) unsalted butter
-
6 cups regular marshmallows (or 1½ cups marshmallow fluff)
-
4 cups Rice Bubbles / Rice Krispies®
-
½ teaspoon salt
-
Red food colouring (gel preferred for vibrant color)
-
Optional for garnish/presentation: shredded coconut “zombie moss,” cocoa powder dusting, melted chocolate
Instructions
Step 1: Melt Butter
In a large saucepan over low heat, melt the butter gently. Avoid browning.
Step 2: Melt Marshmallows
Add marshmallows to the butter. Stir constantly over low heat until fully melted and smooth, about 5–7 minutes.
Step 3: Add Color & Salt
Remove from heat. Stir in salt and red food colouring, 4–5 drops gel (or 10–12 drops liquid). Adjust until a deep, “bloody” red is achieved.
Step 4: Fold in Cereal
Quickly add Rice Bubbles and fold gently until fully coated in the marshmallow mixture. Work quickly—mixture will start to set as it cools.
Step 5: Shape Brains
Butter your hands lightly. Grab about ½ cup of mixture and form into an oval mound. Place on a parchment-lined tray. Press a line down the center for hemispheres, then create squiggly lines with fingertips to mimic a brain. Repeat with remaining mixture.
Step 6: Set
Allow brains to cool and firm at room temperature for 20–30 minutes. Do not refrigerate.
Notes
-
Hard/Crunchy Brains: Marshmallows overheated or too much cereal—use low heat and measure accurately.
-
Sticky Brains: Too much liquid colouring or not enough cereal—add cereal gradually until manageable. Gel coloring is preferred.
-
Cleanup: Baking soda paste or boiling soapy water helps remove sticky marshmallow residue.
Nutrition
- Calories: 160 cal Per Serving
- Carbohydrates: 30 g
- Protein: 1 g
Nutritional Information (Approximate, Per Brain)
Calories: 160 | Protein: 1g | Carbohydrates: 30g | Fat: 5g
Please note: This is an estimate based on the specific ingredients I used. Values can vary depending on your brands.
**Prep Time:** 10 minutes | **Cook Time:** 10 minutes | **Setting Time:** 20 minutes | **Total Time:** 40 minutes | **Servings:** 12 brains
Final Thoughts: Embrace the Spooky, Silly Fun
And that’s it! You’ve just created the ultimate edible Halloween spectacle. I hope your hands are delightfully sticky and your kitchen is filled with the sound of laughter (and maybe a few spooky sound effects).
Remember, these treats aren’t about achieving a perfect, anatomical replica of a brain. They’re about the joy of creating something wonderfully weird together. The lopsided brain has just as much character as the “perfect” one, and I promise it will taste just as delicious.
So, gather your little monsters, put on a classic horror movie, and enjoy the process. These gooey, creepy, and incredibly fun brains are more than just a snack—they’re a memory in the making.


