The Viral Comfort Food Mashup That’s Cheating on Dinner (And We Love It)
Hello, my fellow flavor-chasers! Olivia here, apron slightly dusted with flour and heart full of excitement. Have you ever scrolled through your feed, seen a recipe, and just known you had to make it immediately? That was me the first time I saw Mac & Cheese Stuffed Chicken Breast. I mean, come on. It’s like two of the greatest comfort foods of all time looked at each other, fell madly in love, and decided to create the most indulgent, cozy, and downright show-stopping offspring imaginable.
This dish isn’t just dinner; it’s an experience. It’s the culinary equivalent of wearing your favorite oversized sweater on a rainy day. We’re talking juicy, perfectly seasoned chicken giving a warm hug to a pocket of the creamiest, cheesiest macaroni you’ve ever had, all baked until it’s golden and bubbling with joy. It’s rich, it’s a little over-the-top, and it is unapologetically delicious.
I know what you might be thinking: “Olivia, that sounds complicated!” But trust me, my friend. If you can make a box of mac and cheese (no judgment, we’ve all been there) and sear a piece of chicken, you are 100% equipped to create this masterpiece. My goal today is to walk you through every single step, share all my messy-kitchen-learned secrets, and help you create a meal that will have everyone at your table asking, “Wait, you MADE this?!” So, let’s preheat that oven, grab our favorite wooden spoon, and dive into this glorious, viral-worthy creation together. Get ready for some serious flavor magic.
Why This Dish Feels Like a Hug on a Plate
This recipe takes me straight back to my grandma’s linoleum-floored kitchen. Sundays were for big, noisy family dinners, and without fail, there were two constants: a massive tray of her baked macaroni and cheese with that irresistible buttery crumb topping, and a platter of simple, beautifully roasted chicken. As a kid, I’d always—always—smash a bit of chicken onto my fork with a gooey scoop of mac and cheese. To me, it was the only logical way to eat.
Years later, when I first saw the concept of stuffing one inside the other, I laughed out loud. It wasn’t just a clever internet trend; it was my childhood food logic, all grown up and stuffed into a single, glorious package. Making this dish for the first time felt like a fun, delicious rebellion. It was me saying, “Yes, we can have our cozy favorites all in one bite, and yes, it is going to be amazing.” It’s that spirit of playful, heartfelt cooking that I absolutely live for. Every time I make it, I think of those Sunday dinners and get to create that same feeling of abundant, joyful comfort for my own family and friends. Food memories are the best kind of nostalgia, aren’t they?
Gathering Your Flavor Players
Here’s everything you’ll need to bring this cheesy dream to life. I’ve broken it down into the chicken team and the mac & cheese filling dream team. Don’t just grab and go—read my little notes! Knowing your ingredients is the first step to cooking with confidence.
For the Chicken:
- 4 boneless, skinless chicken breasts: Look for ones that are roughly the same size and thickness (about 6-8 oz each) for even cooking. Pro Tip: If yours are wildly thick, you can gently pound them to an even ½-inch thickness, which also makes stuffing easier!
- Salt and pepper, to taste: The foundational flavor. Don’t be shy here—season well!
- 1 tablespoon olive oil: For that beautiful, golden sear. Avocado oil works great too for its high smoke point.
- 1/2 teaspoon garlic powder: Adds a deep, savory note that permeates the chicken perfectly.
- 1/2 teaspoon smoked paprika: This is my secret weapon. It gives a subtle smokiness and gorgeous color. Regular paprika works if that’s what you have!
For the Mac & Cheese Filling:
- 1 cup cooked elbow macaroni: Cook it al dente (a minute or two less than package directions)! It will continue to cook inside the chicken, and we don’t want mushy mac.
- 1/2 cup shredded sharp cheddar cheese: Sharp cheddar has the flavor punch. For the love of all things cheesy, shred it yourself from a block! Pre-shredded cheese has anti-caking agents that can make your sauce less smooth.
- 2 tablespoons cream cheese, softened: The magic ingredient for ultra-creaminess and stability. Let it sit out for 30 minutes before using.
- 2 tablespoons milk or half-and-half: A splash to bring the filling together. Half-and-half makes it extra luxe.
- Optional: A pinch of cayenne or ¼ tsp mustard powder: Highly recommended! Just a tiny bit adds a fantastic background note that cuts the richness and makes the cheese flavor pop.
Let’s Build Some Deliciousness: Step-by-Step
Okay, team! Here we go. I’ll guide you through each step with all the tips I’ve learned from (many) trials and (very tasty) errors. Read through once before you start—it’s like having a game plan for dinnertime victory.
- Preheat & Prep: First things first, get that oven roaring to 375°F (190°C). This ensures it’s perfectly hot when our chicken is ready for its bake. While it heats, cook your macaroni to al dente, drain it, and let it cool slightly in the bowl you’ll mix everything in.
- Make the Filling: To your slightly warm macaroni, add the shredded cheddar, softened cream cheese, milk, and your optional flavor boost (cayenne/mustard powder). Mix, mix, mix until it’s a cohesive, creamy, cheesy wonder. Taste it (chef’s privilege!) and adjust salt if needed. Set this aside. Chef Hack: If the cream cheese is being stubborn, pop the bowl in the microwave for 10 seconds to really help it blend in seamlessly.
- Prepare the Chicken: Pat your chicken breasts completely dry with paper towels. This is CRUCIAL for a good sear. Place one breast on your cutting board. Using a small, sharp paring knife, slice a deep pocket into the thickest side. Imagine you’re creating a little canoe. Hold the knife parallel to the board and cut horizontally, stopping about ½ inch from the opposite edge so you don’t cut all the way through. Repeat for all breasts. Now, season the outside of each one generously with salt, pepper, garlic powder, and smoked paprika. Rub those spices in with your fingers—get friendly with it!
- The Fun Part: Stuffing! Take a generous spoonful of your mac and cheese filling and gently stuff it into each chicken pocket. Don’t overfill! You want to be able to close it without too much spillage. If the filling peeks out a bit, that’s okay. If your pocket feels like it’s gaping open, you can use a couple of toothpicks to sew it shut. It’s like giving your chicken a little culinary stitch!
- Sear for Golden Glory: Heat the olive oil in a large, oven-safe skillet (cast iron is a star here) over medium-high heat. Once the oil is shimmering, carefully add the stuffed chicken breasts. Don’t crowd the pan—work in batches if needed. Let them sear, undisturbed, for 2-3 minutes per side, until you get that beautiful, golden-brown crust. This step isn’t just for looks; it builds incredible flavor.
- Bake to Perfection: Once all sides are seared, if you worked in batches, nestle all the chicken back into the skillet. Immediately transfer the whole skillet to your preheated oven. Bake for 15-20 minutes, until the chicken is cooked through (its internal temperature should reach 165°F when inserted into the chicken meat, not just the filling).
- The Most Important Step: Rest! Carefully remove the skillet from the oven (HANDLE IS HOT!). Using tongs, transfer the chicken to a clean plate or cutting board. Let it rest for a full 5-7 minutes. I know it’s hard to wait, but this lets the juices redistribute, ensuring every bite is moist and perfect. Then, remove the toothpicks if you used them, and get ready to serve up some pure happiness.
Plating Your Masterpiece
Presentation is the final flourish! I love slicing one of the breasts in half on a slight diagonal to reveal that gorgeous, cheesy center—it’s the ultimate “wow” moment for your guests. Plate it alongside something fresh and green to balance the richness: a simple arugula salad with lemon vinaigrette, roasted asparagus, or garlicky sautéed green beans. A final sprinkle of fresh chopped parsley or chives adds a pop of color and freshness. Don’t forget to spoon any of those delicious cheesy bits that may have escaped from the skillet right over the top!
Make It Your Own: Fun Twists & Swaps
Once you’ve mastered the classic, the playground is open! Here are a few ways to riff on this viral hit:
- Buffalo Blue Cheese: Add 2 tbsp of buffalo sauce to the mac filling and use a mix of cheddar and crumbled blue cheese. Divine!
- Tex-Mex Fiesta: Mix in 2 tbsp of diced green chiles, use a pepper jack cheese blend, and add a teaspoon of taco seasoning to the chicken rub. Serve with salsa and avocado.
- Spring Veggie & Goat Cheese: Fold in ¼ cup of thawed frozen peas and chopped spinach to the filling and swap cheddar for creamy goat cheese. Lighter but so flavorful.
- Gluten-Free/Pasta Swap: Use your favorite gluten-free pasta or even substitute with cooked cauliflower rice for a lower-carb version (squeeze out excess moisture!).
- Bacon & Caramelized Onion: Because bacon makes everything better. Fold 2-3 tbsp of cooked, crumbled bacon and 2 tbsp of caramelized onions into the filling.
From My Kitchen to Yours: Olivia’s Notes
This recipe has become a legendary request in my house, especially when I need to bribe my nephew to help with yard work! The first time I made it, I was so worried about the filling leaking that I under-stuffed them. Lesson learned: be brave and generous with that mac and cheese! The sear creates a nice seal, and even if a little oozes out, it just becomes a bonus crispy cheese bit in the pan—which, let’s be real, is the cook’s treat.
Over time, I’ve found that letting the stuffed chicken sit at room temperature for 10-15 minutes before searing helps it cook more evenly from fridge-cold to oven-hot. And if you’re really pressed for time, using a high-quality store-bought mac and cheese from the deli section as your filling base is a totally legit shortcut. I won’t tell a soul. The spirit of this dish is all about joy, not stress.
Your Questions, Answered!
Q: My filling keeps leaking out while baking! What am I doing wrong?
A: A little leakage is normal and delicious! To minimize it, make sure you’re not overfilling the pocket, and ensure your sear is nice and firm on all sides to create a “seal.” Using cream cheese and letting the mac cool a bit helps the filling set up, too. If it’s a major issue, you can wrap the outside of the breast loosely in a half-slice of prosciutto or a strip of bacon before searing—it acts as a delicious edible bandage!
Q: How can I tell if the chicken is done without cutting into it and losing all the cheese?
A> A good instant-read thermometer is your best friend here! Insert it into the thickest part of the chicken meat (try to avoid pushing it straight into the filling). Once it reads 165°F, you’re good to go. The carryover heat during resting will take it a few degrees higher, perfectly pasteurized and juicy.
Q: Can I make this ahead of time?
A> You can absolutely prep ahead! Stuff the chicken breasts, secure them with toothpicks, cover tightly, and refrigerate for up to 4 hours before you’re ready to sear and bake. Let them sit out for 15-20 minutes before cooking to take the chill off. I don’t recommend freezing them stuffed, as the pasta texture can suffer.
Q: My chicken breast turned out dry, but the filling was perfect. Help!
A> This usually means the chicken was baked a tad too long. Chicken breasts can vary in thickness. Next time, try pounding them to an even thickness for uniform cooking. Also, investing in that thermometer is key—pull it at 165°F, not a degree more! Finally, that resting period is non-negotiable for juicy results.
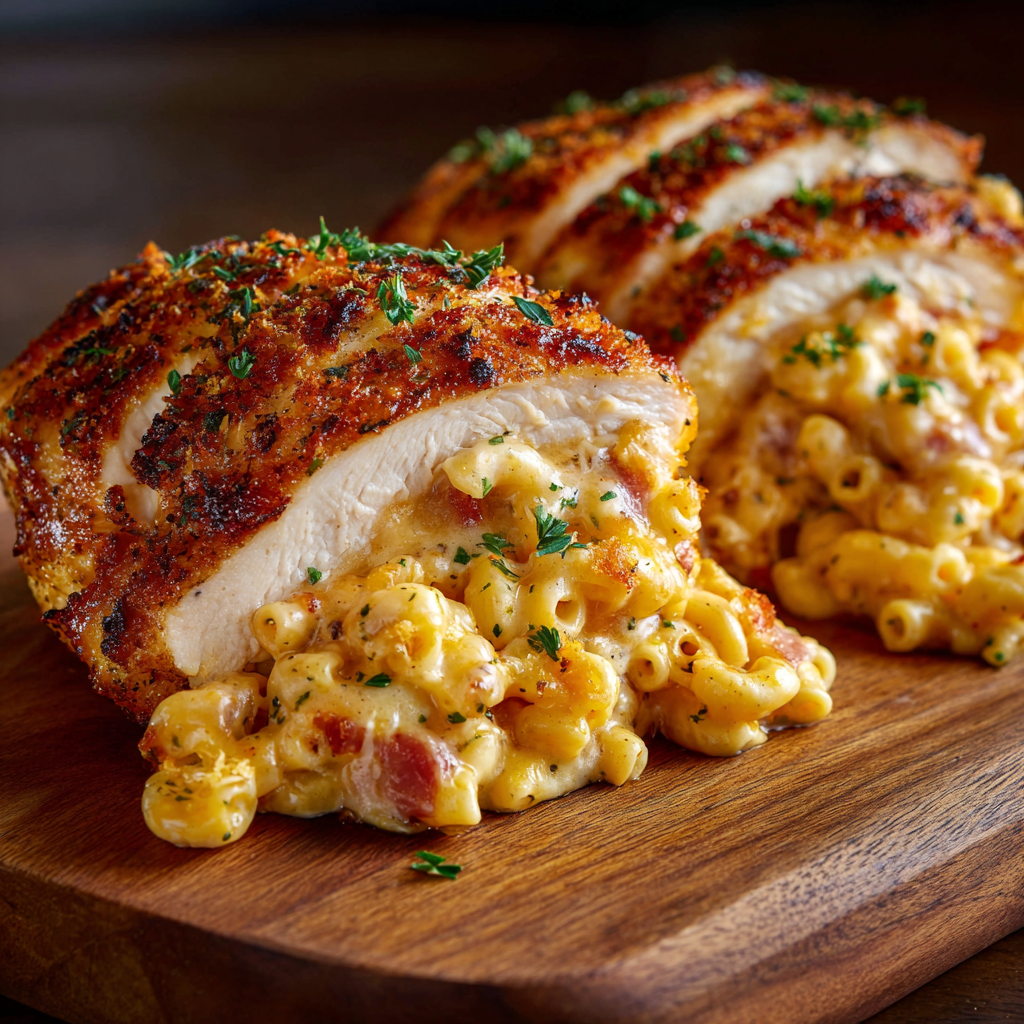
Mac & Cheese Stuffed Chicken Breast : Viral, Cheesy, and Over-the-Top Delicious
Description
This recipe is all about joy in every bite. Tender chicken breasts cradle a creamy, cheesy mac & cheese filling, seared to golden perfection and baked until bubbling. It’s playful, cozy, and guaranteed to wow anyone at your table.
Ingredients
For the Chicken:
-
4 boneless, skinless chicken breasts (~6–8 oz each)
-
Salt and pepper, to taste
-
1 tbsp olive oil (or avocado oil)
-
½ tsp garlic powder
-
½ tsp smoked paprika (or regular paprika)
For the Mac & Cheese Filling:
-
1 cup cooked elbow macaroni (al dente)
-
½ cup shredded sharp cheddar cheese
-
2 tbsp cream cheese, softened
-
2 tbsp milk or half-and-half
-
Optional: pinch of cayenne or ¼ tsp mustard powder
Instructions
Step 1: Preheat & Prep
-
Preheat oven to 375°F (190°C).
-
Cook macaroni al dente, drain, and let cool slightly.
Step 2: Make the Filling
-
In the macaroni bowl, combine cheddar, cream cheese, milk, and optional spices.
-
Mix until creamy and smooth. Microwave 10 seconds if needed to help blend.
Step 3: Prepare the Chicken
-
Pat chicken dry. Using a small knife, create a horizontal pocket in each breast, leaving about ½-inch uncut.
-
Season outside with salt, pepper, garlic powder, and smoked paprika.
Step 4: Stuff the Chicken
-
Spoon mac & cheese filling into each pocket, being careful not to overfill.
-
Use toothpicks if needed to secure the opening.
Step 5: Sear for Flavor
-
Heat olive oil in a large oven-safe skillet over medium-high heat.
-
Sear chicken 2–3 minutes per side until golden.
Step 6: Bake to Perfection
-
Transfer skillet to preheated oven.
-
Bake 15–20 minutes, until chicken reaches 165°F internally.
Step 7: Rest & Serve
-
Let chicken rest 5–7 minutes.
-
Remove toothpicks, slice on a diagonal to reveal gooey filling, and serve.
Notes
-
Prevent leakage: Don’t overstuff and sear well to seal.
-
Check doneness: Use an instant-read thermometer; 165°F is perfect.
-
Prep ahead: Stuffed chicken can be refrigerated up to 4 hours before cooking.
-
Juicy chicken: Pound breasts to uniform thickness and rest after baking.
Nutritional Information*
Per Serving (1 stuffed breast): Calories: ~560 | Protein: 44g | Fat: 30g | Carbohydrates: 22g | Fiber: 1g | Sugar: 2g
*This is an approximate estimate calculated using the specific ingredients listed. Values can vary based on exact ingredients, brands, and portion sizes used.
Final Thoughts
And just like that, you’ve turned two humble classics into one extraordinary meal. This dish is more than just a viral sensation; it’s a passport back to those simple, comforting flavors we all hold dear, repackaged with a little extra love and creativity. I hope that with every golden, cheesy bite, you feel that same sense of abundant joy I did at my grandma’s table. Don’t be afraid to play, to stuff with gusto, and to make it your own. After all, the best recipes are the ones that weave a little bit of your own story into every layer. Now, go enjoy that well-deserved culinary hug.