Loaded Nachos Supreme – The Best Layered Nacho Recipe for Game Day
The Snack That Brings Everyone to the Table
Hey friends, Olivia here! Can you smell it? That incredible, mouth-watering aroma of seasoned beef sizzling in a pan, the sharp scent of jalapeños, and the unmistakable promise of melted cheese about to hit a hot tray of crispy tortilla chips. If there’s one sound that signals a good time in my house, it’s the collective cheer when I walk out of the kitchen carrying a huge, dangerously loaded sheet pan of Nachos Supreme.
This isn’t just a snack; it’s an event. It’s the centerpiece of game day, the hero of movie night, and the easiest way I know to turn a regular Tuesday into a fiesta. We’re not just throwing some cheese on chips and calling it a day. Oh no. We’re building. We’re creating layers of flavor and texture that ensure every single chip, from the cheesy ones on top to the perfectly sauced ones hiding in the middle, is a little piece of heaven.
I believe that the best recipes are the ones that get your hands a little messy and bring people together, leaning over the table to grab that one perfect chip loaded with all the goods. This Loaded Nachos Supreme recipe is exactly that. It’s customizable, it’s forgiving, and it’s guaranteed to make you the most popular person in the room. So, preheat your ovens, grab your biggest sheet pan, and let’s make some magic happen!
My First Fumble: A Nacho Story
I have to take you back to my very first attempt at “gourmet” nachos. I was in college, hosting a small get-together for the big game. I was so proud of my giant bag of chips and block of cheese. I confidently piled all the chips onto a plate, dumped the cheese on one spot in the middle, and nuked it. You can probably imagine the result: a sad, soggy pile of chips in the center with a rock-hard, unmelted block of cheddar, surrounded by a moat of completely bare, lonely chips around the edges. My friends were kind, but it was a culinary tragedy.
That disaster taught me the most important lesson in nacho-making: layer with intention! It’s not about piling; it’s about distributing. Every single chip deserves a chance to be amazing. This recipe is the glorious, delicious result of years of perfecting that art. It’s my love letter to that ambitious college cook, and my gift to you, so you can skip the sad nacho phase and go straight to legendary host status.
Gathering Your Flavor All-Stars
Here’s everything you’ll need to build your ultimate nacho platter. Don’t be shy about substitutions—this is your canvas!
- 1 large bag (12-13 oz) Tortilla Chips: I’m a big fan of a sturdy, restaurant-style chip here. They hold up to all the toppings without turning to mush. Chef’s Insight: If you’re feeling adventurous, a mix of yellow corn and blue corn chips looks gorgeous!
- 1 lb Ground Beef (or Pulled Pork): This is your flavor foundation. I use 80/20 ground beef for the best taste, but leaner works too. Substitution Tip: For a fantastic twist, use shredded chicken tossed in taco seasoning or even seasoned lentils for a plant-based win.
- 1 packet Taco Seasoning (or 2 tbsp Homemade Mix): The quick flavor bomb. My homemade mix is just chili powder, cumin, garlic powder, onion powder, paprika, and a pinch of salt and pepper. It’s worth the extra 60 seconds!
- 1 cup Canned Black Beans, drained and rinsed: They add a wonderful, creamy texture and a boost of fiber. Chef’s Insight: Rinsing them gets rid of that thick canning liquid and lets the other flavors shine.
- 2 cups Shredded Mexican Blend Cheese: The glue that holds our masterpiece together! I love the blend for its perfect meltability. Pro Hack: For the absolute best melt, shred your own cheese from a block. The pre-shredded stuff has anti-caking agents that can make it a bit grainy.
- ½ cup Sliced Pickled Jalapeños: They bring the tangy heat! Substitution Tip: For fresh heat, use sliced fresh jalapeños. For no heat at all, pickled banana peppers are a great alternative.
- ½ cup Sour Cream: The cool, creamy contrast to all the bold flavors. Substitution Tip: Greek yogurt works beautifully for a tangier, protein-packed option.
- ¼ cup Chopped Fresh Cilantro: That fresh, herbal pop at the end. If you’re one of those folks who thinks cilantro tastes like soap, just skip it—parsley is a fine, non-controversial substitute.
- ½ cup Diced Tomatoes or Salsa: A bit of juicy freshness. I like using fresh diced Roma tomatoes because they’re less watery, but a chunky pico de gallo is perfection.
- ¼ cup Chopped Green Onions: For a mild, oniony crunch and a gorgeous pop of green color.
Building Your Nacho Masterpiece, Step-by-Step
Okay, team! This is where the fun begins. Follow these steps, and you will achieve nacho nirvana. I promise.
- Prepare the Meat: Grab a large skillet and place it over medium-high heat. Add your ground beef and cook it, breaking it up with a wooden spoon, until it’s beautifully browned and no pink remains. This should take about 6-8 minutes. Now, here’s a key step: drain off the excess fat. This keeps your nachos from getting greasy. Return the skillet to the heat, sprinkle in your taco seasoning, and add a splash of water (about ¼ cup). Let it simmer for 2-3 minutes until the sauce thickens and coats the meat. Your kitchen should smell incredible right now. Chef’s Hack: If you’re using pulled pork, just warm it up in a skillet with a few tablespoons of your favorite BBQ sauce or a sprinkle of taco seasoning.
- Preheat & Layer the Nachos: While the meat is cooking, preheat your oven to 375°F (190°C). This is the perfect temperature for melting cheese without burning the chips. Now, take your largest, most trusty sheet pan. This is the most important step: LAYER! Spread half of the tortilla chips in an even layer on the pan. Don’t overcrowd them. Now, sprinkle half of your seasoned meat, half of the black beans, half of the cheese, and half of the jalapeños over this first layer of chips. Then, repeat! Add the rest of the chips and top with the remaining meat, beans, cheese, and jalapeños. This double-decker method ensures that every single chip gets some love and avoids the dreaded “naked chip” syndrome.
- Bake to Bubbly Perfection: Carefully slide your meticulously crafted nacho tower into the preheated oven. Bake for 10-12 minutes. You’re looking for the cheese to be completely melted, bubbly, and maybe even just starting to get those gorgeous golden-brown spots. Watch it closely! Ovens can vary, and nobody wants burnt chips.
- The Grand Finale: Top & Serve: Put on your oven mitts and carefully remove the sheet pan. Behold! Your masterpiece. Now, immediately and artfully, dollop the sour cream, scatter the fresh diced tomatoes, sprinkle the green onions, and shower it with the chopped cilantro. Chef’s Tip: I always add these fresh toppings after baking. This keeps the sour cream cool, the tomatoes fresh, and the cilantro bright and green. It’s all about that contrast!
How to Serve These Loaded Nachos Supreme
Presentation is part of the fun! I like to place the entire sheet pan right in the middle of the table on a trivet, with a stack of small plates and a bunch of napkins nearby. This is finger food at its finest, and it’s meant to be a communal, shareable experience. For a more plated look, you can use a large serving platter, but honestly, the rustic, “dig in” vibe of the sheet pan is part of the charm. Don’t forget the margaritas, ice-cold beers, or a big pitcher of agua fresca to wash it all down!
Get Creative! Nacho Variations
This recipe is your playground. Here are a few of my favorite ways to mix it up:
- Fully Loaded Fiesta: Add a layer of guacamole or fresh avocado slices right before serving. A drizzle of zesty lime crema (just mix sour cream with lime juice and a pinch of salt) takes it over the top.
- BBQ Pulled Pork Bliss: Swap the taco-seasoned beef for saucy, slow-cooked pulled pork. Use a Monterey Jack cheese and swap the black beans for corn kernels.
- Queso-Style Pour Over: Instead of shredded cheese, warm up a batch of your favorite homemade or high-quality store-bought queso dip. Bake the nachos with just the meat and beans, then pour the hot queso over the top before adding the fresh toppings.
- Breakfast Nachos: Yes, really! Use scrambled eggs and crumbled breakfast sausage as your base. Top with cheese, bake, and then finish with diced avocado and a drizzle of hot sauce.
- Fully Loaded Veggie: Skip the meat and add more black beans, corn, sautéed bell peppers and onions, and sliced olives for a vibrant vegetarian feast.
Olivia’s Chef Notes & Kitchen Confessions
This recipe has been my go-to for so many years, and it’s evolved in the best ways. I used to be a “chuck everything on at once” person, but I’ve learned that patience in layering is everything. One of my funniest kitchen memories involves making these for my husband’s birthday. I was so focused on the perfect layers that I didn’t notice our dog, Buddy, quietly pulling a chip from the very edge of the counter, starting a slow-motion avalanche that sent a quarter of the unbaked nachos onto the floor. We salvaged the rest, and it’s now known as the “Buddy Batch.”
The beauty of this dish is its flexibility. It’s a reflection of your mood and your pantry. Don’t have black beans? Use pinto. Out of jalapeños? A dash of hot sauce works. Make it yours! The only non-negotiable rule is to serve them immediately. Nachos wait for no one.
Nacho FAQs: Your Questions, Answered!
I’ve gotten a lot of questions about this recipe over the years. Here are the big ones!
- Why are my nachos soggy? Sogginess is the enemy of good nachos! It usually comes from two things: 1) Overloading with wet toppings (like salsa) before baking. Keep the wet stuff for after. 2) Steaming. Make sure you’re baking at a high enough heat (375°F is perfect) and spreading your chips in a single layer so the heat can circulate and the cheese can melt quickly, without steaming the chips into submission.
- Can I make any part of this ahead of time? Absolutely! You can cook and season the meat up to two days in advance and keep it in the fridge. You can also chop all your fresh toppings ahead of time. But the actual assembling and baking should be done right before you serve them for the best texture.
- What’s the best cheese for melting? My go-to is a pre-blended Mexican cheese, but if you’re shredding your own, a combination of Monterey Jack (incredible melt) and a bit of sharp cheddar (for flavor) is unbeatable. Avoid cheeses that are oily or don’t melt well, like cotija or feta, for the base layer—save those for a garnish!
- My cheese isn’t melting evenly. Help! This is almost always a shredding issue! Pre-shredded bagged cheese is coated to prevent clumping, which also prevents it from melting into a smooth, creamy pool. For the ultimate, velvety cheese melt, buy a block and shred it yourself. It makes a world of difference.
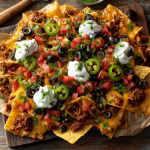
Loaded Nachos Supreme : Ultimate Game Day Snack
Description
Hey friends, Olivia here! Can you smell it? That irresistible aroma of seasoned beef sizzling away, the tang of jalapeños, and the glorious promise of cheese melting its way across a hot tray of tortilla chips. In my house, nothing gets people cheering faster than when I walk into the room carrying a giant, dangerously loaded sheet pan of Nachos Supreme.
Ingredients
-
1 large bag (12–13 oz) tortilla chips
Sturdy, restaurant-style chips hold up best.
Chef’s Insight: Mix yellow and blue corn chips for color contrast! -
1 lb ground beef (or pulled pork, shredded chicken, or seasoned lentils)
This is your flavor foundation. -
1 packet taco seasoning
Or 2 Tbsp homemade mix: chili powder, cumin, onion powder, garlic powder, paprika, salt & pepper. -
1 cup canned black beans, drained and rinsed
-
2 cups shredded Mexican blend cheese
Pro Tip: Shredding from a block melts smoother than pre-shredded. -
½ cup pickled jalapeños
Sub with fresh jalapeños or pickled banana peppers. -
½ cup sour cream
Or Greek yogurt for a tangier twist. -
¼ cup chopped fresh cilantro
Or parsley for cilantro-haters. -
½ cup diced tomatoes or salsa
Roma tomatoes work best—they’re less watery. -
¼ cup chopped green onions
Instructions
1. Cook the Meat
Brown the ground beef in a large skillet over medium-high heat (6–8 minutes). Drain excess fat. Return to heat, sprinkle in taco seasoning, and add about ¼ cup water. Simmer 2–3 minutes until saucy and fragrant.
Using pulled pork? Warm it in a skillet with a spoonful of BBQ sauce or taco seasoning.
2. Preheat & Layer
Preheat oven to 375°F (190°C).
Spread half the chips onto a large sheet pan. Top with half the beef, half the beans, half the cheese, and half the jalapeños.
Repeat with remaining ingredients to create a glorious second layer.
This double-layer method prevents the dreaded naked chip.
3. Bake
Bake for 10–12 minutes until the cheese is fully melted and bubbly with a few golden spots. Keep an eye on it—nobody wants burnt chips.
4. The Fresh Finish
Remove from oven and immediately add:
-
dollops of sour cream
-
diced tomatoes or pico
-
green onions
-
fresh cilantro
This keeps everything bright, cool, and crisp.
How to Serve
Honestly? I put the whole sheet pan right in the middle of the table. Nachos are meant to be shared, grabbed, and devoured.
Add plates, napkins, and your favorite drinks—margaritas, agua fresca, or ice-cold sodas.
Notes
My layers used to be chaotic, but once I learned to slow down and build intentionally, every batch became a masterpiece. My funniest memory? Making these for my husband’s birthday and watching our dog Buddy swipe a chip from the edge of the counter, causing a small nacho avalanche. We still call it the “Buddy Batch.”
Nachos are flexible. Out of beans? Use corn. No jalapeños? Use hot sauce. Make it yours.
The only rule?
Nutritional Information (Approximate)
Let’s be real, we’re not eating nachos for their diet properties, but it’s still good to know! This is a rough estimate per serving (assuming 8 servings), and will vary based on your specific ingredients and toppings.
- Calories: 390
- Protein: 20g
- Fat: 22g
- Carbohydrates: 28g
- Fiber: 4g
- Sodium: 650mg
There you have it, my friends! My ultimate, foolproof, always-a-hit Loaded Nachos Supreme recipe. I hope it brings as much joy and messy-fingered fun to your table as it has to mine. Now go forth and build the nachos of your dreams! And don’t forget to tag me on social media with your creations—I love seeing your kitchen wins!
Final Thoughts: More Than Just Nachos
If there’s one thing I hope you take away from this recipe, it’s that great food is about more than ingredients—it’s about intention, joy, and sharing something you’ve made with love. These Loaded Nachos Supreme aren’t just a dish; they’re an invitation. An invitation to gather, to laugh, to cheer, and to pass a sheet pan down the table while everyone searches for their perfect chip.
This recipe was born from a kitchen fumble, perfected through years of game days, casual dinners, and “just because” moments. It’s forgiving, flexible, and designed to make you feel like a hero—no fancy skills required. Whether you stick to the classic build or go wild with your own variations, the magic is in the layering, the melting, and the moment you set it down in front of your favorite people.
So here’s to the messy fingers, the melted cheese stretches, and the satisfied silence that falls when everyone digs in. Thank you for letting me share my kitchen stories and this recipe with you. Now, it’s your turn. Own it, adapt it, and make it yours.
Wishing you many delicious moments together,
Olivia
With love and a fully loaded sheet pan