Is there anything more magical than a slice of perfect Angel Food Cake? I’m talking about a cake so light, so cloud-soft, and so ethereally sweet that it practically dissolves on your tongue in a whisper of vanilla and almond. It’s the dessert equivalent of a happy sigh. If you’ve ever been intimidated by the idea of making one from scratch, let me be the first to tell you: you can absolutely do this, and the reward is one of the most satisfying baking experiences ever.
This isn’t just a cake; it’s a masterpiece of air and intention. We’re building a skyscraper out of egg whites, and it’s a project I cannot wait to guide you through. Forget dense, store-bought versions that taste like sweet foam. We’re creating a homemade wonder—a golden-crusted, tender-crumbed beauty that’s fat-free, but full of soul. So, tie on that apron (messy or not!), and let’s whip up some pure, unadulterated joy.
The Cake That Taught Me to Be Brave
My first attempt at angel food cake was… a learning experience. I was about fourteen, feeling wildly ambitious in my grandmother’s sun-drenched kitchen. I’d watched her make it a dozen times, her hands moving with a quiet confidence as she folded the snowy batter. That day, I was on my own. I meticulously separated a dozen eggs, my heart pounding with each crack, terrified a speck of yolk would sabotage the whole operation. I beat those egg whites until my arm ached, convinced I was moments away from stiff peaks. But in my youthful haste, I dumped all the flour in at once. The result was a sad, dense little cake that barely rose an inch. I was devastated.
But my grandma just smiled, sliced the “cake” into chunks, layered it with berries and whipped cream in fancy glasses, and called it “Angel Food Trifle.” It was a hit. She taught me that day that even kitchen “flops” can be delicious, and that the real magic isn’t perfection—it’s the love and the lesson in the attempt. Now, every time I bake this cake, I think of her, and I fold with a little more patience and a whole lot of heart.
Gathering Your Cloud-Making Ingredients
This recipe is beautifully simple, but each ingredient plays a critical role in creating that iconic airy texture. Here’s the rundown:
- 1½ cups egg whites (about 10–12 large eggs): This is our foundation! Make sure they are at room temperature—this is non-negotiable for maximum volume. Separate them carefully; even a tiny bit of yolk can hinder whipping. Chef’s Insight: Save those yolks for homemade custard, pasta, or rich ice cream!
- 1½ cups powdered sugar: We sift this with the flour to create an ultra-fine, lump-free dry mix that integrates gently into our delicate egg whites.
- 1 cup all-purpose flour: Provides the gentle structure for our airy cloud. Substitution Tip: For a slightly more delicate crumb, you can swap in cake flour, but all-purpose works beautifully.
- 1 teaspoon cream of tartar: This is our secret weapon! It stabilizes the egg whites, making them less likely to collapse and ensuring they reach those glorious, stiff peaks. Substitution Tip: In a pinch, you can use an equal amount of fresh lemon juice or white vinegar.
- ¼ teaspoon salt: A tiny amount to balance the sweetness and make the flavors pop.
- 1 teaspoon vanilla extract: The classic warm flavor we all know and love. Use the good stuff—it makes a difference!
- ½ teaspoon almond extract: This is my favorite little hack. It doesn’t make the cake taste strongly of almond, but it adds a incredible depth of flavor that makes people say, “Wow, what is that?” It tastes like nostalgia.
- ¼ cup granulated sugar: We add this gradually to the whipped egg whites to help build a stable, glossy meringue.
Step-by-Step: Building Your Edible Cloud
Ready for the fun part? Let’s transform these simple ingredients into a masterpiece. Read through all the steps first, and remember: confidence is your best ingredient!
- Preheat and Prep: Preheat your oven to 350°F (175°C). Now, here’s a crucial step: DO NOT grease your tube pan. Angel food cake needs to climb the sides of the pan to rise properly. A greased pan will send it sliding right back down. Just make sure your 10-inch tube pan is spotlessly clean and dry. Chef’s Hack: If your pan has little feet, fantastic! If not, you’ll cool the cake upside down by inverting the pan over the neck of a bottle.
- The Dry Team: In a medium bowl, sift together the powdered sugar and flour. I know sifting can feel like an extra step, but trust me, it’s essential for that feather-light texture. Sift it once, then sift it again. This aerates the mixture and ensures there are no lumps to deflate our beautiful egg whites later. Set this aside.
- Whipping the Whites – Stage 1: Foamy: In a large, impeccably clean and grease-free bowl, add your room-temperature egg whites. Using a hand mixer or stand mixer with the whisk attachment, beat on medium speed until the egg whites are foamy and look like the head on a bubble bath. This takes about a minute.
- Whipping the Whites – Stage 2: Soft Peaks: Now, add the cream of tartar and salt. Continue beating on medium speed. You’ll see the transformation begin! The bubbles will get smaller and the mixture will turn white and opaque. When you lift the beaters, the peaks should form but then gently curl over at the tips. That’s your “soft peak” stage.
- Whipping the Whites – Stage 3: Stiff Peaks: Keeping the mixer on medium speed, now begin adding the granulated sugar, just one tablespoon at a time. Let each tablespoon incorporate before adding the next. This slow addition helps dissolve the sugar and build a strong, stable meringue. Once all the sugar is in, keep beating until the peaks are stiff and glossy. When you lift the beaters, the peaks should stand straight up without drooping. Chef’s Tip: Be patient here! Rushing can lead to over-beating, which makes the whites grainy. You should be able to turn the bowl upside down over your head (the ultimate test of bravery!) without the meringue moving.
- Flavor and Fold: Add the vanilla and almond extracts to the meringue. Now, for the most delicate part: incorporating the dry ingredients. Sprinkle about a quarter of the flour-sugar mixture over the top of the meringue. Using a large rubber spatula, gently fold it in. Cut down through the center of the bowl, slide along the bottom, and fold up and over the top. Turn the bowl a quarter turn and repeat. Continue adding the dry ingredients in three more additions, folding just until no white streaks remain. Do not stir or mix vigorously! We are preserving all those precious air bubbles.
- Pan and Bake: Gently spoon the billowy, white batter into your ungreased tube pan. Use a spatula to smooth the top. Give the pan a few gentle taps on the counter to release any large air bubbles. Place it in the preheated oven and bake for 35-40 minutes. It’s done when the top is a deep golden brown and the crust feels firm and springy to the touch. A toothpick inserted should come out clean.
- The Upside-Down Cool: This is the final, critical step! As soon as the cake comes out of the oven, immediately invert the pan. If it has feet, rest it on them. If not, carefully slide the center tube over the neck of a glass bottle or a heavy bottle. Let it hang there, completely undisturbed, for at least one hour. This prevents the cake from collapsing under its own weight as it cools. I know it’s hard to wait, but it’s worth it!
- The Grand Reveal: After the cake is completely cool, run a long, thin knife or a flexible offset spatula around the edges of the pan, including the center tube. Gently push the bottom of the pan up and out to release the cake. Slice with a serrated knife using a gentle sawing motion for clean, beautiful slices.
Serving Your Slice of Heaven
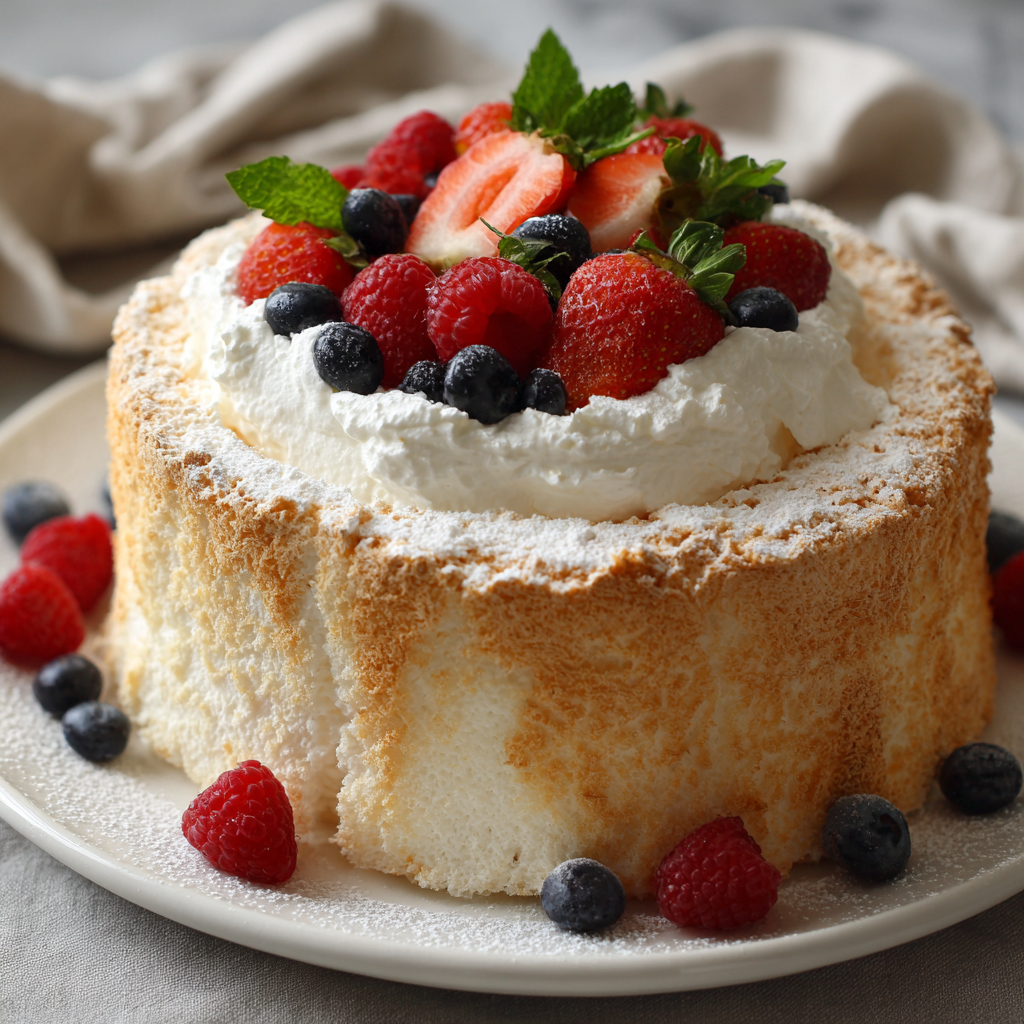
The beauty of this cake is its versatility. It’s sublime all on its own, but it also loves to be dressed up! For a classic presentation, place a slice on a vintage plate and dust it generously with powdered sugar. In the summer, I adore it with a mound of macerated strawberries and their ruby-red juices pooling around the plate. A dollop of freshly whipped cream is never a bad idea. For a truly show-stopping dessert, layer slices with lemon curd and blueberries for a deconstructed angel food parfait. However you serve it, do it with pride!
Let’s Get Creative: Recipe Variations
Once you’ve mastered the classic, try these fun twists to make it your own!
- Citrus Zest: Fold the zest of one lemon or orange into the batter at the very end for a bright, sunny flavor.
- Confetti Funfetti: Gently fold ¼ cup of rainbow sprinkles into the batter before panning for a festive birthday version.
- Chocolate Swirl: Sift 2 tablespoons of cocoa powder with a tablespoon of the flour mixture and fold it in at the very end for a marbled effect.
- Coconut Dream: Substitute the almond extract with coconut extract and fold in ½ cup of finely shredded, unsweetened coconut.
- Gluten-Free: You can easily substitute the all-purpose flour with a certified gluten-free 1:1 baking blend. Just be sure to sift it well!
Chef’s Notes: A Few More Kitchen Confessions
This recipe has been my kitchen companion for years, and it has evolved in little ways. I used to be terrified of over-folding, often leaving little streaks of flour. While you don’t want to deflate it, a few tiny streaks are better than a tough, over-mixed cake. I also learned that a copper bowl is lovely, but my trusty stand mixer works just as well. The almond extract was my grandma’s secret, and now it’s ours. The biggest lesson? Don’t stress. Baking is supposed to be fun. If it sinks a little, or cracks on top (which is totally normal!), just cover it with berries and cream. No one will ever know, and they’ll be too busy asking for seconds to care.
FAQs & Troubleshooting
I’ve gotten so many questions about this cake over the years! Here are the most common ones to help you succeed.
- My egg whites won’t form stiff peaks. What did I do wrong?
This is usually caused by one of three things: 1) A trace of yolk or fat in the bowl (even a little grease can be a party pooper). 2) The bowl or beaters weren’t perfectly clean. 3) The egg whites were cold. Room temp is key! If this happens, you can try adding another ½ tsp of cream of tartar and keep beating. If they still won’t stiffen, it’s best to start over with new eggs and a freshly washed bowl. - Why does the cake need to be cooled upside down?
Angel food cake is essentially a giant, baked meringue. While it’s hot, its structure is very delicate. Cooling it right-side-up would cause it to collapse under its own weight as the steam escapes and the structure sets. Hanging it upside down lets it “set” in its fully risen, tall position. It’s non-negotiable for a high-rising cake! - My cake stuck to the pan! How do I prevent this?
This is heartbreaking, but it happens. First, always use a knife to loosen the cake thoroughly from the center tube and the sides. A non-stick pan can sometimes be too “grippy.” If this is a recurring issue, you can line the bottom of your tube pan with a circle of parchment paper (do not grease the sides). This usually gives you a clean release every time. - Can I make this without a tube pan?
For the classic height and texture, a tube pan is highly recommended. The center tube helps the heat circulate and the cake bake evenly. You *can* try two 9-inch round cake pans, but the cake will be much flatter and may bake faster, so keep a close eye on it after 20 minutes.

Light and Fluffy Angel Food Cake : Classic, Airy & Perfectly Sweet
Description
A slice of angel food cake is pure magic: light, airy, and tender with a whisper of vanilla and almond. Fat-free but full of flavor, it’s the perfect dessert for any occasion—and surprisingly easy to make from scratch with patience and care.
Ingredients
-
1½ cups (10–12 large) egg whites, room temperature
-
1½ cups powdered sugar, sifted
-
1 cup all-purpose flour, sifted
-
1 teaspoon cream of tartar
-
¼ teaspoon salt
-
1 teaspoon vanilla extract
-
½ teaspoon almond extract
-
¼ cup granulated sugar
Optional Variations:
-
Citrus Zest: zest of 1 lemon or orange
-
Funfetti: ¼ cup rainbow sprinkles
-
Chocolate Swirl: 2 tbsp cocoa powder
-
Coconut Dream: replace almond extract with coconut extract + ½ cup shredded coconut
-
Gluten-Free: substitute all-purpose flour with gluten-free 1:1 baking blend
Instructions
-
Preheat & Prep: Preheat oven to 350°F (175°C). Do not grease a 10-inch tube pan; it must remain ungreased for proper rising.
-
Mix Dry Ingredients: Sift together powdered sugar and flour twice. Set aside.
-
Whip Egg Whites – Stage 1 (Foamy): In a clean, grease-free bowl, beat egg whites on medium until foamy (~1 min).
-
Stage 2 (Soft Peaks): Add cream of tartar and salt; continue beating until soft peaks form.
-
Stage 3 (Stiff Peaks): Gradually add granulated sugar, 1 tbsp at a time, until stiff, glossy peaks form. Peaks should stand straight when beaters are lifted.
-
Add Flavor & Fold Dry Ingredients: Stir in vanilla and almond extracts. Gently fold in dry ingredients in four additions, using a rubber spatula and preserving the air in the meringue.
-
Bake: Pour batter into ungreased tube pan. Smooth top, tap gently to remove large bubbles. Bake 35–40 minutes until golden brown and firm.
-
Cool Upside-Down: Immediately invert pan on bottle neck or pan feet; cool at least 1 hour to prevent collapse.
-
Remove & Slice: Run a knife around edges and center tube. Gently remove cake and slice with a serrated knife.
Notes
-
Egg Whites: Must be room temp; no yolk allowed.
-
Folding: Do not overmix; preserve air for maximum rise. A few small streaks of flour are okay.
-
Pan Release: Use a knife around edges; optional parchment on pan bottom.
-
Upside-Down Cooling: Essential to maintain height and structure.
-
Flavor Boosters: Add zest, cocoa, sprinkles, or coconut for creative variations.
Nutrition
- Calories: 120 cal Per Serving
- Fat: 0g
- Carbohydrates: 25g
- Protein: 4g
Nutritional Information*
*This is an estimate provided for informational purposes.
Per slice (approx. 1/12 of the cake):
Calories: ~120 | Protein: 4g | Fat: 0g | Carbohydrates: 25g | Sugar: 18g
Prep Time: 20 minutes | Bake Time: 40 minutes | Total Time: 1 hour | Yields: 12 slices
Final Thoughts: A Cake Built on Love and Air
So, is there anything more magical than a slice of perfect Angel Food Cake? After reading this, I hope your answer is a resounding “no.” But this journey is about so much more than just a dessert.
It’s about the courage to begin—to crack those eggs with a hopeful heart. It’s about the patience to fold, gently and deliberately, understanding that some of the best things in life are built slowly. It’s about the wisdom to know that even our “flops” can be transformed into something wonderful with a little creativity and grace, just like my grandmother taught me.
You are not just baking a cake. You are weaving a cloud. You are creating a tangible piece of joy from the most humble of ingredients. You are participating in a tradition of home bakers who have found satisfaction in the silent triumph of a perfectly risen, golden-crusted beauty.
Remember, the true secret ingredient has been with you all along. It’s not the vanilla or the almond extract—it’s the love and the intention you pour into every step. So, take a deep breath, believe in the process, and trust your hands. You are about to create something truly wonderful.
Now, go preheat that oven. Your slice of heaven awaits.