Brunch Just Got a Major Upgrade: Say Hello to Kimchi Waffles!
Hey there, friend! Can we talk about brunch for a second? I mean really talk about it. We all love a classic stack of fluffy pancakes or a perfectly golden Belgian waffle, right? But sometimes, your soul—and your taste buds—are craving something a little more… adventurous. Something that breaks the mold and turns your weekend morning into a full-blown culinary event.
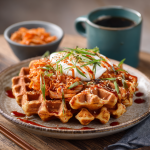
Well, pull up a chair and get ready to have your mind (and your waffle iron) completely blown. I’m about to introduce you to your new brunch obsession: Korean-Style Kimchi Waffles with Sesame Aioli. Imagine this: a waffle that’s irresistibly crispy on the outside, tender and savory on the inside, packed with the tangy, spicy, umami-packed punch of fermented kimchi. Each bite is a flavor explosion that wakes up your palate and gets your senses buzzing.
And then, we bring it all home with a drizzle of the most addictive sesame aioli you’ll ever taste. It’s creamy, nutty, with a hint of spice and acidity that cuts through the richness of the waffle perfectly. This isn’t just a dish; it’s an experience. It’s for the brunch rebels, the flavor adventurers, and anyone who believes that the best meals are the ones that surprise and delight you. So, let’s ditch the ordinary and create some kitchen magic together. Your waffle maker is about to become your favorite fusion tool!
The Happy Accident That Started It All
This recipe was born from one of those gloriously messy, “what-do-I-have-in-the-fridge?” Sunday mornings. I had a serious craving for something savory for brunch, but I also had my heart set on using my beloved, slightly dusty waffle iron. A half-empty jar of homemade kimchi was staring back at me from the fridge shelf, next to some lonely green onions. In a moment of “what’s the worst that could happen?” inspiration, I chopped up the kimchi, folded it into my standard waffle batter, and crossed my fingers.
The smell that wafted through my kitchen as it cooked was pure magic—savory, tangy, with that unmistakable fermented kick. When I pulled that first golden, speckled waffle out of the iron, I knew I was onto something special. I whipped up a quick aioli with sesame oil and sriracha, drizzled it over the top, and took a bite. My eyes literally widened. It was a perfect harmony of textures and flavors I didn’t know I needed. It was a happy little accident that instantly became a staple, a story I love sharing almost as much as I love sharing the recipe itself.
Gathering Your Flavor Power Players
Here’s everything you’ll need to create this masterpiece. Don’t worry, it’s all simple stuff! I’ve included some of my favorite chef insights and substitutions so you can make it your own.
For the Kimchi Waffles:
- 1½ cups all-purpose flour: The trusty foundation of our waffle. It gives that perfect structure for a crispy exterior. For a gluten-free version, a 1:1 GF baking blend works wonderfully!
- 1 tablespoon sugar: Just a touch! It’s not for sweetness, but to help with browning and to balance the tangy kimchi.
- 1 teaspoon baking powder & ½ teaspoon baking soda: Our dynamic leavening duo! They work together to create a beautifully light and airy interior with lots of little pockets for the flavors to nestle into.
- ½ teaspoon salt: Essential for enhancing all the other flavors. Don’t skip it!
- 1 cup buttermilk: The secret to a tender crumb and a subtle tang. No buttermilk? No problem! Make a quick “soured milk” by adding 1 tablespoon of lemon juice or white vinegar to a cup of regular milk and let it sit for 5 minutes.
- 2 large eggs: They bind everything together and add richness. Let them come to room temperature for a more even mix.
- ¼ cup neutral oil or melted butter: I love the flavor of butter, but a neutral oil like avocado or grapeseed guarantees an ultra-crispy waffle. Your choice!
- ¾ cup chopped fermented kimchi, drained: The star of the show! Make sure your kimchi is well-fermented for that signature tangy flavor. Give it a rough chop and a light squeeze to remove excess liquid—this is the key to maximum crispiness.
- 1 green onion, thinly sliced: A fresh, sharp counterpoint to the rich, fermented kimchi.
- Optional: ½ teaspoon gochugaru (Korean chili flakes): For my heat-seekers! This adds a beautiful, smoky heat and a vibrant red color. If you don’t have it, a pinch of cayenne will do in a pinch.
For the Sesame Aioli:
- ½ cup mayonnaise: The creamy, luxurious base of our aioli. Use your favorite brand, or go for Kewpie mayo for an extra umami boost!
- 1 tablespoon toasted sesame oil: This is non-negotiable for that deep, nutty flavor. Make sure it’s toasted sesame oil—it makes all the difference.
- 1 teaspoon rice vinegar: A little acidity to cut through the richness and brighten everything up.
- 1 teaspoon sriracha (or to taste): Adds a garlicky kick. Adjust this to your preferred spice level—you do you!
- Pinch of salt: Just a tiny pinch to bring all the aioli flavors into harmony.
Let’s Make Some Magic: Your Step-by-Step Guide
Ready to cook? Follow these steps, and you’ll be a kimchi waffle pro in no time. I’ve packed this section with all my favorite little hacks to ensure your success.
- Preheat Your Waffle Iron. Go ahead and get it nice and hot! A properly preheated iron is the #1 secret to a crispy, non-stick waffle. I usually set mine to a medium-high setting. Chef’s Hack: While it’s heating, this is the perfect time to chop your kimchi and green onions and get your mise en place ready. A little prep makes the process so smooth!
- Combine Your Dry Ingredients. In a large bowl, grab a whisk and vigorously whisk together the flour, sugar, baking powder, baking soda, and salt. Why the vigor? We want to make sure those leaveners are evenly distributed throughout the flour for a perfectly even rise. No one wants a baking soda pocket!
- Whisk Together Your Wet Ingredients. In a separate, medium-sized bowl, whisk the buttermilk, eggs, and oil (or melted butter) until they are beautifully smooth and emulsified. You’ll see the mixture turn a pale, creamy yellow. Chef’s Insight: Using a spouted measuring cup or bowl for your wet ingredients makes pouring into the dry mix a breeze and minimizes mess.
- Marry the Wet and Dry. Pour your wet ingredients into the bowl with the dry ingredients. Now, here’s the most important tip: mix until *just* combined. A few lumps are totally fine—I promise! Overmixing is the enemy of tender waffles, as it develops the gluten and can make them tough.
- Fold in the Flavor. Now for the fun part! Gently fold in the chopped kimchi, sliced green onions, and the optional gochugaru. Use a spatula and a light hand—you just want to distribute them evenly without overworking the batter.
- Cook to Perfection. Lightly grease your preheated waffle iron with a brush of oil or a spritz of cooking spray. Pour enough batter to cover the center of the iron (about ¾ cup for a standard round iron, but check your maker’s instructions!). Close the lid and let it work its magic. Resist the urge to peek too early! Wait until the steam significantly subsides, then check for a deep, golden brown color. Chef’s Hack: To keep cooked waffles crisp while you finish the batch, place them in a single layer on a wire rack in a low (200°F/95°C) oven. This prevents them from getting steamy and soft.
- Whip Up the Aioli. While the waffles are cooking, make your aioli. Simply combine the mayonnaise, toasted sesame oil, rice vinegar, sriracha, and salt in a small bowl. Whisk until it’s smooth, creamy, and dreamy. Give it a taste and adjust the seasoning to your liking—maybe a squeeze more sriracha?
How to Serve These Savory Wonders
Presentation is part of the fun! I love serving these waffles hot from the iron, stacked high on a warm plate. Drizzle that gorgeous sesame aioli generously over the top—don’t be shy! For the ultimate brunch experience, crown your stack with a perfectly fried egg with a runny yolk. The rich yolk acts as a second, incredible sauce. Finish with a final sprinkle of thinly sliced green onions and maybe a few extra kimchi pieces for a vibrant, colorful pop. Serve immediately and watch faces light up!
Get Creative: Fun Twists on the Classic
Once you’ve mastered the base recipe, the world is your oyster (or should I say, your kimchi waffle?). Here are a few of my favorite ways to mix it up:
- Cheesy Kimchi Waffle: Fold in ½ cup of shredded sharp cheddar or mozzarella cheese into the batter for an extra gooey, indulgent treat.
- Pork Belly & Kimchi Waffle: Top your finished waffle with slices of crispy, pan-fried pork belly for the ultimate Korean-inspired flavor bomb.
- Seafood Lover’s Version: Add ½ cup of chopped cooked shrimp or squid to the batter for a delicious brunch-for-dinner option.
- Vegan Kimchi Waffle: Use a flax egg (1 tbsp ground flax + 3 tbsp water per egg), plant-based milk + vinegar for the buttermilk, and vegan mayo for the aioli. Just make sure your kimchi is vegan-friendly!
- Spicy Gochujang Aioli: Swap the sriracha in the aioli for a teaspoon of gochujang (Korean chili paste) for a deeper, fermented, and complex heat.
Olivia’s Kitchen Notes & Stories
This recipe has evolved so much since that first experimental batch! I’ve learned that squeezing the kimchi juice out is non-negotiable for crispiness, but I’ve also started saving that precious liquid. I sometimes add a teaspoon of it to the batter for an even more intense kimchi flavor, or I’ll use it to marinate proteins—it’s a fantastic waste-not-want-not trick.
One of my favorite kitchen memories involves these waffles. I was hosting a brunch for my most skeptical friend, who insisted that “fruit belongs in waffles, period.” I served her one of these, and after one silent, contemplative bite, she just looked at me and said, “Okay, you win. I was wrong.” It’s now the dish she requests every time she visits. It just goes to show that the best recipes are the ones that create a little bit of joy and a whole lot of delicious conversation.
Your Questions, Answered!
Here are answers to some common questions to make sure your kimchi waffle journey is flawless.
Q: My waffles are coming out soft and not crispy. What am I doing wrong?
A: The most common culprits are a under-preheated waffle iron and excess moisture. Make sure your iron is piping hot before you add the batter, and don’t forget to drain and squeeze the kimchi well. Also, avoid stacking waffles directly on a plate—use a wire rack in a warm oven to keep them crisp.
Q: Can I make the batter ahead of time?
A: I don’t recommend it. The baking powder and soda start working as soon as they hit the liquid, and letting the batter sit will result in less rise and denser waffles. For the best texture, mix and cook immediately!
Q: My kimchi isn’t very spicy. Will these waffles be bland?
A: Not at all! The flavor comes from the tangy, fermented taste of the kimchi itself, not just the heat. If you want more kick, that’s where the optional gochugaru or an extra dash of sriracha in the aioli comes in. You can always add heat, but you can’t take it away!
Q: Can I freeze these waffles for later?
A> Absolutely! Let the cooked waffles cool completely on a wire rack. Then, place them in a single layer on a baking sheet to “flash freeze” for about an hour. Once frozen solid, transfer them to a freezer bag. They’ll keep for up to 3 months. Reheat them straight from the freezer in a toaster or oven for a quick and delicious meal anytime.
Korean-Style Kimchi Waffles with Sesame Aioli : Crispy, Tangy, Bold Brunch Goals
Description
Turn brunch into an adventure with these crispy, savory waffles packed with tangy kimchi and green onions. Top with a drizzle of creamy sesame aioli for a flavor-packed, irresistible meal.
Ingredients
Waffles:
-
1½ cups all-purpose flour
-
1 tbsp sugar
-
1 tsp baking powder
-
½ tsp baking soda
-
½ tsp salt
-
1 cup buttermilk (or milk + 1 tsp lemon juice)
-
2 large eggs
-
¼ cup neutral oil or melted butter
-
¾ cup chopped kimchi, drained
-
1 green onion, thinly sliced
-
Optional: ½ tsp gochugaru or pinch of cayenne
Sesame Aioli:
-
½ cup mayonnaise
-
1 tbsp toasted sesame oil
-
1 tsp rice vinegar
-
1 tsp sriracha (or to taste)
-
Pinch of salt
Instructions
-
Preheat waffle iron to medium-high and lightly grease.
-
Mix dry ingredients: In a large bowl, whisk flour, sugar, baking powder, baking soda, and salt.
-
Mix wet ingredients: In another bowl, whisk buttermilk, eggs, and oil/butter.
-
Combine: Pour wet into dry and stir just until combined. A few lumps are fine.
-
Fold in kimchi and green onion (and gochugaru if using).
-
Cook waffles: Pour batter into preheated waffle iron (about ¾ cup per waffle). Cook until golden and crisp. Keep cooked waffles warm on a wire rack in a 200°F (95°C) oven.
-
Make aioli: Whisk together mayonnaise, sesame oil, rice vinegar, sriracha, and salt until smooth.
-
Serve: Top waffles with sesame aioli and extra kimchi or green onion if desired. Add a fried egg for extra indulgence.
Notes
-
Keep waffles crisp: Place on a wire rack instead of stacking.
-
Make pancakes instead: Cook on a greased skillet if no waffle iron.
-
Cheesy version: Add ½ cup shredded cheese to the batter.
-
Protein boost: Add cooked shrimp, squid, or crispy pork belly.
-
Vegan: Use flax eggs, plant-based milk, and vegan mayo.
Nutrition
- Calories: 420 cal Per Serving
- Carbohydrates: 28g
- Fiber: 30g
- Protein: 10g
Nutritional Information*
*Please note: This is an estimated nutritional breakdown for one serving (one waffle with a portion of aioli). Values may vary based on specific ingredients used.
- Calories: 420
- Protein: 10g
- Carbohydrates: 28g
- Fat: 30g
- Fiber: 2g
- Sugar: 3g
- Sodium: 480mg
Final Thoughts: Your Brunch Game, Forever Changed
And just like that, you’re armed and ready to launch a full-scale assault on boring brunches everywhere. These Kimchi Waffles are more than just a recipe; they’re a declaration that morning meals can be bold, exciting, and packed with personality. They prove that your waffle iron isn’t just for sweet treats—it’s a portal to a world of savory, umami-packed possibilities.
I hope this recipe brings as much joy and lively conversation to your table as it has to mine. It’s a celebration of happy accidents, fusion flavors, and the simple thrill of trying something wonderfully new.
So, go ahead, break the mold, drizzle that aioli with abandon, and take that first, life-changing bite. Your inner brunch rebel will thank you.
I am so excited to see your creations! Tag me on social media @OliviasKitchen and use the hashtag #KimchiWaffleRevolution so I can share in the crispy, savory, glorious fun.
Happy brunching!
Love,
Olivia