Your New Favorite Low-Carb Comfort Food is Here!
Hey there, friend! Come on in, grab an apron, and get ready to fill your kitchen with the most incredible, soul-warming smell. I’m talking about the cozy, buttery, garlicky aroma of fresh-baked biscuits. If your heart just did a little happy dance, you and I are already on the same page.
But what if I told you that you could have all that fluffy, cheesy, “I-can’t-believe-it’s-not-bread” perfection without the carb coma? What if you could whip up a batch of biscuits so good they’d make a famous seafood chain jealous, all while sticking to your keto or low-carb lifestyle? Sounds like a dream, right? Well, pull up a stool, because dream we will no more.
Today, we’re making my legendary Keto Cheddar Garlic Biscuits. These little rounds of joy are my go-to for everything from a busy weeknight dinner side to an impressive addition to a holiday spread. They’re crustless, meaning no fussy dough to roll out, and they come together in one bowl with just a handful of simple ingredients. They bake up golden, tender, and packed with so much sharp cheddar and garlic flavor, you’ll be doing a taste-test victory dance right there by the oven. They’re the ultimate proof that eating low-carb doesn’t mean sacrificing an ounce of comfort or flavor. Let’s get baking!
The Biscuit That Started It All
I have to confess: my love affair with these biscuits started out of sheer desperation. A few years ago, my husband and I decided to give the keto lifestyle a try. It was going great until we hosted a big, family-style seafood boil for some friends. As I laid out the feast—the crab legs, the shrimp, the spicy sausage and corn—I felt a pang of sadness. Something was missing. The centerpiece, the carb-y anchor that soaks up all the delicious juices: the biscuits.
Everyone else would have those warm, cheddar-packed gems, and we’d just have… empty plates. I refused to accept it. I spent the entire afternoon before the party in a cloud of almond flour, determined to crack the code. Batch after batch came out of the oven, each one a little closer. Then, on the final try, it happened. I pulled out a tray of golden, puffy, perfectly cheesy biscuits. The moment my friend’s son, a known carb-devotee, tried one and said, “Wow, these are even better than the ones from the restaurant!” I knew we had a winner. Now, they’re not just a recipe; they’re a memory of that first shared victory, a reminder that you can always bring your favorite comforts to the table, no matter how you eat.
Gathering Your Biscuit-Making Crew
The magic of this recipe is in its beautiful simplicity. You probably have most of this in your pantry and fridge right now! Here’s what you’ll need and why each ingredient is a rockstar.
- 2 cups shredded cheddar cheese: This is the star of the show, providing flavor, structure, and that wonderful pull. I highly recommend shredding a block of sharp or extra-sharp cheddar yourself. The pre-shredded stuff is coated in anti-caking agents (like potato starch!) that can sometimes mess with the texture and melt. For a fun twist, try a pepper jack or a gouda!
- 1 cup almond flour: Our trusty low-carb flour substitute! Almond flour gives these biscuits a tender, moist crumb and a lovely, nutty flavor. Make sure you’re using blanched almond flour (a fine, light powder) and not almond meal (a coarser grind with the skins), for the best texture. It’s our foundation!
- 4 large eggs: Our binding agent and leavening helper! The eggs give the biscuits structure and help them puff up beautifully in the oven. Make sure they’re at room temperature for best results—it helps them incorporate into the batter more smoothly.
- 1 tbsp baking powder: This is the secret to that light, airy, “biscuit-y” rise. It’s what makes them fluffy instead of dense. Chef’s tip: Check the expiration date on your baking powder! If it’s old, it won’t have the power to lift your biscuits, and we want them tall and proud.
- ½ tsp garlic powder: For that essential, savory garlic flavor that permeates every single bite. You can absolutely adjust this to taste—if you’re a garlic fiend like me, feel free to bump it up to ¾ or even 1 teaspoon!
- ½ tsp Italian seasoning (optional but highly recommended): This little addition adds a subtle layer of herby complexity that makes these biscuits taste truly gourmet. If you don’t have a blend, a pinch each of dried oregano, basil, and thyme will do the trick.
Let’s Make Some Magic: Step-by-Step Instructions
Ready? This is where the fun begins. I promise, it’s so easy. Just follow these steps, and you’ll be a keto biscuit hero in no time.
- Preheat and Prep. First things first, get that oven preheating to a toasty 350°F (175°C). This gives your biscuits the instant heat they need to start rising the moment they hit the oven. While it’s warming up, generously grease a standard muffin tin. I’m a big fan of avocado oil spray or just a little smear of butter. This is a non-negotiable step—it ensures your beautiful biscuits pop out easily without leaving their golden crusts behind!
- The Big Mix. In a large mixing bowl, combine all of your ingredients: the shredded cheddar, almond flour, eggs, baking powder, garlic powder, and Italian seasoning. Yes, you read that right—all in one bowl! I love a recipe that minimizes cleanup. Now, roll up your sleeves and get mixing. A sturdy spatula or even your hands (my favorite tool!) works perfectly here. You want to mix until everything is fully combined and you have a thick, sticky, uniformly cheesy dough. Don’t overmix it, just make sure there are no big pockets of dry almond flour hiding.
- Scoop and Fill. Using a spoon, a cookie scoop, or your hands, portion the dough into your prepared muffin tin. You’re not looking for a smooth, domed top here—the rustic, craggy look is part of their charm! The recipe should make between 10 to 12 biscuits, depending on how generously you scoop. I like to fill the cups about ¾ of the way full to give them room to rise and create a nice “muffin top.”
- Bake to Golden Perfection. Slide that tray into your preheated oven and let the magic happen! Bake for 10-15 minutes. You’re looking for beautifully golden-brown tops and firm centers. A great test is to gently press the top of a biscuit; it should spring back. If it feels soft or leaves an indent, give it another minute or two. Ovens can vary, so keep an eye on them after the 10-minute mark!
- The (Important!) Cool Down. This might be the hardest step of all: patience. Once they’re out of the oven, let the biscuits cool in the pan for at least 5-10 minutes. I know, the smell is intoxicating, but trust me on this. This resting time allows them to set and firm up, making them much easier to remove without falling apart. They’ll be plenty warm and delicious, I promise.
How to Serve These Cheesy Wonders
Okay, they’re baked, they’ve cooled slightly, and now it’s time for the grand finale! I love serving these biscuits piled high in a warm basket lined with a checkered kitchen towel—it just feels like home. They are the ultimate sidekick to a big bowl of keto-friendly chili, a crisp salad, or a beautiful roast chicken. Of course, they’re a non-negotiable part of any seafood night, perfect for sopping up lemon-butter sauce. And honestly? They’re phenomenal all on their own, still warm from the oven, maybe with a little extra pat of butter melting on top. Pure bliss.
Mix It Up! Fun Recipe Variations
Once you’ve mastered the classic, the kitchen playground opens up! Here are a few of my favorite ways to twist this recipe:
- Everything Bagel Style: Before baking, sprinkle the tops with a generous amount of everything bagel seasoning. The sesame seeds, poppy seeds, garlic, and onion add incredible texture and flavor.
- Jalapeño Popper: Fold in ¼ cup of finely diced jalapeños (seeds removed for less heat) and 2 tablespoons of real bacon bits into the batter. It’s a spicy, smoky delight!
- Everything Herb: Swap the Italian seasoning for a heaping tablespoon of fresh, finely chopped herbs like chives, parsley, and dill. The fresh flavor is so bright and lovely.
- Dairy-Free Delight: You can make these dairy-free! Use a dairy-free cheddar shred (Violife is a great brand) and a neutral-flavored oil for greasing the pan.
A Few Chef’s Notes From My Kitchen to Yours
Over the hundreds of batches I’ve made, I’ve learned a thing or two! First, don’t be alarmed by how thick and sticky the batter is—that’s exactly how it should be. It’s not a pourable batter; it’s a scoopable dough. Second, these biscuits are at their absolute prime served the day they’re made, but they reheat like a dream. Just pop them in a 350°F oven for 5-8 minutes or in the toaster oven for a few minutes to get that crispy exterior back.
Funny story: I once, in a pre-coffee haze, accidentally used powdered sugar instead of almond flour. Let’s just say we had some very sweet, very confusing “biscuits” that morning! Always double-check your labels before you start. This recipe has evolved from that initial desperate experiment into a foolproof family favorite, and I love hearing how it becomes a favorite in your home, too.
Your Biscuit Questions, Answered!
I’ve gotten so many wonderful questions about this recipe over the years. Here are the most common ones to help ensure your biscuit success!
Q: My biscuits came out a bit greasy. What happened?
A: This usually traces back to the cheese! Some brands of pre-shredded cheese have more starch or oil. The best fix is to shred your own cheese from a block. Also, make sure you’re using blanched almond flour, as almond meal can release more oils.
Q: Can I make these without eggs?
A: This is a tricky one, as the eggs are crucial for structure and lift in a flourless recipe like this. I haven’t found a reliable substitute that replicates the texture perfectly. If you’re feeling experimental, a “flax egg” might work in a bind, but the texture will be denser and more crumbly.
Q: Why did my biscuits not rise very much?
A: Nine times out of ten, the culprit is old baking powder! Baking powder loses its potency over time. To test it, stir half a teaspoon into a cup of hot water. If it doesn’t fizz vigorously, it’s time for a new can. Also, be sure not to overmix the batter, as that can deflate the air bubbles needed for a good rise.
Q: How should I store leftovers?
A: Once completely cool, store them in an airtight container in the fridge for up to 5 days. For longer storage, they freeze beautifully! Just place them in a single layer on a baking sheet to freeze solid, then transfer to a freezer bag. They’ll keep for about 3 months. Reheat from frozen in a 350°F oven until warm.
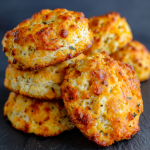
Keto Cheddar Garlic Biscuits
Description
Warm, cheesy, and melt-in-your-mouth delicious — these Keto Cheddar Garlic Biscuits are the comfort food you didn’t know you needed. Imagine the irresistible aroma of garlic and butter filling your kitchen, but without the heavy carbs. Perfect as a side, snack, or star of your dinner table, these golden bites are pure low-carb joy. Get ready to bake your way to bliss!
Ingredients
-
2 cups shredded sharp cheddar cheese
-
1 cup blanched almond flour
-
4 large eggs (room temperature)
-
1 tbsp baking powder
-
½ tsp garlic powder
-
½ tsp Italian seasoning (optional but amazing)
Instructions
-
Preheat & Prep: Heat oven to 350°F (175°C). Grease a muffin tin with butter or avocado oil spray.
-
Mix It Up: In a bowl, combine all ingredients. Mix until a thick, sticky dough forms — no dry spots!
-
Scoop & Fill: Divide dough evenly into 10–12 muffin cups, filling about ¾ full.
-
Bake: Bake 10–15 min until golden brown and firm to touch.
-
Cool: Let rest 5–10 min before removing — it helps them set perfectly.
Notes
-
Cheese Choice: Shred your own for the best melt!
-
Flavor Boost: Try jalapeño bits or everything bagel seasoning on top.
-
Serving Magic: Pair with soups, salads, or seafood — or just add butter and enjoy warm!
Nutrition
- Calories: 145 cal Per Slice
- Fat: 11g
- Carbohydrates: 4g
- Protein: 9g
Nutritional Information
Per Biscuit (Recipe makes 12): Calories: 145 | Fat: 11g | Protein: 9g | Total Carbohydrates: 4g | Dietary Fiber: 1g | Net Carbs: 3g
*Please note: Nutritional information is an estimate and may vary based on the specific brands of ingredients you use.
Final Thoughts: Your New Comfort Food Awaits
So, there you have it. What started as a desperate attempt to not feel left out at my own dinner party has blossomed into the recipe I’m most proud to share. These Keto Cheddar Garlic Biscuits are more than just a low-carb side; they’re a warm, cheesy, buttery hug in food form. They’re proof that the heart of comfort food isn’t found in a bag of flour, but in the joy of creating something delicious to share with the people you love.
You don’t need a special occasion to make your kitchen feel like the coziest place on earth. You just need one bowl, a handful of simple ingredients, and about 20 minutes. Whether you’re a keto veteran or just someone looking for a delicious, easy bread alternative, these biscuits are ready to earn a permanent spot in your recipe rotation.