
Let’s Make Magic With Rice: Your Journey to Perfect Onigiri Starts Here!
Hey there, friend! Come on in, wipe your feet on the mat, and get ready to roll up your sleeves. There’s something truly magical happening in kitchens all over the world right now—and it involves little more than warm rice, a sprinkle of love, and your own two hands. I’m talking about onigiri, Japan’s iconic handheld comfort food. If you’ve never made them before, you’re in for the most delightful, satisfying kitchen adventure. And if you have, well, get ready to fall in love all over again.
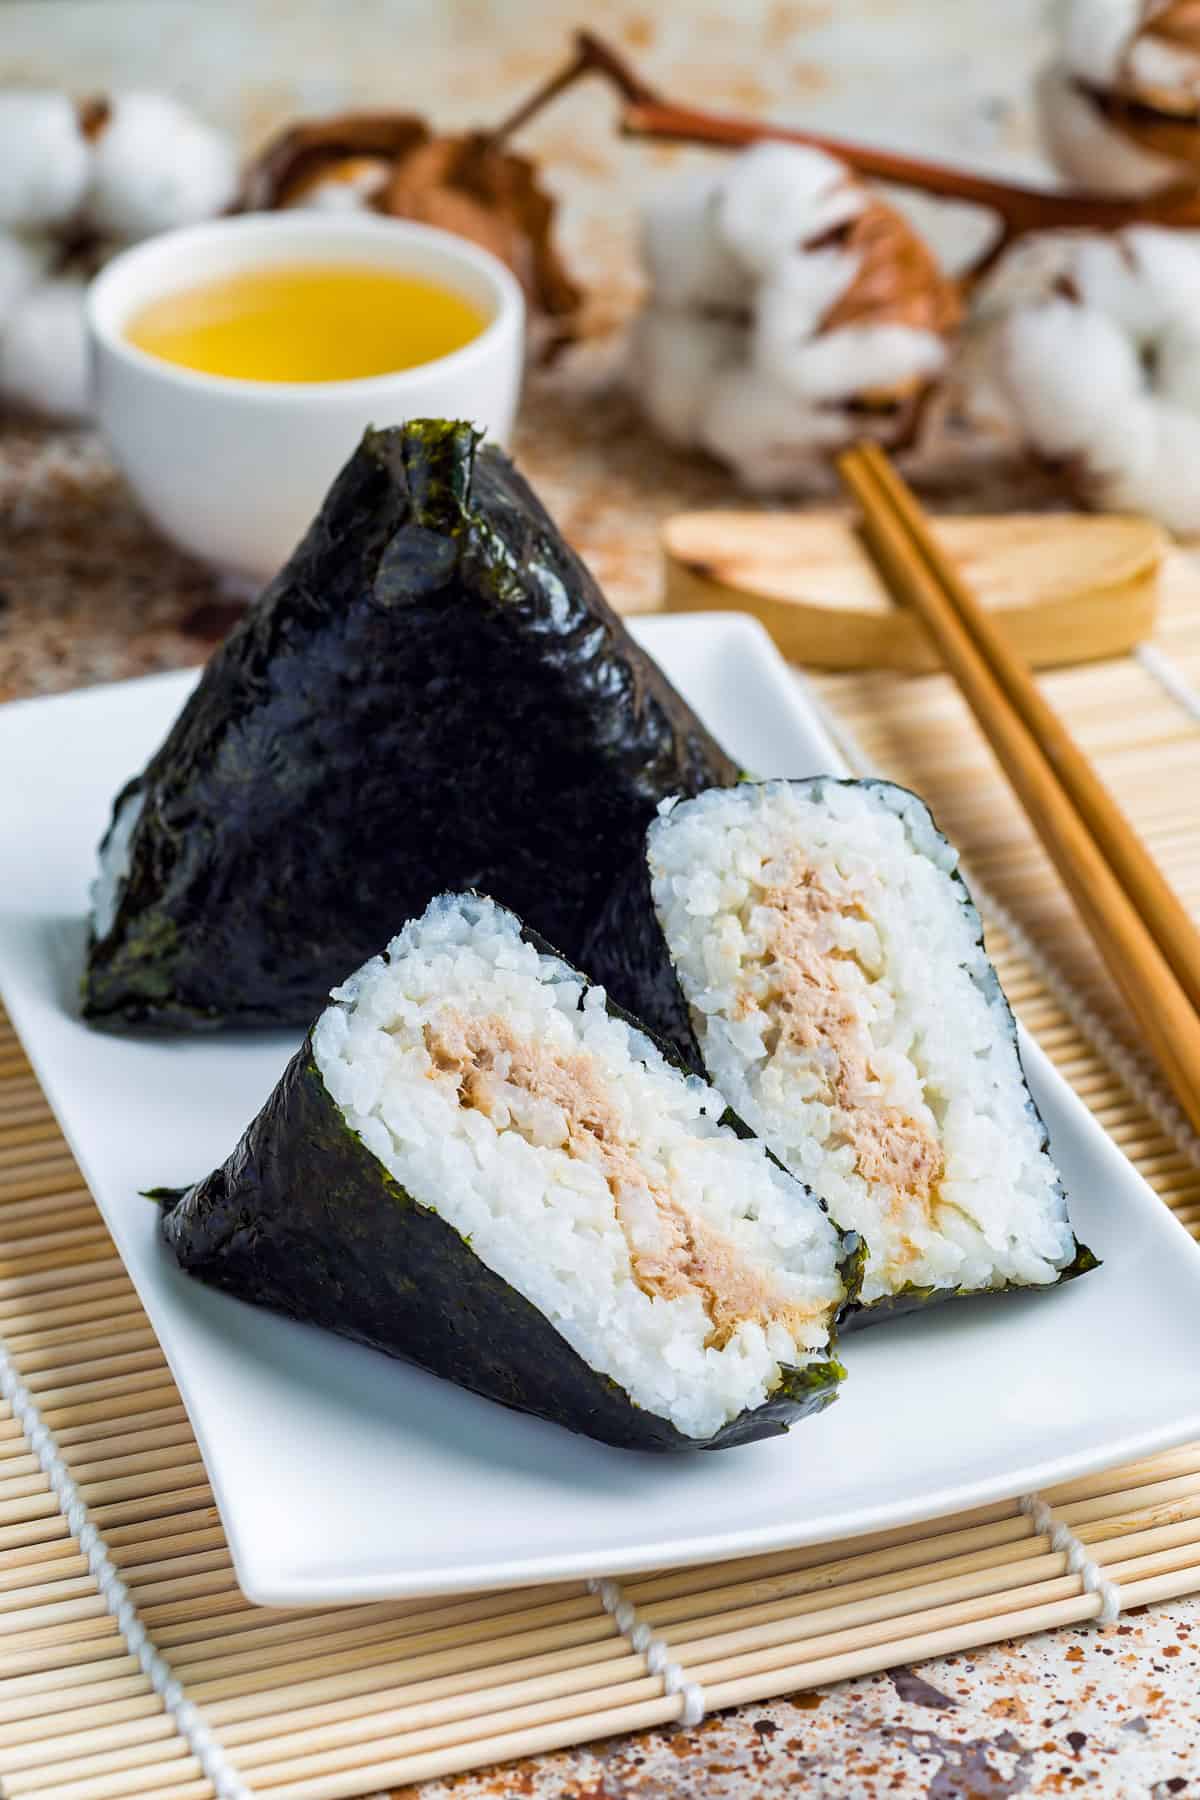
Picture this: perfectly seasoned, still-warm sushi rice, tender and slightly sticky. Nestled inside, a secret pocket of savory, soy-kissed flaked salmon. The whole thing is shaped into a comforting triangle or a plump oval, then hugged by a crisp, salty strip of nori. It’s a snack, a lunchbox superstar, a picnic essential, and a midnight craving all rolled into one beautifully simple package. The best part? You don’t need any special equipment. No fancy molds, no complicated techniques—just you, a bowl of rice, and a willingness to play with your food in the best possible way. So, tie on that apron (the messy one is my favorite too), and let’s transform humble ingredients into little parcels of pure joy.
The Onigiri That Stole My Heart: A Tokyo Convenience Store Revelation
My own love affair with onigiri started not in a fancy restaurant, but in the glowing aisle of a Tokyo convenience store at 11 PM. I was jet-lagged, a little lost in translation, and desperately hungry. Everything looked amazing but unfamiliar. Then I saw them: rows of pristine triangles wrapped in crinkly plastic, with little pictures of what was inside. I picked one with a salmon icon, paid my 150 yen, and stepped back out into the buzzing night.
I unwrapped it on a tiny side street, the nori still satisfyingly crisp. That first bite was a revelation. The rice was seasoned with a subtle tang, the salmon inside was smoky and rich, and the contrast with the crispy seaweed was pure texture heaven. It was humble, filling, and utterly perfect. In that moment, I wasn’t just eating a snack; I was understanding a culture’s genius for creating profound comfort from simple, beautiful ingredients. I’ve been trying to recreate that feeling in my own kitchen ever since, and today, I’m so excited to share that magic with you. Let’s make some memories!
Gathering Your Onigiri Toolkit: Simple Ingredients, Big Flavor
Here’s everything you’ll need to create these portable wonders. I’ve included my little chef insights for each one because knowing your ingredients is the first step to cooking with confidence!
- 2 cups sushi rice – This is non-negotiable for the perfect sticky-yet-firm texture. Short-grain sushi rice has the right amount of starch to hold its shape. Chef’s Insight: Don’t sub with long-grain rice like jasmine or basmati; they won’t stick together!
- 2 1/2 cups water – For cooking our star ingredient to fluffy perfection.
- 1 cup cooked salmon, flaked – I use leftover baked or pan-seared salmon, or even a good-quality canned salmon (drained well). It’s a fantastic way to reduce food waste! Substitution Tip: Flaked tuna, cooked shredded chicken, or even crumbled firm tofu are all delicious here.
- 2 tablespoons soy sauce – This seasons our filling with that deep, savory umami we all crave. Use tamari for a gluten-free version.
- 1 teaspoon sesame oil – A tiny splash adds a wonderful nutty aroma that complements the salmon beautifully.
- 1 tablespoon furikake (optional) – This Japanese seasoning blend (often with seaweed, sesame seeds, and bonito) is a flavor bomb. Stirring a bit into the rice or sprinkling on top adds incredible depth. Chef’s Insight: If you don’t have it, a mix of toasted sesame seeds and a tiny pinch of salt works too!
- Salt to taste – We’ll also use this for wetting our hands to prevent sticking. It’s a double-duty ingredient!
- Nori sheets, cut into strips or squares – The classic wrapper that adds crunch and a taste of the sea. Cut them just before serving to keep them crisp.
- Optional Extras for Adventure: Have fun! A small piece of pickled plum (umeboshi) for a sour punch, a slice of creamy avocado, or a drizzle of spicy mayo (mix mayo with sriracha!) can be amazing alternative fillings.
Shaping Happiness: Your Step-by-Step Onigiri Guide
Ready to get your hands dirty (in a good, ricey way)? Follow these steps, and you’ll be an onigiri pro in no time. I’ve packed each one with my favorite tips and hacks!
- Rinse and Conquer Your Rice: Place your sushi rice in a fine-mesh strainer and rinse under cold, running water. Gently swish it with your fingers until the water runs almost clear, not milky. This removes excess surface starch so your rice isn’t gummy. Chef’s Hack: I do this right in the pot I’m going to cook it in—just add water, swirl, carefully pour off the cloudy water, and repeat. Fewer dishes = happier cook!
- Cook to Fluffy Perfection: Add the 2 1/2 cups of fresh water to the rinsed rice in your pot. Bring it to a lively boil over high heat, then immediately reduce the heat to the lowest setting, cover with a tight-fitting lid, and let it simmer for 15-18 minutes. No peeking! This traps the steam. After cooking, take it off the heat and let it sit, still covered, for 10 full minutes. This resting time is crucial for the rice to finish absorbing moisture and become perfectly tender.
- Create Your Flavorful Filling: While the rice rests, mix your flaked salmon, soy sauce, and sesame oil in a small bowl. Give it a taste! Feel free to add a pinch of salt or a sprinkle of that furikake if you’re using it. This is your moment to adjust. Want a little ginger? Grate some in! Love garlic? A microplane will make it disappear into the mixture. Make it yours.
- The Hand-Wetting Ritual: Fill a small bowl with water and add a good pinch of salt. This is your onigiri shaping station. Wetting your hands with this salty water prevents the rice from sticking to you like glue and adds a subtle seasoning to the outside. Re-wet your hands before shaping each onigiri!
- Shape with Heart (Not Pressure): Scoop about 1/3 cup of warm rice into your damp palm. Use your fingers from your other hand to make a gentle indent in the center. Place a generous teaspoon of your salmon filling into that little well. Now, cup your hand and use your fingers to gently fold the rice over the filling, sealing it inside. Don’t squeeze or pack it tightly—you want it to hold together but still be light and tender. Shape it into a triangle by gently pressing and turning it between your palms, or keep it as a soft oval. Imperfections are charming!
- The Crispy Nori Finish: Take a strip of nori and wrap it around the bottom or side of your onigiri. I love leaving a little rice exposed at the top—it’s pretty and gives you options. Pro Tip: If you’re packing these for later, keep the nori separate and wrap it just before eating so it stays crackly-crisp.
Plating Your Portable Masterpieces
Onigiri are the ultimate casual food, so keep serving simple and stylish. Arrange them on a beautiful wooden board or a simple plate, nori-side up. Tuck a few extra nori strips on the side for DIY wrapping. Add a small bowl of soy sauce for dipping (though they’re plenty flavorful on their own!), and maybe some pickled ginger or a simple cucumber salad on the side. For a lunchbox, wrap each one individually in parchment paper or a reusable wrap—it makes unwrapping them feel like opening a delicious gift.
Play With Your Food! Onigiri Twists & Swaps
The fun truly begins once you master the basic shape. Here are a few of my favorite ways to mix it up:
- Spicy Tuna: Mix canned tuna with kewpie mayo, a squeeze of lemon, and a big spoonful of sriracha.
- Vegetarian Miso-Glazed: Sauté mushrooms and greens, then toss with a spoonful of white miso paste for a rich, meat-free filling.
- Yaki Onigiri (Grilled): After shaping, brush the triangles lightly with soy sauce and grill or pan-fry in a bit of oil until golden and crispy on both sides. Divine!
- Inside-Out Furikake: Roll your shaped, nori-less onigiri in a plate of furikake for a colorful, super-savory exterior.
- Kids’ Favorite Pizza: Fill with a tiny spoonful of tomato paste and a few bits of chopped mozzarella. Trust me on this one.
From My Messy Apron to Yours: A Few Final Thoughts
This recipe has evolved so much in my kitchen over the years. I’ve made them with my nieces, their tiny hands carefully patting the rice into lopsided balls. I’ve hastily shaped them for road trips, wrapped in foil and eaten in the car. I’ve even served a platter of fancy, multi-filled onigiri at a dinner party—they were the first thing to disappear! The beauty is in their adaptability. My biggest lesson? Don’t stress about the shape. Your first few might look a little… abstract. That’s okay! They will taste incredible, and that’s what matters. Each one you make will be better than the last, and soon, you’ll be shaping them without even thinking, chatting with a friend at the kitchen island, rice on your fingers, and a smile on your face. That’s the real goal.
Your Onigiri Questions, Answered!
Q: My rice is too sticky/mushy. What did I do wrong?
A: This usually means either not rinsing the rice enough before cooking, or using too much water. Next time, rinse until the water is very clear, and be precise with your water measurement. Using a different type of rice (like jasmine) will also cause this.
Q: How do I keep the nori from getting soggy?
A> The golden rule: wrap just before eating! If you’re meal prepping, store the shaped rice balls and nori strips separately. Assemble your onigiri right before you pack your lunch or sit down to eat. The contrast between the cool, crisp nori and the warm rice is part of the magic.
Q: Can I make these with brown rice?
A> You can, but it’s trickier. Short-grain brown rice has less sticky starch. Cook it according to package directions, let it cool slightly, and you may need to press a bit more firmly to get it to hold. The flavor will be nuttier and delicious, but the texture will be different.
Q: How long do they keep, and how should I store them?
A> They are best enjoyed the day they are made. Store any leftovers in a single layer in an airtight container in the fridge for up to 24 hours. The rice will harden when cold, so let them come to room temperature for 20 minutes or gently reheat in the microwave for 15-20 seconds before eating.
Japanese Onigiri : Handheld, Savory, and Surprisingly Simple
Description
Onigiri are Japan’s iconic handheld rice balls—warm, comforting, and surprisingly easy to make. Soft sushi rice, a savory salmon filling, and a crisp strip of nori come together to create the perfect snack, lunchbox treat, or grab-and-go meal. No special tools needed, just your hands and a bowl of rice.
Ingredients
Rice
-
2 cups sushi rice (short-grain, rinsed well)
-
2 ½ cups water
-
Salt (for seasoning and hand-wetting)
Filling
-
1 cup cooked salmon, flaked (or canned salmon, well drained)
-
2 tbsp soy sauce
-
1 tsp sesame oil
To Assemble
-
Nori sheets, cut into strips or squares
-
Optional: 1 tbsp furikake (mixed into rice or sprinkled on top)
Optional Fillings to Try
-
Avocado
-
Canned tuna + mayo
-
Umeboshi (pickled plum)
-
Spicy mayo
-
Cooked mushrooms
Instructions
Rinse sushi rice under cold water until the water runs mostly clear.
This keeps the rice sticky but not mushy.
Add rice and 2½ cups water to a pot.
Bring to a boil, then reduce heat to low, cover, and simmer 15–18 minutes.
Turn off heat and let sit, covered, for 10 minutes.
Mix flaked salmon, soy sauce, and sesame oil.
Taste and adjust seasoning if needed. You can add furikake here too.
Fill a small bowl with water and a pinch of salt.
Dip hands before shaping each onigiri—this prevents sticking and seasons the rice.
Scoop about ⅓ cup warm rice into your hand.
Press a small well in the center, add 1 tsp salmon filling, and gently close the rice around it.
Shape into a triangle or oval with light pressure—don’t squeeze hard.
Wrap a strip of nori around the bottom or back.
For best crispiness, add nori right before eating.
Notes
-
Warm rice shapes better than cold rice.
-
Use gentle pressure—firm enough to hold, soft enough to stay fluffy.
-
If rice sticks to your hands, re-dip in salted water.
-
Keep nori separate until serving to avoid sogginess.
-
If the rice feels too loose, you may need to rinse less or use slightly less water next time.
Nutritional Information (Per Serving, serves 6)
This is a general estimate and will vary based on specific ingredients and fillings used.
- Calories: 240
- Protein: 14g
- Carbohydrates: 32g
- Fat: 6g
- Fiber: 1g
Final Thoughts
Let’s make magic with rice, indeed! What started as a simple convenience store snack has become a beloved ritual in my kitchen—and now, I hope, in yours too. Onigiri are more than just food; they’re tiny, edible hugs. They remind us that joy doesn’t have to be complicated. With a little warm rice, a dash of creativity, and your own hands, you can create something that nourishes both body and soul.
Remember, your first onigiri might not be picture-perfect. It might lean a little, or the filling might peek out. But I promise you this: it will taste wonderful, because you made it. Every lopsided triangle is a step toward your own rhythm, your own style. Before long, you’ll be shaping them with your eyes closed, dreaming up new fillings, and sharing them with people you love.
So take this recipe, make it yours, and fill your kitchen with the simple, profound magic of rice. Thank you for letting me share this journey with you. Now, go roll up your sleeves, wet your hands, and shape a little happiness.


