
Ditch the Deli Counter: Your Guide to Unforgettable Homemade Turkey Pastrami
Hey there, friend! Come on in, grab an apron, and let’s get something simmering. If your kitchen is your happy place and the thought of a truly epic sandwich makes your heart do a little happy dance, you are so in the right spot. Today, we’re rolling up our sleeves and diving into a project that is far more rewarding than it is difficult: Homemade Turkey Pastrami.
Now, I know what you might be thinking. “Olivia, pastrami? That’s deli counter stuff. That’s complicated.” But trust me on this one. Making your own pastrami—especially with lean, versatile turkey breast—is a game-changer. We’re talking about transforming a simple cut of meat into something magical: juicy, impossibly flavorful, brined to perfection, and packed with those warm, bold spices we all love. This isn’t just lunch meat; it’s a labor of love that fills your whole house with the most incredible aroma and ends with you feeling like a certified kitchen rockstar.
The best part? You control everything. No cryptic preservatives, no excessive sodium—just wholesome, beautiful ingredients coming together to create something truly special. Whether you pile it high on rye with a slather of mustard, layer it into a protein-packed wrap, or even snack on it straight from the fridge (no judgment here!), this turkey pastrami is about to become your new favorite thing to make. So, let’s turn up the music, pour ourselves a little iced tea (or coffee!), and embark on this flavor adventure together. I promise, it’s going to be delicious.
The Pastrami Epiphany: A New York Memory
My love affair with pastrami started not in a fancy restaurant, but in a cramped, incredibly loud, and gloriously aromatic deli in New York City. I was there with my grandpa, a man who believed the best life lessons happened over a good meal. We squeezed into a booth, the Formica table sticky with nostalgia, and he ordered us two pastrami on rye, “lean, with a pickle.”
When that sandwich arrived, it was a mountain of meat, steaming gently, the scent of pepper and coriander hitting me like a welcome wave. That first bite was a revelation—the peppery crust, the tender, brined meat that practically melted, the sharp bite of the mustard. It was messy, it was perfect, and it was shared. We didn’t talk much; we just ate, smiled, and nodded at each other in mutual appreciation. That sandwich taught me that food isn’t just fuel; it’s an experience, a memory, a story on a plate.
This homemade turkey pastrami is my tribute to that day. It captures all the bold, comforting spirit of that deli classic but in a way that feels light, approachable, and perfect for our home kitchens. It’s my way of sharing that “wow” moment with you, right at your own table.
Gathering Your Flavor Arsenal: The Ingredients
This is where the magic begins! Brining is the secret handshake of the culinary world—it ensures every single bite is moist and bursting with flavor. Here’s what you’ll need to create your own pastrami masterpiece.
- 4½ lbs Turkey Breasts, skinless and boneless: Look for a whole breast or two smaller ones. The key is an even thickness for consistent brining and cooking. Chef’s Insight: Turkey breast is a fantastic lean canvas that soaks up the brine beautifully. If you’re feeling adventurous, you can use this same brine on thick-cut pork chops or even chicken breasts!
- ⅔ cup Brown Sugar: This isn’t just for sweetness; it balances the salinity and helps create a beautiful color on the finished meat. Substitution Tip: Coconut sugar or even maple syrup will work in a pinch for a slightly different flavor profile.
- 6 tbsp Pickling Spice: The MVP of the brine! This blend usually includes mustard seeds, coriander, allspice, ginger, and chilies. Chef’s Insight: If you have the time, toasting your pickling spice in a dry pan for a minute until fragrant will unlock incredible depth of flavor.
- 2 tbsp Curing Salt (Prague Powder #1): (Optional but recommended for authenticity) This is what gives traditional pastrami its signature pink hue and classic savory flavor. It is not regular table salt. Important Note: It must be used precisely according to weight. If you prefer to skip it, your pastrami will be delicious but will have a more roasted turkey color.
- 1 cup Pickling Salt or Kosher Salt: I prefer kosher salt (like Diamond Crystal) for brining as it’s less salty by volume than table salt and dissolves easily. Substitution Tip: Do not use iodized table salt, as it can impart a metallic taste. If using fine sea salt, use about ¾ cup.
- 1 tsp Ground Cinnamon & ¼ tsp Ground Nutmeg: These warm spices are the “secret” background notes that make this recipe sing. They add a incredible complexity that will have people asking, “What is *in* this?!”
- 16 cups (1 gallon) Filtered Water: Using filtered water ensures no chlorine or other chemicals interfere with the pure, clean flavors of your brine.
Optional Flavor Twists: Feel free to add 4 smashed garlic cloves, 1 tsp black peppercorns, or 2 bay leaves to your brine for an extra layer of aroma. For a subtly sweet twist, replace half the water with apple cider!
Crafting Your Masterpiece: Step-by-Step Instructions
Don’t let the brining time intimidate you! Active hands-on time is minimal. Most of the work happens happily in your fridge while you go about your day. Let’s walk through it.
Step 1: Create the Brine. In your largest stockpot, combine the water, brown sugar, pickling spice, both salts, cinnamon, and nutmeg. Warm it over medium heat, stirring occasionally. We are NOT bringing it to a boil! We just want to heat it enough to dissolve the sugars and salts completely. This should only take about 4-5 minutes. Once dissolved, immediately remove it from the heat. Chef’s Hack: To cool the brine down quickly, fill your sink with ice water and place the entire pot in the ice bath, stirring the brine occasionally. This can cut the cooling time in half!
Step 2: The Brining Bath. Place your turkey breasts in a non-reactive container (like a large glass baking dish, food-safe plastic container, or even a sterilized stockpot). Alternatively, you can use a giant 2-gallon zip-top bag placed inside a bowl or pan (to catch any potential leaks—learned that one the messy way!). Pour the completely cooled brine over the turkey, ensuring it’s fully submerged. If using a container, you can place a plate on top to keep the meat underwater. Pop it, covered, into the refrigerator for 24-48 hours. This slow soak is what transforms the turkey from bland to brilliant.
Step 3: The Dry Wait (Optional but Worth It!). After the brining time is up, remove the turkey from the brine and give it a good rinse under cold water to remove any excess salt and spices stuck to the surface. Pat it completely dry with paper towels. Now, for a pro-level trick: place the rinsed and dried turkey breast on a wire rack set over a baking sheet and put it back in the fridge, uncovered, for at least 2 hours or up to 8. This allows the surface to dry out, which helps form a better texture and allows any smoke or spices to adhere better during cooking. You’ll be amazed at the difference this makes!
Step 4: Cook to Perfection. You have two fantastic options here!
Oven Roasting (Easy & Accessible): Preheat your oven to 300°F (150°C). Place the turkey on a rack in a roasting pan. Roast until the internal temperature in the thickest part reaches 165°F (74°C). This will take about 60-75 minutes.
Smoking (The Ultimate Flavor): If you have a smoker, fire it up to 225-250°F (107-121°C). Use a mild wood like apple, cherry, or maple. Smoke the turkey until it hits that same internal temp of 165°F. This could take 3-4 hours, but the smoky flavor is absolutely incredible.
Chef’s Tip: No matter your method, use a digital meat thermometer! It’s the only way to guarantee perfectly cooked, juicy meat every single time.
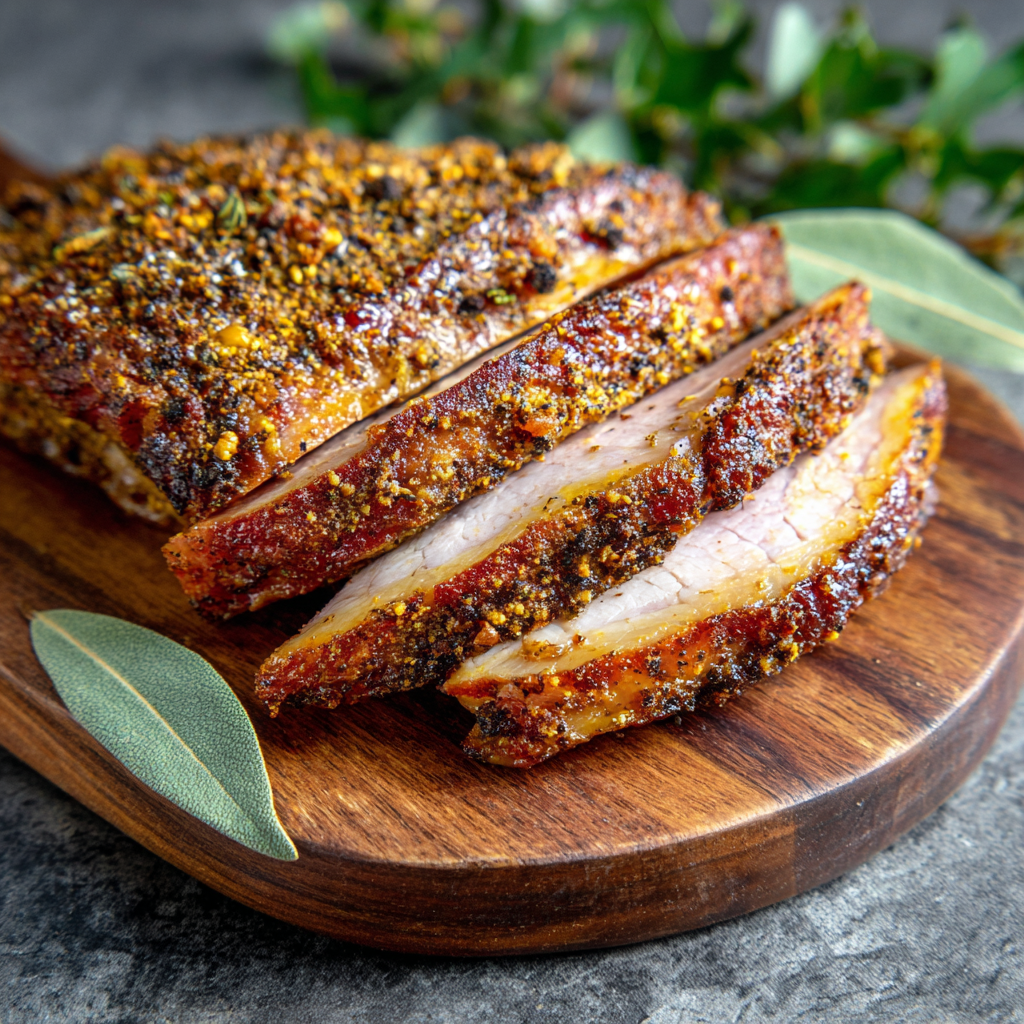
Step 5: The Patient Rest. This is the hardest step because the smell will be driving you crazy! But do not skip it. Once cooked, remove the turkey from the heat and let it rest on a cutting board for at least 20-30 minutes. Then, for the absolute best slicing results, wrap it tightly in plastic wrap and refrigerate it until it’s completely cold, preferably overnight. Chilling it firms up the meat, making it easy to slice paper-thin, just like the deli.
Feasting Time: How to Serve Your Turkey Pastrami
The moment has arrived! Unwrap your beautiful creation and use a very sharp knife or a mandoline (carefully!) to slice it as thin as you can. Now, the fun begins. The classic move is, of course, a towering sandwich on seeded rye bread with a generous slather of spicy brown mustard and a crisp dill pickle on the side. But don’t stop there! Dice it up for a incredible pastrami hash for breakfast, layer it into a chef’s salad for lunch, or simply enjoy it straight from the cutting board as a high-protein snack. It’s your masterpiece—enjoy it every way you can imagine!
Make It Your Own: Delicious Variations
Once you’ve mastered the base recipe, the flavor world is your oyster! Here are a few ways to mix it up:
- Coffee-Chili Rub: After brining and drying, pat the surface with a rub made from finely ground coffee, ancho chili powder, and extra black pepper before cooking for a deep, robust crust.
- Citrus Zest Twist: Add the zest of one orange and one lemon to the brine for a bright, fresh note that cuts through the richness.
- Southwest Style: Swap the pickling spice for a blend of cumin, smoked paprika, and oregano for a completely different flavor profile perfect for tacos.
- Lower-Sodium Version: Simply reduce the pickling salt to ¾ cup for a less salty, but still perfectly flavorful, result.
- Salmon Pastrami: Yes, really! Use a large, center-cut salmon filet (skin-on) and brine for only 8-12 hours before cooking. It’s incredible.
Olivia’s Chef Notes & Kitchen Stories
I’ll let you in on a little secret: the first time I made this, I was so impatient that I tried to slice it while it was still warm. It shredded like a sad confetti machine. I learned the hard way that good things come to those who wait (and chill!). This recipe has evolved from that initial slightly frustrating experiment into my go-to for impressing guests. I love watching their faces when I tell them, “Oh, that pastrami? Yeah, I made it.” The look of disbelief is worth every minute of brining time.
This recipe is also a testament to the power of a good brine. I now use this technique as a starting point for all kinds of poultry and pork. It’s a foundational skill that will level up your cooking in so many ways. So embrace the process, have fun with it, and don’t be afraid to get a little messy. That’s what the apron is for!
Your Questions, Answered: FAQs & Troubleshooting
Q: Can I skip the curing salt (Prague Powder)? What will happen?
A: Absolutely, you can skip it. The curing salt is primarily for color and that specific “cured” flavor reminiscent of traditional deli pastrami. Without it, your turkey will be fully cooked, perfectly brined, and delicious, but it will have the appearance of roasted turkey breast (more white/gray than pink). The taste from the spice brine is still phenomenal!
Q: My pastrami turned out a bit too salty for my taste. What can I do?
A: No worries! This can happen depending on the exact salt you use and brining time. For next time, you can reduce the pickling salt to ¾ cup. For this batch, all is not lost! Soak the sliced pastrami in cool water for 5-10 minutes, then pat it dry. This will help leach out some of the excess salt. Also, using it in applications where it’s not the sole star (like in a salad or a hash with potatoes) can help balance it out.
Q: Is it safe to brine for longer than 48 hours?
A: I wouldn’t recommend it for turkey breast. Because it’s a lean, relatively thin cut, brining for too long (more than 72 hours) can start to break down the proteins too much, resulting in a mushy, ham-like texture rather than a firm sliceable one. 48 hours is the sweet spot!
Q: I don’t have a pot big enough for a gallon of brine! What’s my solution?
A: This is a common kitchen dilemma! The easy fix is to use a clean, food-safe plastic bucket or a large, heavy-duty zip-top bag. Double-bag it if you’re nervous about leaks, place it in a baking dish or bowl to catch any spills, and put the whole thing in the fridge. The bag method is actually fantastic because you can flip it easily to ensure even brining.
Print
Homemade Turkey Pastrami
Description
Hey friend! If you love a good sandwich but want something fresher, leaner, and more flavorful than what comes wrapped in deli paper, this recipe is for you. Homemade turkey pastrami takes a little patience (thanks to the brine), but the hands-on work is surprisingly simple—and the reward is deli-style slices you made yourself. You’ll control the ingredients, keep things wholesome, and end up with juicy, spice-packed meat that’s perfect for sandwiches, wraps, or snacking straight from the fridge.
Ingredients
-
4 ½ lbs boneless, skinless turkey breast
-
⅔ cup brown sugar
-
6 tbsp pickling spice
-
2 tbsp curing salt (Prague Powder #1, optional)
-
1 cup kosher salt (or ¾ cup fine sea salt)
-
1 tsp ground cinnamon
-
¼ tsp ground nutmeg
-
16 cups (1 gallon) filtered water
Optional add-ins: 4 garlic cloves, 1 tsp black peppercorns, 2 bay leaves, or replace half the water with apple cider.
Instructions
-
Make the brine: In a large pot, combine water, sugar, salts, pickling spice, cinnamon, and nutmeg. Heat gently until dissolved (don’t boil). Cool completely.
-
Brine the turkey: Place turkey in a large non-reactive container or zip-top bag. Cover with cooled brine, making sure it’s fully submerged. Refrigerate 24–48 hours.
-
Dry and rest: Rinse turkey well under cold water and pat dry. Place on a wire rack in the fridge (uncovered) for 2–8 hours for best texture.
-
Cook:
-
Oven: Roast at 300°F (150°C) until internal temp reaches 165°F (74°C), about 60–75 minutes.
-
Smoker (best flavor): Smoke at 225–250°F (107–121°C) with apple or cherry wood, 3–4 hours, until internal temp hits 165°F.
-
-
Rest & chill: Let rest 20–30 minutes. Wrap and refrigerate until fully chilled (ideally overnight) before slicing thinly.
Notes
-
Don’t rush the chill: Slice only when cold—this keeps slices neat and deli-style.
-
Salt check: If worried about saltiness, reduce brine salt to ¾ cup next time.
-
Make it yours: Add citrus zest for brightness, or rub with coffee + chili before cooking for bold flavor.
Nutrition
- Calories: 180 cal Per Serving
- Carbohydrates: 2g
- Protein: 32g
Nutritional Information*
Per Serving (approx. 4 oz / 113g): Calories: 180 | Protein: 32g | Carbohydrates: 2g | Fat: 4g
*Please note: This is an estimate based on the ingredients used and can vary slightly depending on specific brands and any substitutions made. The values account for the majority of the brine ingredients being discarded.
Final Thoughts: Your Kitchen, Your Masterpiece
Well, friend, we’ve reached the end of our turkey pastrami journey. Look at you—briner, smoker (or roaster!), and now, a certified pastrami pro. What started as a simple turkey breast has been transformed through a little patience and a lot of flavor into something truly extraordinary.
Remember, the heart of this recipe isn’t just about ditching the deli counter; it’s about reclaiming the joy of creating something incredible with your own hands. It’s about the anticipation that builds as your kitchen fills with the scent of warm spices, and the pure satisfaction of slicing into your very own, perfectly crafted pastrami.
This is more than just a sandwich filling. It’s a story on a plate—a story you now get to tell. It’s the memory of a New York deli, the warmth of a shared meal, and the pride of a project beautifully completed. So pile it high, share it with someone you love, and savor every single bite of your well-earned triumph.


