

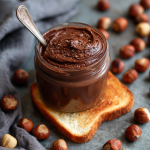
Why Homemade Nutella Became My Kitchen’s Happy Place
Hey there, fellow flavor adventurer! Olivia here, waving from my flour-dusted countertop. Can we just talk about that magical moment when you open a jar of chocolate-hazelnut spread? It smells like childhood joy and cozy mornings, right? But here’s the thing: what if I told you that *you* could create something even more incredible in your own kitchen? Something rich, velvety, and made with ingredients you can actually pronounce? Enter: Homemade Healthy Nutella.
Picture this: no mystery oils, no eye-watering sugar levels—just toasted hazelnuts dancing with cocoa and your favorite natural sweetener. This isn’t just a recipe; it’s your ticket to feeling like a kitchen wizard. Maybe you’re a busy parent sneaking a spoonful after bedtime, a brunch host wowing friends, or someone reclaiming joy in simple rituals. Whoever you are, this jar is your edible hug. And guess what? You don’t need fancy gear or chef-level skills. Just a food processor, 25 minutes, and that gorgeous curiosity of yours. Ready to make magic?
I’ll walk you through every step, spill my favorite messy-apron secrets, and even share why my first batch looked like chocolate gravel (spoiler: we’re fixing that!). Let’s turn those humble hazelnuts into liquid gold.
That Time I Burned the Hazelnuts (And Found Joy Anyway)
So, confession time: my first homemade Nutella adventure started with… smoke alarms. Yep. Picture 24-year-old me, newly obsessed with “clean eating,” determined to recreate my favorite spread. I was so busy belting out Shania Twain (don’t judge) that I forgot the hazelnuts roasting away. Suddenly, my tiny apartment smelled like a campfire. I frantically fanned the alarm with a towel while my cat gave me judgey side-eye.
But here’s the sweet part: scraping those slightly-charred nuts into the food processor anyway. I added cocoa and maple syrup, praying for a miracle. And friends? The *flavor*—deep, almost smoky, with this addictive toasted edge—was UNREAL. My “mistake” became my signature twist! Now, I intentionally roast those nuts until they’re dancing on the edge of dark. It taught me that kitchen “oops” moments often lead to the best discoveries. Perfection is overrated; flavor and fun are everything. Now, let’s make your version (sans fire department, promise).
Your Nutella Dream Team: Simple, Wholesome & Flexible
Gather these beauties! Measurements matter, but creativity rules. *Pro tip: Set everything out before starting—it’s like a flavor mise en place party!*
- Hazelnuts (2 cups / 240g): The rockstar! Raw or blanched work, but raw lets you control the roast. Chef’s insight: Toast them dark for depth—it hides bitterness!
- Cocoa Powder (¼ cup): Not hot chocolate mix! Use natural, unsweetened cocoa for true chocolate intensity. Sub: Cacao powder works but tastes fruitier.
- Sweetener (⅓ cup): Your call! Maple syrup adds earthiness, honey gives floral notes, powdered sugar makes it ultra-smooth, erythritol keeps it sugar-free. Adjust to taste!
- Pure Vanilla Extract (¼ tsp): The flavor booster! Chef’s secret: A tiny pinch of espresso powder here? *Chef’s kiss.*
- Salt (¼ tsp): Crucial! Balances sweetness. Use fine sea salt to blend seamlessly.
- Milk or Oil (½ cup milk OR 2 tbsp oil): Optional creaminess! Almond milk keeps it light, coconut oil firms up when chilled (great for dipping!), avocado oil is neutral. Add gradually!
Let’s Make Magic: Step-by-Step with Chef Cheers!
Step 1: Roast Those Nuts Like a Boss (10-12 mins)
Preheat oven to 375°F (190°C). Spread hazelnuts on a baking sheet—no oil needed! Roast 10-12 minutes until fragrant and skins split. Watch closely after 8 mins! They burn fast. Hack: Shake the pan halfway for even color. Done when they smell like heaven and look crackly.
Step 2: Skin Removal Shimmy (5 mins)
Dump warm nuts onto a CLEAN kitchen towel. Bundle it up, let them steam 1 minute (this loosens skins!). Then, rub vigorously like you’re warming cold hands. Truth bomb: Don’t obsess! 80% removed is fine. Stubborn skins? Toss ’em—flavor’s in the nut!
Step 3: Blend to Butter Bliss (8-10 mins)
Add nuts to food processor/blender. Blend on high, scraping down every minute. Patience, grasshopper! It’ll go: crumbs → paste → thick dough → suddenly SILKY butter. Takes 8-10 mins. Hot tip: If your machine groans, pause to cool it. We avoid motor meltdowns!
Step 4: Flavor Fusion Dance (2 mins)
Add vanilla, cocoa, sweetener, and salt to the nut butter. Blend 1-2 minutes until glossy. Taste! Want sweeter? Add 1 tsp sweetener. Game changer: For melt-in-mouth texture, stream in milk/oil while blending until it ribbons.
Step 5: Jar It Up! (2 mins)
Scoop into a clean jar. It thickens in the fridge. Pro move: Lick the spatula. Chef’s privilege.
Beyond the Spoon: Serving Your Liquid Gold
This isn’t just toast topping—it’s a vibe! For brunch: Swirl into yogurt with bananas and sea salt. Feeling fancy? Dollop on pancakes with raspberries. Kid-approved? Dip apple slices or pretzels. My fave? A warm spoonful over vanilla ice cream. Or hey, straight from the jar at 11 pm… I won’t tell! Store chilled; it spreads easier if you let it sit 10 minutes first.
Homemade Nutella: The Science Behind the Magic
What makes this homemade Nutella so much better than store-bought? It’s not just the absence of palm oil and refined sugar—it’s the food chemistry at work. Let’s break it down:
1. The Maillard Reaction: Toasting = Flavor Alchemy
When hazelnuts roast, the Maillard reaction occurs—a chemical process where amino acids and sugars in the nuts transform into complex, rich flavors. That’s why deeply toasted nuts taste nuttier, almost caramel-like, compared to raw ones. Bonus: This reaction also reduces bitterness!
2. Emulsion: How Nuts Turn into Butter (Then Spreadable Gold)
Blending hazelnuts breaks down their cell walls, releasing natural oils. At first, it looks dry and crumbly, but with patience, the oils emulsify into a smooth, liquid consistency. Adding a splash of milk or oil stabilizes the emulsion, preventing separation and creating that silky texture we love.
3. Cocoa’s Role: More Than Just Chocolate Flavor
Natural cocoa powder contains flavanols, antioxidants linked to heart health. Unlike commercial Nutella (which uses processed cocoa), homemade retains more of these benefits. Plus, cocoa’s bitterness balances the sweetness, making it craveable without being cloying.
4. Sweetener Science: Why Your Choice Matters
-
Maple syrup/honey add moisture, keeping the spread softer when chilled.
-
Powdered sugar dissolves instantly for ultra-smooth texture.
-
Sugar-free options (erythritol, monk fruit) don’t caramelize like sugar, so the flavor profile stays brighter.
Pro Tip: For a thicker, fudge-like spread, use coconut oil—it solidifies when cold, perfect for dipping fruit!
The Psychology of Homemade Treats: Why This Nutella Feels Special
This isn’t just a recipe—it’s a happiness trigger. Here’s why:
1. The Pride of Mastery
Creating something from scratch (especially a beloved treat) gives a dopamine boost. That “I made this!” feeling is linked to self-efficacy, a psychological motivator for sticking with healthy habits.
2. Nostalgia, Reinvented
Store-bought Nutella tastes like childhood, but homemade adds personal pride. It’s familiar yet novel—a psychological sweet spot for satisfaction.
3. Mindful Indulgence
Because you control the ingredients, there’s no guilt. Studies show that when people perceive food as “clean” or “wholesome,” they enjoy it more and feel fuller longer.
4. The Joy of Sharing
Gifting a jar triggers oxytocin (the “bonding hormone”). Whether for a neighbor or your future self, it’s edible love.
Pro Tip: Label your jar with a fun name (“Olivia’s Midnight Magic”) to reinforce the emotional connection!
Global Inspirations: Nutella’s Cultural Cousins
This recipe is part of a worldwide tradition of nut-chocolate pairings:
-
Italy’s Gianduja: The OG hazelnut-chocolate paste (1800s!), born when cocoa was scarce and nuts stretched it.
-
Turkey’s Çikolatalı Fındık Ezmesi: A less sweet, more nutty version, often eaten with simit (sesame bread).
-
Colombia’s Arequipe con Nueces: Dulce de leche + walnuts, proving the nut-chocolate combo is universal.
Cultural Twist Idea: Swap hazelnuts for pecans (Southern U.S. style) or pistachios (Middle Eastern vibe) for a regional spin!
Mix It Up: 5 Delicious Twists
- Orange Dream: Add 1 tbsp orange zest + ½ tsp cinnamon with the cocoa.
- Mocha Buzz: Blend in 1 tbsp instant espresso powder.
- Protein Power: Stir 2 scoops collagen peptides after blending (adds creaminess!).
- Vegan & Oil-Free: Use maple syrup + almond milk. Creamy without compromise!
- Nut-Free “Notella”: Swap hazelnuts for sunflower seeds! Roast same way.
Olivia’s Notebook: Real Talk from My Kitchen
This recipe evolved from my smoky hazelnut disaster! Early versions used expensive blanched nuts—turns out, lazy skin removal works fine. Texture woes? I learned: blend longer than you think, and adding liquid WARM makes it smoother. Also, a reader once subbed beet powder for cocoa (bless her heart)… stick to cocoa, friends. Now, I double batches for gifting—tie a ribbon around the jar! Nothing beats seeing someone’s face light up tasting real homemade goodness. It’s kitchen alchemy: simple ingredients + love = edible joy.
Your Nutella Queries—Solved!
Q: Why is my Nutella gritty? Help!
A: Two fixes! 1) Blend longer—up to 15 mins total. 2) Add 1-2 tbsp warm milk/oil while processing. Grit usually means under-blending or old nuts.
Q: Can I use a blender instead of a food processor?
A: Yes, but high-speed blenders (like Vitamix) work best. Use the tamper! Regular blenders may struggle—pause often to scrape.
Q: How long does it keep?
A: 2 weeks refrigerated. Oil versions may separate—just stir! Freezing? Portion in ice cube trays for smoothies!
Q: Too bitter? Too sweet?
A: Balance is key! Too bitter? Add 1 tsp sweetener + pinch salt. Too sweet? Blend in 1 tbsp extra nuts or cocoa.
Homemade Nutella
- Total Time: 25 minutes
Description
Hey flavor adventurer! Olivia here—ready to help you transform simple hazelnuts into rich, velvety Homemade Nutella that’s way better than store-bought. No mystery oils, no sugar overload—just deep chocolate flavor, natural sweetness, and the nostalgic comfort of spreading love on toast. Grab your food processor—it’s time to feel like a kitchen wizard!
Ingredients
-
2 cups (240g) raw or blanched hazelnuts
-
¼ cup unsweetened cocoa powder
-
⅓ cup natural sweetener (maple syrup, honey, or powdered sugar)
-
¼ tsp pure vanilla extract
-
¼ tsp fine sea salt
-
½ cup milk or 2 tbsp neutral oil (optional, for extra creaminess)
Instructions
1️⃣ Roast: Preheat oven to 375°F (190°C). Spread hazelnuts on a tray, roast 10–12 mins until fragrant and skins split. Shake halfway—don’t walk away!
2️⃣ Skin: Wrap warm nuts in a clean towel, rub to remove skins (perfection not required!).
3️⃣ Blend: Add nuts to processor. Blend 8–10 mins, scraping sides often. Be patient—crumbs → paste → glossy nut butter.
4️⃣ Flavor: Add cocoa, sweetener, vanilla, and salt. Blend 1–2 mins more. For a silkier spread, stream in warm milk or oil until smooth.
5️⃣ Jar: Spoon into a clean jar. Chill to thicken, spread at room temp for max scoopability!
Notes
-
Roast nuts darker for a deep, toasty flavor.
-
For smoother texture, add liquid warm.
-
Store in fridge for 2 weeks—stir if it separates!
- Prep Time: 25 mins
Nutrition
- Calories: 80 Cal per serving
- Fat: 6g
- Carbohydrates: 4g
- Protein: 1.5g
Nutritional Perks (Per 1 tbsp)
Calories: ~80 | Fat: 6g (Healthy fats from nuts!) | Carbs: 4g | Protein: 1.5g | Sugar: Varies by sweetener
Note: Values vary with subs. Using only nuts/oil? Fat increases. Sugar-free sweetener? Carbs decrease.
Final Thoughts: More Than a Spread—A Little Jar of Joy
This Homemade Healthy Nutella isn’t just about skipping additives. It’s about:
✅ Owning your cravings (no guilt, just goodness).
✅ Celebrating mistakes (hello, smoky hazelnut happy accident!).
✅ Creating moments of delight—whether it’s a solo spoonful or a brunch centerpiece.
So next time you dip a strawberry or swipe some on toast, remember: You’re not just eating. You’re crafting joy, one blend at a time. Now, go forth and spread the love—literally!


