

The Magic Potion: My Homemade New Mexico Green Chile Sauce
Hey friends, Olivia here! Can we talk about something that smells like pure happiness? I’m talking about that incredible, smoky aroma that fills your kitchen when fresh chiles hit a hot surface. It’s the scent of anticipation, of a meal that’s about to become legendary. If you’ve ever been to the Southwest, you know exactly what I mean. It’s the smell of roadside stands in late summer, of bustling family kitchens, and of a sauce so versatile, it deserves a permanent spot in your fridge.
Today, we’re diving headfirst into making my absolute favorite: Homemade New Mexico Green Chile Sauce. This isn’t just a condiment; it’s a liquid gold, a flavor bomb, the secret weapon that can turn simple scrambled eggs into a fiesta, a humble burrito into a masterpiece, and a piece of grilled chicken into something you’ll dream about for days. The best part? It’s deceptively simple. If you can chop an onion and stir a pot, you are more than capable of creating this iconic sauce.
I know some of you might be thinking, “But Olivia, I can’t get Hatch chiles where I live!” Don’t you worry. We’re going to talk substitutions and workarounds because everyone deserves to experience this magic. So, tie on your favorite apron (the messy one with all the stains tells the best stories), and let’s make some kitchen magic together. This sauce is about to become your new best friend.
A Hatch Chile Memory: More Than Just Heat
My love affair with this sauce started not in a fancy restaurant, but in the passenger seat of my best friend’s beat-up pickup truck during a sweltering August in New Mexico. We were on a road trip, windows down, radio blasting, when we saw them: endless rows of bright green chiles roasting in giant, mesquite-fired drums right there on the side of the road. The air was thick with this incredible smoky perfume. We pulled over, bought a bushel bag still warm from the roaster, and drove straight to her abuela’s house.
I’ll never forget walking into that kitchen. Abuela Elena, a tiny woman with a formidable presence and the warmest smile, took one look at our prized chiles, nodded approvingly, and put me to work peeling them while my fingers tingled slightly from the capsaicin. No recipe card, no measuring cups—just instinct, tradition, and laughter. As the sauce simmered on the stove, filling the entire house with its promise, she told me stories of her own childhood, of family gatherings that always, always featured a pot of green chile. That sauce wasn’t just food; it was a thread connecting generations. Every time I make this recipe, I’m transported back to that warm, fragrant kitchen, and I remember that the best meals are the ones seasoned with love and shared with people who matter.
Gathering Your Green Chile Dream Team
Here’s everything you’ll need to create about 4 cups of pure bliss. Remember, great ingredients make a great sauce, so let’s get to know them a little better!
- 2 lbs fresh Hatch green chiles: This is the star of the show! Hatch chiles have a unique, earthy sweetness and a variable heat level (from mild to hot) that’s perfect for sauce. Chef’s Insight: When in season (late July through September), buy extra, roast them, and freeze them flat in bags for year-round goodness. Substitution: No Hatch? Use a combination of poblano peppers (for flavor) and jalapeños or serranos (for heat). Anaheim peppers are also a good stand-in.
- 2 tbsp olive oil or butter: Your cooking fat. Oil gives a cleaner flavor, while butter adds a touch of rich, velvety sweetness. I often use one tablespoon of each for the best of both worlds!
- 1 medium onion, finely chopped: We’re building a flavor base, and the onion is the foundation. Yellow onions are perfect for their balance of sweetness and sharpness.
- 4 cloves garlic, minced: Because is there any savory dish that isn’t made better by garlic? I think not.
- 2 tbsp all-purpose flour: This is our thickening agent, creating a light roux that gives the sauce body. Gluten-Free Swap: An equal amount of almond flour, masa harina, or even a cornstarch slurry (mix 1 tbsp cornstarch with 2 tbsp cold water and add at the end of cooking) works perfectly.
- 2 cups chicken or vegetable broth: The liquid base. Use a good-quality broth, as it contributes significantly to the depth of flavor. Vegetable broth keeps it vegetarian-friendly!
- 1 tsp ground cumin: Adds a warm, earthy, slightly smoky note that complements the chiles beautifully.
- 1 tsp dried oregano: I highly recommend seeking out Mexican oregano if you can find it. It has a more citrusy, robust flavor compared to its Mediterranean cousin.
- Salt & pepper, to taste: Essential for making all the other flavors pop. Season in steps—a little when you cook the onions, and then again at the end.
- Juice of 1 lime: The secret weapon! A splash of fresh lime juice at the very end brightens everything up and balances the richness.
Let’s Get Cooking: Your Step-by-Step Guide
Okay, team, it’s go time! This process is simple, but each step builds layers of flavor. Read through once, then let’s get our hands (metaphorically) dirty.
Step 1: Roast Those Chiles! (Skip this step if using pre-roasted chiles.)
If you’re starting with fresh chiles, we need to blister and blacken the skins to make them easy to peel and to develop that incredible smoky flavor. You can do this a few ways: under your oven’s broiler (place them on a baking sheet, turn every 5-7 minutes), directly over the flame of a gas stove (using tongs!), or on a hot grill. We want them charred and blistered all over. Once they’re nicely blackened, immediately transfer them to a bowl and cover it tightly with plastic wrap, or pop them into a paper bag and fold it closed. Let them steam for 10-15 minutes. This sweating process loosens the skin. After they’ve cooled enough to handle, the skins will rub right off! Then, slice them open, scrape out the seeds and inner membranes (this is where a lot of the heat lives, so adjust to your preference), and give them a rough chop. Chef’s Hack: Wear disposable gloves for this part if you have sensitive skin, and whatever you do, don’t touch your eyes!
Step 2: Build Your Flavor Foundation.
Place a medium-sized saucepan or Dutch oven over medium heat. Add your olive oil or butter. Once it’s shimmering (for oil) or melted and foamy (for butter), toss in your chopped onion. We’re not looking for color here, just softness. Sauté those onions, stirring occasionally, until they become translucent and fragrant, about 5-7 minutes. Now, add the minced garlic and cook for just one more minute. You’ll smell the garlic’s perfume—that’s your cue to move on. We don’t want to burn the garlic, as it will turn bitter.
Step 3: Create the Roux.
Sprinkle the 2 tablespoons of flour over the onion and garlic mixture. Immediately start stirring with a wooden spoon or whisk. Cook this paste, which is called a roux, for about a minute. This cooks out the raw flour taste and ensures our sauce thickens nicely without being gritty.
Step 4: Whisk, Simmer, and Infuse.
Now, here’s the key to a lump-free sauce: slowly add the broth while whisking constantly. I mean it—pour in a steady, thin stream and whisk like your sauce depends on it (because it does!). Once all the broth is incorporated, you’ll have a smooth, thin liquid. Now, stir in your star ingredient: the chopped, roasted Hatch chiles. Add the cumin, oregano, a good pinch of salt, and a few grinds of black pepper. Bring the whole glorious mixture to a gentle simmer, then reduce the heat to low. Let it bubble away happily for 15-20 minutes, stirring occasionally. You’ll see it slowly thicken and the flavors meld into something truly special.
Step 5: The Final, Flavor-Boosting Touch.
Turn off the heat. Now, stir in the fresh lime juice. Taste it! This is the most important step. Does it need more salt? A bit more pepper? Adjust the seasoning until it makes your taste buds sing. Now, decide on your texture. I love a sauce with a bit of chunkiness, so I often leave it as is. But if you prefer a smoother, more pourable sauce, this is the time to use an immersion blender right in the pot, pulsing a few times until it reaches your desired consistency. You can also carefully transfer it to a regular blender, but be sure to leave the lid’s center plug out and cover it with a towel to avoid steam explosions!
How to Serve Your Liquid Gold
The possibilities are endless, but here are a few of my favorite ways to use this sauce. For a classic New Mexico dish, make Green Chile Enchiladas: smother corn tortillas filled with cheese and onion in the sauce, top with more cheese, and bake until bubbly. It’s absolute heaven drizzled over huevos rancheros or folded into scrambled eggs. Take your burgers, fries, or baked potatoes to the next level. My personal favorite? A simple bowl of pinto beans and rice becomes a celebratory meal with a generous ladleful of this sauce on top. Don’t be shy—get creative!
Make It Your Own: Delicious Twists & Swaps
This recipe is a fantastic canvas. Feel free to play!
- Porky Goodness: Add ½ lb of ground pork or diced pork shoulder to the pot after cooking the onions. Brown the pork before adding the garlic for a heartier, meaty sauce.
- Creamy Green Chile: Stir in ½ cup of Mexican crema, sour cream, or even heavy cream at the very end (after turning off the heat) for a richer, milder, and creamier version.
- Tomato Twist: Add one 14.5-oz can of diced fire-roasted tomatoes (undrained) along with the broth for a “Green Chile Salsa Verde” hybrid.
- Smokier & Spicier: Add a pinch of chipotle powder or a single canned chipotle in adobo (minced) for a deeper, smokier heat.
- Vegan/Vegetarian: It’s already vegetarian if you use veggie broth! For vegan, just stick with olive oil instead of butter.
Olivia’s Chef Notes & Kitchen Stories
This recipe has evolved so much since that first day in Abuela Elena’s kitchen. I’ve made it for countless potlucks, poured it over Thanksgiving turkey leftovers (trust me, it works), and even shipped frozen containers to homesick friends. One of my favorite kitchen fails involved me, in a hurry, forgetting to wear gloves while peeling a huge batch of extra-hot chiles. Let’s just say my hands felt like they were vibrating for hours, and I learned my lesson the hard way! The beauty of this sauce is its forgiving nature. A little more onion, a little less cumin—it will still be delicious. It also freezes like a dream. I let it cool completely, then pour it into freezer-safe jars or zip-top bags (lay them flat to save space!). It will keep for up to 6 months, ready to bring a taste of summer to any dreary winter day.
Your Green Chile Questions, Answered!
Q: My sauce is too thin! How can I thicken it?
A: No worries! The easiest fix is to let it simmer uncovered for a bit longer, which will allow excess liquid to evaporate. If you’re in a rush, you can create a quick slurry: mix 1 tablespoon of cornstarch with 2 tablespoons of cold water until smooth. Whisk this into the simmering sauce, and it should thicken up within a minute or two.
Q: My sauce is too spicy! How can I tame the heat?
A: It happens to the best of us! The capsaicin (the compound that creates heat) is oil-soluble. Stirring in a bit of fat can help mellow it out. Try adding a tablespoon of butter, a splash of heavy cream, or even a pinch of sugar. Serving it with cooling ingredients like sour cream, avocado, or a creamy cheese (like queso fresco) on your final dish will also balance the spice.
Q: Can I use canned green chiles?
A: You can, in a pinch! One 28-ounce can of diced green chiles (drained) is roughly equivalent to 2 lbs of fresh. The flavor won’t have the same depth and smokiness as using freshly roasted chiles, but it will still be tasty. I’d recommend sautéing the canned chiles with the onions for a minute to wake up their flavor before proceeding.
Q: Why does my sauce taste a little bitter?
A: Bitterness can come from a couple of places. The most common culprit is accidentally burning the garlic or flour. Remember, we’re just toasting them lightly, not browning them. Another potential cause is the white pith (the inner membrane) of the chiles, which can be bitter. Be sure to scrape it out thoroughly when you’re seeding them.
Print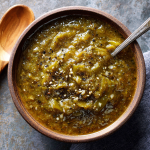
Homemade New Mexico Green Chile Sauce
- Total Time: 45 min
Description
There’s a reason this sauce is liquid gold: smoky roasted chiles, garlic, onions, and just the right spices come together to transform eggs, burritos, chicken, or even beans and rice into something unforgettable. This versatile sauce will quickly become your go-to flavor booster.
Ingredients
Main Ingredients:
-
2 lbs fresh Hatch green chiles (or poblano + jalapeño/serrano blend)
-
2 tbsp olive oil or butter (or 1 tbsp each)
-
1 medium onion, finely chopped
-
4 cloves garlic, minced
-
2 tbsp all-purpose flour (or almond flour / masa harina / cornstarch slurry for GF)
-
2 cups chicken or vegetable broth
-
1 tsp ground cumin
-
1 tsp dried oregano (Mexican oregano preferred)
-
Salt & pepper, to taste
-
Juice of 1 lime
Instructions
1. Roast the Chiles (Skip if using pre-roasted)
-
Char chiles under a broiler, on a grill, or over a gas flame until blackened and blistered.
-
Steam in a covered bowl or paper bag for 10–15 min.
-
Peel off skins, remove seeds/membranes, and roughly chop. Tip: Wear gloves to avoid capsaicin burns!
2. Build the Flavor Base
-
Heat oil/butter in a saucepan over medium heat.
-
Sauté onion until translucent (~5–7 min).
-
Add garlic; cook 1 more minute, until fragrant.
3. Create the Roux
-
Sprinkle flour over the onions and garlic.
-
Stir constantly for ~1 minute to remove raw flour taste.
4. Whisk in Broth & Chiles
-
Slowly pour in broth while whisking to prevent lumps.
-
Stir in roasted chiles, cumin, oregano, salt, and pepper.
-
Simmer gently 15–20 min, stirring occasionally, until thickened.
5. Final Touch
-
Turn off heat and stir in lime juice.
-
Adjust seasoning as needed.
-
Optional: Use an immersion blender for a smoother sauce.
Notes
-
Too Thin: Simmer longer uncovered, or whisk in a cornstarch slurry (1 tbsp cornstarch + 2 tbsp water).
-
Too Spicy: Add fat (butter, cream), a pinch of sugar, or serve with sour cream/avocado.
-
Canned Chiles: 28-oz can ≈ 2 lbs fresh. Sauté briefly to boost flavor.
-
Bitterness: Avoid burnt garlic/flour and remove white pith from chiles.
- Prep Time: 20 min
- Cook Time: 25 min
Nutrition
- Calories: 40 cal Per Serving
- Fat: 2g
- Carbohydrates: 4g
Nutritional Information*
Prep time: 20 minutes | Cook time: 25 minutes | Total time: 45 minutes | Yield: ~4 cups
*Please note: This is an estimate provided for informational purposes only. Exact values can vary based on specific ingredients used.
Per ¼ cup serving (approx.):
40 calories | 2g fat | 4g carbs | 1g protein
Final Thoughts: A Sauce to Savor and Share
And there you have it! What was once a humble bag of chiles is now a vibrant, simmering pot of pure Southwestern soul. This sauce is more than just a recipe; it’s a keeper of memories, a builder of new ones, and a testament to the fact that the most powerful ingredients are often the simplest ones.
As you ladle this liquid gold into a jar, you’re not just stocking your fridge—you’re arming yourself with the power to transform the ordinary into the extraordinary. You’ve created something real, something filled with the warmth of tradition and the spark of your own effort.
So go ahead, drizzle it, dunk it, smother it. Share it with friends and watch their eyes light up. Make a double batch and stash one in the freezer for a day when you need a quick taste of sunshine. This Homemade New Mexico Green Chile Sauce is your secret now. Use it well, make it your own, and most importantly, enjoy every single delicious bite.


