
Why Your Lunch Needs a Little Shake-Up (Literally!)
Hey there, friend! Let’s have a little heart-to-heart. Tell me if this sounds familiar: It’s 12:03 PM. You’re hungry, you’re busy, and you’re staring into the fridge’s abyss, hoping a delicious, satisfying meal will magically materialize. Instead, you’re faced with sad leftovers, questionable condiments, and the crushing guilt of that expensive takeout salad you bought yesterday… and will probably buy again today. I’ve been there more times than I’d like to admit, usually while wearing my flour-dusted “Kiss the Cook” apron. The midday scramble is real.
But what if I told you the secret to conquering your week isn’t a superhero effort on Monday night, but a simple, joyful 30 minutes of kitchen playtime? What if your lunch could be a vibrant, protein-packed fiesta that actually excites you? Enter the hero we all deserve: the High-Protein Taco Bowl Jar.
This isn’t just meal prep; it’s meal prep magic. We’re taking everything you love about taco Tuesday—the savory, spiced meat, the hearty beans, the cool, creamy toppings—and packing it into a brilliant, portable, no-soggy-lettuce-in-sight jar. Imagine grabbing a jar from your fridge, giving it a confident shake, and dumping out a perfectly layered, restaurant-worthy bowl. It’s convenience without compromise, flavor without the fuss. So, tie on that apron (messy is encouraged!), and let’s build something delicious that your future, very-hungry self will thank you for.
Taco Night & The Blue Spatterware Bowl
This recipe has its roots in the noisy, wonderful chaos of my family’s kitchen growing up. My dad was the undisputed king of Taco Night. He’d take over the stove, browning ground beef with a packet of seasoning that made the whole house smell like pure joy. My job? The “Assembly Line Manager.” I’d set out the big blue spatterware bowl for the meat, and all the little dishes for the toppings: shredded cheese, diced tomatoes, sour cream (the full-fat kind, because it was the 90s!), and crisp iceberg lettuce.
The magic wasn’t just in the eating; it was in the building. Everyone customized their own plate, creating little edible landscapes of flavor and crunch. It was where we talked about our days, argued over who got the last olive, and just connected. This Taco Bowl Jar captures that same spirit of customizable joy, but in a single-serving, grab-and-go package. Every time I layer a jar, I think of that blue bowl and the simple, powerful truth that good food is about more than fuel—it’s a little edible love note, even when you’re just writing it to yourself.
Gathering Your Flavor Builders
Here’s everything you need to create four perfect, portable fiestas. I’ve tossed in my favorite tips and swaps so you can make this recipe your own!
- 500 g (about 1.1 lbs) Ground Turkey or Lean Ground Beef: The protein powerhouse! I lean towards 93% lean ground turkey for a lighter feel, but 90% lean beef brings that classic, rich taco flavor. Chef Insight: Don’t be afraid to mix half and half for the best of both worlds!
- 1 tbsp Olive Oil: Just enough to get our meat browning beautifully without sticking.
- 1 Packet Taco Seasoning (or 1 tbsp Homemade Blend): The flavor commander! Store-bought is perfectly convenient. If you’re feeling crafty, a quick homemade blend (think chili powder, cumin, paprika, garlic powder, onion powder, and a pinch of oregano) lets you control the salt and spice.
- ½ cup Water: This helps the seasoning coat every morsel and creates a saucy, clingy texture that’s key for layering.
- 1 cup Black Beans, drained and rinsed: For fiber, plant-based protein, and that wonderful hearty texture. Sub Tip: Pinto or kidney beans work just as well here. Always rinse canned beans to remove that starchy liquid.
- 1 cup Corn: A pop of sweet, sunny flavor. I love using frozen fire-roasted corn if I can find it—it adds a subtle smokiness! Thaw frozen corn before layering.
- 2 cups Chopped Romaine or Iceberg Lettuce: The crucial crunch factor! Romaine holds up slightly better, but Iceberg has that iconic crispness. Chop it finely so it layers and shakes out easily.
- 1 cup Greek Yogurt (plain, full-fat or 2%): Our “secret weapon” creamy layer. It’s tangy, protein-rich, and mimics sour cream perfectly. Trust me on this one! If you’re dairy-free, a plain, unsweetened vegan yogurt or mashed avocado works.
- 1 cup Salsa: This is our jar’s flavorful foundation. Use a thicker pico de gallo or a chunky restaurant-style salsa. The liquid from a runny salsa can make things mushy.
- Optional Toppings (The Fun Stuff!): Shredded cheese (cheddar or a Mexican blend), diced tomatoes, sliced avocado (add fresh when serving), fresh cilantro, a squeeze of lime juice. These are best added fresh after shaking out the jar.
Let’s Build Some Jars! (Step-by-Step)
Ready to play culinary architect? This process is simple, satisfying, and the key to soggy-proof lunches. Follow the layering order—it’s science and deliciousness combined.
- Cook the Protein: Heat the olive oil in a large skillet over medium heat. Add your ground meat. Cook, breaking it up with a spoon, until it’s fully browned and no pink remains. This usually takes about 7-8 minutes. Chef Hack: Don’t stir constantly! Let it get a little caramelized in spots for extra flavor.
- Season to Perfection: Sprinkle the taco seasoning over the cooked meat. Pour in the ½ cup of water. Give it all a good stir, scraping up any tasty browned bits from the bottom of the pan. Let it simmer for 3-4 minutes, until the liquid has mostly absorbed and the meat is beautifully coated in that fragrant seasoning. Remove from heat and let it cool for at least 10 minutes. Important! Cooling prevents steam from wilting your lettuce in the jar.
- Prep Your Station: While the meat cools, get your assembly line ready. Drain and rinse your beans, thaw your corn if using frozen, chop your lettuce, and have your salsa, Greek yogurt, and four clean mason jars (wide-mouth, 24-32 oz jars are ideal) standing by.
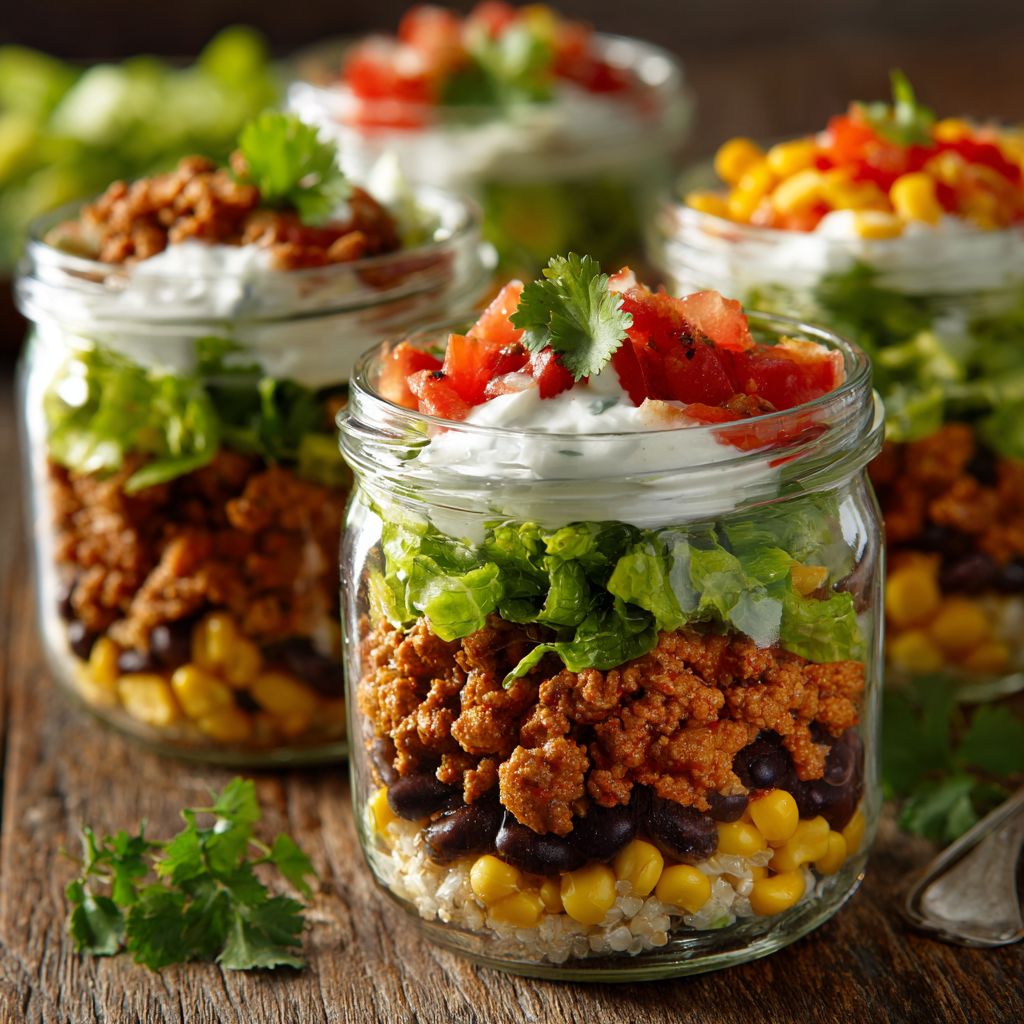
- The Magic Layering (Bottom to Top): This order is your ticket to crispness! For each jar:
- Layer 1 (The Foundation): ¼ cup of Salsa. This saucy base sits at the bottom, away from the delicate lettuce.
- Layer 2 (The Creamy Barrier): ¼ cup of Greek Yogurt. Spoon it right on top of the salsa. It acts as a sealant, protecting the layers above from moisture.
- Layer 3 (The Warm Heart): The cooled, seasoned meat. Divide it evenly among the jars. Press it down gently.
- Layer 4 (The Hearty Fillers): ¼ cup Black Beans, then ¼ cup Corn. They sit happily in the middle.
- Layer 5 (The Crunchy Crown): A big handful of Chopped Lettuce. Pack it in loosely—it needs room to breathe! Screw the lid on tightly.
- Store & Serve: Refrigerate your finished jars for up to 4 days. When hunger strikes, simply unscrew the lid, give the jar a few good shakes to mix the bottom layers, and either eat straight from the jar or pour it all into a bowl. Top with your fresh goodies like avocado, extra cilantro, or a lime wedge!
How to Serve Your Masterpiece
The beauty is in the grab-and-go! For maximum enjoyment at your desk or on the patio, shake the jar vigorously to distribute the salsa and yogurt throughout. Then, you have two stellar options: 1) The Minimalist: Eat it right from the jar with a long-handled spoon. 2) The Presentation Pro: Invert the jar over a bowl and let the colorful layers tumble out in all their glory. This is the perfect moment to add those fresh, last-minute toppings—a sprinkle of cheese, a few avocado slices, a shower of cilantro. It instantly feels like a treat!
Make It Your Own: 5 Flavor Twists
- Fiesta Veggie: Swap the meat for 2 cups of roasted sweet potatoes and black beans, seasoned with taco spice. A vegan dream!
- Buffalo Chicken: Use shredded rotisserie chicken tossed in buffalo sauce. Swap the salsa for a blue cheese or ranch Greek yogurt dip.
- Mediterranean Meets Mexican: Use ground lamb or turkey with a za’atar spice blend. Swap black beans for chickpeas, salsa for a cucumber-tomato salad, and use tzatziki instead of Greek yogurt.
- “Cheeseburger” Bowl: Season beef with onion powder and garlic. Use a layer of burger sauce (mix ketchup, mayo, relish), pickles, and shredded cheddar. Skip the salsa and corn.
- Low-Carb/Cauliflower Rice: Replace the beans and corn with a layer of riced cauliflower sautéed with taco seasoning. It soaks up all the flavors beautifully.
Olivia’s Kitchen Notes
This recipe has evolved from a “desperation meal prep” idea to my most-requested lunch hack! I learned the hard way that layering order is non-negotiable—lettuce on the bottom equals a sad, wilted salad by Wednesday. The biggest game-changer? Using Greek yogurt. A friend challenged me to try it years ago, and I’ve never looked back. It adds a tangy creaminess and a whopping protein boost that keeps me full for hours.
Funny story: I once tried to layer these in fancy Weck jars with glass lids for a photoshoot. They looked gorgeous… until I realized you couldn’t shake them without the lid popping off! Cue a comical kitchen moment of me chasing taco ingredients across the counter. Stick with trusty screw-top mason jars, folks. They’re the unsung heroes of the meal prep world.
Your Questions, Answered!
Q: How long do these jars actually stay fresh?
A: The beauty of the proper layering is freshness! They are perfect for 4 days in the fridge. By day 5, the lettuce might start to lose its pep. I don’t recommend freezing, as the texture of the fresh veggies and yogurt won’t hold up.
Q: My lettuce got soggy! What did I do wrong?
A: Two likely culprits: 1) The meat was still warm/hot when you layered it. Let it cool completely! 2) You used a very watery salsa or didn’t have a thick enough creamy layer (the Greek yogurt) to block the moisture. Always drain salsa if it looks liquidy, and ensure your yogurt layer fully covers the salsa below.
Q: Can I make these vegetarian or vegan?
A: Absolutely! For vegetarian, use a plant-based ground “meat” or double up on beans and corn. For vegan, follow the vegetarian swap and replace the Greek yogurt with a plain, unsweetened vegan yogurt, cashew cream, or simply a layer of mashed avocado (add fresh when serving).
Q: I don’t have mason jars. What can I use instead?
A: Any container with a tight-sealing lid works! Plastic meal-prep containers are fine—just follow the same layering principles. The jar is fun for the “shake” factor, but the magic is in the method, not the vessel.

High-Protein Taco Bowl Jars : Meal Prep Made Easy
Description
Let’s be honest—lunchtime can feel repetitive. But this High-Protein Taco Bowl Jar turns meal prep into something colorful, flavorful, and actually exciting. It’s packed with over 40 grams of protein, layered to stay crisp for days, and designed for one simple move at lunchtime: shake and enjoy.
Ingredients
-
500 g (1.1 lb) 93% lean ground turkey or 90% lean ground beef
-
1 tablespoon olive oil
-
1 packet taco seasoning (or 1 tablespoon homemade blend)
-
½ cup water
-
1 cup black beans, drained and rinsed
-
1 cup corn (fresh, canned, or thawed frozen)
-
2 cups chopped romaine or iceberg lettuce
-
1 cup plain Greek yogurt (full-fat or 2%)
-
1 cup thick salsa (chunky style works best)
Optional Toppings (add before serving):
Shredded cheddar, diced tomatoes, sliced avocado, fresh cilantro, lime wedges.
Instructions
1. Cook the Meat
Heat olive oil in a skillet over medium heat. Add ground turkey or beef and cook until browned, breaking it up as it cooks (about 7–8 minutes).
2. Season
Add taco seasoning and ½ cup water. Stir well and simmer for 3–4 minutes until slightly thickened. Remove from heat and let cool completely.
3. Prepare Ingredients
Drain beans, thaw corn if needed, and chop lettuce.
4. Layer the Jars (Bottom to Top)
For each jar:
-
¼ cup salsa (bottom layer)
-
¼ cup Greek yogurt (acts as moisture barrier)
-
Seasoned meat (evenly divided)
-
¼ cup black beans
-
¼ cup corn
-
Handful of chopped lettuce (top layer)
Seal tightly.
5. Store
Refrigerate for up to 4 days.
6. Serve
When ready to eat, shake the jar to distribute flavors or pour into a bowl and add fresh toppings.
Notes
-
Cool the meat fully before layering to prevent wilted lettuce.
-
Use thick salsa to avoid excess liquid.
-
Follow the layering order—wet ingredients stay on the bottom.
-
Wide-mouth jars (24–32 oz) work best for easy shaking and pouring.
-
Add avocado fresh to prevent browning.
Nutritional Info (Per Jar, est. with 93% lean turkey & full-fat Greek yogurt)
- Calories: ~480 kcal
- Protein: 42 g (The star of the show!)
- Carbohydrates: 38 g
- Fat: 19 g
- Fiber: 8 g
Final Thoughts
Why Your Lunch Needs a Little Shake-Up (Literally!)
Hey there, friend! Let’s have a little heart-to-heart. Tell me if this sounds familiar: It’s 12:03 PM. You’re hungry, you’re busy, and you’re staring into the fridge’s abyss, hoping a delicious, satisfying meal will magically materialize. Instead, you’re faced with sad leftovers, questionable condiments, and the crushing guilt of that expensive takeout salad you bought yesterday… and will probably buy again today. I’ve been there more times than I’d like to admit, usually while wearing my flour-dusted “Kiss the Cook” apron. The midday scramble is real.
But what if I told you the secret to conquering your week isn’t a superhero effort on Monday night, but a simple, joyful 30 minutes of kitchen playtime? What if your lunch could be a vibrant, protein-packed fiesta that actually excites you? Enter the hero we all deserve: the High-Protein Taco Bowl Jar.
This isn’t just meal prep; it’s meal prep magic. We’re taking everything you love about taco Tuesday—the savory, spiced meat, the hearty beans, the cool, creamy toppings—and packing it into a brilliant, portable, no-soggy-lettuce-in-sight jar. Imagine grabbing a jar from your fridge, giving it a confident shake, and dumping out a perfectly layered, restaurant-worthy bowl. It’s convenience without compromise, flavor without the fuss. So, tie on that apron (messy is encouraged!), and let’s build something delicious that your future, very-hungry self will thank you for.


