
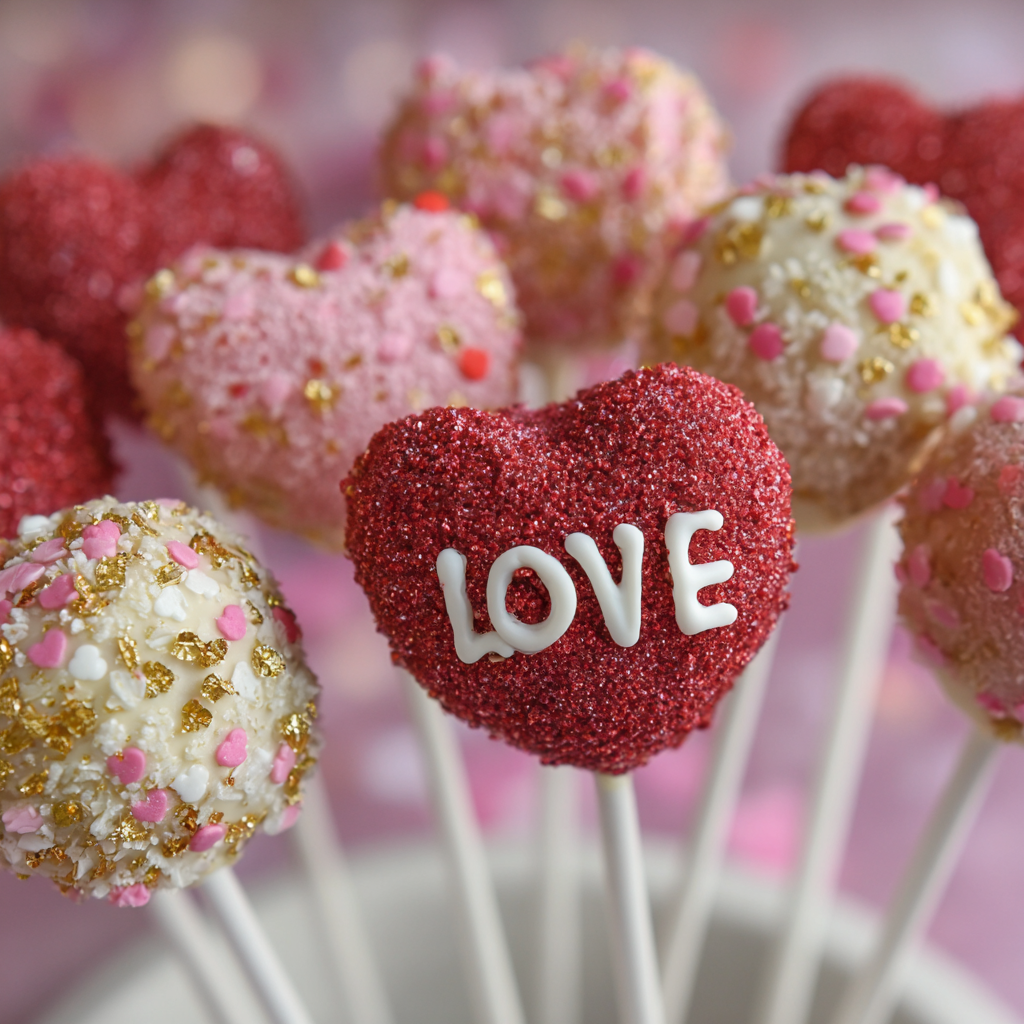
Heart Cake Pops with Edible Glitter: Sparkly Bites of Joy
Is there any smell more purely, wonderfully joyful than a cake baking in the oven? That warm, buttery, sugar-kissed aroma that wafts through the house and pulls everyone into the kitchen, noses first? I live for that moment. And today, we’re taking that simple, beautiful joy and turning it into something extra magical, extra sparkly, and undeniably cute: Heart Cake Pops with Edible Glitter.
Now, I know what you might be thinking. “Olivia, cake pops look so fancy! Are they fussy?” Let me stop you right there, my friend. These are the anti-fussy fancy treat. They are the ultimate kitchen alchemy: turning humble cake crumbs and a bit of frosting into gleaming, handheld jewels. They’re proof that you don’t need a pastry degree to create something that looks like it came from the sweetest little boutique bakery. All you need is a willingness to get your hands a little messy and a heart ready to spread some joy.
These pops are for you if you’ve got a Valentine to impress (hello, homemade gift from the heart!), a Galentine’s brunch that needs a showstopper, or just a Tuesday afternoon that craves a dash of sparkle. They’re conversation starters, smile-inducers, and pure, bite-sized happiness. So, tie on that apron—the messy one is always the best—and let’s make something unforgettable together.
A Little Sparkle & A Lot of Love
My love affair with cake pops started not in a fancy kitchen, but at my Grandma Mae’s laminate countertop. She wasn’t a “cake pop” grandma—those didn’t really exist back then. She was a “never-waste-a-crumb” grandma. If a cake layer broke or the edges got too crispy, she’d sigh, crumble the perfectly good cake into a big bowl, stir in a spoonful of leftover frosting or a splash of milk, and let my sister and I roll the sticky mixture into lopsided balls. We’d eat them with our fingers, giggling, covered in chocolate.
Years later, when I first saw a professional, perfectly spherical cake pop on a stick, I gasped. “Grandma!” I thought. She was a trendsetter and didn’t even know it. My modern twist—shaping them into hearts and showering them in glitter—is my way of honoring her thrifty, creative spirit. It’s that same act of transforming something simple into something special, but with a little extra shimmer. Every time I make these, I think of her hands, dusty with flour, and mine, now dusty with edible glitter. It’s a delicious, sparkly legacy.
Gathering Your Sparkle Supplies
Here’s the beautiful part: the ingredient list is wonderfully short and flexible. This is a “choose your own adventure” kind of recipe!
- 2 cups crumbled cake – This is your canvas! Use vanilla for a classic taste, chocolate for deep comfort, or red velvet for a gorgeous, vibrant center. Bake a simple 8-inch round from your favorite box mix or scratch recipe, let it cool completely, and crumble it finely with your fingers. Chef’s Insight: Day-old cake is actually PERFECT here—it’s slightly drier, so it soaks up the frosting binder beautifully without becoming too wet.
- 2–3 tablespoons frosting – This is your “glue.” Start with 2 tbsp and add the third only if needed. You can use canned or homemade. Cream cheese frosting is divine with red velvet or carrot cake, while chocolate buttercream loves a chocolate cake base. Substitution Tip: For a less sweet option, try mascarpone cheese thinned with a teaspoon of milk, or even a thick fruit jam!
- 1 ½ cups candy melts (white, pink, or red) – These are the secret to that smooth, crackly shell. They melt easily and set firmly. Find them in the baking aisle. Chef’s Insight: While you can use pure chocolate, it requires tempering to get a shiny, hard shell. Candy melts are the no-fuss, reliable friend we all need for this project.
- Lollipop sticks – Paper or plastic, find them with the candy-making supplies.
- Edible glitter (gold, pink, or holographic) – The STAR of the show! Must say “edible” on the label. Non-edible craft glitter is not safe for consumption. This is where the magic happens.
- Optional: Heart-shaped silicone mold – This is a helpful tool for uniform shapes, but honestly, your hands work just as well. Don’t let not having a mold stop you!
Let’s Make Some Magic: Step-by-Step
Ready? Let’s do this! Clear some counter space, put on a fun playlist, and embrace the process. This is where the joy happens.
- Create Your Cake “Dough.” In a large bowl, combine your finely crumbled cake and 2 tablespoons of frosting. Use your hands (yes, get in there!) or a spatula to mix until it resembles a thick, moldable dough. It should hold together when you squeeze a bit in your palm. If it’s too dry and crumbly, add the extra tablespoon of frosting, bit by bit. Chef’s Hack: The goal is the minimum amount of frosting needed to bind it. Too much makes the pops heavy and overly sweet.
- Shape Those Hearts. If using a mold, press the dough firmly into each cavity, leveling off the top. If shaping by hand, roll about 1.5 tablespoons of dough into a ball, then gently form it into a heart shape on your palm, pinching a slight point at the bottom. Place your shaped hearts on a parchment-lined baking sheet. Chef’s Commentary: Don’t stress perfection! Imperfect, handmade hearts have so much more charm. They’re made with love, remember?
- The Chill Patrol. Pop the baking sheet into the freezer for 15-20 minutes, or the fridge for 30. This is CRUCIAL. A firm, cold heart won’t fall apart when we dip it. Think of this as their power nap before their glittery makeover.
- Melt Your Coating. While hearts chill, melt your candy melts. Use a deep, narrow microwave-safe bowl or cup (a tall mason jar works great!). Microwave in 30-second bursts, stirring vigorously between each, until completely smooth. Pro Tip: If the coating seems too thick for dipping, stir in a teaspoon of coconut oil or shortening to thin it. This makes for a smoother, thinner shell.
- Stick ‘Em Up! Remove hearts from fridge/freezer. Dip the tip of a lollipop stick about ½ inch into the melted coating, then gently insert it straight into the base of a heart, pushing about halfway through. This melted coating acts like edible cement, securing the stick. Let them sit for a minute for that “glue” to set.
- The Big Dip. Now for the fun part! Holding the stick, fully submerge a heart into the melted coating. Gently tap off the excess by lightly tapping your wrist—let gravity do the work. Twirl it slightly as you lift it out. Chef’s Hack: DO NOT stir the pop in the coating. Just dip, lift, and tap. Over-manipulating creates crumbs in your coating.
- Sparkle, Sparkle! Before the coating sets, immediately hold your pop over a plate or bowl and sprinkle generously with edible glitter. The wet coating will catch and hold all that shimmer. This is your moment to be lavish!
- Let Them Set. Stand the pop upright by poking the stick into a block of styrofoam, a tall glass filled with sugar, or a specialty cake pop stand. Let them dry completely, about 15 minutes. Admire your sparkling assembly line of joy!
Presenting Your Sparkling Creations
Presentation is half the fun! For a gift, bundle a few together with a beautiful ribbon tied around the sticks and wrap in clear cellophane—instant wow factor. For a party, arrange them in a vase or weighted pitcher like a dazzling bouquet of sweet flowers at the center of your dessert table. Or, simply line them up on a pretty cake stand; their glitter will catch the light and make the whole table twinkle. However you serve them, they’re guaranteed to make people’s eyes light up.
Make Them Your Own: Fun Variations
The basics are just the beginning! Here are a few twists to play with:
- Cookies & Cream: Use chocolate cake, bind with a little vanilla frosting, and roll the shaped hearts in crushed oreo crumbs before the final chill. Dip in dark candy melts.
- Tropical Bliss: Use coconut cake, bind with a dab of pineapple jam, and dip in white candy melts. Sprinkle with toasted coconut and a touch of gold glitter.
- “Dirty” Valentine: Use red velvet cake, dip in dark chocolate coating, and immediately roll the wet base in chocolate sprinkles or mini chocolate chips for a fun, textured look.
- Gluten-Free/Guest-Friendly: Simply start with your favorite gluten-free cake mix. The process is identical!
- Vegan Sparkle: Use a vegan cake and frosting, and ensure your candy melts and glitter are vegan-friendly (many are!).
Olivia’s Kitchen Notes
This recipe has seen many iterations in my kitchen. My first batch? Let’s just say the hearts were more like “blobs” and the coating was so thick you needed a jackhammer to bite into it. I learned that chilling is non-negotiable and that a deep, narrow container for dipping is a game-changer—you use less coating and get better coverage.
The funniest mishap was the “Great Glitter Avalanche of 2020.” I was sprinkling glitter over a freshly dipped pop, held it a little too close to my face to admire it, and sneezed. My kitchen, my dog, and I sparkled for days. Moral of the story: sprinkle with purpose, but away from your nose!
Over time, this has become my go-to “happy project.” It’s meditative to shape the hearts, and there’s something so viscerally satisfying about that final glitter shower. Don’t be afraid to make a mess. The best memories usually come from a glitter-covered counter.
Your Questions, Answered!
Q: My cake pop keeps falling off the stick when I dip it! What am I doing wrong?
A: This is usually a two-part issue. First, make sure your hearts are COLD. A firm center is key. Second, that initial “glue” step (dipping the stick tip in coating before inserting) is vital. Let that set for a full minute before attempting the full dip. It creates a secure anchor.
Q: My coating is lumpy and hard to work with. Help!
A: Candy melts can “seize” if overheated or if a drop of water gets in. Always melt slowly and stir well. If it’s thick, stir in that teaspoon of coconut oil or shortening to bring it back to a smooth, dippable consistency. If it’s truly lumpy, you can try straining it through a fine-mesh sieve, but prevention is easier!
Q: Can I make these ahead of time?
A: Absolutely! Once fully set, store them in a single layer in an airtight container at room temperature for up to 3 days, or in the fridge for up to a week. The fridge can sometimes cause condensation, so let them come to room temperature in the container before serving to avoid “sweating.”
Q: Is there an alternative to candy melts?
A> Yes, but with a caveat. You can use pure chocolate chips or melting wafers, but to get a shiny, hard shell that doesn’t melt in your hands, you’ll need to temper it (a process of precise heating and cooling). For ease and reliability, especially for beginners, candy melts are my strong recommendation.

Heart Cake Pops with Edible Glitter : Sparkly Bites of Joy
Description
There’s something magical about the smell of cake baking — warm, sweet, and instantly comforting. These Heart Cake Pops take that comforting feeling and turn it into something extra fun: cute little heart-shaped treats coated in smooth candy and sprinkled with edible glitter. They look fancy, but they’re actually super easy to make. If you can crumble cake and mix frosting, you can make these!
Ingredients
-
2 cups crumbled cake
(Vanilla, chocolate, red velvet — anything works! Day-old cake is ideal.) -
2–3 tbsp frosting
(Start with 2 tbsp and add more only if needed.) -
1 ½ cups candy melts
(White, pink, or red — your choice!) -
Lollipop sticks
-
Edible glitter
(Must be labeled edible.) -
Optional: Heart-shaped silicone mold
Instructions
1. Mix the Cake Dough
-
In a bowl, mix the cake crumbs and 2 tbsp frosting.
-
Squeeze a little in your hand — if it holds together, it’s ready.
-
If too dry, add a tiny bit more frosting.
2. Shape the Hearts
-
Roll about 1.5 tbsp of mixture into a ball.
-
Gently pinch the bottom to make a point and press the top to make a heart.
OR press the mixture into a heart-shaped mold. -
Place on a parchment-lined tray.
3. Chill the Shapes
-
Freeze for 15–20 minutes, or refrigerate for 30 minutes.
This helps the pops stay firm for dipping.
4. Melt the Candy Coating
-
Microwave candy melts in 30-second bursts, stirring between each round.
-
If too thick, stir in 1 tsp coconut oil or shortening.
5. Insert the Sticks
-
Dip the tip of a stick into the melted coating.
-
Push it gently into the base of a chilled heart.
-
Let it sit for 1 minute so the “glue” sets.
6. Dip & Glitter
-
Dip each pop fully into the melted coating.
-
Lift, gently tap your wrist to remove excess, and quickly sprinkle with edible glitter while still wet.
7. Let Them Set
-
Stand the pops upright in a styrofoam block, jar of sugar, or pop stand.
-
Let them dry for about 15 minutes.
Notes
-
Cold centers = fewer pops falling off sticks.
-
Use a deep cup for dipping so the coating goes on smoothly.
-
Avoid adding too much frosting — it makes pops heavy and mushy.
-
Don’t skip the chill step! It’s the secret to perfect dipping.
Nutritional Info (Approximate)
Per cake pop (based on vanilla cake & frosting, yields 12):
Calories: ~180 | Fat: 8g | Carbs: 25g | Sugar: 20g | Protein: 1g
Note: This varies greatly based on your specific cake and frosting choices. For dietary needs, calculate using your exact ingredients.
Final Thoughts
Heart Cake Pops with Edible Glitter are more than just a dessert—they’re a tiny celebration in your hand. They remind us that joy doesn’t have to be complicated, and that a little sparkle can turn the ordinary into something extraordinary. Whether you’re making them for someone special or just to brighten your own day, these pops are a testament to the magic of homemade creativity.
Remember: perfection isn’t the goal here. A lopsided heart or a slightly-too-thick coating just adds to the charm. What matters is the love you stir into the crumbs, the patience you give to the process, and the glitter you sprinkle with abandon. This recipe is an invitation—to play, to reminisce, and to create moments of delight.
So the next time you have a bit of cake to spare, or simply need a reason to smile, roll up your sleeves and reach for the glitter. You’re not just making treats; you’re crafting edible joy. And in a world that can always use a little more light, every sparkly bite counts.
Happy baking, and may your days be as sweet and shimmering as these pops.


