Spooktacular Sweets: Your Ultimate Halloween Candy Grazing Board
Hey there, candy crusaders! Olivia here, apron dusted with powdered sugar and probably sporting a chocolate smudge on my cheek. Can you feel that crisp October magic in the air? That electric buzz of jack-o’-lantern carving, costume planning, and the glorious rustle of candy wrappers? Halloween isn’t just a holiday in my kitchen—it’s a full-blown, sprinkle-covered spectacular. And what’s better than diving into your trick-or-treat haul? Sharing that rainbow-bright, sugar-rush joy with your favorite people!
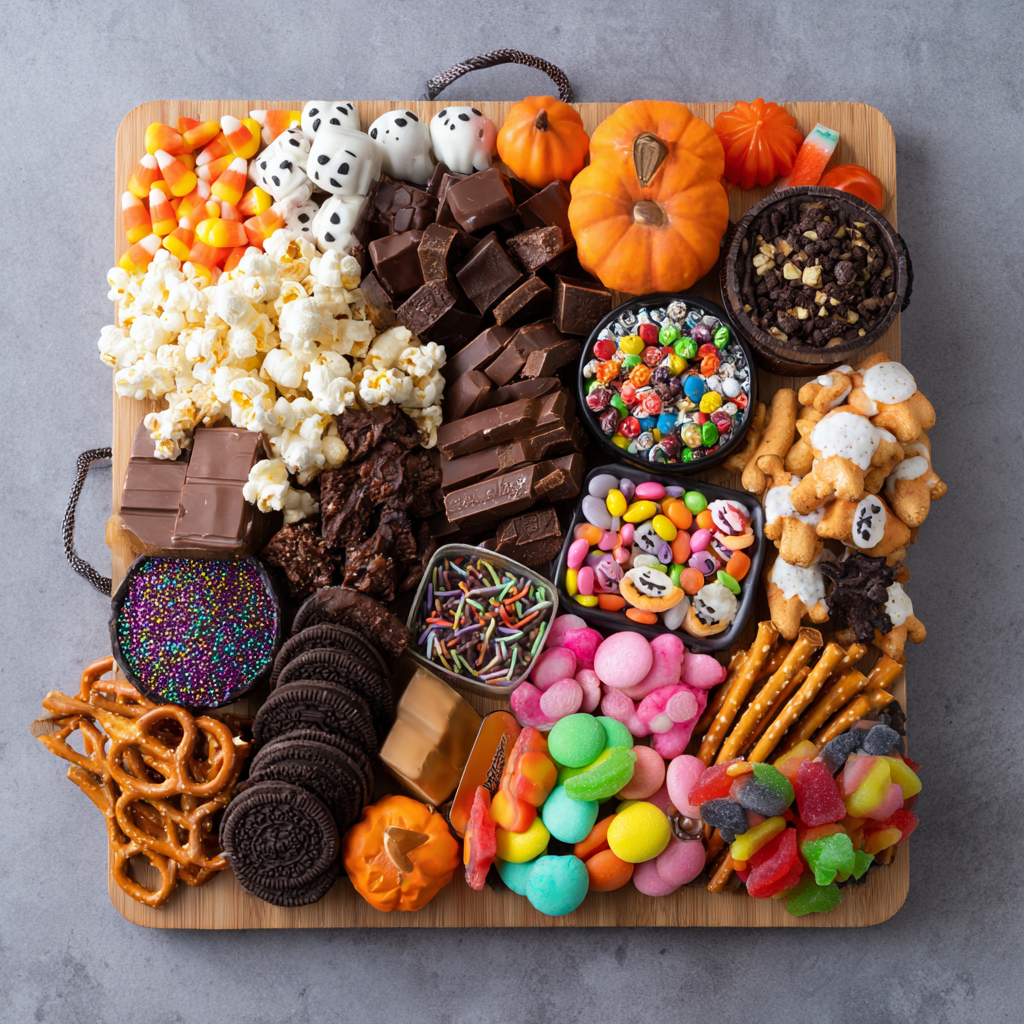
That’s why I’m utterly obsessed with creating a Halloween Candy Grazing Board. Forget fancy platters requiring chef-level skills—this is pure, unadulterated FUN. Imagine a sprawling canvas of chocolates, gummies, cookies, and crunchy bites, all mingling like guests at the coolest monster mash. It’s a pick-your-own-adventure snack station perfect for trick-or-treat night chaos, cozy horror movie marathons (extra points for Hocus Pocus!), or potlucks where you wanna be the MVP. No cooking, no stress—just you, a giant board, and every nostalgic sweet that makes Halloween taste like childhood. Ready to unleash your inner candy artist? Let’s make something wickedly delightful!
A Halloween Memory: The Great Candy Swap
Picture this: I’m eight years old, dressed as a slightly lopsided vampire (cape safety-pinned to my sweater), lugging a pillowcase heavy with loot. The real magic happened post-trick-or-treating, when my brothers and I would dump our haul onto the living room floor like treasure hunters. We’d negotiate trades with the intensity of Wall Street brokers—my Reese’s cups for his Twix bars, gummy worms for sour belts. That messy, colorful pile of possibilities? Pure joy. Mom would hover, pretending to disapprove of our sugar highs, but even she couldn’t resist sneaking a caramel chew. Fast forward to now, and my Halloween Candy Board is basically that glorious floor pile—all grown up and Instagram-ready! It’s my edible love letter to those sticky-fingered, flashlight-lit nights. Creating this board isn’t just assembling candy; it’s stirring up that giddy, communal excitement—where sharing a gummy spider feels like sharing a secret.
Gathering Your Candy Coven: Ingredients & Insights
Here’s the best part: flexibility is your BFF! Raid your pantry, hit the Halloween aisle, or mix homemade treats with store-bought gems. This isn’t a rigid recipe—it’s a candy playground. Here’s my go-to lineup with tips to make it uniquely yours:
- Mini Chocolate Bars (Snickers, Twix, Milky Way): The backbone! Chef’s Tip: Unwrap a few and break them in half for easy grabbing. Substitute with mini peanut butter cups if nut allergies aren’t a concern.
- Reese’s Pumpkins/Bats: Seasonal superstars! Their shape adds instant Halloween vibes. Can’t find them? Regular Reese’s cups work—just spookify ’em with candy eyeballs!
- Candy Corn & Mellowcreme Pumpkins: Divisive but iconic! Insight: They’re visually essential. Not a fan? Use orange/white jelly beans instead.
- M&M’s or Skittles: Color bombs! Pour them into small ramekins or scatter freely. Substitution: Candy-coated chocolates or rainbow mini marshmallows.
- Caramel Chews or Taffy: Chewy nostalgia. Tip: Keep ’em wrapped to prevent sticking.
- Gummy Worms & Spiders: Eww-y goodness! Drape them creepily over other candies. Hack: Freeze them for 10 mins first—they hold shape better!
- Sour Belts or Rings: Tangy contrast! Kids adore these. Swap with sour patch kids if needed.
- Halloween Fruit Snacks: Fruity fun. Look for bat or ghost shapes!
- Chocolate-Covered Pretzels: Sweet & salty crunch. Chef’s Secret: Make your own by dipping pretzel rods in melted chocolate + sprinkles.
- Oreos or Halloween Cookies: Festive filler. Use themed ones (orange filling? Yes please!).
- Popcorn Balls or Caramel Corn: Homemade charm! Insight: Wrap balls in cling wrap so they don’t crumble.
- Candy Eyeballs & Marshmallow Ghosts: ESSENTIAL for drama. Stick eyeballs onto chocolates or cookies for instant giggles.
- Optional Savory Touches: Pretzel twists, cheese cubes, or pumpkin seeds. Why? They balance the sweet frenzy!
- Garnish: Mini pumpkins, black lace doilies, or plastic skulls. Go moody with a slate board or rustic with wood!
Remember: Allergies? Swap nuts for seeds, use allergy-friendly chocolates, or label sections clearly!
Assembling Your Masterpiece: Step-by-Step Spookiness
Grab your largest board, tray, or even a clean baking sheet—and let’s create edible magic! This takes 15-20 minutes tops. Channel your inner artiste; there are no mistakes, just “spooky surprises.”
- Anchor Your Monsters: Start with the BIG players—popcorn balls, wrapped cookie packs, or Reese’s pumpkins. Place them unevenly across the board. Chef’s Hack: Put heavier items near the center so the board won’t tip!
- Build Your Candy Neighborhoods: Group similar candies together for visual impact. Mound M&M’s in one corner, pile gummy worms in another. Tip: Use small bowls or cookie cutters (like bats!) to corral loose candies like candy corn.
- Fill Every Creepy Crevice: Scatter smaller items (chocolate-covered pretzels, unwrapped minis) to fill gaps. Pro Move: Tuck gummy spiders peeking out from under cookies—surprise element!
- Theme It Up: Now the FUN part! Press candy eyeballs onto marshmallow ghosts or chocolate bars. Drape sour belts like slime trails. Sprinkle edible glitter or black/orange sprinkles over everything like fairy dust. Story Time: My cat once stole a marshmallow ghost mid-assembly… now I call it “ghost training.”
- Savory Oasis (Optional): If using, cluster pretzels, cheese cubes, or seeds in a separate zone. Why? They’re the “palate cleanser” between sugar rushes!
- Garnish Like a Ghoul: Tuck mini pumpkins or plastic skulls into empty spots. Add black paper cups for napkins or extra candy storage. Final Touch: Mist with edible gold spray for a haunted mansion vibe!
Hot Tip: Work from the center outward, and step back every few minutes to spot empty zones. If candies start to warm and stick, pop the whole board in the fridge for 5 minutes!
Setting the Scene: Serving Your Spooky Spread
Presentation is half the fun! Place your board where guests can graze freely—coffee tables are perfect. Pair it with:
- 🧃 Drinks: Witch’s brew punch (ginger ale + lime sherbet) or hot cocoa with marshmallow ghosts.
- 🎃 Ambiance: Dim lights, battery candles, and a playlist of Halloween classics.
- 🍴 Tools: Provide small tongs or Halloween-themed scoops for easy grabbing (and less sticky fingers!).
Serve at room temperature so chocolates are perfectly snappy and gummies stay chewy!
Boo-tiful Twists: Creative Variations
Customize your board for any crowd or theme! Here are 5 fang-tastic ideas:
- Chocolate Lover’s Nightmare: Swap gummies for chocolate-covered espresso beans, dark chocolate bark, and chocolate-dipped strawberries (dyed black with food coloring!).
- “Healthy-ish” Haunt: Focus on dark chocolate, pumpkin seeds, dried orange slices, yogurt-covered raisins, and monster-themed fruit kabobs (banana ghosts + berry eyes).
- Retro Candy Throwback: Use wax soda bottles, candy cigarettes (chalky sticks!), Necco wafers, and Pixy Stix for 80s/90s nostalgia.
- Vegan Vampire Board: Choose vegan chocolates (like Enjoy Life), sour patch kids, Oreos, and Dandies marshmallows. Label clearly!
- Kiddo-Friendly Cauldron: Skip hard candies. Fill a plastic cauldron with popcorn, animal crackers, and juice boxes—let kids “dig” for treats!
Olivia’s Kitchen Confessions: Behind the Board
Confession: The first time I made this, it looked like a candy tornado hit my kitchen! I learned quickly: unwrap some items for visual appeal, but leave others wrapped for freshness (looking at you, taffy!). Over the years, I’ve added savory elements after my nephew declared, “Aunt Liv, my tongue is tired of sweet!”—genius. The cheese cubes were a hit! Now, I love watching guests create wild combos: a pretzel spear through a marshmallow ghost, or a gummy worm wrapped in caramel. One year, my friend used hot glue to attach tiny brooms to marshmallows for “witch ghosts”… and yes, we ate them anyway. The board evolves with every Halloween, but the heart remains: pure, silly, shared delight.
Candy Board SOS: FAQs & Fixes
Q: Can I make this ahead of time?
A: Absolutely! Assemble it 2-3 hours before serving. Cover loosely with wax paper (not plastic wrap—it causes condensation!) and store in a cool, dry place. Avoid the fridge unless your kitchen is hot—it can make chocolates bloom (those white streaks are harmless but less pretty!).
Q: Help! My candies are melting/sticking together!
A: Sugar panic—we’ve all been there! If things get warm, slide the board onto a baking sheet and chill for 5-10 minutes. For stickiness, dust gummies with a tiny bit of cornstarch. Prevention tip: Keep the board away from direct sunlight or heaters.
Q: How do I handle allergies?
A: Safety first! Use separate bowls for allergen-free candies (like sunflower seed butter cups). Label everything clearly. For severe allergies, consider a dedicated “safe zone” board with sealed packages.
Q: Leftover storage tips?
A: Disassemble the board. Store wrapped candies in ziplock bags. Unwrap anything sticky or melty (like chocolates or caramels) and layer them in airtight containers with parchment paper. They’ll last weeks… if they survive the night!

Halloween Candy Grazing Board
Description
Hey there, candy lovers! This Halloween, skip the complicated desserts and embrace the fun of a candy-filled grazing board. Perfect for trick-or-treat nights, spooky movie marathons, or Halloween parties, this board is all about colorful, sugary joy—plus a few savory touches to balance the sweetness. It’s easy to assemble, visually striking, and guaranteed to delight kids and adults alike.
Ingredients
Candies & Sweet Treats:
-
Mini chocolate bars (Snickers, Twix, Milky Way) – unwrap a few and break in halves for easy grabbing.
-
Reese’s pumpkins or cups – seasonal shapes add Halloween vibes.
-
Candy corn or mellowcreme pumpkins – iconic for color contrast; swap with jelly beans if preferred.
-
M&Ms or Skittles – scatter or serve in small bowls for color bombs.
-
Caramel chews or taffy – keep wrapped to prevent sticking.
-
Gummy worms and spiders – freeze 10 mins first to hold shape better.
-
Sour belts or rings – tangy contrast to sweeter candies.
-
Halloween fruit snacks – fun shapes like bats or ghosts.
-
Chocolate-covered pretzels – make your own by dipping in melted chocolate and sprinkles.
-
Oreos or Halloween cookies – festive fillers.
-
Popcorn balls or caramel corn – wrap individually if homemade.
-
Candy eyeballs & marshmallow ghosts – stick on chocolates or cookies for drama.
Optional Savory Touches:
-
Pretzel twists, cheese cubes, or pumpkin seeds – balance the sugar frenzy.
Garnishes:
-
Mini pumpkins, black lace doilies, or plastic skulls.
Tip: Consider allergies—swap nuts for seeds, use allergy-friendly chocolates, and label sections clearly.
Instructions
-
Anchor Your Board: Start with big items like popcorn balls, wrapped cookies, or Reese’s pumpkins. Place them unevenly. Tip: heavier items near the center for stability.
-
Build Candy Neighborhoods: Group similar candies for visual impact. Use small bowls or molds to corral loose items.
-
Fill Gaps: Scatter smaller treats (chocolate-covered pretzels, mini chocolates) in empty spaces. Hide gummy spiders for surprise fun.
-
Add Thematic Touches: Attach candy eyeballs to marshmallows or chocolate bars. Drape sour belts like slime trails. Sprinkle edible glitter or black/orange sprinkles.
-
Savory Zone (Optional): Cluster pretzels, cheese, or seeds in a separate area as palate cleansers.
-
Garnish: Place mini pumpkins, plastic skulls, or other decorations in remaining gaps.
Hot Tip: Work from the center outward. Chill 5 minutes if candies begin to melt or stick.
Notes
-
Chocolate Lover’s Board: Replace gummies with dark chocolate bark, chocolate-covered espresso beans, or chocolate-dipped strawberries.
-
“Healthy-ish” Board: Dark chocolate, pumpkin seeds, dried fruit, yogurt-covered raisins, fruit kabobs.
-
Retro Candy Throwback: Wax soda bottles, candy cigarettes, Pixy Stix, Necco wafers.
-
Vegan Board: Vegan chocolate, sour patch kids, Oreos, vegan marshmallows.
-
Kid-Friendly Cauldron: Skip hard candy, fill a plastic cauldron with popcorn, animal crackers, and juice boxes.
Nutrition
- Calories: 300–450 cal Per Serving
- Sugar: 35–50 g
- Fat: 0–20 g
- Carbohydrates: 45–65 g
- Protein: 2–4 g
Nutritional Notes (Approximate)
Per serving (based on 1/10th of board):
Calories: 300-450 • Sugar: 35-50g • Fat: 10-20g • Carbs: 45-65g • Protein: 2-4g
Remember: This is a festive treat—enjoy mindfully, but savor every spooky bite!
Final Thoughts
A Halloween Candy Grazing Board is so much more than a way to serve sweets. It’s a catalyst for joy, a canvas for creativity, and the ultimate tool for a stress-free, memorable Halloween gathering. It honors the nostalgic, kid-at-heart excitement of the holiday while appealing to our grown-up love for beauty and connection. Whether you go all-out with homemade elements or keep it brilliantly simple with store-bought favorites, the act of building this board is a celebration in itself. So embrace the mess, unleash your inner candy artist, and create a spooktacular centerpiece that will have everyone talking long after the last candy corn is gone. Happy Haunting