
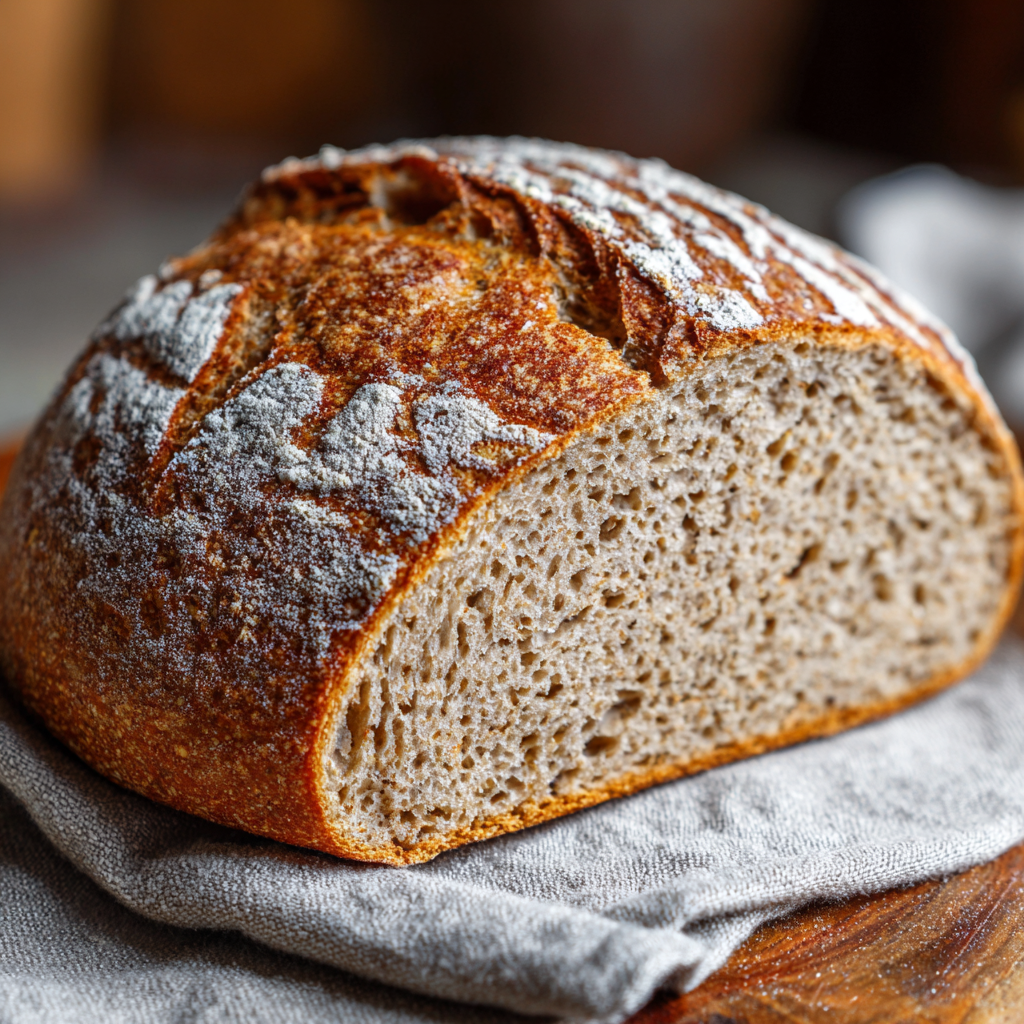
Gluten-Free Sourdough Bread: Your New Kitchen Triumph Awaits
Hey there, friend! Come on in, grab an apron, and let’s get flour on our hands. If you’ve ever stood in a bakery, breathing in that unmistakable, tangy scent of sourdough and felt a little pang because you thought, “That’s not for me anymore,” I’m here to tell you something incredible: it absolutely is.
For years, I believed the magic of sourdough—the crackly crust, the chewy, holey interior, the complex flavor born of wild yeast—was locked away in a world of wheat and gluten. Then, my sister went gluten-free. Seeing her miss the simple joy of tearing into a warm, crusty loaf sparked a mission in my kitchen. After countless experiments (some hilarious, doorstop-worthy failures included), I cracked the code. This isn’t just a “good for gluten-free” bread. This is a legitimately amazing, soul-warming, real-deal sourdough loaf that happens to be gluten-free.
This recipe is a celebration of patience and natural flavor. We’re using a vibrant, active gluten-free starter and a blend of wholesome flours to create something truly special—no gums, no weird additives, just pure, fermented goodness. It’s soft yet crusty, tangy, and perfect for everything from your morning avocado toast to sopping up the last bits of weekend soup. So, let’s quiet that doubt, feed our starter, and bake a loaf that will fill your kitchen with the cozy, triumphant smell of “I did it!”
The Starter That Started It All: Meet “Bubbles”
My journey to this loaf began with a jar of questionable goop named Bubbles. Creating a gluten-free sourdough starter from scratch feels less like a science project and more like adopting a low-maintenance, hungry pet. For 10 days, I faithfully fed Bubbles a mix of brown rice flour and water, whispering encouragements as I stirred. “You can do it, Bubbles. Show me those air pockets!”
The day Bubbles finally doubled in volume after a feeding, with a frothy, happy surface and that sweet, sour aroma, I did a little dance right there on the kitchen tile. It was alive! That moment of pure, unadulterated kitchen joy—the kind that comes from nurturing a living ingredient—is at the heart of this bread. Every loaf I bake now begins with a scoop of Bubbles’ descendants. It connects my baking to those early days of experimentation and hope, a delicious reminder that the best things often take a little time and a lot of love. This bread is Bubbles’ legacy, and I’m so excited to share it with you.
Gathering Your Gluten-Free Sourdough Squad
Here’s your team of all-stars. Using a kitchen scale (in grams) is my #1 pro-tip for consistent, perfect gluten-free baking every single time. It’s a game-changer!
- 1 cup (240g) active gluten-free sourdough starter: This is the heart and soul! “Active” means it’s been fed 4-12 hours before baking, is bubbly, and floats in a glass of water. If it sinks, let it ferment a bit longer. No starter? See the Variations section for a quick-leaven option!
- 1 ½ cups (360g) warm water: Aim for about 85°F (30°C)—warm to the touch, not hot. Hot water will harm our yeast friends.
- 2 cups (280g) gluten-free flour blend (gum-free): I love a simple blend like Bob’s Red Mill 1-to-1 Gluten Free Baking Flour (BLUE BAG, not the red one which has xanthan gum). The gum-free base gives us control over the texture.
- ½ cup (60g) sorghum or buckwheat flour: This adds depth, a hint of sweetness, and fantastic structure. Sorghum is my go-to for a neutral flavor, but buckwheat adds a lovely, earthy note. Don’t worry, buckwheat is gluten-free!
- ¼ cup (40g) tapioca starch: Our secret weapon for chew and a lovely, stretchy crumb. It helps mimic that classic sourdough “pull.”
- 1 ½ tsp salt: Fine sea salt is perfect. It’s not just for flavor; it strengthens the dough’s structure and regulates fermentation.
- 1 tbsp olive oil: For tenderness and a beautiful golden crust. A mild avocado oil works too.
- 1 tsp apple cider vinegar: A little acid boost enhances the tang and helps activate the leavening. White vinegar works in a pinch.
Let’s Bake: Your Step-by-Step Guide to Sourdough Success
Ready? Let’s transform these ingredients into your new favorite loaf. I’m right here with you, sharing all the little hacks I’ve learned along the way.
Step 1: The Big Mix. In a large bowl, combine your bubbly starter, warm water, olive oil, and apple cider vinegar. Give it a good whisk until it looks like a creamy, frothy latte. This ensures everything is evenly distributed. See those bubbles? That’s your promise of a good rise!
Step 2: Bring in the Dry Team. Add the gluten-free flour blend, sorghum flour, tapioca starch, and salt directly to the wet ingredients. Now, grab a sturdy spatula. We’re going to stir and fold until no dry pockets remain. The batter will be thick, scoopable, and sticky—think a very thick cake batter or a soft, damp cookie dough. This is normal! Gluten-free “dough” is often a batter, and that’s our key to a tender crumb.
Step 3: Pan Up & Smooth Out. Generously grease a standard 9×5-inch loaf pan with oil or butter. Scoop your batter into the pan. Wet your spatula or fingers with a bit of water and gently smooth and pat the top into an even, rounded dome. This gives you a prettier, bakery-style finish.
Step 4: The Patient Rise. This is where the magic happens! Cover the pan loosely with a damp kitchen towel, beeswax wrap, or a loose lid. Let it sit at warm room temperature for 4-6 hours. You’re looking for the batter to rise to about 1.5x its original size and the surface should look puffy with small bubbles. Chef’s Hack: For incredible flavor, do an overnight rise in the fridge (8-12 hours). The cold slows fermentation, developing a deeper tang. Just let it sit on the counter for an hour before baking to take the chill off.
Step 5: Heat it Up & Bake! Place a rack in the center of your oven and preheat to 425°F (220°C). No need to score this loaf—the crust is delicate and will crack beautifully on its own. Place your loaf pan directly on the rack and bake for 45-55 minutes. The loaf is done when it’s deeply golden brown, sounds hollow when tapped on the top, and an internal thermometer reads about 205-210°F (96-99°C).
Step 6: The Crucial Cool. This is the hardest part, I swear! Remove the loaf from the pan immediately and let it cool completely on a wire rack. Do not slice it while warm! The interior is still setting. Slicing too early leads to a gummy texture. Let it cool for at least 2-3 hours. I know, the smell is torture, but trust me. It’s worth the wait.
Sharing the Love: How to Serve Your Masterpiece
Once fully cooled, use a serrated bread knife and a gentle sawing motion to slice. Toasting is your best friend—it amplifies the crust and brings out the nutty, tangy flavors. Slather a warm slice with good butter and a flake of sea salt. Cube it for the best croutons of your life, or layer it with avocado, microgreens, and a soft-boiled egg for the ultimate breakfast. It makes phenomenal grilled cheese and holds up beautifully to hearty soups and stews.
Make It Your Own: Delicious Twists & Swaps
This recipe is a wonderful canvas! Try these fun variations:
- Seeded & Hearty: Fold ¼ cup each of sunflower seeds and pepitas into the batter before rising.
- Rosemary & Olive: Add 1 tbsp chopped fresh rosemary and ½ cup chopped, pitted kalamata olives.
- Quick-Leaven “Cheat”: No active starter? Mix 1 cup warm water with 1 tbsp honey, 2 tsp instant yeast, and 1/2 cup plain yogurt. Let it foam for 10 mins, then use in place of starter/water. Reduce rise time to 60-90 mins.
- Dairy-Free: Ensure your starter is fed with water (not milk) and use a neutral oil instead of butter for greasing.
- Egg Wash Shine: For a glossy, dark crust, whisk an egg with 1 tbsp water and brush it lightly on the loaf just before baking.
Olivia’s Kitchen Notes & Evolution of a Loaf
My first attempt at this bread could have doubled as a brick for a garden path. I was using the wrong flours, not letting it cool, and my starter was practically a toddler in terms of maturity. The key evolution? Switching to a gum-free blend and embracing the batter-style dough. I stopped trying to knead it like wheat dough and instead treated it with a gentler hand. Also, becoming best friends with my oven thermometer was huge—ovens lie! Now, I always keep one in there to ensure accurate temp. And remember, your starter gets better with age and regular feeding. The older and more robust it is, the better your bread’s rise and flavor will be. Don’t get discouraged if loaf #1 isn’t perfect. Like any good friendship, it gets better with time.
Your Questions, Answered (We’ve All Been There!)
Q: My bread didn’t rise much. What happened?
A: The most common culprit is a starter that wasn’t active enough. Always do the float test! Drop a small spoonful of starter in a glass of water. If it floats, it’s ready. If it sinks, feed it and wait a few more hours. Also, ensure your rising spot is warm (70-75°F is ideal). A chilly kitchen will slow fermentation.
Q: The middle is gummy/dense. Help!
A: Two things: 1) You likely sliced it while it was still warm. Patience is key! 2) The bread might have needed 5-10 more minutes in the oven. Use that internal thermometer—205-210°F is your target. Ovens vary, so trust the temp, not just the timer.
Q: Can I use a different gluten-free flour?
A> You can experiment, but stick to a blend meant for all-purpose use. I don’t recommend using 100% dense flours like almond or coconut flour here. The blend of a light AP mix, a whole grain (sorghum), and a starch (tapioca) creates the perfect texture balance.
Q: How do I store it?
A> Once cool, store it in a bread bag or wrapped in beeswrap at room temp for 2-3 days. For longer storage, slice and freeze it in a bag for up to 3 months. Pop frozen slices straight into the toaster!
Gluten-Free Sourdough Bread : Soft, Crusty & Naturally Fermented
Description
If you thought real sourdough was off-limits without gluten, this loaf is here to change your mind. This gluten-free sourdough bread has a crisp, golden crust, a soft and gently chewy interior, and that signature tangy flavor we all love. It’s naturally fermented, made without gums or strange additives, and relies on a good gluten-free starter and smart flour choices.
Ingredients
(Using a kitchen scale is strongly recommended for best results)
-
1 cup (240 g) active gluten-free sourdough starter
-
1½ cups (360 g) warm water (about 85°F / 30°C)
-
2 cups (280 g) gluten-free flour blend, gum-free
-
½ cup (60 g) sorghum flour or buckwheat flour
-
¼ cup (40 g) tapioca starch
-
1½ teaspoons salt
-
1 tablespoon olive oil
-
1 teaspoon apple cider vinegar
Instructions
-
Mix the wet ingredients
In a large bowl, whisk together the starter, warm water, olive oil, and apple cider vinegar until smooth and bubbly. -
Add dry ingredients
Add the gluten-free flour blend, sorghum (or buckwheat) flour, tapioca starch, and salt. Stir with a spatula until fully combined.
The dough will look like a thick, sticky batter—this is correct. -
Transfer to pan
Grease a 9×5-inch loaf pan well. Spoon the dough into the pan and smooth the top with a wet spatula or fingers. -
Rise
Cover loosely and let rise at room temperature for 4–6 hours, until the loaf looks puffy and has increased about 50% in volume.
(Optional: For deeper flavor, refrigerate overnight and bring to room temperature before baking.) -
Bake
Preheat oven to 425°F (220°C). Bake for 45–55 minutes, until deeply golden and the loaf sounds hollow when tapped.
Internal temperature should reach 205–210°F (96–99°C). -
Cool completely
Remove from the pan immediately and cool on a wire rack for at least 2–3 hours before slicing.
Notes
-
Starter strength matters: Your starter should be bubbly and active. If it doesn’t float in water, it needs more time.
-
Do not slice warm bread: Gluten-free sourdough finishes setting as it cools. Cutting early causes gumminess.
-
Warm environment helps: A cooler kitchen will slow fermentation—be patient.
-
Toasting is magic: This bread shines when toasted.
Nutritional Info (A Slice of the Good Stuff)
Per slice (based on 12 slices per loaf):
Calories: 160 | Total Carbohydrates: 30g | Dietary Fiber: 2g | Sugars: <1g | Protein: 2g | Total Fat: 4g | Sodium: 290mg


