
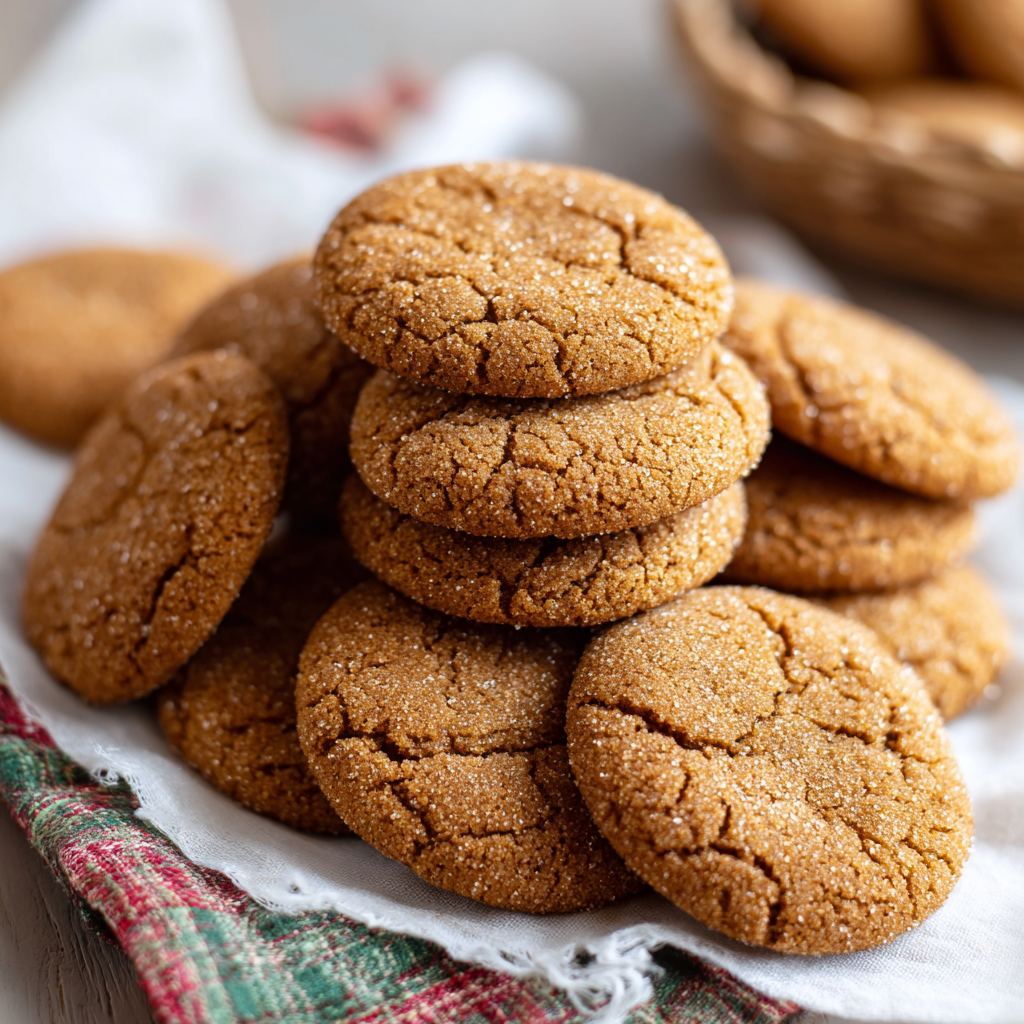
The Cookie That Started a Family Tradition: Gingerdoodles!
Hey there, friend! Come on in, grab an apron, and get ready to fill your kitchen with the most incredible aroma you’ve ever smelled. I’m talking about the warm, spicy, soul-hugging scent of molasses and cinnamon, with that unmistakable cozy feeling of gingerbread. But we’re not just making gingerbread today. And we’re not just making snickerdoodles. Oh no. We’re creating magic by fusing them into one absolutely perfect cookie: the Gingerdoodle.
Imagine the soft, chewy, melt-in-your-mouth texture of the best snickerdoodle you’ve ever had. Now, infuse it with the deep, warm, and wonderfully spiced heart of a classic gingerbread cookie. Roll that perfect dough ball in a blanket of cinnamon-sugar, and boom—you have a cookie that is greater than the sum of its parts. This is the cookie that disappears from the cooling rack in minutes. It’s the star of every holiday cookie exchange, the treat that has my friends texting me for the recipe before they’ve even left my driveway, and the ultimate companion to a hot cup of coffee on a chilly afternoon.
The best part? You don’t need any fancy skills or equipment. This recipe is all about heart, a little bit of messy fun, and creating something truly special from simple ingredients. So, whether you’re a seasoned baker or this is your first time creaming butter and sugar, I’m right here with you. Let’s preheat those ovens and bake a batch of memories together.
The “Oops” That Became Our Favorite Christmas Eve Tradition
I have to confess, the Gingerdoodle was born from a beautiful kitchen mishap. It was Christmas Eve, years ago, and I was in a baking frenzy. Tins of cookies covered every surface, and I was determined to make one last batch of my grandma’s famous snickerdoodles. In my sugar-and-spice-induced haze, I reached for the molasses instead of the vanilla extract. I realized my mistake a second too late, after a generous glug had already plopped into the butter mixture.
My heart sank for a second. But instead of starting over, my inner flavor enthusiast got curious. “What if…?” I thought. I grabbed the jar of ginger and added a spoonful. Then a pinch of cloves. I rolled the now deeply fragrant dough in the usual cinnamon sugar, crossed my fingers, and slid the tray into the oven. What emerged were not snickerdoodles. They were something new. Something better. They were puffy, crackled, and had this incredible spicy-sweet depth. My family devoured them, declaring them the best cookie I’d ever made. Now, we can’t imagine a Christmas Eve without that “happy accident.” It’s a lovely reminder that sometimes the best things in life—and in the kitchen—aren’t perfect. They’re spontaneous, a little messy, and made with a whole lot of love.
Gathering Your Gingerdoodle Ingredients
Let’s talk about our players! This list might look long, but I promise it’s mostly spices you likely already have. Using quality ingredients here makes a world of difference, especially with the molasses and spices.
For the Spice Sugar Coating:
- ¾ cup granulated sugar: This creates that classic, crackly, sweet crust we all love. The coarse grains help create that perfect texture.
- 3 tsp ground cinnamon: The warm, familiar flavor that pairs magically with the ginger. Don’t be shy with it!
For the Dry Ingredients:
- 4 ½ cups all-purpose flour: The foundation of our cookie. I like to fluff my flour with a spoon before scooping and leveling it off with a knife to avoid dense, dry cookies.
- 2 tbsp cornstarch: This is my secret weapon for an unbelievably soft and tender cookie! It gives them that bakery-style softness that stays for days.
- 4 tsp baking soda: Our leavening agent. It helps the cookies puff up and gives them that slight tang that snickerdoodles are known for. Make sure it’s fresh!
- 1 tsp salt: Crucial for balancing all the sweetness and making the spices pop. Never skip the salt!
- 2 tsp ground ginger: The star of the spice show! It provides that warm, peppery kick that defines the gingerbread flavor.
- ½ tsp ground cloves: Adds a deep, intense warmth. A little goes a very long way here.
- ¼ tsp ground nutmeg: Lends a sweet, nutty complexity that rounds out the whole spice profile beautifully.
For the Wet Ingredients:
- 1 ½ cups (3 sticks) unsalted butter, softened: Softened is the key word! It should be cool to the touch but leave a slight indent when you press it. This creams perfectly with the sugar for a light, fluffy texture. For a dairy-free swap, use a high-quality plant-based butter.
- 1 ½ cups light brown sugar: This adds a rich molasses flavor and moisture, thanks to its higher content. It’s what gives the cookies their chewy center.
- ½ cup molasses: The soul of the gingerbread flavor! I prefer unsulphured molasses for its cleaner, smoother taste. Blackstrap molasses is too bitter for cookies.
- 2 large eggs: They bind everything together and add richness. Bring them to room temperature for best incorporation.
- 4 tsp vanilla extract: A generous amount enhances all the other flavors and adds a beautiful aroma. Use the real stuff if you can!
Let’s Bake: Step-by-Step Gingerdoodle Magic
Okay, team! Let’s turn these beautiful ingredients into cookie perfection. Read through these steps once before you start—it makes the process so smooth and fun.
Step 1: Preheat your oven to 350°F (175°C). This is non-negotiable for the perfect bake! Line your baking sheets with parchment paper. Not only does this prevent sticking, but it also makes cleanup an absolute dream. I never bake cookies without it.
Step 2: In a small, adorable bowl, mix together the ¾ cup granulated sugar and 3 tsp cinnamon for the coating. Set this aside. You’ll thank yourself later for having it ready to go.
Step 3: In a large bowl, grab your whisk and thoroughly combine all the dry ingredients: flour, cornstarch, baking soda, salt, ginger, cloves, and nutmeg. Whisking now ensures the spices and leavening are evenly distributed, so every single bite is perfectly spiced. No one wants a pocket of baking soda! Set this bowl aside.
Step 4: In another large bowl (I know, dishes—but it’s worth it!), use a hand mixer or a stand mixer with the paddle attachment to beat the softened butter and light brown sugar together. Now, here’s a chef hack: beat it on medium-high speed for a full 2-3 minutes until it’s light, fluffy, and pale in color. This step incorporates air into the dough, which is a secret to a softer, cakier cookie texture. Don’t rush this!
Step 5: Add the molasses, eggs, and vanilla extract to the butter mixture. Mix on medium speed until everything is beautifully combined. It might look a little curdled at first, but just keep mixing—it will come together into a smooth, glorious, fragrant brown mixture.
Step 6: Now, with your mixer on low speed, gradually add the dry ingredients to the wet ingredients. Mix until just combined and no streaks of flour remain. Be careful not to overmix! Overworking the dough develops gluten and can lead to tough cookies. We want tender, melt-in-your-mouth goodness.
Step 7: Time for the fun, slightly messy part! Use a 1.5-tablespoon cookie scoop (or a spoon) to portion out the dough. Roll each portion between your palms into a smooth ball. Pro-tip: if the dough is too sticky, pop it in the fridge for 15 minutes. Roll each ball generously in the cinnamon-sugar mixture until completely coated. Place the dough balls on your prepared baking sheet about 2 inches apart to give them room to spread.
Step 8: Here’s another chef’s choice for you: For a thicker, puffier cookie, bake them as is. For a slightly chewier, crisper-edged cookie, use the bottom of a glass or your fingers to gently flatten each ball just a bit. I love them chewy, so I always give them a gentle press.
Step 9: Bake for 9-11 minutes. The cookies are done when the edges are set and look slightly dry, but the centers still look soft, puffy, and ever-so-slightly underbaked. They will firm up as they cool. This is the single most important tip for a soft cookie! Do not overbake them.
Step 10: Remove the pan from the oven and let the cookies cool on the hot baking sheet for 5 full minutes. This allows them to set up without becoming rock hard. Then, transfer them to a wire rack to cool completely. Try to resist eating at least one while it’s still warm and gooey… I dare you.
How to Serve Your Gingerdoodle Masterpieces
These cookies are stars all on their own, but presentation is part of the fun! Pile them high on a rustic wooden board or a vintage cake stand for a gorgeous, homey look. They are the ultimate cookie for gifting—tie a stack with baker’s twine and wrap them in cellophane for a present anyone would adore. Of course, serving them still slightly warm with a cold glass of milk is a classic for a reason. For the adults, pair one with a hot mug of coffee, a chai latte, or even a sweet dessert wine. The spices complement them beautifully!
Get Creative: Gingerdoodle Variations
Once you’ve mastered the classic, feel free to play with these fun twists!
- Double Ginger Kick: Add ¼ cup of finely chopped crystallized ginger to the dough for chewy, spicy bursts of flavor.
- Molasses Swap: For a deeper, darker flavor, use dark brown sugar instead of light brown sugar.
- Chocolate Chip Spice: Fold in 1 cup of white chocolate chips or dark chocolate chunks. Chocolate and spice are a match made in heaven.
- Gluten-Free Friendly: Substitute the all-purpose flour with a 1:1 gluten-free baking blend. The texture is nearly identical!
- Orange Zest Twist: Add the zest of one orange to the wet ingredients for a bright, citrusy note that cuts through the spice.
Olivia’s Chef Notes & Kitchen Stories
This recipe has evolved so much since that first accidental batch! I’ve learned that the dough benefits hugely from a chill session. If you have the time, cover the mixed dough and refrigerate it for 30-60 minutes. This prevents overspreading and allows the flavors to deepen even more. It also makes the dough much easier to roll. I also have a funny story: I once, in a major multitasking fail, mistook cayenne pepper for paprika. Let’s just say I created a “Spicy Fire-Doodle” that was… memorable. Always double-check your spice jars! These days, this recipe is my go-to for potlucks. I always bring a few extra copies of the recipe written on cute cards because I know I’ll be asked for it.
Your Gingerdoodle Questions, Answered!
Q: My cookies spread too much and became flat. What happened?
A: This is usually caused by butter that is too warm! Ensure your butter is softened but still cool, not melty. Also, your baking soda might be old and lost its potency (check the expiration date). Finally, if your kitchen is very warm, chilling the dough for 30 minutes before baking will work wonders.
Q: My cookies are too cakey and puffy, not chewy. How can I fix that?
A> This likely means you added a bit too much flour. Next time, try fluffing your flour with a spoon before gently scooping it into your measuring cup and leveling it off with a knife. Avoid tapping the cup or packing the flour down. Using a kitchen scale for the most accurate measurement is always best!
Q: Can I make the dough ahead of time and bake it later?
A: Absolutely! This dough is a great make-ahead option. After portioning the dough into balls, you can freeze them on a parchment-lined tray. Once solid, transfer them to a freezer bag. You can bake them straight from the freezer—just add 1-2 minutes to the baking time. No need to thaw!
Q: The spices are a little strong for my kids. Can I tone them down?
A: Of course! Baking is all about personal taste. Feel free to reduce the ginger to 1 ½ tsp and the cloves to ¼ tsp for a milder spice profile. They’ll still be delicious.

Gingerdoodle Cookies
Description
What do you get when gingerbread collides with snickerdoodles? Pure cookie magic. Gingerdoodles are soft, chewy, spiced just right, and rolled in a sweet cinnamon-sugar coat that crackles beautifully in the oven. Born from a happy kitchen accident, these cookies have become a holiday must-bake—comforting, cozy, and unforgettable. Whether you’re baking for a cookie swap, gifting, or just treating yourself with a cup of coffee, these will be the ones everyone remembers.
Ingredients
Spice Sugar Coating
-
¾ cup granulated sugar
-
3 tsp ground cinnamon
Dry Ingredients
-
4 ½ cups all-purpose flour
-
2 tbsp cornstarch
-
4 tsp baking soda
-
1 tsp salt
-
2 tsp ground ginger
-
½ tsp ground cloves
-
¼ tsp ground nutmeg
Wet Ingredients
-
1 ½ cups (3 sticks) unsalted butter, softened
-
1 ½ cups light brown sugar
-
½ cup molasses
-
2 large eggs (room temp)
-
4 tsp vanilla extract
Instructions
-
Preheat oven to 350°F (175°C). Line baking sheets with parchment.
-
Mix sugar + cinnamon in a small bowl for coating; set aside.
-
In a large bowl, whisk flour, cornstarch, baking soda, salt, and spices.
-
Beat butter + brown sugar until fluffy (2–3 min). Add molasses, eggs, and vanilla; mix until smooth.
-
Gradually add dry mix to wet, stirring just until combined. Chill dough 15–30 min if sticky.
-
Scoop 1.5 tbsp dough, roll into balls, coat generously in cinnamon-sugar. Place 2 in. apart.
-
Bake 9–11 min, until edges are set but centers look slightly underbaked.
-
Cool 5 min on pan, then transfer to rack.
Notes
-
Add crystallized ginger for extra zing.
-
Swap dark brown sugar for richer flavor.
-
Stir in white or dark chocolate chips.
-
Chill dough for thicker cookies.
-
Freeze dough balls to bake fresh anytime.
Nutritional Information (Per Cookie – Approximate)
Calories: 145 | Fat: 6g | Carbohydrates: 22g | Sugar: 12g | Protein: 1.5g
Prep Time: 15 mins | Cook Time: 10 mins | Total Time: 25 mins | Storage: Keeps soft for up to 7 days in an airtight container at room temperature.
Final Thoughts: More Than Just a Cookie
In the end, the Gingerdoodle is so much more than a clever fusion of two classic recipes. It’s a reminder that the most cherished family traditions often begin not with perfection, but with a happy accident and a willingness to embrace the “oops.”
This cookie is a story—a story of a Christmas Eve mix-up that became a non-negotiable part of your family’s holiday. It’s a lesson that the best memories are often baked with a dash of spontaneity and a whole lot of love. Every time you smell that warm, spicy aroma filling your kitchen, you’re not just baking; you’re creating an experience, a feeling, and a connection to those who gather around your table.
So, as you share these crackly, sugar-dusted treasures with friends and family, know that you’re sharing more than a treat. You’re sharing a piece of a story—one that’s now yours to continue. We hope this recipe becomes the beautiful, messy, and delicious beginning of a new tradition in your home.


