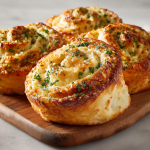
Garlic Parmesan Swirl Rolls – Cheesy, Buttery Garlic Bread Reinvented
The Cozy, Savory Aroma That Feels Like a Hug
Hello, my fellow flavor lovers! Olivia here, welcoming you back to my cozy kitchen corner. Is there anything in the world that smells more like pure, unadulterated joy than garlic bread baking in the oven? That warm, buttery, savory aroma just has a way of wrapping itself around you like the coziest blanket, promising nothing but comfort and deliciousness ahead.
But today, we’re not just making any garlic bread. Oh no. We’re taking that beloved classic and turning it into something truly spectacular. We’re creating Garlic Parmesan Swirls. Imagine this: a soft, fluffy, golden roll, swirled not with cinnamon sugar, but with a rich, herbaceous garlic-Parmesan butter. Each pull-apart piece reveals layers of flavor, with a soft, tender center and those irresistible, crisp, buttery edges. These swirls are the star of the bread basket, the perfect partner for a big bowl of pasta, and the secret weapon for making any weeknight dinner or holiday feast feel extra special.
I promise, you don’t need to be a master baker to conquer this recipe. It’s all about the love you knead into the dough and the excitement of creating something beautiful and delicious from simple, honest ingredients. So, tie on your favorite apron (the messy one tells the best stories!), and let’s bake up some magic together.
A Happy Accident in a Flour-Dusted Kitchen
This recipe, like so many of my favorites, was born from a happy accident and a serious craving. A few years ago, I was hosting my first big “Friendsgiving.” I had planned a classic Italian feast, and my mission was to create the ultimate garlic bread. But in my typical, over-enthusiastic style, I got a little carried away with the garlic butter filling. I slathered so much of the glorious, Parmesan-flecked mixture onto my dough that when I tried to shape it into a traditional loaf, it started oozing out everywhere!
Instead of panicking, I laughed, looked at the messy, buttery situation, and thought, “What if I just roll this up and slice it?” I quickly re-rolled the dough, spread another (slightly more reasonable) layer of filling, and created a log that I cut into individual rolls. The result? Pure, buttery, cheesy bliss. My friends descended on them the second they came out of the oven, and they were gone in minutes. That “mistake” instantly became a treasured tradition, and now, I can’t imagine a gathering without these warm, pull-apart swirls on the table.
Gathering Your Flavor Arsenal
Let’s gather our simple, powerful ingredients. Using high-quality components here makes a world of difference, but I’ve also got some easy swaps if you’re in a pinch!
For the Dough:
- 8½ cups all-purpose flour: The sturdy backbone of our swirls. I like unbleached all-purpose for a perfect, fluffy texture.
- 4 tbsp sugar: Don’t worry, these aren’t sweet! The sugar is just a little snack for the yeast to help it get active and foamy.
- 2 packets (4½ tsp) active dry yeast: Our little miracle workers that make the dough rise and become light and airy. Make sure your yeast is fresh for the best rise!
- 3 tsp kosher salt: Essential for balancing the flavors. I prefer kosher salt for its pure, clean taste.
- 2 cups warm water (110°F): The key word is warm, not hot. Too hot, and you’ll harm the yeast; too cold, and it won’t wake up. Think baby-bottle warm!
- ½ cup olive oil: This adds a beautiful richness and softness to the dough, keeping it wonderfully moist.
- 4 large eggs + 2 egg yolks: The whole eggs add structure and richness, while the extra yolks give us that gorgeous, golden color and a tender, cake-like crumb.
For the Magical Garlic Parmesan Filling:
- 1½ cups unsalted butter, softened: This is the heart of the filling. Using unsalted lets you control the salt level. Chef’s Insight: Truly softened butter is non-negotiable! Leave it out for an hour, or gently warm it for a few seconds. It should be spreadable, not melted.
- 12 cloves garlic, finely minced: Yes, twelve! We’re going for bold, unforgettable flavor. For a milder taste, you can roast the garlic first.
- ⅔ cup fresh parsley, finely chopped: The fresh, grassy note that cuts through all the richness. Dried parsley just won’t give you the same vibrant pop.
- 1 cup grated Parmesan cheese: Use the good stuff from a wedge that you grate yourself! Pre-shredded cheese contains anti-caking agents that can make the filling a bit grainy.
- 1 tsp salt & ½ tsp black pepper: The essential seasonings that make all the other flavors sing.
- Optional: 1 tsp crushed red pepper flakes: My personal favorite addition! It adds a subtle, warm heat that is absolutely incredible.
Let’s Get Rolling: Your Step-by-Step Guide
Ready to create some kitchen magic? Follow these steps, and you’ll be a swirl-making pro in no time. I’ve packed this section with all my favorite tips and hacks to ensure your success.
- Wake Up the Yeast: In the bowl of your stand mixer (or a large mixing bowl), combine the warm water, sugar, and yeast. Give it a quick stir and let it sit for 5-10 minutes. You’re waiting for it to become foamy and fragrant—this is how you know your yeast is alive and ready to party! Little Chef Hack: If your mixture doesn’t foam, your yeast might be old. It’s best to start over with a new packet to avoid flat swirls.
- Create the Dough: To the yeast mixture, add the olive oil, whole eggs, and egg yolks. Mix with the dough hook attachment (or a wooden spoon) until just combined. Now, add the salt and gradually add the flour, about one cup at a time, until a shaggy dough forms. Once it starts pulling away from the sides of the bowl, it’s time to knead!
- Knead to Perfection: Knead the dough on a lightly floured surface (or in your mixer with the dough hook) for 8-10 minutes. You’re looking for a smooth, soft, and slightly elastic dough. It should feel like a soft, pliable pillow. Chef’s Commentary: This kneading time is crucial—it develops the gluten, which gives your swirls their wonderful, pull-apart texture. Don’t rush it!
- The First Rise: Place your beautiful ball of dough into a lightly oiled bowl, turning it once to coat it in oil. Cover the bowl with a clean kitchen towel or plastic wrap and let it rise in a warm, draft-free spot for about 1 hour, or until doubled in size. My favorite warm spot? On top of the dryer while it’s running, or in a slightly warmed oven (turn it off before you put the dough in!).
- Make the Incredible Filling: While the dough is rising, let’s make the star of the show! In a medium bowl, combine the softened butter, minced garlic, chopped parsley, grated Parmesan, salt, pepper, and red pepper flakes (if using). Mix it all together until it’s one glorious, fragrant, herb-flecked paste.
- Roll and Fill: Once the dough has doubled, punch it down to release the air. Turn it out onto a lightly floured surface and divide it in half. Working with one half at a time, roll the dough out into a large rectangle, about ¼-inch thick. Now, spread half of the garlic butter mixture evenly over the entire surface, all the way to the edges. Pro Tip: An offset spatula makes this job incredibly easy and mess-free!
- Create the Swirl: Starting from one of the long edges, tightly roll the dough into a log, like you would for cinnamon rolls. Pinch the seam closed to seal in all that buttery goodness.
- Slice Your Swirls: Using a sharp serrated knife or a piece of unflavored dental floss (my secret weapon for clean cuts!), slice the log into 1½-inch thick rounds. You should get about 15 swirls from each log.
- The Second Rise: Arrange your swirls in a greased 9×13-inch baking pan (or on a parchment-lined baking sheet if you like crispier edges). They should be nestled close together but not crammed. Cover them again and let them rise for another 45-60 minutes, until they’re puffy and touching.
- Bake to Golden Glory: Preheat your oven to 350°F (175°C). Bake your swirls for 30-35 minutes, until they are deeply golden brown on top and sound hollow when you tap them. Chef’s Hack: For an extra boost of flavor, melt a couple tablespoons of the remaining garlic butter and brush it over the hot swirls the second they come out of the oven. A final sprinkle of Parmesan cheese on top is never a bad idea, either!
- Cool (a little!) and Serve: Let the swirls cool in the pan for about 10-15 minutes. I know it’s hard to wait, but this allows the filling to set just enough so it doesn’t all run out. Then, serve them warm and watch them disappear!
How to Serve These Buttery Masterpieces
Presentation is part of the fun! I love serving these right in the baking pan, placed in the center of the table for a gorgeous, family-style moment. Let everyone pull apart their own warm, gooey swirl. They are the absolute perfect companion to a big, hearty pasta dish like my Sunday Night Bolognese or a vibrant Creamy Tomato Basil Soup. Don’t forget a little bowl of warm marinara sauce for dipping—it takes the experience to a whole new level of cozy. For a holiday spread, they elevate the humble dinner roll into the main event everyone will be talking about.
Get Creative: Flavor Twists & Swaps
Once you’ve mastered the classic, the world is your oyster! Here are a few of my favorite ways to mix things up:
- ‘Nduja & Honey: Swirl in a few tablespoons of spicy ‘nduja (a spreadable Italian sausage) into the butter filling and drizzle the baked swirls with a touch of honey for a sweet-heat sensation.
- Everything Bagel Style: Before the second rise, brush the tops with an egg wash and sprinkle generously with everything bagel seasoning.
- Spinach & Artichoke: Mix ½ cup of finely chopped cooked spinach and ½ cup of chopped marinated artichoke hearts into the butter filling for a dip-inspired twist.
- Dairy-Free Delight: Use your favorite plant-based butter and a high-quality vegan Parmesan alternative. The dough is already egg-based, but you can try a flax-egg substitute for a fully vegan version.
- Fresh Herb Garden: Swap the parsley for a blend of fresh basil, oregano, and thyme for a more complex, Italian-herb flavor profile.
Olivia’s Kitchen Confidential
This recipe has been my trusty sidekick for years, and it’s evolved in so many fun ways. I’ve learned that on particularly humid days, the dough might need a bit more flour, so don’t be afraid to adjust as you go—you want a tacky but not sticky dough. The biggest lesson? Don’t stress about making it look perfect. Some of my most delicious batches were the ones where the filling leaked out and created gloriously crispy, cheesy bits on the bottom of the pan. That’s not a mistake; it’s a bonus feature!
I also love making a double batch of the garlic-Parmesan butter and freezing half of it. That way, the next time a craving strikes, I’m already halfway there. These swirls also freeze beautifully after baking. Just warm them in a 300°F oven straight from the freezer, and it’s like you just baked them all over again. Trust me, having a stash of these in your freezer is a form of self-care.
Your Questions, Answered!
I’ve gotten so many wonderful questions about this recipe over the years. Here are the ones that pop up most often.
Q: My dough didn’t rise. What went wrong?
A: The most common culprits are old yeast or liquid that was too hot. Yeast is a living organism, and if it’s past its prime, it won’t do its job. Always check the expiration date! Also, ensure your water is warm to the touch (around 110°F), not scalding. If you kill the yeast, it won’t foam in the first step.
Q: Can I make these ahead of time?
A: Absolutely! You have two great options. 1) Overnight, Cold Rise: After shaping the swirls and placing them in the pan, cover them tightly and pop them in the fridge overnight. The next day, let them sit at room temperature for about an hour before baking. 2) Freeze Before Baking: After the second rise, freeze the entire pan of unbaked swirls until solid, then transfer to a freezer bag. Bake from frozen, adding 10-15 minutes to the baking time.
Q: My filling leaked out everywhere while baking. Is that normal?
A> A little bit of buttery leakage is totally normal and, in my opinion, delicious! But if it’s a full-on flood, you might have spread the filling a bit too thickly, or your butter was too soft/melty. Next time, make sure your butter is just softened, not melted, and use a slightly thinner layer. Remember, you can always reserve a little butter to brush on top after baking!
Q: Can I use a bread machine for the dough?
A: You bet! Use the ‘dough’ setting on your machine. Add the liquid ingredients first, then the dry, with the yeast going in last (making a small well in the flour for it). Let the machine do all the mixing and kneading, then proceed with the recipe from the “punch down” step.
Garlic Parmesan Swirls : A Buttery, Cheesy Twist on Classic Garlic Bread
Description
Garlic Parmesan Swirl Rolls
Cheesy, buttery garlic bread reinvented
Ingredients
Dough:
-
8½ cups all-purpose flour
-
4 tbsp sugar
-
2 packets (4½ tsp) active dry yeast
-
3 tsp kosher salt
-
2 cups warm water (110°F / 43°C)
-
½ cup olive oil
-
4 large eggs + 2 egg yolks
Garlic-Parmesan Filling:
-
1½ cups unsalted butter, softened
-
12 cloves garlic, finely minced
-
⅔ cup fresh parsley, finely chopped
-
1 cup grated Parmesan cheese
-
1 tsp salt
-
½ tsp black pepper
-
Optional: 1 tsp crushed red pepper flakes
Instructions
1. Activate the Yeast
-
Combine warm water, sugar, and yeast in a large bowl. Let sit 5–10 minutes until foamy.
2. Make the Dough
-
Add olive oil, eggs, and egg yolks; mix until combined.
-
Stir in salt and gradually add flour until a shaggy dough forms.
-
Knead 8–10 minutes until smooth, elastic, and slightly soft.
3. First Rise
-
Place dough in a lightly oiled bowl, turning to coat. Cover and let rise 1 hour, or until doubled.
4. Prepare Filling
-
Mix butter, garlic, parsley, Parmesan, salt, pepper, and red pepper flakes until combined.
5. Roll & Fill
-
Punch down dough and divide in half. Roll each half into a rectangle, ~¼ inch thick.
-
Spread half the filling evenly over each rectangle.
6. Form the Swirls
-
Roll each rectangle tightly from one long edge into a log. Pinch seams closed.
-
Slice logs into 1½-inch rounds.
7. Second Rise
-
Arrange swirls in a greased 9×13-inch pan (or lined baking sheet). Cover and rise 45–60 minutes until puffy.
8. Bake
-
Preheat oven to 350°F (175°C).
-
Bake 30–35 minutes until golden brown.
-
Optional: Brush with extra melted butter and sprinkle Parmesan after baking.
9. Cool & Serve
-
Let rolls rest 10–15 minutes before serving. Pull apart warm and enjoy!
Notes
-
Overnight Rise: Cover shaped swirls and refrigerate overnight; bake next day after 1 hour at room temp.
-
Freeze: Freeze unbaked swirls after second rise; bake from frozen, adding 10–15 min.
-
Flavor Twists:
-
‘Nduja & honey swirl
-
Everything bagel topping before baking
-
Spinach & artichoke filling
-
Vegan butter & Parmesan alternative
-
Nutritional Information (Approximate)
Servings: 30 rolls | Prep Time: 20 mins | Rising Time: 2 hrs | Bake Time: 35 mins | Total Time: 2 hrs 55 mins
Calories per roll: ~399 | Fat: 22g | Carbohydrates: 38g | Protein: 9g
*Nutrition information is an estimate and will vary based on the specific brands and quantities of ingredients used.
Final Thoughts
And there you have it—a garlic bread revelation, transformed into the most delectable, pull-apart, and utterly irresistible Garlic Parmesan Swirl Rolls. This recipe is a celebration of what happens when comfort food gets a little extra love, a bit of creative flair, and a whole lot of butter.
From that first foamy bloom of yeast to the final, golden-brown pull of a warm, cheesy swirl, this process is baking at its most rewarding. It’s a reminder that the best dishes aren’t just about feeding the body, but about creating an experience—the fragrant anticipation as they bake, the collective “wow” when you bring them to the table, and the simple, profound joy of sharing something made entirely by hand.
Whether these swirls become your new holiday tradition, your surefire party hit, or just a very special treat for a Tuesday night, I hope they fill your kitchen with the same warmth and happiness they’ve brought to mine. Don’t be afraid of the flour, embrace the buttery mess, and bake with all the heart you’ve got.
After all, there’s no problem in this world that can’t be made a little better with a warm, soft, garlicky, cheesy bite of homemade bread.
Now, go preheat that oven. Your new favorite bread basket awaits.
Happy baking, my friends!
Love,
Olivia
P.S. I always say the mark of a truly great recipe is the happy silence that falls over the table when it’s served. I can’t wait to hear about the silence (or the cheers!) in your home. Share your swirls, your twists, and your proud baking moments with me. Let’s keep spreading the buttery, garlicky joy, one golden swirl at a time.