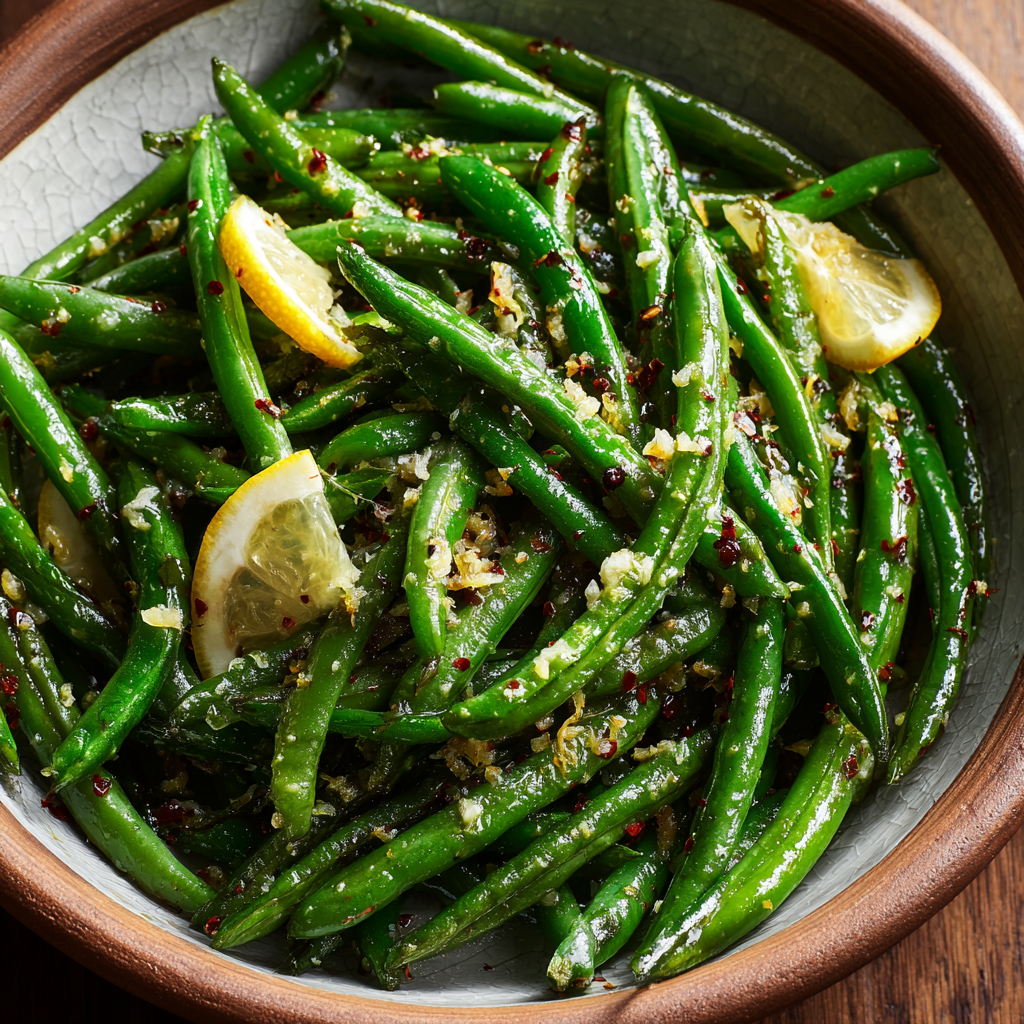
Welcome to My Cozy Kitchen, Foodie Friends!
Is there anything more magical than that sizzle-hiss when veggies hit a hot pan? That’s the sound of dinner transforming from “meh” to “MORE!” right before your eyes. I’m Olivia Bennett – your apron-clad cheerleader for bold flavors and uncomplicated cooking. Whether you’re racing against the clock or craving that *pop* of restaurant-worthy flair at home, I’ve got your back. Today? We’re turning humble green beans into a jaw-dropping side dish that’ll steal the spotlight. Garlic Chili Green Beans with Lemon Zest are my weeknight superheroes: crispy, spicy, and brightened with citrus sunshine. They’re ready in 20 minutes flat but taste like you fussed for hours. No fancy skills needed – just a skillet, hungry hearts, and that beautiful mess we call cooking. Let’s make your tastebuds dance!
The Dinner Party That Sparked a Obsession
Picture this: It’s my first big dinner party after moving cross-country. I’m 23, sweating over a stubborn roast, when I realize… I forgot a vegetable dish. Panic mode! I grab the lone bag of green beans languishing in my fridge, some garlic, and the sad-looking lemon on my counter. In a blaze of “what’s the worst that could happen?”, I toss them with chili flakes and pray. Friends, those beans vanished faster than my nerves. My spicy-savvy Aunt Maria chased me around the kitchen for the recipe, laughing: “Olivia! You made rabbit food taste like FIRE!” That chaotic night taught me two things: 1) Imperfect meals create the best memories, and 2) Green beans deserve way more excitement. This recipe? It’s my love letter to quick fixes that wow crowds.
Gathering Your Flavor Arsenal
Makes 8 generous servings – halve easily for smaller crews!
- 2 lbs haricots verts or green beans, ends trimmed – Haricots verts are thinner and more tender (my fave!), but standard green beans work beautifully. Chef’s tip: Snapped beans > cut beans! Hold each end and bend – they break naturally at the perfect point.
- 4 tbsp olive oil – Extra virgin adds fruity depth. Swap: Avocado oil for higher smoke point if you crank the heat.
- 12 garlic cloves, chopped – Yes, TWELVE! They mellow when cooked. Chef’s confession: I often add 15. No vampires here.
- 2 shallots, thinly sliced – Softer, sweeter cousin of onions. Don’t have? Use 1/2 red onion + pinch of sugar.
- 2-4 tsp red pepper flakes – Start low if sensitive! Insider hack: Korean gochugaru flakes add smokiness.
- Flaky salt, to finish – Maldon or Jacobsen. That crunchy saline burst is GOLD.
- Zest of 1-2 lemons – Non-negotiable: Use a microplane! Oils in the zest make the flavor SING.
Let’s Make Magic: Crispy, Fiery, Zingy Perfection
Prep Time: 10 mins | Cook Time: 10 mins | Total Time: 20 mins
- Blanch Like a Boss: Bring a large pot of heavily salted water (tastes like the sea!) to a rolling boil. Add beans and cook just 2-3 minutes until bright green and crisp-tender. Why blanch? It locks in color and texture! Immediately drain and plunge into a bowl of ice water. Chef’s game-changer: Add ice cubes *on top* of beans to keep them fully submerged. Drain again and PAT DRY – soggy beans won’t crisp up!
- Sizzle Your Aromatics: Heat olive oil in a large skillet (cast iron = best crust!) over medium heat. Add garlic and shallots. STIR CONSTANTLY for 2-3 minutes until golden but NOT brown. Burn alert: Garlic turns bitter fast! Lower heat if needed.
- Bring the Heat: Sprinkle in red pepper flakes – listen for that fragrant sizzle! Add beans and toss aggressively with tongs to coat. Cook 2-3 minutes, letting beans char slightly in spots. Hear the crunch? That’s the sound of success!
- The Grand Finale: Remove from heat. Immediately zest lemon directly over skillet – residual heat wakes up the oils. Toss once more. Sprinkle with flaky salt. Pro move: Add extra zest at the table for a fragrant punch!
Plate It Pretty (or Just Fork-Straight-From-Skillet!)
Pile these glistening beans high on a warm platter. Drizzle any garlicky oil left in the pan over top – that’s liquid gold! For dinner parties, scatter extra lemon zest and a pinch of pepper flakes over the mound for Instagram-worthy vibes. They’re the ultimate wingman for simple grilled chicken, seared salmon, or sticky soy-glazed tofu. Weeknight hack? Serve straight from the skillet family-style with crusty bread to mop up the spicy oil. Leftovers? Ha. Good luck.
Shake It Up: 5 Delicious Twists
- Nutty Crunch: Toast 1/3 cup slivered almonds or sesame seeds with the garlic.
- Umami Bomb: Finish with 1 tbsp fish sauce or soy sauce + extra zest.
- Meaty Main: Toss in cooked shrimp or crumbled bacon during last 2 minutes.
- Vegan Creamy-Spicy: Swirl in 2 tbsp coconut milk at the end.
- Citrus Swap: Use lime zest + 1 tsp lime juice for tropical vibes.
Why This Recipe Works (The Science Behind the Deliciousness)
Ever wonder why these Garlic Chili Green Beans taste so much better than your average steamed side? There’s actually some kitchen science at play! Let’s break it down:
1. Blanching for Brightness & Bite
Blanching isn’t just a fancy chef move—it’s essential for locking in that vibrant green color and crisp-tender texture. When green beans hit boiling water, the heat deactivates enzymes that cause dullness and mushiness. The ice bath (a.k.a. “shocking”) halts the cooking instantly, preserving that satisfying snap. Skipping this step? You risk ending up with sad, olive-drab beans.
2. The Maillard Reaction = Flavor Fireworks
Searing the beans in hot oil after blanching triggers the Maillard reaction—the same chemical magic that gives grilled steaks and toasted bread their deep, savory flavor. Those slightly charred spots on your beans? That’s caramelized natural sugars meeting high heat, creating layers of umami.
3. Garlic’s Sweet Spot
Raw garlic punches; burnt garlic stings. But golden, gently sautéed garlic? Chef’s kiss. Cooking it low and slow (but not too slow!) transforms its sharp allicin into mellow, sweet notes. Bonus: Olive oil acts as a flavor carrier, infusing every bite with garlicky richness.
4. Chili Flakes’ Oil Infusion
Adding red pepper flakes to hot oil isn’t just for spice—it’s for flavor extraction. Capsaicin (the compound behind the heat) is fat-soluble, meaning the oil absorbs its vibrancy and distributes it evenly. Pro tip: For more complexity, toast the flakes in the oil for 10 seconds before adding garlic.
5. Lemon Zest’s Citrus Oils
Unlike juice, which can make beans soggy, zest packs concentrated aroma without acidity. The oils in lemon zest (limonene) are volatile—meaning they’re at their peak right after grating. Adding it off-heat preserves that bright, sunny pop.
Fun Experiment: Try swapping lemon zest with orange or grapefruit for a floral twist, or add a pinch of MSG to amplify the savory depth (no shame—it’s a game-changer!).
Pairing Perfection: What to Serve With Your Green Beans
These beans are versatile enough to complement almost any main, but here’s how to build a showstopping meal around them:
For a Light, Fresh Spread:
-
Main: Pan-Seared Lemon Butter Salmon
-
Pairing Logic: The beans’ spice cuts through the salmon’s richness, while the lemon zest ties both dishes together.
-
Add-Ons: Quinoa pilaf with toasted pine nuts, a crisp white wine (Sauvignon Blanc or Pinot Grigio).
For Comfort Food Nights:
-
Main: Garlic-Herb Roasted Chicken
-
Pairing Logic: The beans’ crunch contrasts the tender chicken, and the chili flakes echo any paprika in the rub.
-
Add-Ons: Creamy mashed potatoes (scoop up that extra garlic-chili oil!), a hoppy IPA beer.
For Vegetarian Feasts:
-
Main: Crispy Tofu with Soy-Ginger Glaze
-
Pairing Logic: The beans’ heat balances the glaze’s sweetness, creating a sweet-spicy-umami trifecta.
-
Add-Ons: Steamed jasmine rice, quick-pickled cucumbers.
For Fancy Dinner Parties:
-
Main: Herb-Crusted Rack of Lamb
-
Pairing Logic: The beans’ boldness stands up to lamb’s intensity, while the lemon zest lightens the dish.
-
Add-Ons: Roasted fingerling potatoes, a bold Cabernet Sauvignon.
Leftover Hacks (If You Somehow Have Any):
-
Breakfast: Fold into an omelet with feta cheese.
-
Lunch: Toss with cold soba noodles and tahini dressing.
-
Snack: Top toasted baguette slices with beans and goat cheese.
The Art of Prep: Time-Saving Tips for Busy Cooks
Love this recipe but short on time? Here’s how to streamline it without sacrificing flavor:
1. The Batch Blanch
Blanch a big batch of green beans on Sunday, ice-shock them, and store in a towel-lined container (squeeze out excess moisture). They’ll keep for 3 days—ready for quick sautéing on weeknights.
2. Garlic & Shallot Shortcuts
-
Pre-Chopped Garlic: Store-bought works in a pinch (use 1.5x the amount to compensate for milder flavor).
-
Freeze Your Aromatics: Chop garlic and shallots in bulk, freeze in teaspoon portions in ice cube trays, then pop out as needed.
3. Heat Control for No-Fuss Cooking
-
Nonstick Skillet Hack: Use medium heat only—no need to babysit.
-
Oven Finish: Too busy to stir? After sautéing, spread beans on a sheet pan and roast at 425°F for 5 minutes for extra crispness.
4. Kid-Friendly Adaptations
-
Mild Version: Replace chili flakes with smoked paprika for depth without heat.
-
Fun Presentation: Let kids “decorate” their plates with lemon zest “confetti.”
5. Disaster Recovery
-
Too Spicy? Add a drizzle of honey or maple syrup to balance.
-
Overcooked? Revive with a splash of vinegar (apple cider or rice wine) and call it a “warm bean salad.”
Pro Time-Saver: Use a mandoline for the shallots—paper-thin slices in seconds!
Olivia’s Extra Pinch of Love
This recipe evolved from my “kitchen sink” days into my most-requested side! Early versions used powdered garlic (cringe!), but fresh cloves make ALL the difference. Funny story: Once subbed cayenne for flakes while distracted by my barking pug… let’s just say we needed emergency yogurt on standby! Now I keep a bowl of cool yogurt on the table when serving spicy newbies. The beans also shrink slightly when cooked – don’t panic! That flavor concentration is intentional. Over the years, I’ve learned: UNDERCOOK them slightly during blanching. They’ll finish perfectly in the skillet. Trust the process – and your tastebuds!
Your Questions, My Answers!
Q: My beans turned out soggy! What went wrong?
A: Two likely culprits: Over-blanching (stick strictly to 2-3 mins!) or not drying thoroughly after the ice bath. Water = enemy of crispness! Pat like your crunch depends on it.
Q: Can I use frozen green beans?
A: Absolutely! Thaw completely and pat EXTRA dry. Skip blanching – sauté frozen beans 1 minute longer. Texture differs slightly, but flavor still rocks.
Q: How do I tone down the heat for kids?
A: Reduce flakes to 1 tsp and add them with the lemon zest OFF the heat (less oil infusion = milder spice). Serve yogurt or ranch for dipping!
Q: Can I prep components ahead?
A: YES! Blanch beans and ice-shock them up to 24 hours ahead. Store dried in a towel-lined container. Chop garlic/shallots morning-of. Sauté just before serving!

Garlic Chili Green Beans with Lemon Zest
- Total Time: 20 min
Description
Turn a humble veggie into a crowd-stunner with Olivia’s spicy, citrus-kissed green beans. Whether you’re hosting a dinner party or need a quick zingy fix for Tuesday night dinner, this recipe brings restaurant-level flavor without the stress. One skillet, zero stress, all the wow.
Ingredients
-
2 lbs green beans or haricots verts, ends trimmed
-
4 tbsp olive oil
-
12 garlic cloves, chopped
-
2 shallots, thinly sliced
-
2–4 tsp red pepper flakes (to taste)
-
Zest of 1–2 lemons
-
Flaky salt, to finish
Instructions
-
Blanch Like a Pro: Boil salted water. Cook beans for 2–3 mins till bright green. Ice-shock immediately, then pat dry.
-
Sizzle Magic: Heat oil over medium. Add garlic and shallots. Stir constantly for 2–3 mins till golden.
-
Bring the Fire: Add chili flakes. Toss in green beans, cook 2–3 mins till lightly charred.
-
Zest & Serve: Remove from heat. Zest lemon directly over the pan. Finish with flaky salt. Toss once more and serve hot!
Notes
-
Max crunch: Pat beans completely dry post-blanch.
-
Spice balance: Add chili flakes at the end for less heat.
-
Make ahead: Blanch beans 1 day early; sauté fresh before serving.
-
Zest smart: Microplane brings out citrus oils—don’t skip it!
- Prep Time: 10 min
- Cook Time: 10 min
Nutrition
- Calories: 120 cal Per Serving
- Fat: 8g
- Carbohydrates: 10g
- Fiber: 4g
- Protein: 3g
Nutritional Per Serving (Approx):
Calories: 120 | Carbs: 10g | Fat: 8g | Protein: 3g | Fiber: 4g
Final Thoughts: More Than Just a Side Dish
These Garlic Chili Green Beans aren’t just a recipe—they’re a reminder that the best meals often come from happy accidents (like my dinner party panic!). They celebrate how a few humble ingredients, treated with care, can outshine even the fanciest mains.
So here’s my challenge to you: Make this once as written, then play! Swap the chili for harissa, the lemon for yuzu, or toss in crispy prosciutto bits. Cooking isn’t about perfection; it’s about the sizzle, the smells, and the stories you’ll tell when your aunt begs for the recipe.
Now, go forth and make those beans sing. And when you do, tag me @OliviasCozyKitchen—I want to see your spicy, zesty masterpieces!