

The Ultimate Comfort in a Cup: My Fluffy Cheddar Cheese Muffins with Chives
Hello, my fellow flavor-chasers! Olivia here. If you’ve spent any time in my kitchen (and I hope you feel like you have!), you know there are two sounds that make my heart do a little happy dance: the soft “whoosh” of the oven door opening, and the collective “mmm…” that follows when something warm and cheesy lands on the table. Today, I’m sharing a recipe that’s a master of both ceremonies: my beloved Fluffy Cheddar Cheese Muffins with Chives.
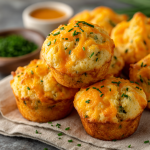
Imagine this: you pull a tray from the oven, and there they are. Golden-brown crowns, slightly craggy and utterly inviting, with little flecks of emerald-green chives peeking out. The air smells like toasted cheese and warm bread, a scent that can rally anyone to the kitchen table. You break one open, and steam wafts up, revealing a tender, feather-light crumb woven with ribbons of melted, sharp cheddar cheese. It’s not just a muffin; it’s a hug in edible form.
These muffins are my secret weapon. They’re the perfect partner for a steaming bowl of tomato soup on a rainy day, the star of a lazy weekend brunch board, and the ultimate “I-made-this-for-you” snack tucked into a lunchbox. The best part? They come together in one bowl (almost!) and are ready in just 30 minutes. No fancy skills required, just a love for good, simple, cozy food. So, tie on that apron—the messy ones are the most loved—and let’s bake some joy.
A Panic, a Party, and the Birth of a Go-To Recipe
I have to confess, these muffins were born from a near-crisis. A few years back, I was hosting a last-minute, casual dinner for a big group of friends. The plan was a giant pot of chili—foolproof, right? As everyone was arriving, laughing and filling the house with noise, I realized my cornbread wasn’t rising. It was a sad, dense puck in the cast iron. Cue the internal panic!
With people already here, I did what any slightly-frazzled home cook would do: I winged it. I grabbed my basic muffin tin, whisked together the simplest savory batter I could think of, and emptied an entire bag of leftover sharp cheddar into the bowl. I snipped some chives from the window sill herb garden that was barely hanging on. In a flurry, I popped them in the oven, not expecting much.
Twenty minutes later, I pulled out a tray of the most glorious, puffed, cheesy, golden muffins. They were an instant sensation. The chili was great, but those impromptu cheese muffins stole the show. Everyone begged for the recipe, and I had to sheepishly admit I didn’t have one. That night, I knew I had to recreate and perfect that happy accident. Now, this recipe is a testament that sometimes the best things in the kitchen—and in life—come from a little bit of beautiful chaos.
Gathering Your Flavor Allies: The Ingredients Breakdown
Let’s talk about our team players! Every ingredient here has a purpose, and knowing the “why” makes you a more confident cook. Here’s what you’ll need:
- 2 cups all-purpose flour: The reliable foundation. It gives our muffins structure. For a slightly more tender crumb, you can swap out 1/2 cup with cake flour. Chef’s Insight: For accuracy (and less cleanup!), I fluff the flour in its bag, spoon it gently into the measuring cup, and level it off with a knife. No compacting!
- 2 tsp baking powder: Our leavening hero! This is what gives the muffins their signature lift and fluffy texture. Make sure yours is fresh—if it doesn’t fizz when you add a pinch to hot water, it’s time for a new can.
- 1 tsp salt: The flavor enhancer. Don’t skip it! Salt makes the cheese and butter flavors truly sing by balancing everything out.
- 1½ cups shredded sharp cheddar cheese: The star of the show! I insist on sharp or extra-sharp cheddar for maximum flavor impact. Pre-shredded bags contain anti-caking agents that can make things a bit gummy, so I always grab a block and shred it myself for the best melt. (It’s a great arm workout, I promise!).
- 2 large eggs, at room temperature: Our binders and tenderizers. Room temp eggs incorporate more evenly into the batter, leading to a better rise. In a hurry? Place cold eggs in a bowl of warm water for 5 minutes.
- 1 cup milk: The hydrator. Whole milk will give you the richest flavor and texture, but 2% works beautifully too. For a dairy-free version, unsweetened almond or oat milk are great substitutes.
- ½ cup (1 stick) unsalted butter, melted: This adds incredible moisture, tenderness, and that irresistible buttery flavor. Using unsalted lets you control the salt level perfectly. Let it cool slightly before mixing so it doesn’t cook the eggs!
- 2 tbsp chopped fresh chives: The fresh, aromatic finish. They add a mild oniony pop and gorgeous color. In a pinch, 1 tbsp of dried chives works, or try the green parts of thinly sliced scallions.
Let’s Get Baking: The Foolproof, Step-by-Step Guide
Ready? This is where the magic happens. Follow these steps, embrace the tips, and you’ll have perfect muffins every single time.
Step 1: Preheat & Prep. Crank that oven to 400°F (200°C). This high heat is key for that initial explosive rise that creates the beautiful muffin top. While it heats, generously grease your 12-cup muffin tin with butter or non-stick spray, or line it with paper liners for super-easy cleanup. I’m a fan of liners for muffins this cheesy—they prevent any stubborn sticking.
Step 2: The Dry Team Huddle. In a large mixing bowl, take your whisk and energetically blend together the flour, baking powder, and salt. You’re not just mixing; you’re aerating the flour and ensuring the baking powder is evenly distributed. This simple act guarantees every muffin gets an equal share of lift. Set this bowl aside.
Step 3: The Wet Team Mix. In another medium bowl, whisk your room-temperature eggs until they’re just broken up and uniform. Pour in the milk and the slightly cooled melted butter. Whisk it all together until it’s a smooth, homogenous, pale yellow liquid. See those tiny bubbles forming on the surface? That’s a good sign!
Step 4: The Grand (Gentle) Union. Here’s the most crucial step for fluffy muffins: DO NOT OVERMIX. Pour the wet ingredients into the bowl with the dry ingredients. Using a rubber spatula or a wooden spoon, gently fold them together. Stir just until the last traces of dry flour disappear. The batter will be lumpy and thick, and that is PERFECT. Overmixing develops gluten, leading to tough, dense muffins. We want tender, cloud-like crumbs!
Step 5: Fold in the Goodies. While there are still a few streaks of flour visible, dump in your gorgeous pile of shredded cheddar and the bright green chives. Fold them in gently, just 4-5 folds, until they’re evenly dispersed. Let the batter rest for 2 minutes while you get your muffin tin ready. This allows the flour to fully hydrate.
Step 6: Fill ‘Er Up! Using a large spoon or an ice cream scoop (my secret weapon for even portions!), divide the batter among the 12 muffin cups. Fill each one about ¾ of the way full. Don’t be shy—this gives them room to rise into that perfect domed shape we love.
Step 7: Bake to Golden Perfection. Slide the tin into your preheated oven. Now, set your timer for 18 minutes, but don’t wander too far. Ovens vary, so at the 18-minute mark, check them. They’re done when the tops are golden, the edges are just starting to pull away from the tin, and a toothpick inserted into the center comes out clean (maybe with a little melted cheese, but no wet batter). This can take up to 22 minutes.
Step 8: The Finishing Touch (Optional, but Highly Recommended). The minute you pull them from the oven, brush the tops with a little extra melted butter. This gives them a gorgeous glossy sheen, adds a whisper more buttery flavor, and keeps the tops soft. It’s my non-negotiable chef hack!
Step 9: The (Brief) Wait. Let the muffins cool in the tin for exactly 5 minutes. This allows them to set so they don’t fall apart when you take them out. Then, transfer them to a wire rack. I know it’s hard, but try to let them cool for another 5-10 minutes. That molten cheese is dangerously hot! Serve warm.
How to Serve These Savory Stars
Presentation is part of the joy! Pile these warm muffins into a rustic basket lined with a checkered napkin for that homemade, welcoming feel. They are incredible all on their own, but they truly shine as part of a meal. Serve them alongside a creamy tomato basil soup or a hearty chili for the ultimate cozy dinner. For brunch, pair them with scrambled eggs and crispy bacon. Or, simply split one open, spread it with a little soft herb butter, and savor the moment.
Get Creative: Recipe Twists & Swaps
Once you’ve mastered the classic, make it your own! Here are a few of my favorite riffs:
- Everything Bagel Style: Fold in 2 tbsp of everything bagel seasoning with the chives. Before baking, sprinkle the tops with more seasoning and sesame seeds.
- Jalapeño Popper: Add 1-2 finely diced jalapeños (seeds removed for mild, kept for heat) and swap ½ cup of the cheddar for cream cheese, diced into small cubes.
- Herb Garden Delight: Swap chives for a mix of fresh dill, parsley, and thyme for a more complex herbal note.
- Gluten-Free: Use a 1:1 gluten-free all-purpose flour blend (like Bob’s Red Mill) and ensure your baking powder is GF.
- Bacon & Cheddar: Fold in ½ cup of cooked, crumbled crispy bacon for the ultimate savory treat.
Olivia’s Chef Notes & Kitchen Confessions
This recipe has evolved from that first panicked batch! I’ve learned that the brand of cheddar matters—a good, aged supermarket block works wonders. I’ve also started adding a tiny pinch of smoked paprika or garlic powder to the dry ingredients sometimes, just for a hidden layer of flavor. My biggest kitchen story? I once, in a sleepy morning haze, accidentally used powdered sugar instead of flour. Do not recommend. The resulting “muffins” were a sweet, cheesy, bizarre puddle. We laughed about it over proper, savory ones the next day. The moral: always turn on the kitchen light before you bake! And remember, even the flops make good stories.
Your Questions, Answered: FAQs & Troubleshooting
Q: My muffins turned out dense and heavy. What happened?
A: The most common culprit is overmixing the batter. Remember, fold just until combined—lumps are your friend! Also, check your baking powder’s freshness. If it’s old, it won’t provide the necessary lift.
Q: Why did my cheese sink to the bottom?
A: This usually happens if the cheese shreds are too large or wet. Make sure to shred your own cheese from a block (it’s drier) and toss the shreds in a tablespoon of the measured flour before folding them in. This light coating helps suspend them throughout the batter.
Q: Can I make these ahead of time?
A: Absolutely! Bake them, let them cool completely, and store in an airtight container at room temp for 2 days, or freeze for up to 3 months. To reheat, warm in a 350°F oven for 10 minutes or microwave for 15-20 seconds.
Q: My muffin tops didn’t dome. They’re flat.
A> This could be from an oven that wasn’t hot enough. Make sure it’s fully preheated to 400°F. Also, don’t overfill the cups—¾ full is the sweet spot. Finally, avoid opening the oven door during the first 15 minutes of baking.
Fluffy Cheddar Cheese Muffins with Chives : Easy, Savory, and Irresistible!
Description
Golden-brown, cheesy, and flecked with fresh chives, these muffins are a cozy hug in edible form. Perfect alongside tomato soup, chili, or a weekend brunch, they’re quick, simple, and irresistibly fluffy.
Ingredients
Dry Ingredients:
-
2 cups all-purpose flour (or swap ½ cup for cake flour for a more tender crumb)
-
2 tsp baking powder
-
1 tsp salt
Wet & Flavor Ingredients:
-
2 large eggs, room temperature
-
1 cup milk (whole or 2%; almond/oat milk works too)
-
½ cup (1 stick) unsalted butter, melted and slightly cooled
-
1½ cups shredded sharp cheddar cheese (shred from a block for best results)
-
2 tbsp chopped fresh chives (or 1 tbsp dried chives)
Optional Finish:
-
Extra melted butter for brushing tops
Instructions
-
Preheat & Prep:
-
Heat oven to 400°F (200°C).
-
Grease a 12-cup muffin tin or line with paper liners.
-
-
Mix Dry Ingredients:
-
Whisk together flour, baking powder, and salt in a large bowl.
-
-
Mix Wet Ingredients:
-
In another bowl, whisk eggs, milk, and slightly cooled melted butter until smooth.
-
-
Combine (Gently!):
-
Pour wet ingredients into dry. Fold with a spatula or wooden spoon until just combined. Lumps are perfect—don’t overmix.
-
-
Fold in Cheese & Chives:
-
Add cheddar and chives. Fold gently 4–5 times to evenly distribute. Let batter rest 2 min.
-
-
Fill Muffin Cups:
-
Using a spoon or ice cream scoop, fill each cup ~¾ full.
-
-
Bake:
-
Bake 18–22 min until golden, edges slightly pull away, and a toothpick inserted comes out clean (some melted cheese is fine).
-
-
Optional Finish:
-
Brush tops with melted butter for extra sheen and flavor.
-
-
Cool Slightly & Serve:
-
Let muffins cool 5 min in the tin, then transfer to a wire rack. Serve warm.
-
Notes
-
Dense muffins? Likely overmixing or old baking powder. Fold gently and ensure leavening is fresh.
-
Cheese sinks? Toss shreds in 1 tbsp flour before folding.
-
Flat tops? Oven too cool, batter overfilled, or opened oven door too early.
Nutritional Information (Per Muffin)
Calories: ~210 | Protein: 7g | Carbohydrates: 22g | Fat: 12g (Saturated Fat: 7g) | Cholesterol: 60mg | Sodium: 350mg | Fiber: 1g | Sugar: 1g
Note: Nutritional information is an estimate provided for convenience and may vary based on specific ingredients and brands used.
Final Thoughts: The Quiet Magic of a Simple Muffin
In a world that often feels overwhelmingly complex, there is a profound comfort in simplicity. These Cheddar Cheese Muffins with Chives are a testament to that truth. They aren’t fussy or fragile. They are humble, hearty, and deeply reliable—the kind of food that feels like a grounding force in a chaotic day.
What I love most about this recipe is its generous spirit. It asks for little—a few pantry staples, a single bowl, half an hour of your time—and gives back so much: warmth, nourishment, and the undeniable joy of sharing something made by hand. It’s a recipe that builds confidence, reminding you that great cooking isn’t about perfection; it’s about the intention you stir into the bowl.
So, whether you’re serving them to a crowd with a pot of soup, packing one as a secret treat in a lunchbox, or simply enjoying a warm muffin with your afternoon tea, remember this: you’re not just baking a snack. You’re creating a small, delicious moment of pause. You’re crafting an edible reminder that the best comforts are often the simplest ones, rising golden and fragrant from your own oven.


