
Welcome to the Most Whimsical Kitchen Party of the Year!
Is there anything better than the pure, unadulterated joy of holiday baking? That magical feeling when your kitchen smells like sugar and happiness, and every countertop is a potential canvas for something delicious and delightful. If you’re like me, you live for those moments—the ones that turn simple ingredients into edible memories. And today, my friend, we are creating a memory that is as fun to make as it is to eat. We’re whipping up a batch of utterly adorable, completely irresistible Elf Hat Cones!
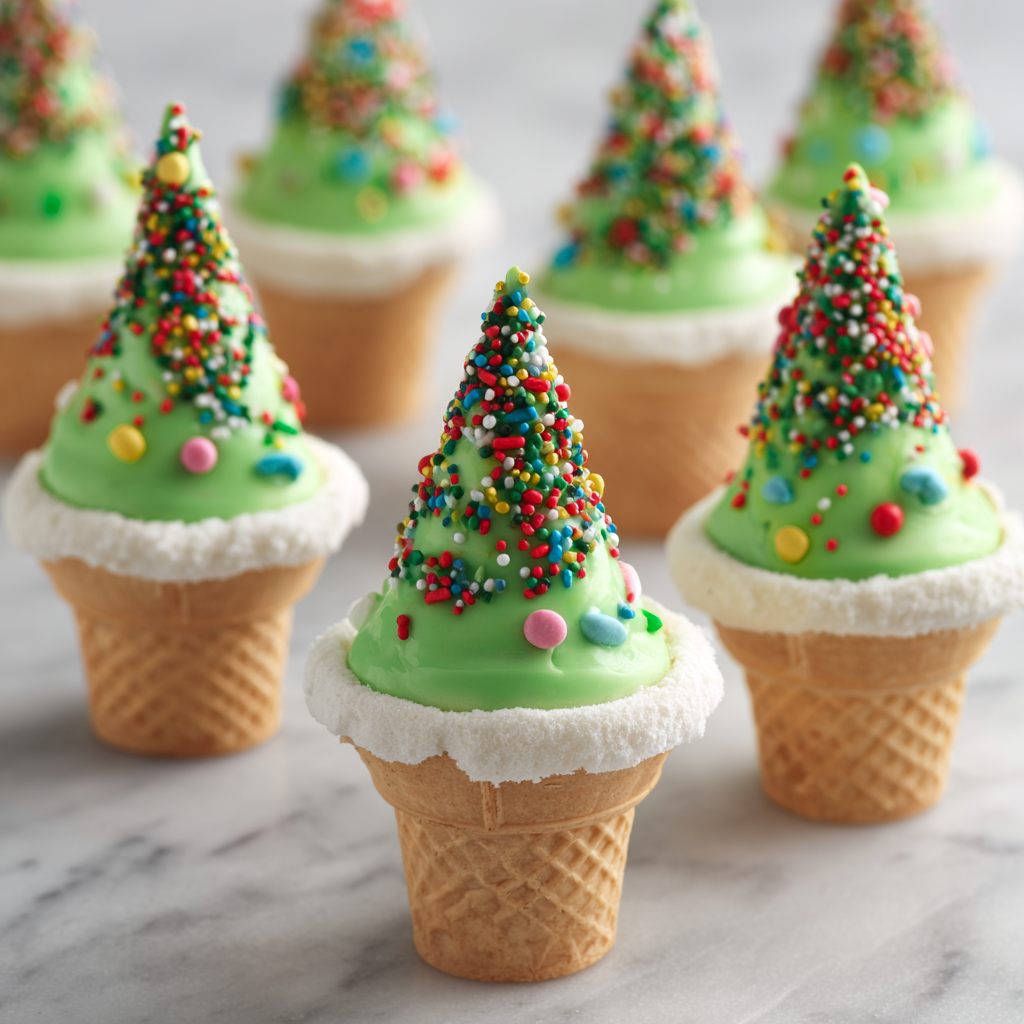
Imagine this: crispy sugar cones, transformed into the most cheerful little elf hats you’ve ever seen, decked out in vibrant green and a confetti of festive sprinkles. They’re the ultimate edible craft, perfect for little helpers with big imaginations, cookie platters that need a show-stopping centerpiece, or simply as a sweet project to make your December afternoons a little brighter. You don’t need a degree in pastry arts or a pantry full of fancy tools. All you need is a sense of fun and about 30 minutes. So, tie on your favorite (probably messy) apron, put on some holiday tunes, and let’s turn these simple cones into a holiday sensation that will have everyone grinning from ear to ear!
The Christmas My Kitchen Turned into Santa’s Workshop
I’ll never forget the Christmas my niece, Lily, then five years old, declared she was going to be “Head Elf” for our family gathering. This involved a lot of tinsel, a very serious demeanor, and a deep desire to help me in the kitchen. I knew we needed a project that was safe, engaging, and, most importantly, magical. That’s when the idea for these Elf Hat Cones was born!
We laid out all our ingredients like an elf’s toolkit. Lily’s job was sprinkles (a role she took with the utmost gravity). As we dipped and decorated, her little face was a picture of concentration and wonder. The moment we placed the final hat on a platter, she gasped. “Aunt Livvy,” she whispered, “they’re perfect. The elves will love them.” That simple afternoon of melted chocolate and sticky fingers is one of my most treasured holiday memories. It wasn’t about perfection; it was about the pure, sugary joy of creating something together. Every time I make these now, I think of her and that magical feeling of believing. I hope these little hats bring that same spark of joy and togetherness to your kitchen.
Gathering Your Elf Toolkit: Ingredients & Insights
Here’s everything you need to assemble your edible workshop. The beauty of this recipe is in its simplicity and the easy swaps you can make!
- 12 sugar cones: These are our hat foundations! I love their sweet, crispy texture and sturdy shape. Chef’s Insight: Make sure your cones are fresh and not stale or soft. If you can’t find sugar cones, you could use waffle cones, but their pointed tops aren’t as pronounced, so the “hat” shape might be a little different.
- 2 cups green candy melts: This is the classic, vibrant green “felt” of our elf hats. Substitution Tip: No candy melts? No problem! You can use 2 cups of high-quality white chocolate chips mixed with 1-2 teaspoons of green gel food coloring (liquid food coloring can cause chocolate to seize). Melt slowly and stir gently for a smooth, rich coating.
- ¼ cup holiday sprinkles: The more colorful, the better! This is where you can really let your personality shine. Use classic red and green, go for a winter wonderland theme with blues and whites, or even use themed sprinkles like tiny trees or stars. Chef’s Insight: Jimmies (long sprinkles) and nonpareils (tiny balls) work best as they stick easily to the chocolate.
- Optional: mini marshmallows or M&Ms for hat toppers: A single mini marshmallow perched on the very tip of the hat is just the cutest thing. An red or green M&M works beautifully too for a pop of color!
- Optional: royal icing or frosting for trimming edges: A little piped white frosting around the base mimics the fuzzy brim of an elf’s hat. A small store-bought tub of vanilla frosting works perfectly for this—just pop it in a zip-top bag, snip a tiny corner, and you have an instant piping bag!
Let’s Build Some Hats! Your Step-by-Step Guide
Ready to get your hands a little messy? Follow these steps for foolproof, fabulous elf hats.
- Prep Your Station: Before you even think about melting chocolate, line a baking sheet with parchment paper. This is your drying rack and will save you from a huge sticky mess later. Have your sprinkles and toppings open and within easy reach. Once the chocolate is melted, you’ll need to work relatively quickly! Chef’s Hack: If your kitchen is warm, pop your lined baking sheet in the fridge for 10 minutes before you start. A cold surface helps the chocolate set faster.
- Melt the Chocolate: Place your candy melts (or white chocolate chips) in a microwave-safe bowl that is deep enough to dip a cone. Heat in 30-second bursts on medium power, stirring well between each burst. It usually takes about 90 seconds total. Stop heating when there are still a few lumps and stir until they melt completely. This prevents the chocolate from burning. Chef’s Commentary: The goal is smooth and fluid. If your chocolate seems too thick, you can add a tiny, tiny amount of coconut oil or vegetable shortening (about ½ tsp) to thin it out and make dipping easier.
- The Dip: Hold a sugar cone by its wide base. Carefully dip it tip-down into the melted green chocolate. Swirl it gently to coat all sides. Lift it out and let the excess chocolate drip back into the bowl for a few seconds. You want a nice, even coat without any globby bits. Chef’s Tip: To get a clean base, after dipping, gently tap your wrist while holding the cone over the bowl to shake off any last drips.
- Decorating & Sprinkling: Place the dipped cone upright on your prepared parchment paper. Now, the fun part! Immediately, while the chocolate is still wet, shower it with sprinkles. If you’re adding a marshmallow or M&M topper, gently press it onto the very tip of the cone now. Chef’s Hack: For less mess, hold the cone over a separate small bowl while you add sprinkles, letting the excess fall into the bowl for re-use.
- Add the Fuzzy Brim (Optional): Once all your hats are dipped and sprinkled, it’s time for the finishing touch. If you’re using frosting for the brim, pipe a zig-zag or a simple band of white frosting around the base of each hat. It doesn’t have to be perfect—a little whimsy is what we’re going for!
- The Waiting Game (The Hardest Part!): Allow the chocolate to set completely. You can let them sit at room temperature for about 20-30 minutes, or if you’re impatient like me, pop the entire baking sheet into the refrigerator for 10-15 minutes until the chocolate is firm to the touch.
How to Serve Your Festive Creation
Presentation is part of the magic! Arrange your completed Elf Hat Cones on a festive platter as a standalone treat. They make a incredible centerpiece for a holiday dessert table. For an extra special touch, place them individually on small plates as a fun place setting for a kids’ holiday party. You can also gently nestle them among cookies on a holiday cookie tray—they’ll instantly become the star of the show. They’re a guaranteed conversation starter and are just begging to be Instagrammed!
Mix It Up! Fun Elf Hat Variations
Once you’ve mastered the classic green hat, the sky’s the limit! Here are a few ways to customize your creations:
- The Snow Elf: Use white candy melts and blue and silver sprinkles for a frosty, wintery vibe.
- Chocolate Lover’s Hat: Dip the cones in melted milk or dark chocolate and use red and gold sprinkles for a rich, decadent twist.
- Nut-Free/Dairy-Free Friendly: Use dairy-free white chocolate and ensure your sprinkles are certified dairy-free. A great option for accommodating allergies without sacrificing fun.
- The “Filled” Hat: Before dipping, fill the cone about 1/3 of the way with mini chocolate chips, M&Ms, or even a small treat like a Ferrero Rocher for a delicious surprise inside!
- Peppermint Twist: Add a drop or two of peppermint extract to your melted candy coating and crush up candy canes to use as your sprinkles.
Liv’s Kitchen Confidential: Notes from My Apron Pocket
This recipe has seen many Christmases and has evolved from a slightly lopsided, messy experiment into our family’s favorite holiday tradition. One year, in a fit of ambition, I tried to dip two cones at once. Do not recommend. I ended up with two cones fused together into a weird chocolate bridge and green chocolate all over my arms. The dog was very interested in helping me clean up that day! The lesson? Embrace the mess. Laugh when a sprinkle goes flying. Let the kids do it their way. The slightly imperfect, heavily sprinkled hats made by tiny hands are always the most loved. Over time, I’ve learned that a deep bowl for dipping is non-negotiable and that setting a timer for the microwave is the best way to avoid chocolate disasters. But the most important ingredient, always, is a dash of holiday spirit and a heaping spoonful of fun.
Your Elf Hat Questions, Answered!
Q: My chocolate coating is really thick and clumpy. What did I do wrong?
A: This usually means the chocolate was overheated. Candy melts can be a little finicky. Next time, try heating for shorter intervals and stirring more. If it’s already seized, it’s tricky to fix, but you can try adding that tiny bit of coconut oil (½ tsp at a time) and stirring vigorously to see if you can bring it back to a smooth state.
Q: My sprinkles won’t stick! Help!
A: The number one reason for sprinkles not sticking is that the chocolate has already started to set. You have to work quickly! Dip one cone, immediately add sprinkles, then move on to the next. If you’re working with a helper, try an assembly line: one person dips, the next person decorates.
Q: Can I make these ahead of time?
A: Absolutely! These hold up really well. Once the chocolate is completely set, store them in a single layer in an airtight container at room temperature for up to 3 days. Avoid the fridge for long-term storage if possible, as it can introduce moisture and make the cones lose their crunch.
Q: The cones are rolling around while I’m trying to decorate them. Any tips?
A: This is a common frustration! To keep them steady, you can create a simple stand by poking small holes in a cardboard box and placing the cone bases in the holes while they dry. Alternatively, you can rest them in the cups of a muffin tin to hold them upright after decorating.

Elf Hat Cones
Description
Bring a sprinkle of whimsy to your holiday kitchen with these colorful Elf Hat Cones! Crispy sugar cones get a magical makeover with green candy coating, festive sprinkles, and playful toppers. They’re quick to make, impossible not to smile at, and perfect for holiday parties, cookie trays, or a fun family craft afternoon. No baking required—just melt, dip, decorate, and enjoy!
Ingredients
-
12 sugar cones
-
2 cups green candy melts (or white chocolate + green gel color)
-
¼ cup holiday sprinkles
-
Mini marshmallows or M&Ms (optional toppers)
-
White frosting (optional trim for the brim)
Instructions
-
Prep: Line a baking sheet with parchment. Set out sprinkles & toppers.
-
Melt: Heat candy melts in 30-sec bursts, stirring until smooth. Add ½ tsp coconut oil if too thick.
-
Dip: Hold cone by base, dip tip-first into melted coating, swirling to cover. Tap gently to remove excess.
-
Decorate: Stand cone upright on parchment. While coating is wet, add sprinkles and topper.
-
Optional Brim: Pipe frosting around the base for a fluffy “hat trim.”
-
Set: Let sit at room temp 20–30 min, or refrigerate for 10 min, until firm.
Notes
-
Work one cone at a time so sprinkles stick before the coating sets.
-
Use a muffin tin to hold cones upright while drying.
-
Try fun variations: white & blue “snow elf” hats, chocolate-coated “cocoa elf” hats, or even filled hats with hidden candies inside.
Quick Nutrition Note
These are a fun, occasional treat! Please note that nutritional info is estimated and can vary based on specific brands of ingredients and how heavily you apply the sprinkles and frosting.
Estimated per cone: Calories: ~140 | Fat: 6g | Sugar: 14g | Carbs: 18g | Protein: 1g
Final Thoughts: Your Whimsical Kitchen Awaits
And there you have it! In the time it takes to watch a holiday special, you’ve created a troop of cheerful, edible elves ready to spread joy. Remember, the true magic of these Elf Hat Cones isn’t just in their adorable appearance—it’s in the laughter shared while making them, the concentration on a little helper’s face, and the proud moment of presenting your delicious creation.
This isn’t a recipe that demands perfection. It’s an invitation to play, to get a little messy, and to weave a sweet, simple memory into the fabric of your holiday season. So whether you’re building them solo with a cup of cocoa or leading a full-scale elf workshop with your favorite tiny humans, embrace the moment. You’re not just decorating cones; you’re crafting joy.


