

Sunshine in Every Slice: My Unbeatable Hawaiian Pineapple Cake
Hey there, friend! Come on in, tie on an apron, and let’s get something wonderfully sweet baking. If you’ve ever dreamt of a cake that tastes like a hug from a tropical breeze—moist, bursting with flavor, and topped with a cloud of creamy frosting—then you’re in for the happiest kind of kitchen magic today.
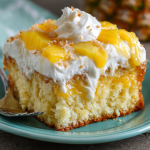
This isn’t just any cake. This is my go-to, never-fail, always-gets-raves Hawaiian Pineapple Cake. It’s the recipe I turn to when I need a guaranteed smile, whether it’s for a potluck, a birthday that snuck up on me, or just a Tuesday that deserves a little celebration. The secret? A whole can of crushed pineapple, juice and all, baked right into the batter. It creates an unbelievably tender crumb and a natural, sun-kissed sweetness that’s impossible to resist.
The best part? You can ditch the stand mixer and the fussy techniques. This is a glorious, one-bowl wonder. We’re talking ten minutes of prep, one pan to wash, and a kitchen that smells like a paradise picnic. It’s the kind of effortless baking that makes you look like a rockstar, and I’m so excited to share every tip and trick I’ve learned over the years. So, preheat that oven and let’s bake a slice of pure, unadulterated joy.
The Cake That Started It All: A Story of Sticky Fingers & Sweet Memories
This cake recipe is woven into the fabric of my family. It was my Grandma Louise’s absolute specialty, scribbled on a notecard stained with vanilla and butter. She called it her “Sunshine Cake,” and it made an appearance at every single family gathering, without fail.
My most vivid memory is of being about seven years old, standing on a wobbly stool next to her formica countertop. My job was to “help” by pouring the entire can of crushed pineapple into the big yellow mixing bowl. I remember the glorious *schlop* sound it made, and how she’d let me swipe a finger through the sweet, tangy juice before she stirred it all together. The anticipation while it baked was torture, but the reward was heaven: a warm, sticky corner piece she’d sneak me before dinner, whispering, “Our little secret.”
That cake wasn’t just dessert; it was the centerpiece. It was the reason we all lingered at the table a little longer, laughing and scraping the last bits of cream cheese frosting from our plates. It represented comfort, simplicity, and the profound joy of sharing something made by hand. Every time I bake it now, that scent transports me right back to her kitchen, and I feel that same rush of happiness. That’s the power of a truly great recipe—it feeds more than just your stomach.
Gathering Your Sunshine: Ingredients & Insights
Part of what makes this cake so magical is its simple, humble ingredient list. Each one plays a starring role. Here’s exactly what you’ll need and why it matters:
For the Cake:
- 2 cups all-purpose flour: The dependable foundation of our cake. I don’t recommend swapping for a whole-grain flour here, as it can make the cake dense. For a gluten-free version, a 1:1 gluten-free baking blend works beautifully!
- 2 cups granulated sugar: Yes, it’s two full cups. The pineapple juice adds acidity and moisture, but we need this sugar for structure, tenderness, and that perfect golden-brown top. Trust the process!
- 2 large eggs, at room temperature: Room temp eggs incorporate more evenly, giving us a uniform crumb. If you forget, just pop them in a bowl of warm water for 5 minutes.
- 1 teaspoon baking soda: This is our only leavener! It reacts with the acidic pineapple juice to create bubbles, making the cake rise beautifully. Make sure yours is fresh for the best lift.
- 1 teaspoon pure vanilla extract: The flavor enhancer. It rounds out the tropical notes with warm, cozy depth. Don’t skip it!
- 1 can (20 oz) crushed pineapple, UNDRAINED: This is the MVP, the star, the secret weapon! The juice provides all the necessary liquid and acidity, and the pulp gives every bite little bursts of flavor. Do not drain it—pour the whole glorious can in there.
For the Dreamy Cream Cheese Frosting:
- 1 package (8 oz) full-fat cream cheese, softened: Full-fat is non-negotiable for a silky, pipeable, non-runny frosting. Let it sit on the counter for at least an hour. The softer it is, the smoother your frosting will be.
- 1/2 cup (1 stick) unsalted butter, softened: Unsalted lets you control the salt level. Combined with the cream cheese, it creates a perfectly balanced, rich, and tangy base.
- 2 cups powdered sugar: Sift it if you have time! This prevents any little lumps in your otherwise velvety frosting.
- 1 teaspoon vanilla extract: A must for the frosting, too. It adds a lovely flavor bridge between the tangy frosting and the sweet cake.
- Optional Toppings: 1/2 cup chopped toasted walnuts for crunch, or 1/2 cup toasted shredded coconut for extra tropical vibes. Toasting nuts and coconut is a quick step that amplifies their flavor tenfold!
Let’s Bake! Your Foolproof Step-by-Step Guide
Ready? This is where the fun begins. I’ll walk you through each step with all my favorite chef hacks to ensure perfect results.
- Preheat & Prep: First, crank your oven to 350°F (175°C). This is the sweet spot for even baking. Grab your trusty 9×13-inch baking pan. Grease it generously with butter, cooking spray, or even a light coating of oil. I’m a butter loyalist for that extra flavor. Chef’s Tip: For ultimate non-stick insurance, grease the pan, then dust it with a light sprinkle of flour, tapping out the excess. Your cake will flip out (or rather, won’t flip out) perfectly.
- Mix the Magic (One Bowl!): In a large mixing bowl—I mean large, this batter is generous—simply combine the flour, sugar, eggs, baking soda, vanilla, and the entire can of pineapple with all its juice. Yes, you add everything at once! No separate wet and dry bowls needed. Use a sturdy wooden spoon or a rubber spatula and stir until you have a smooth, well-blended batter. It will be thick but pourable. Chef’s Hack: Don’t overmix! Once you stop seeing dry flour streaks, you’re done. Overmixing can develop gluten and lead to a tougher cake.
- Pan & Bake: Pour that beautiful, speckled batter into your prepared pan. Use your spatula to spread it into an even layer, nudging it gently into the corners. Slide it onto the center rack of your preheated oven. Now, set a timer for 30 minutes, but do NOT open the oven door before then. We need that steady heat to work its magic. Important Note: Ovens can vary. At 30 minutes, perform the toothpick test: insert a toothpick into the center of the cake. If it comes out with a few moist crumbs clinging to it, it’s perfect. If it comes out with wet batter, give it 3-5 more minutes. The cake is done when it’s golden brown on top and springs back lightly when touched.
- The Crucial Cool Down: This might be the hardest step! Once baked, place the pan on a wire cooling rack. You must let the cake cool completely in the pan before you even think about frosting. I mean it! If you frost a warm cake, that luscious cream cheese frosting will melt into a sad, runny puddle. Patience is a virtue that pays off in perfect slices. This usually takes about 1-2 hours.
- Make the Frosting Cloud: While the cake cools, make your frosting. In a medium bowl, use a hand mixer (or a stand mixer fitted with the paddle) to beat the softened cream cheese and butter together on medium speed for 2-3 minutes, until it’s completely smooth, pale, and fluffy. Scrape down the bowl. Add the vanilla and beat to combine. With the mixer on low, gradually add the sifted powdered sugar. Once incorporated, crank the speed to medium-high and beat for another minute until it’s gloriously creamy and spreadable. Pro Tip: If your kitchen is very warm, pop the finished frosting in the fridge for 15 minutes to firm up slightly before spreading.
- Frost & Finish: Once the cake is 100% cool, spread the frosting evenly over the top with an offset spatula or the back of a spoon. Get creative with swoops and swirls! Now’s the time to sprinkle on your toasted walnuts or coconut, if using. The frosting acts like delicious glue for those toppings.
Serving Your Slice of Paradise
This cake is a beautiful, homey masterpiece just as it is, served right from the pan. For serving, I love using a simple metal spatula or pie server to get clean slices. If you want to dress it up, garnish each plate with a thin, fresh pineapple ring or a few extra shreds of toasted coconut. It pairs magically with a cup of strong coffee to cut the sweetness, or a glass of cold milk for the ultimate nostalgic treat. For a dinner party, a scoop of vanilla bean ice cream or a dollop of barely-sweetened whipped cream alongside turns it into a truly decadent dessert.
Make It Your Own: Delicious Twists & Swaps
- Tropical Coconut Dream: Add 1 cup of sweetened shredded coconut to the cake batter. Frost as usual and top with toasted coconut for a double coconut punch.
- Piña Colada Version: Substitute 1 teaspoon of vanilla extract with 1/2 teaspoon of coconut extract in the cake AND the frosting. You’ll swear you’re on a beach.
- Nutty Crunch Delight: Fold 3/4 cup of chopped pecans or macadamia nuts into the batter before baking for texture in every bite.
- Dairy-Free/ Vegan Adaptation: Use flax eggs (2 tbsp ground flax + 5 tbsp water, set for 5 mins) for the eggs. For the frosting, use vegan cream cheese and plant-based butter. The cake itself is already accidentally dairy-free!
- Mini Cake Layers: Divide the batter between two greased 8-inch round pans and bake for 25-30 minutes. Let cool, then frost between layers and on top for a stunning layer cake.
From My Kitchen to Yours: Chef’s Notes
Over the years, this recipe has become my kitchen confidante—it never lets me down. I’ve learned a few things: First, the brand of pineapple doesn’t matter much, but do try to find one packed in 100% juice, not heavy syrup, for the best flavor. Second, if I’m bringing this to a picnic, I sometimes skip the frosting and instead, while the cake is still warm, I’ll poke holes all over the top with a fork and pour a simple glaze (1 cup powdered sugar mixed with 2-3 tbsp pineapple juice) over it. It soaks in and creates a fabulous, travel-friendly snack cake.
One funny story: I once accidentally used a can of pineapple chunks instead of crushed. In a panic, I just threw it in the blender for a pulse! It worked, but it was much more liquidy. The cake baked up extra moist and a bit sunk in the middle, but you know what? My friends dubbed it “Pineapple Pudding Cake” and fought over the gooey center pieces. There are no real mistakes here, just happy accidents!
Your Questions, Answered: FAQs & Troubleshooting
Q: My cake is very moist/soggy in the middle. What happened?
A: This almost always means it needed more baking time. Ovens vary, and a too-early toothpick test can be deceiving. Next time, make sure the top is uniformly golden brown and the cake springs back when pressed. If it’s consistently soggy, check your oven temperature with an independent thermometer—it might be running cool.
Q: Can I use fresh pineapple instead of canned?
A: I don’t recommend it for this specific recipe. Canned crushed pineapple is consistently soft and comes packed in the exact amount of sugary juice the batter chemistry needs. Fresh pineapple is more variable in sweetness and moisture, and its enzymes can prevent the cake from setting properly.
Q: My frosting is too runny. How can I fix it?
A> This usually happens if the cream cheese or butter was too warm. Immediately pop the whole bowl of frosting into the fridge for 20-30 minutes to firm up, then re-whip it. For future success, ensure your ingredients are softened but still cool to the touch, not oily or melty.
Q: Can I make this ahead of time?
A> Absolutely! You have options: 1) Bake the cake, cool completely, wrap the pan tightly in plastic wrap, and store at room temp for 1 day. Frost the day of serving. 2) Frost the entire cake, cover loosely (a cake carrier is perfect), and refrigerate for up to 2 days. Let it sit at room temperature for an hour before serving for the best texture and flavor.
Easy Hawaiian Pineapple Cake with Cream Cheese Frosting
Description
Hawaiian Pineapple Cake
Sunshine in every bite—moist, tropical, and topped with dreamy cream cheese frosting.
This cake is bursting with crushed pineapple, giving it natural sweetness and a tender, fluffy crumb. Perfect for birthdays, potlucks, or any day that deserves a tropical treat.
Ingredients
For the Cake
-
2 cups all-purpose flour
-
2 cups granulated sugar
-
2 large eggs, room temperature
-
1 tsp baking soda
-
1 tsp vanilla extract
-
1 can (20 oz) crushed pineapple, undrained
For the Cream Cheese Frosting
-
8 oz cream cheese, softened
-
½ cup (1 stick) unsalted butter, softened
-
2 cups powdered sugar, sifted if possible
-
1 tsp vanilla extract
Optional Toppings
-
½ cup chopped toasted walnuts
-
½ cup toasted shredded coconut
Instructions
-
Preheat & Prep:
Preheat oven to 350°F (175°C). Grease a 9×13-inch baking pan with butter or cooking spray. For extra insurance, lightly dust with flour. -
Mix the Batter:
In a large bowl, combine flour, sugar, eggs, baking soda, vanilla, and the entire can of pineapple (with juice). Stir gently until smooth. Do not overmix. -
Bake the Cake:
Pour batter into prepared pan, spreading evenly. Bake for 30–35 minutes. Test doneness with a toothpick; it should come out with a few moist crumbs but not wet batter. Golden brown on top is key. -
Cool Completely:
Place pan on a wire rack and let the cake cool completely (1–2 hours) before frosting. Frosting a warm cake will melt it. -
Make the Frosting:
In a medium bowl, beat cream cheese and butter until smooth and fluffy (2–3 minutes). Add vanilla. Gradually add powdered sugar and beat until creamy. Chill 15 minutes if too soft. -
Frost & Decorate:
Spread frosting evenly over the cooled cake. Sprinkle optional toasted walnuts or coconut on top.
Notes
-
Tropical Coconut Dream: Add 1 cup shredded coconut to the batter and top with toasted coconut.
-
Piña Colada: Substitute ½ tsp coconut extract for ½ tsp vanilla in both cake and frosting.
-
Nutty Crunch: Fold ¾ cup chopped pecans or macadamia nuts into the batter.
-
Mini Layer Cake: Divide batter between two 8-inch round pans, bake 25–30 minutes, and frost between layers.
-
Dairy-Free/Vegan: Use flax eggs and plant-based cream cheese and butter.
Nutritional Information*
*Please note: These values are approximate estimates calculated using online tools and will vary based on specific brands and optional toppings used.
- Prep Time: 10 minutes
- Cook Time: 35 minutes
- Total Time: 45 minutes (plus cooling)
- Servings: 12
Per Serving (approximate, without nuts/coconut): Calories: 390 | Fat: 17g | Saturated Fat: 10g | Carbohydrates: 55g | Fiber: 1g | Sugar: 42g | Protein: 4g
Final Thoughts: A Taste of Pure, Sun-Drenched Joy
This Hawaiian Pineapple Cake is more than just a dessert—it’s a passport to a simpler, sweeter time. It’s the alchemy of pantry staples transforming into something that feels like a celebration, embodying the warmth of shared memories and the effortless pleasure of home baking.
What makes this recipe truly special isn’t just its undeniable deliciousness or its incredibly easy, one-bowl method. It’s the way it consistently creates joy. It’s a humble cake that wears its heart on its sleeve (or rather, in its juicy, pineapple-speckled crumb). It asks for so little—no fancy techniques, no temperamental ingredients—and gives back so much: a moist, tender bite, a perfect balance of sweet and tangy, and the kind of comforting aroma that makes a house feel like a home.
Whether you’re baking it to continue a family tradition, to create a new one, or simply to brighten an ordinary day, this cake is a guaranteed success. It’s a testament to the fact that the most beloved recipes are often the simplest ones, passed down on stained notecards and perfected through years of happy repetition.


