

Your New Favorite 3-Ingredient Miracle: Chocolate-Covered Strawberries
Hey there, friend! Come on in, grab an apron, and let’s make something magical happen. Is there anything more universally delightful than a chocolate-covered strawberry? That perfect, glossy sheen, the crack of dark chocolate giving way to a juicy, sweet-tart berry… it’s a tiny, handheld masterpiece. And the best part? You don’t need to be a pastry chef to pull it off. I’m here to show you that creating stunning, elegant treats can be one of the simplest, most joyful acts in the kitchen.
Maybe you’re looking for a last-minute Valentine’s surprise, a charming addition to a party platter, or just a little “you deserve it” moment on a Tuesday afternoon. This is your recipe. With just three main ingredients and a method so easy you’ll have it memorized after one try, we’re turning humble components into pure celebration. Forget complicated tempering and fancy equipment. We’re going for approachable, foolproof, and utterly delicious. So, let’s ditch the intimidation and embrace the fun. I promise, by the end of this, you’ll be dipping strawberries like a pro, feeling that wonderful buzz that comes from creating something beautiful with your own two hands. Ready to make some magic?
A Sweet Start: My First (Slightly Melty) Kitchen Triumph
My love affair with chocolate-dipped strawberries started not in a fancy kitchen, but at my grandmother’s wobbly Formica table. I was about seven, wearing an apron that was basically a dish towel with a neck strap, and my mission was to create a “restaurant” dessert for my parents’ anniversary. Grandma, ever the patient co-conspirator, set out a bag of chocolate chips and a pint of berries. We used a makeshift double boiler—a heatproof bowl perched precariously over a pot of simmering water. I remember the intense focus of holding the strawberry by its leafy crown, the thrilling moment of the dip, and the agonizing wait as they chilled on her vintage floral platter.
They were… lumpy. Some had way too much chocolate, others had suspicious fingerprints, and they all softened quickly in our warm kitchen. But when I presented them to my beaming parents, it was like I’d brought out the crown jewels. That moment—the messy, heartfelt, *homemade* effort being met with pure delight—stuck with me. It taught me that the best food isn’t about perfection; it’s about the intention and the shared joy. Every time I make these now, I get a little flash of that childhood pride. And now, with a few chef-approved hacks up my sleeve, I can help you make versions that are both stunning *and* structurally sound!
What You’ll Need: A Closer Look at Your Ingredients
Great food starts with great ingredients, but don’t stress—this is a short list! Here’s the breakdown of what you need and why each component matters.
- 1 pound fresh strawberries – This is your canvas! Look for berries that are bright red, firm, and fragrant, with bright green leaves (called the hull or calyx) attached. The leaves are your built-in handle, so don’t remove them! Size is up to you, but medium to large berries give you more to dip. Chef’s Insight: Wash and dry them incredibly, painstakingly well. Any leftover water will cause the chocolate to seize up and become a grainy mess. I wash them, then pat them dry and let them air-dry on a towel for a bit. This step is non-negotiable for glossy chocolate!
- 1 cup semi-sweet chocolate chips or chopped baking chocolate – You have options here! Chocolate chips are convenient and melt fairly well. For a truly professional, snappy finish, I recommend using a chopped chocolate bar (look for brands like Ghirardelli or Baker’s in the baking aisle). It has less stabilizers than chips, so it melts more smoothly. Substitution Tip: Feel free to use dark, milk, or even white chocolate here. Just ensure it’s real chocolate (check for cocoa butter in the ingredients) for the best melting and setting properties.
- 1 teaspoon coconut oil or shortening (optional but recommended) – This is my secret weapon! Adding just a tiny bit of fat to your melting chocolate makes it more fluid for easier dipping, gives it a beautiful sheen, and helps it set a bit softer so it doesn’t crack when you bite into it. It’s a simple trick for a major upgrade.
- Toppings & Drizzles (Optional, but so fun!):
- Melted white or dark chocolate for drizzling
- Finely chopped nuts (pistachios, almonds, pecans)
- Sprinkles (choose colors for the season!)
- Crushed cookies or pretzels for a sweet & salty twist
- Shredded coconut or sea salt flakes
Chef’s Insight: Have your toppings ready in small bowls before you start dipping. You’ll need to add them while the chocolate is still wet!
Let’s Get Dipping: Your Foolproof 3-Step Process
Okay, everything is prepped and ready. Let’s transform these ingredients into something gorgeous. Follow these steps, lean into the process, and have fun with it!
- Prep Your Station. This is the “measure twice, cut once” of the dessert world. Line a baking sheet with parchment or wax paper. This prevents sticking and makes cleanup a breeze. Make absolutely sure your strawberries are bone-dry. Gather your toppings. Now, let’s melt! Chef’s Hack: If your kitchen is warm, pop your lined baking sheet in the freezer for 10 minutes before you start. A cold pan helps the chocolate set faster when you place the dipped berries down.
- Melt the Chocolate (The Gentle Way). Place your chocolate (and the teaspoon of coconut oil, if using) in a clean, dry, microwave-safe bowl. Heat in the microwave on 50% power for 30-second intervals. After each interval, stop and stir vigorously. Repeat until the chocolate is just about 90% melted—it should look mostly liquid with a few soft lumps. Keep stirring off the heat; the residual warmth will melt those last bits. This gentle method prevents the chocolate from burning, which can happen in an instant. Chef’s Commentary: If you’re a double-boiler fan, go for it! A heatproof bowl over a pot of barely simmering water (making sure the bowl doesn’t touch the water) works beautifully. It’s slower but gives you more control.
- The Dip & Decorate. Here’s the fun part! Hold a strawberry by its leafy stem. Swirl it in the melted chocolate, letting it coat about ¾ of the way up. Lift it out and let the excess chocolate drip back into the bowl for a few seconds—gently shake it or twirl your wrist. Place it on your prepared baking sheet. If you’re adding toppings like nuts or sprinkles, do it immediately after placing it on the sheet, before the chocolate sets. For a drizzle, wait until all berries are dipped and the chocolate is fully set, then use a fork or a small piping bag to zig-zag a different colored chocolate over the top. Chef’s Hack: For a perfect “foot” at the base of the strawberry, after dipping, touch the very tip of the berry to the parchment and pull it slightly toward you before releasing. This creates a little chocolate puddle that gives it a clean, finished look.
- The Chill. Once all your berries are beautifully adorned, carefully transfer the baking sheet to the refrigerator. Let them chill undisturbed for at least 30 minutes, or until the chocolate is completely firm to the touch. Chef’s Tip: No peeking! Letting them set fully is key for that satisfying snap.
Presenting Your Sweet Creations
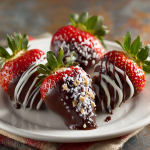
You’ve made edible jewels, so let’s show them off! For a casual gathering, a simple rustic platter works perfectly. For something more elegant, place each strawberry in a mini paper cupcake liner and arrange them on a tiered stand. You can also pack them into a cute gift box lined with parchment or tissue paper—tie it with a ribbon for an instantly thoughtful homemade present. Remember, the contrast of the dark chocolate against the red berry is stunning, so don’t crowd them. Give them a little space to shine!
Mix It Up! Creative Twists on the Classic
The basic recipe is just the beginning. Once you’ve mastered it, play with these fun variations!
- “Turtle” Strawberries: After dipping in chocolate, roll in chopped pecans, then drizzle with caramel sauce after chilling.
- “Cookies & Cream”: Roll the wet chocolate-dipped berry in finely crushed Oreo cookie crumbs.
- “Zesty Delight”: Add a whisper of flavor by zesting an orange or a lime over the wet chocolate before it sets.
- “Pink & White Swirl”: Melt white chocolate separately. Dip the berry mostly in dark chocolate, then quickly drizzle with lines of white chocolate. Use a toothpick to swirl the two chocolates together for a marbled effect.
- “S’mores Style”: Dip in milk chocolate, then immediately roll in crushed graham cracker crumbs and a few mini marshmallow bits.
A Few More Thoughts from My Kitchen to Yours
This recipe has been my go-to for years, and it’s evolved with every batch. I’ve learned that a rainy or humid day can make the chocolate set slower and less crisply, so patience is key. I’ve also learned that kids (and kids-at-heart) absolutely love being put on “sprinkle duty.” It’s the perfect way to get little hands involved in the kitchen. One of my favorite kitchen stories involves a batch I made for a friend’s wedding shower. I was rushing and didn’t let the berries dry thoroughly… let’s just say I ended up with a bowl of delicious but decidedly un-dippable chocolate paste. We laughed, ordered pizza, and ate the berries plain with chocolate sauce for dipping. The lesson? Even the “failures” are fun. So don’t be afraid. Put on some music, embrace the process, and enjoy the sweet, sweet results.
Your Questions, Answered
Q: My chocolate got thick and grainy when I melted it. What happened?
A: This is called “seizing,” and it’s almost always caused by a tiny drop of water or steam getting into the chocolate. Chocolate and water are arch-nemeses! To fix it, try stirring in a teaspoon of warm vegetable oil or shortening (not butter, which contains water) until it smooths out. To prevent it, ensure all your bowls, spoons, and strawberries are completely dry.
Q: How far in advance can I make these?
A: For the absolute best texture and flavor, enjoy them within 24 hours. As they sit, the berry releases moisture into the chocolate shell, which can cause it to soften and sweat. Store them in a single layer in an airtight container in the refrigerator. Don’t let them sit out at room temperature for more than an hour or two, especially if it’s warm.
Q: Can I use frozen strawberries?
A: I wouldn’t recommend it for this recipe. Frozen strawberries become very soft when thawed and will release too much water, making it impossible to get a crisp chocolate shell. Fresh is definitely the way to go here.
Q: My chocolate won’t harden all the way, even after chilling. Why?
A> This could be a few things: 1) The chocolate may have been overheated. 2) The humidity is very high. 3) You may have used a chocolate that doesn’t set firmly (some “melting wafers” are designed to stay softer). Ensure your fridge is cold enough and give them more time. Placing them in the freezer for 10-15 minutes can help in a pinch, but let them come back to a cool fridge temp before serving to avoid condensation.
Easy Chocolate-Covered Strawberries : Classic 3-Step Treat
Description
These chocolate-covered strawberries are an easy, elegant treat perfect for Valentine’s Day, parties, or a little “treat yourself” moment. Glossy chocolate coats juicy, fresh berries, and optional toppings take them to the next level—without requiring any fancy equipment or tempering.
Ingredients
Main Ingredients:
-
1 lb fresh strawberries, washed and thoroughly dried (keep stems attached)
-
1 cup semi-sweet chocolate chips or chopped baking chocolate
-
1 tsp coconut oil or shortening (optional, for shine and smoother chocolate)
Optional Toppings & Drizzles:
-
Melted white or dark chocolate for drizzling
-
Chopped nuts (pistachios, almonds, pecans)
-
Sprinkles
-
Crushed cookies or pretzels
-
Shredded coconut or sea salt
Chef’s Insight: Prepare toppings in small bowls before dipping—the chocolate sets fast!
Instructions
-
Prep Your Station:
-
Line a baking sheet with parchment or wax paper.
-
Ensure strawberries are completely dry. Optional: chill the lined sheet in the freezer for 10 min to help chocolate set faster.
-
-
Melt the Chocolate:
-
In a microwave-safe bowl, combine chocolate and coconut oil (if using).
-
Microwave on 50% power in 30-second intervals, stirring vigorously each time, until about 90% melted. Let residual heat melt the rest.
-
Optional: Use a double boiler for more controlled, gentle melting.
-
-
Dip & Decorate:
-
Hold a strawberry by the stem and dip about ¾ of the berry into chocolate.
-
Let excess chocolate drip off, then place on prepared sheet.
-
Add toppings immediately while chocolate is wet. Drizzle contrasting chocolate after berries are fully set if desired.
-
-
Chill:
-
Refrigerate for at least 30 minutes or until chocolate is firm. Avoid peeking to prevent fingerprints or condensation.
-
Notes
-
Turtle Style: Roll dipped berries in chopped pecans, then drizzle with caramel.
-
Cookies & Cream: Roll in crushed Oreo cookies.
-
Zesty Twist: Sprinkle orange or lime zest on wet chocolate.
-
Pink & White Swirl: Drizzle white chocolate over dark chocolate and use a toothpick to swirl.
-
S’mores Style: Dip in milk chocolate, roll in crushed graham crackers and mini marshmallows.
Quick Nutritional Snapshot
Prep Time: 15 minutes | Chill Time: 30 minutes | Total Time: 45 minutes | Servings: About 15 strawberries
Nutrition per strawberry (approximate, using semi-sweet chocolate): 60-70 calories | 1g protein | 4g fat | 7g carbohydrates | 1g fiber | 5g sugar.
Final Thoughts
So there you have it—a little magic in just three ingredients, a few simple steps, and less than an hour. What started as a pint of fresh berries and a bowl of chocolate has transformed into something far greater: a moment of indulgence, a gesture of care, or maybe just a sweet pause in a busy day.
This recipe is more than just a treat—it’s a reminder that joy doesn’t have to be complicated. Whether you’re making these for someone you love or as a gift to yourself, the act of creating something beautiful with your own hands is its own kind of sweetness. The glossy chocolate, the jewel-like berries, the satisfying snap when you take that first bite—it’s an experience that feels special every single time.
Don’t forget: perfection is overrated. A slightly uneven dip or a rogue sprinkle? That’s the charm of homemade. It’s the love and intention that make these truly delicious. So go ahead—play with toppings, swirl colors, and make this classic your own. You’ve got all the tools you need to create sweet moments anytime.


