Description
Making your own sourdough starter might sound intimidating, but it’s simpler than you think! With just flour, water, and a little patience, you can cultivate a living starter that will help you bake tangy, crusty, homemade bread. This step-by-step guide is perfect for beginners and doesn’t require any fancy equipment.
Ingredients
-
½ cup (60g) organic, unbleached all-purpose flour
-
¼ cup (60ml) filtered or dechlorinated water, room temperature
-
Optional Day 1 boosters:
-
1 tbsp whole wheat or rye flour
-
Small piece of unwashed organic apple peel or a pinch of sugar
-
Equipment
-
Two 16 oz (2 cup) glass jars
-
Wooden spoon or silicone spatula
-
Rubber band or erasable marker
Instructions
-
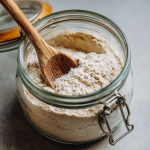
In a clean jar, mix ½ cup flour and ¼ cup water (add optional boosters if using) until smooth.
-
Scrape down sides, mark the level with a rubber band, and cover loosely.
-
Place in a warm spot (70–75°F) for 24 hours.
Day 2:
-
Discard half of the starter.
-
Add ½ cup flour and ¼ cup water to the remaining starter, stir well, scrape down sides, mark new level, and cover loosely.
-
Let rest 24 hours.
Days 3–6:
-
Repeat the discard and feed routine daily.
-
Watch for bubbles and a tangy smell. Don’t worry about the initial funky odors—they’ll mellow.
-
If you see a dark liquid (hooch), stir it in for extra sourness or pour it off.
Day 7 and onward:
-
Starter is ready when it doubles in size within 4–6 hours of feeding and passes the float test (a spoonful floats in water).
-
Move to the fridge for weekly feedings until ready to bake.
Notes
-
Discard Use: Don’t throw away the discarded starter—use it for pancakes, waffles, crackers, or muffins.
-
Warm Spot: If your kitchen is cold, place the jar in the oven with just the light on or in a microwave with a bowl of warm water.
-
Feeding Routine: Consistency is key; feed the starter daily until it’s strong and active.
-
Troubleshooting:
-
Hooch: Dark liquid means hungry starter. Stir in or pour off.
-
No bubbles: Continue feeding; some environments take longer for wild yeast to establish.
-
Mold: Only discard if you see pink, orange, or fuzzy patches.
-