

Easter Dirt Cups: The No-Bake Treat That Brings Back the Joy
Hey there, friend! Olivia here, wiping a bit of chocolate from my apron as I type. Can you smell that? It’s the scent of pure, unadulterated joy—and maybe a little bit of crushed cookie. If there’s one thing I believe in (aside from the healing power of a good loaf of bread), it’s that magic in the kitchen doesn’t have to be complicated. Sometimes, the most unforgettable moments come from the simplest, silliest, and most nostalgic recipes. And that’s exactly where our Easter Dirt Cups come waltzing in, marshmallow bunnies in tow.
Picture this: creamy, dreamy chocolate pudding, layers of chocolatey “dirt,” and those adorable pastel marshmallow critters peeking out. It’s a dessert that makes everyone—from the tiniest toddler to the most sophisticated gourmand—break into a grin. This is more than just a no-bake dessert; it’s a playful centerpiece, a conversation starter, and a guaranteed memory-maker. Best of all? You can whip it up in minutes with zero oven time, leaving you free to actually enjoy your own gathering. So, grab your favorite mixing bowl and let’s make a mess (the delicious kind) together. This is the kind of easy, festive cooking that makes my heart sing, and I’m so thrilled to share it with you.
A Sprinkling of Nostalgia: My First “Garden”
My love for these dirt cups is deeply rooted (pun absolutely intended) in my childhood. I must have been seven or eight, and my super-cool aunt was in charge of the kids’ table for Easter dessert. While the adults were sipping coffee and debating pie, she beckoned my cousins and me into the kitchen. She handed out little clay flower pots she’d washed and lined, a bag of chocolate cookies, and told us we were making “edible gardens.” The rule was: the messier, the better.
I remember the sheer, giddy power of pulverizing those cookies in a zip-top bag with a rolling pin. We “planted” gummy worms and later, the then-novel marshmallow Peeps. We felt like culinary wizards, creating something that looked like mud but tasted like heaven. That moment—the laughter, the sticky fingers, the pride of presenting our creations—captured the essence of what I now believe cooking is all about: connection, creativity, and a whole lot of fun. Every time I layer a dirt cup now, I’m not just making dessert; I’m passing on that little spark of kitchen magic.
Gathering Your “Garden” Supplies
Here’s everything you need to create this easy spring spectacle. I’ve added my little chef notes and swaps so you can make this recipe your own!
- 1 (3.9 oz) box instant chocolate pudding mix: The foundation of our creamy “mud.” Instant is key here for its no-cook convenience. Chef’s Insight: For a richer flavor, try a dark chocolate or fudge variety.
- 2 cups cold whole milk: The colder the milk, the quicker and thicker your pudding will set. I don’t recommend skim milk here; the fat in whole or 2% gives the pudding a luscious mouthfeel.
- 1 cup whipped topping or freshly whipped cream: This lightens the pudding into a mousse-like cloud. Whipped topping holds its shape beautifully, but for a from-scratch vibe, whip 1/2 cup of heavy cream with a tablespoon of powdered sugar until stiff peaks form.
- 18–20 chocolate sandwich cookies (like Oreos®): Our glorious “dirt.” You’ll crush the entire cookie—cream filling and all—for the perfect sweet, chocolaty crunch. Pro Sub: Use gluten-free chocolate sandwich cookies for a celiac-friendly version.
- Marshmallow bunnies or chicks: The festive toppers! Peeps are the classic, but any pastel marshmallow shape works.
- Optional Garnishes: Chocolate eggs (candy-coated or foil-wrapped), pastel sprinkles, or even a few gummy worms for an extra dose of playful nostalgia. This is your garden—decorate it how you love!
Let’s Build Some Sweet Dirt Cups!
Ready to play with your food? Let’s do this! The process is as fun as the result.
- Chill Your Bowls & Milk: Before you start, pop your mixing bowl and beaters (if you’re whipping cream) into the freezer for 10 minutes. This ensures everything stays cold for maximum fluffiness. Also, make sure your milk is straight from the fridge. Trust me, this little pre-step makes a world of difference.
- Create the Cookie “Dirt”: Place your chocolate sandwich cookies in a large zip-top bag. Seal it tightly, pressing out the air. Now, the fun part: crush them! Use a rolling pin, a heavy skillet, or even a wine bottle to bash them into a mix of fine crumbs and a few chunky pieces for texture. Chef’s Hack: For ultra-fine, consistent “soil,” pulse them a few times in a food processor. Pour the crumbs into a shallow bowl and set aside.
- Whip Up the Pudding Cloud: In your chilled bowl, whisk the instant pudding mix and the cold milk together vigorously for a full 2 minutes. It will start to thicken beautifully right before your eyes. Now, gently fold in your whipped topping or freshly whipped cream until no white streaks remain. You’re looking for a smooth, airy, and delightfully creamy mixture. Give it a taste—you’ve earned it!
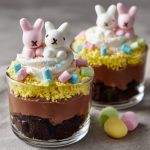
- The Art of Layering: Grab your clear cups, jars, or even those adorable mini flower pots (lined with plastic wrap). Start with a generous spoonful of cookie crumbs to create your “dirt” foundation. Then, add a layer of the chocolate pudding mixture. Repeat! I usually do two layers of each, but feel free to get creative. The final top layer should be cookie crumbs.
- Decorate & Chill: This is where personality shines. Nestle your marshmallow bunnies or chicks into the top “dirt.” Scatter a few chocolate eggs around them or add a rainbow of sprinkles. Once decorated, cover lightly and chill in the refrigerator for at least 20 minutes. This short rest allows the layers to settle and the flavors to marry, giving you the perfect cool, creamy, and crunchy bite.
Presenting Your Easter Masterpiece
Presentation is half the fun with this dessert! I love serving these in clear plastic cups so everyone can admire the layers, or in small mason jars for a rustic-chic feel. Arrange them on a platter or a tray lined with a bed of green shredded paper “grass” for a full-on Easter basket effect. Hand them out directly to your guests with a spoon and watch their faces light up. It’s a personal, playful dessert that makes everyone feel special.
Grow Your Own Flavor Garden: Fun Twists!
- Cookies & Cream Dream: Fold a handful of mini chocolate chips or even finely chopped chocolate sandwich cookies into the pudding mixture itself for extra texture.
- Bunny Bait Pudding: Use vanilla instant pudding instead of chocolate. Mix in pastel M&M’s or Easter sprinkles into the pudding layer for a confetti-filled surprise.
- Dirt Pie Parfait: Turn it into a full pie! Press half the cookie crumbs mixed with a few tablespoons of melted butter into a pie dish to form a crust. Fill with the pudding mixture, top with remaining crumbs, and chill.
- Vegan Spring Garden: Use your favorite plant-based milk, vegan instant pudding mix (Jell-O brand isn’t, but many store brands are), coconut whipped topping, and vegan chocolate cookies. Top with Dandies or other vegan marshmallows.
- Salted Caramel Pretzel Dirt: Replace half the chocolate cookies with crushed pretzels for a sweet-and-salty twist. Drizzle the layers with a little store-bought salted caramel sauce.
Olivia’s Kitchen Chronicles
This recipe has seen more variations in my kitchen than I can count! One year, I accidentally bought butterscotch pudding mix and decided to roll with it, creating a “sandy beach” cup with graham cracker crumbs and blueberry “water” (a little tinted whipped cream). It was a hit! The beauty of this concept is its flexibility. Over time, I’ve learned that the chill time is non-negotiable for the perfect texture—impatience leads to soupier cups. I also once, in a pre-coffee haze, tried to make the pudding with warm milk. Let’s just say we had chocolate soup that day (which my kids happily drank with a straw!). The lesson? Embrace the happy accidents, but keep that milk cold.
Your Dirt Cup Questions, Answered
Q: My pudding didn’t set! What happened?
A: The most common culprit is not using cold enough milk or not whisking for the full 2 minutes. Instant pudding needs that initial shock of cold to activate the thickening agents. If it’s still runny after chilling, you can try folding in a bit more whipped topping to stabilize it, but prevention (cold milk!) is key.
Q: Can I make these ahead of time?
A: Absolutely! You can assemble them completely, cover tightly, and refrigerate for up to 24 hours. I’d add any very soft marshmallow decorations (like Peeps) just before serving, as they can weep and get sticky in the fridge overnight.
Q: What can I use instead of whipped topping?
A> Freshly whipped cream is a fantastic substitute. Whip 1/2 cup of heavy cream with 1 tbsp of powdered sugar and 1/2 tsp of vanilla extract until it holds stiff peaks. Fold it in just as you would the whipped topping. The texture will be slightly lighter and less stable over many hours, but the flavor is divine.
Q: Help! I don’t have clear cups. What else can I use?
A> No problem at all! Use any small bowls, ramekins, or even a large trifle dish to make one big “dirt pile.” The visual of the layers is fun, but the taste is what truly matters. You could also use colorful ceramic mugs for a cozy feel.
Easter Dirt Cups : Nostalgic No-Bake Spring Dessert
Description
These Easter Dirt Cups are one of those desserts that never fail to make people smile. Creamy chocolate pudding, crushed cookie “dirt,” and cute marshmallow toppers come together in a fun layered cup that’s perfect for spring parties and family gatherings. No oven, no stress — just mix, layer, decorate, and chill.
Ingredients
-
1 box (3.9 oz / 110 g) instant chocolate pudding mix
-
2 cups cold milk (whole or 2%)
-
1 cup whipped topping or freshly whipped cream
-
18–20 chocolate sandwich cookies
-
Marshmallow bunnies or chicks (for topping)
Optional Extras
-
Candy chocolate eggs
-
Pastel sprinkles
-
Gummy worms
-
Mini chocolate chips
Instructions
-
Crush the cookies
Place cookies in a zip bag and crush with a rolling pin until you get fine crumbs with a few small chunks. Set aside. -
Make the pudding
In a bowl, whisk pudding mix and cold milk for about 2 minutes until thick. -
Lighten the mixture
Gently fold in the whipped topping or whipped cream until smooth and fluffy. -
Layer the cups
Spoon cookie crumbs into the bottom of each cup.
Add a layer of pudding mixture.
Repeat layers once more, finishing with cookie crumbs on top. -
Decorate
Add marshmallow bunnies or chicks and any extra candies or sprinkles. -
Chill
Refrigerate at least 20–30 minutes before serving.
Notes
-
✅ Use very cold milk so the pudding sets properly.
-
✅ Clear cups or jars show off the layers and look extra festive.
-
✅ A piping bag makes neat pudding layers.
-
✅ Add marshmallow toppers just before serving if making ahead.
-
✅ Want extra crunch? Mix in a few cookie chunks between layers.
Quick Nutrition Snapshot
Prep Time: 15 mins | Chill Time: 20 mins | Total Time: 35 mins | Servings: 6-8
Approximate Nutrition per Serving (1 cup, calculated with whole milk and whipped topping): Calories: 290 | Protein: 4g | Carbohydrates: 38g | Fat: 14g
***
And there you have it—your guide to creating the most joyfully messy, deliciously simple Easter treat. I hope these dirt cups bring as much laughter and sweetness to your table as they have to mine over the years. Happy cooking, happy Easter, and remember: the best kitchens are always a little bit dirty!
With love and a sprinkle of cookie crumbs,
Olivia


