
Easter Confetti Pudding Bombs: Your New Favorite No-Bake Tradition
Hey there, friend! Come on in, grab an apron, and let’s make a mess. I’m so glad you’re here. Is there anything better than the promise of a kitchen project that’s equal parts playful and delicious? I don’t think so. Today, we’re trading in our rolling pins for a little bit of kitchen magic as we create the most delightful, surprise-filled Easter treat: Easter Confetti Pudding Bombs.
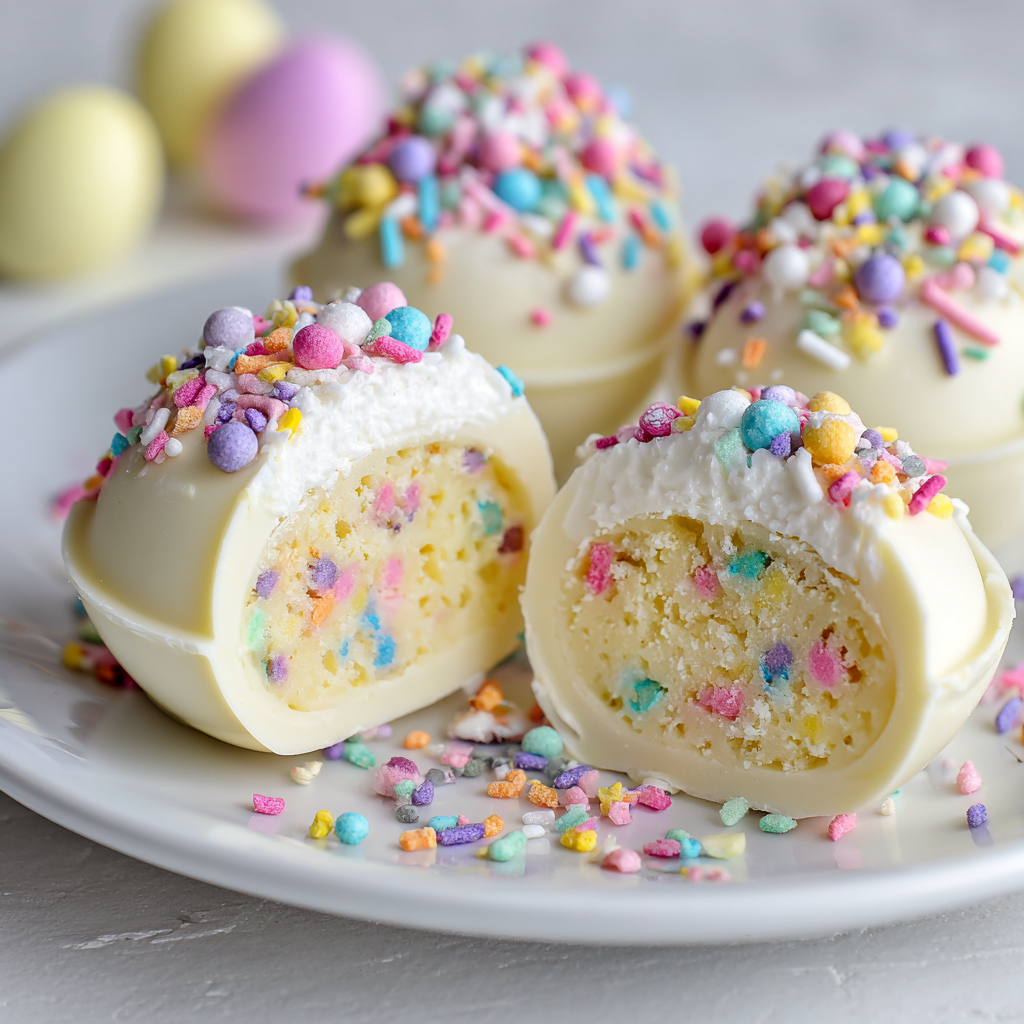
Imagine this: a crisp, beautiful white chocolate egg sits on your dessert table. It looks almost too pretty to eat. But then, you (or an excited little one) give it a gentle tap. *Crack.* Inside? Not what anyone expects! Instead of a solid center, you reveal a cloud of silky, creamy vanilla pudding, studded with cheerful pastel confetti sprinkles. The combination of that smooth, cool filling and the sweet snap of the chocolate shell is pure, unadulterated joy in every bite.
This is the recipe for the fun-seeker, the busy host, and the person who believes dessert should be an experience. You don’t need an oven, you don’t need professional pastry skills—you just need a sense of adventure and a love for making people smile. These Pudding Bombs are the star of any Easter egg hunt, the dazzling centerpiece of your brunch table, or the most memorable homemade gift. They’re a conversation starter, a memory maker, and proof that the best things in life often come in delicious, surprise packages. Ready to play with your food? Let’s do this!
The Day I Learned Dessert Could Be an Adventure
This recipe takes me straight back to my grandma’s linoleum-floored kitchen, the air thick with the scent of ham and yeast rolls. Easter was a big deal. While the adults handled the savory feast, my cousin Mia and I were always put in charge of “something sweet.” One year, a well-intentioned but slightly chaotic aunt brought over a bag of chocolate molds and a box of instant pudding, telling us to “invent something.” What resulted was… messy. Pudding everywhere, chocolate shells that were more like thick lace, and sprinkles stuck to our foreheads.
But when we finally managed to seal a pudding-filled egg and presented it to my grandpa, his face lit up. The surprise of the soft filling inside the hard shell made him laugh out loud—a deep, rumbling sound that meant true delight. It wasn’t perfect, but it was fun. That’s the spirit I’ve chased ever since. These Confetti Pudding Bombs are the polished, sprinkle-fied version of that childhood experiment. They capture that same feeling of playful surprise, but I’ve worked out all the messy kinks for you. They’re my edible homage to the idea that cooking isn’t just about the final product; it’s about the laughter and the stories you collect along the way.
Gathering Your Rainbow: Ingredients & Insights
Here’s everything you’ll need to create your own batch of edible magic. I’ve added my little chef notes next to each one because knowledge is power (and in this case, power leads to perfect pudding bombs!).
For the Chocolate Shell:
- 12 oz white chocolate, chopped: Use a good-quality baking bar, not chips if you can help it! Chips have stabilizers that help them hold their chip shape, which can make melting and tempering trickier. Chopping a bar gives you smooth, meltable pieces for a gorgeous, snappy shell.
- 2 oz pastel-colored candy melts (optional): These are my secret weapon for that perfect Easter egg color without thinning out the chocolate. You can melt a handful of pink, yellow, or blue melts and stir them into your white chocolate for a soft pastel hue. Chef Tip: If you don’t have these, a tiny drop of oil-based food coloring works, but candy melts are more reliable for color and consistency.
- 2 tbsp rainbow confetti sprinkles: We’re putting sprinkles right in the shell! This gives the outside a festive, textured look and a little extra crunch.
For the Pudding Filling:
- 1 ½ cups cold milk: The colder the better! Instant pudding sets by bonding with the milk proteins, and cold milk speeds this process up, giving you a thick, luscious filling faster.
- 1 (3.4 oz) box instant vanilla pudding mix: The trusty workhorse. It provides the perfect base texture and flavor. For a richer taste, seek out a “cook and serve” pudding mix and prepare it according to package directions, then let it cool completely before using.
- ½ cup whipped cream (optional for fluffier filling): This is the “fluffier filling” game-changer! Fold in some lightly sweetened whipped cream or even thawed whipped topping to make the filling airy and mousse-like.
- 1 tsp vanilla extract: A dash of pure vanilla amplifies that cozy, homemade flavor and rounds out any overly-sweet notes from the chocolate.
- ¼ cup rainbow confetti sprinkles: The “confetti” in the confetti bomb! Use the classic round sprinkles (jimmies) for the best texture. Avoid nonpareils (the tiny balls) inside the filling as their color can bleed.
For Decoration:
- Extra white chocolate for drizzling: A little drizzle makes them look professionally pretty.
- Pastel sprinkles: Go wild! This is where you personalize your bombs.
- Mini chocolate eggs (optional): A cute topper that hints at what’s inside (sort of!).
Let’s Build Some Magic: Step-by-Step Instructions
Put on some happy music, clear a space in your fridge, and let’s get crafting. I’ll walk you through every step with all my favorite hacks.
Step 1: Make the Chocolate Shells. This is the most important step, but don’t stress—I’ve got you. Start by finely chopping your white chocolate bar. Place it in a microwave-safe bowl. Microwave it in 30-second bursts, stirring vigorously between each one. Stop when there are just a few small lumps left; the residual heat will melt them as you stir. This prevents scorching. If using candy melts for color, stir them in now until smooth. Grab your Easter egg molds (silicone is easiest!). Using a pastry brush or a small spoon, coat the inside of each mold cavity with a thick, even layer of melted chocolate. Don’t be shy! A thin shell is a fragile shell. Immediately sprinkle the backs with your 2 tablespoons of confetti sprinkles and gently press them in. Pop the molds onto a tray and into the freezer for a solid 15 minutes. Once set, take them out and apply a second coat of chocolate. This double-layer method is my #1 tip for bombshells that won’t crack prematurely. Freeze again for 15 minutes.
Step 2: Prepare the Pudding Filling. While the shells are setting, let’s make the fluffy surprise. Pour your ice-cold milk into a medium bowl. Sprinkle the entire box of pudding mix over the milk. Immediately start whisking! Whisk for a full 2 minutes—set a timer. You want it thick and smooth. If you’re using the whipped cream option, gently fold it in now along with the vanilla extract. Finally, fold in your ¼ cup of confetti sprinkles with a light hand to avoid over-mixing. Cover the bowl with plastic wrap pressed directly onto the surface of the pudding (this prevents a skin from forming) and pop it in the fridge to firm up a bit more while your second chocolate coat sets.
Step 3: The Grand Assembly. Time for the fun part! Remove your chocolate shells from the freezer. Carefully pop them out of the molds; they should release easily if they’re fully set. You’ll have two halves for each bomb. Place half of the shells (the ones that look the prettiest!) on a parchment-lined tray, sprinkle-side down—these will be your bottoms. Take your chilled pudding and spoon or pipe it into these bottom shells, filling them almost to the top but leaving a tiny lip. Now, take your other shell halves. Using a small amount of your re-melted chocolate (just zap it for a few seconds), “paint” a thin line around the edge of a top shell. Quickly and carefully place it, sprinkle-side up, onto a pudding-filled bottom shell, pressing the edges together gently to seal. The chocolate acts as your edible glue. Repeat with all your eggs. Place the tray back in the fridge for at least 20 minutes to let the seal set.
Step 4: Decorate with Abandon. This is your artist moment! Melt a little more white or pastel chocolate. Using a fork or a piping bag with a tiny tip, drizzle the chocolate over your sealed bombs in zig-zags or swirls. Immediately, before the drizzle sets, shower them with more pastel sprinkles and maybe a mini chocolate egg or two. The key is to work quickly and embrace the happy chaos.
Step 5: Serve & Celebrate! Keep your finished Easter Confetti Pudding Bombs refrigerated until the very moment you’re ready to serve. The cold ensures the shell has a satisfying snap and the filling stays dreamy and creamy. Present them on a platter and watch the delight unfold as everyone discovers the surprise inside.
How to Serve Your Edible Masterpieces
Presentation is half the fun! Arrange your Pudding Bombs on a cake stand lined with Easter grass or nestled in a bed of shredded green coconut “grass.” For a brunch table, place each one in a small, colorful paper cupcake liner on everyone’s plate—it’s an instant individual dessert that feels special. If you’re including them in an egg hunt, tuck them gently into obvious spots (they’re not for hiding in the dirt!). The real magic happens when you encourage everyone to tap their egg with the back of a spoon to crack it open, revealing the hidden confetti treasure inside.
Make It Your Own: Fun Variations
- Chocolate Lover’s Dream: Use milk or dark chocolate for the shell and chocolate pudding mix for the filling. Fold in mini chocolate chips instead of sprinkles.
- Lemon Berry Burst: Use lemon pudding mix. Fold in finely chopped freeze-dried strawberries (they won’t bleed color!) and use a tiny drop of yellow food coloring in the white chocolate shell.
- Cookies & Cream: Fold crushed Oreo pieces into the vanilla pudding. Use a mix of white and black cookie crumbs to decorate the outside.
- Dairy-Free Delight: Use a high-quality dairy-free white chocolate and your favorite non-dairy milk (coconut milk works beautifully for richness) with the pudding mix.
- “Bunny Bait” Version: Add a tablespoon of smooth peanut butter to the pudding mix with the milk, and fold in crushed pretzel bits for a sweet-and-salty surprise.
From My Kitchen to Yours: Chef’s Notes
This recipe has been through more iterations than I can count! The first version used only one coat of chocolate, and let’s just say we had more “pudding puddles” than pudding bombs. The double-coat method is non-negotiable for structural integrity. I also learned the hard way that liquid food coloring can make chocolate seize up into a grainy mess—hence my love for candy melts. One Easter, I accidentally used a sugar cookie sprinkle mix that had little star shapes in it, and it was such a happy accident; the different shapes made the confetti even more fun. Don’t be afraid to play. The worst that can happen is you have to eat your “mistakes,” which are usually still delicious. These bombs are best enjoyed within 2-3 days, but I doubt they’ll last that long!
Your Questions, Answered: FAQs & Troubleshooting
Q: My chocolate shell cracked when I took it out of the mold! What did I do wrong?
A> This usually means the shell was a bit too thin or it warmed up too quickly. The double-coat method is your best defense. Also, when removing from the mold, if it’s resisting, pop the whole mold back in the freezer for 5 more minutes. Handle the shells quickly and by the edges to avoid melting them with the heat of your hands.
Q: Can I make these ahead of time?
A> Absolutely! You can make the shells up to a week ahead and store them in an airtight container in the fridge. Assemble the bombs the day before you plan to serve them. The filling is best fresh, so I don’t recommend filling them more than 24 hours in advance for optimal texture.
Q: My pudding filling is too runny. How can I fix it?
A> First, ensure you whisked for the full 2 minutes. If it’s still runny, the milk may not have been cold enough, or the pudding just needs more time. Pop it in the fridge for another 30 minutes. As a last resort, you can whisk in a tablespoon of instant dry milk powder or a teaspoon of cornstarch to help thicken it up.
Q: I don’t have Easter egg molds. What can I use instead?
A> No problem! Get creative. You can use small silicone half-sphere molds (like for cake pops), mini muffin tins lined with plastic wrap, or even clean, plastic Easter eggs as a mold (just be sure they are food-safe and give them a very thorough coating of chocolate so they release). The shape changes, but the surprise inside is just as wonderful.
Easter Confetti Pudding Bombs : A No-Bake Surprise in Every Shell
Description
These Easter Confetti Pudding Bombs are playful, colorful, and perfect for spring celebrations. A crisp chocolate shell hides a creamy vanilla pudding center packed with cheerful sprinkles. No oven needed, just a little melting, mixing, and decorating. They’re great for Easter tables, party treats, or a fun kitchen project with family.
Ingredients
Chocolate Shell
-
12 oz white chocolate, finely chopped (best quality bars if possible)
-
2 oz pastel candy melts (optional, for color)
-
2 tbsp confetti sprinkles (for inside shell)
Filling
-
1½ cups cold milk
-
1 (3.4 oz) box instant vanilla pudding mix
-
1 tsp vanilla extract
-
½ cup whipped cream or whipped topping (optional, for fluffier texture)
-
¼ cup confetti sprinkles (jimmies style)
Decoration (Optional)
-
Extra melted chocolate for drizzle
-
Pastel sprinkles or mini candy eggs
Equipment: Silicone egg or half-sphere molds
Instructions
Microwave chopped white chocolate in 30-second bursts, stirring each time until smooth.
If using candy melts for pastel color, stir them in now until fully melted.
Brush or spoon a thick layer of melted chocolate inside each mold cavity.
Sprinkle some confetti sprinkles into the shell and press lightly.
Freeze 15 minutes, then add a second chocolate coat for strength. Freeze again.
Whisk cold milk and pudding mix for 2 minutes until thick.
Stir in vanilla. Fold in whipped cream (if using) and sprinkles.
Refrigerate 10–15 minutes to firm up.
Carefully remove chocolate shells from molds.
Spoon or pipe pudding into half of the shells, leaving a small edge clear.
Rewarm remaining chocolate. Pipe or spread a thin ring around the edge of an empty shell.
Press onto a filled half to seal. Chill 20 minutes to set.
Drizzle with melted chocolate and add pastel sprinkles or candy toppers before it sets.
Keep refrigerated until serving.
Notes
-
Double coat the shells — thin chocolate cracks easily.
-
Use jimmies sprinkles inside — tiny ball sprinkles can bleed color.
-
Cold milk matters for thick pudding.
-
Handle shells by the edges so body heat doesn’t melt them.
-
Silicone molds release easiest and reduce breakage.
Nutritional Information (Per Pudding Bomb, Approximate)
Calories: 280 | Fat: 15g | Saturated Fat: 9g | Carbohydrates: 32g | Sugar: 27g | Protein: 3g | Cholesterol: 10mg | Sodium: 150mg
Note: Nutrition information is an estimate and will vary based on specific ingredients used and any optional additions.
Final Thoughts: More Than a Treat, A Memory
And there you have it—your very own edible Easter magic, ready to bring a wave of wonder to your celebration.
These Easter Confetti Pudding Bombs are so much more than a dessert. They’re a tiny spectacle, a moment of shared delight, and a delicious testament to the joy of playful cooking. In the cracking of the shell and the reveal of the cheerful confetti inside, you’re not just serving a sweet—you’re creating a core memory for your family and friends. It’s the “ooh” and “ahh,” the laughter, the gentle tap of a spoon that turns dessert into an event.
This recipe is for anyone who believes holidays are made brighter with a dash of whimsy. It’s for the parent crafting a magical Easter morning, the friend who brings the most talked-about dish to the potluck, and for you—the one who deserves a little kitchen triumph that’s as fun to make as it is to eat.
So embrace the sprinkles, take your time with the chocolate shells, and don’t worry about perfection. The real beauty is in the handmade charm and the surprise within. When you place that platter on the table, you’re offering more than a treat; you’re offering an experience, a conversation, and a whole lot of happiness.
May your Easter be sweet, bright, and filled with the kind of joy that comes from a delicious, crackable surprise.
Happy creating, and happier eating,
Olivia
Your guide in the kitchen


