
Easter Charcuterie Dessert Board: Your Pastel-Only Sweet Masterpiece
Hey there, friend! Olivia here, apron a little dusty with powdered sugar and my heart absolutely full. Can you feel it? That buzz in the air? Spring is whispering, flowers are peeking out, and Easter is just around the corner. For me, this season has always been about more than just one big meal—it’s about the gathering, the laughter, and those perfect, shareable bites that make everyone’s eyes light up.
If you’ve spent any time on Pinterest or Instagram lately (and let’s be real, who hasn’t?), you’ve seen the charcuterie board revolution. We’ve moved way beyond cheese and crackers, my friends. We’re in an era of edible art, where the board itself becomes the centerpiece of the party. But today, we’re throwing a sweet twist into the mix. We’re ditching the savory and going full-on sugar-dream.
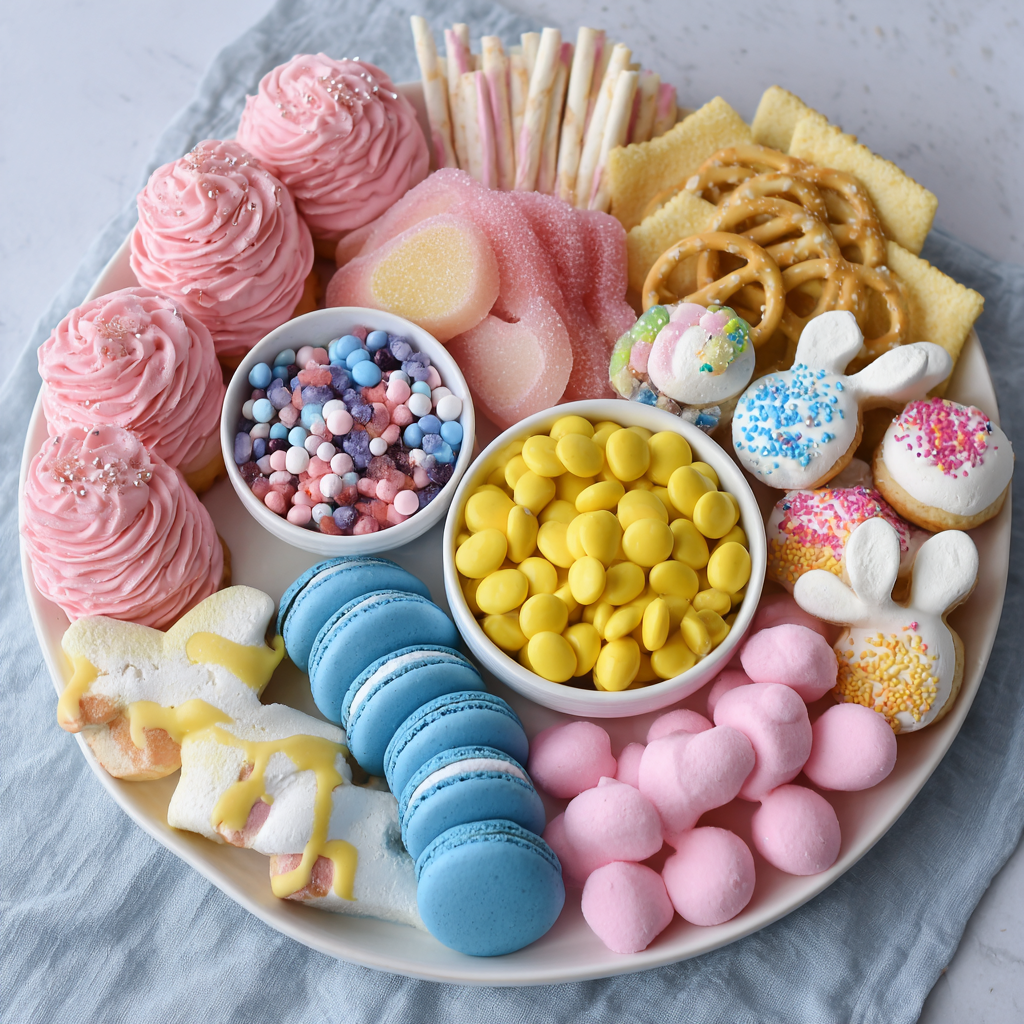
I’m so excited to introduce you to the ultimate Easter showstopper: The Pastel-Only Charcuterie Dessert Board. This isn’t just a plate of cookies. This is a moment. A pastel-hued, texture-filled, joy-sparking masterpiece that follows one gloriously simple rule: everything must be in the softest shades of pink, yellow, and blue. Imagine a watercolor painting you can eat! It’s playful, it’s stunningly pretty, and the best part? It’s incredibly easy to put together. You don’t need to be a pastry chef—you just need a sense of fun and a sweet tooth.
This board is for the host who wants to hear “WOW!” as they bring it to the table. It’s for the parent making magical memories with wide-eyed kids. It’s for anyone who believes that food should be as beautiful as it is delicious. So, grab your favorite large board or platter, and let’s turn your table into a Pinterest-worthy, pastel paradise that tastes as good as it looks.
The Sweet Spark: Where This Idea Came From
This whole pastel obsession? It definitely comes from my childhood Easters. My grandma was a force of nature in the kitchen, but her true artistry came out the night before the holiday. While the rest of the house slept, she’d transform our old, weathered wooden table into a pastel wonderland. It wasn’t a formal, sit-down dessert. It was a sprawling, glorious buffet of happiness.
She’d have little dishes of pastel Jordan almonds, pastel-frosted petit fours from the local bakery, and these incredible, pastel-tinted coconut haystacks she’d make herself. The rule was unspoken but understood: color was key. It was like she was painting with food. My sister and I would sneak downstairs in our pajamas, just to stare at it, our faces bathed in the soft light of the fridge. It felt less like a meal setup and more like she’d laid out a feast for the Easter Bunny himself.
That memory—the anticipation, the pure visual joy—stuck with me. It taught me that presentation is a form of love. When I started seeing the modern charcuterie trend, I instantly thought of Grandma’s pastel table. This board is my homage to that magic. It’s that feeling of festive wonder, designed for sharing, chatting, and grazing with the people you love most. It’s proof that sometimes, the most memorable recipes aren’t cooked at all—they’re carefully, lovingly curated.
Gathering Your Pastel Palette: Ingredients & Tips
Here’s the fun part: shopping (or baking)! This list is your roadmap to pastel perfection. Think of it as choosing paints for a canvas. You can absolutely use store-bought items for a 30-minute miracle, or you can sprinkle in a few homemade touches. I’ve included notes and swaps for everything, because your kitchen, your rules!
Board Essentials: A large wooden board, slate slab, or even a very large, clean serving tray. Round or rectangular works!
- Pink Zone Ingredients:
- Pink Frosted Sugar Cookies: The anchors of your pink section. Store-bought is perfect, or use your favorite cut-out cookie recipe with a pastel pink buttercream. Chef’s Tip: If frosting store-bought, a tiny drop of red gel food coloring in vanilla frosting works miracles.
- Strawberry Macarons: They bring elegance and that classic pastel pink hue. Find them at a bakery, a gourmet market, or frozen section. Swap: Pink frosted donut holes or mini strawberry cupcakes.
- Pink Chocolate-Covered Pretzels: Sweet, salty, crunchy perfection. You can make these by dipping pretzel rods in melted white chocolate tinted pink. Insight: The salt cuts the sweetness and adds fantastic texture.
- Pink Marshmallows: Look for pastel pink ones or large white marshmallows. Fun Twist: Roll them in pink sanding sugar for extra sparkle!
- Pastel Pink M&M’s: Use the Easter mix or buy a bag of just the pink ones online. They’re ideal for filling tiny gaps.
- Yellow Zone Ingredients:
- Lemon Cookies: Bright, cheerful, and tangy. Soft-baked lemon cookies or delicate lemon shortbread rounds are fantastic. Chef’s Insight: The citrus flavor is a refreshing palate cleanser among all the sugar.
- Yellow Candy-Coated Chocolates: Think yellow Sixlets, Reese’s Pieces, or even yellow peanut M&M’s. They add pops of sunny color.
- White Chocolate Pretzels with Yellow Drizzle: Buy them or make your own by drizzling melted yellow candy melts over white chocolate-dipped pretzels.
- Yellow Marshmallow Chicks (Peeps): A non-negotiable dose of nostalgia! They’re pure Easter joy.
- Lemon Fudge Cubes: Rich, creamy, and decadent. Look for them in the candy aisle or make a simple microwave lemon fudge. Swap: Yellow frosted brownie bites or pieces of pineapple upside-down cake.
- Blue Zone Ingredients:
- Blue Macarons: Royal blue, baby blue, or aqua—any shade works! Vanilla or almond flavor is perfect. Tip: Macarons are fragile, place them just before serving.
- Vanilla Cupcakes with Blue Frosting: Mini cupcakes are ideal! They’re adorable and easy to pick up. Use a simple vanilla box mix and color your frosting with blue gel food coloring.
- Blue Candy Melts Bark: So easy! Melt blue candy wafers, spread on parchment, sprinkle with pastel sprinkles and mini eggs, break once set. It’s a gorgeous, textured filler.
- Blue Jelly Beans: Scatter these like little gems in the blue section. They’re a classic.
- Yogurt-Covered Raisins (Light Blue Coating): A slightly healthier(ish) option with a lovely pastel blue hue and a chewy center. A great texture contrast.
- Optional Fillers & “Confetti”:
- White Chocolate Popcorn: A light, airy, and crunchy element that acts as a delicious “filler” between color blocks.
- Pastel Sprinkles: Jimmies, nonpareils, sugar pearls—scatter them like edible glitter over the whole board for a finished look.
- Mini Candy Eggs: The quintessential Easter candy. Use them to bridge color zones or create a border.
Building Your Edible Art: A Step-by-Step Guide
Okay, artiste, it’s time to create! Don’t overthink this. We’re going for abundant, joyful, and organized chaos. Follow these steps, and you simply cannot fail. I’ve sprinkled my best tips throughout.
- Lay the Foundation. Grab your chosen board and place it on a stable surface. I like to work right on the table where it will be served. Give yourself plenty of space! Chef Hack: If your board is very porous (like untreated wood), you can lay down sheets of parchment or wax paper first for easy cleanup. Just tuck the edges under neatly.
- Map Your Zones. Don’t put anything down yet! Just visually divide your board into three main sections: Pink, Yellow, and Blue. You can think of them as wedges of a pie on a round board, or three columns on a rectangular one. It doesn’t have to be perfect—we’re creating an impression.
- Place Your “Anchor” Items. This is the most important step for structure. In each colored zone, start by placing your largest items. In the Pink zone, arrange your frosted cookies and macarons. In the Yellow zone, position your lemon cookies and maybe a cluster of marshmallow chicks. In the Blue zone, place your cupcakes and macarons. Space them out within their zone, but keep them clearly grouped by color. These are the landmarks of your board.
- Add Your Medium-Sized Players. Now, build around those anchors. Tuck in your pink chocolate pretzels near the pink cookies. Place the lemon fudge cubes and drizzled pretzels in the yellow section. Add your blue candy bark and little piles of yogurt raisins to the blue area. You’re starting to fill in the canvas and create height and variety. Pro Tip: Turn some items on their side or stack a few to create visual interest and dimension. Flat boards are boring!
- Fill Every Gap with Small Candies. Here’s where the magic happens and the board goes from “nice” to “WOW!” Take your small candies—the M&M’s, jelly beans, coated chocolates—and pour them into the gaps. Let them cascade around the larger items, filling the empty space and creating lush, abundant color blocks. Don’t be shy! The goal is to have very little board showing. This creates that lavish, generous feeling.
- The Final Flourish. Take a step back and look. Where does it need a little something? This is when you add your “confetti.” Take pinches of pastel sprinkles and lightly dust them over the entire board. Scatter a few mini candy eggs between zones as a unifying element. If you have white chocolate popcorn, you can use it as a neutral buffer between two strong color zones. My Secret: I always add one last tiny sprinkle of flaky sea salt over the chocolate-dipped items. It elevates everything!
Presenting Your Pastel Masterpiece
Place your finished board right in the center of the action—the coffee table, the dessert buffet, the kitchen island. The beauty of this is its interactivity! Provide small plates, napkins, and a few tiny tongs or spoons for easy grabbing (though I promise, fingers will be diving in). For an extra touch, tie pastel ribbon around the napkins or place a small vase of spring flowers (like hyacinths or tulips) next to the board. Then, just watch the smiles appear as your guests explore each colorful section, creating their own perfect sweet bite.
Make It Your Own: Creative Twists & Swaps
The pastel rule is fun, but feel free to play within it! Here are some ideas to tailor this board to your crowd:
- Spring Floral Theme: Incorporate flower-shaped cookies, candied violets, and fruit-flavored gummies in pastel shades. Add edible flowers as garnish!
- “Bunny Bait” Board: Focus on snack mixes! Make pastel popcorn mix, pastel-painted Chex Mix, and include bunny-shaped graham crackers.
- Allergy-Friendly: Create zones with gluten-free cookies, dairy-free chocolates (check coatings), and nut-free candies. Use fruit like pastel-hued grapes (champagne grapes are perfect), raspberries, and pineapple.
- Pastel & White: For a more elegant look, stick to only two colors: white and one pastel (like blush pink). Use white chocolate-dipped everything, meringue kisses, and white macarons.
- Adult-Only Upgrade: Spike it! Include pastel-hued cocktails in shot glasses on the board, or incorporate boozy desserts like limoncello-dipped cake pops or raspberry champagne gummies.

Easter Charcuterie Dessert Board : Pastel-Only Sweet Party Platter
Description
If you want a fun, eye-catching Easter dessert without complicated baking, a pastel dessert board is the perfect solution. It’s colorful, playful, and completely customizable. Think of it like edible art — soft pinks, yellows, and blues arranged into a sweet grazing board that guests can snack from all afternoon. No oven required, just simple treats and a little creativity.
Ingredients
Pink Treats
-
Pink frosted sugar cookies
-
Strawberry or vanilla macarons
-
Pink chocolate-covered pretzels
-
Pink marshmallows
-
Pink candy-coated chocolates
Yellow Treats
-
Lemon cookies or lemon bars
-
Yellow frosted mini cupcakes
-
Yellow candy-coated chocolates
-
Marshmallow chicks
-
Lemon fudge or blondie bites
Blue Treats
-
Blue frosted mini cupcakes
-
Blue macarons
-
Blue candy bark pieces
-
Blue jelly beans
-
Yogurt-covered raisins (light blue coating)
Fillers & Extras
-
White chocolate popcorn
-
Mini candy eggs
-
Pastel sprinkles
-
White chocolate dipped cookies or pretzels
Instructions
-
Choose your board
Use a large platter, wooden board, or tray. Make sure it’s clean and dry. -
Plan color zones
Visually divide the board into three areas: pink, yellow, and blue. -
Place anchor items first
Add the biggest items (cupcakes, large cookies, bark pieces) in each color zone. -
Add medium treats
Arrange pretzels, macarons, and cookie stacks around the larger items to build height and variety. -
Fill the gaps
Pour small candies and jelly beans into open spaces so very little board shows. -
Finish with texture
Tuck popcorn and mini eggs between sections and lightly scatter pastel sprinkles over the top. -
Serve immediately
Add small plates and napkins and let guests mix and match.
Notes
-
Use different textures: soft (marshmallows), crunchy (pretzels), creamy (frosted items).
-
Keep colors grouped — it makes the board look organized and striking.
-
Add height by stacking cookies or leaning bark pieces upright.
-
Put fragile items (macarons, cupcakes) on last.
-
Assemble within 2–3 hours of serving for best freshness.
-
If it’s warm, keep frosted items refrigerated until the last minute.
Olivia’s Kitchen Notes & Stories
I’ve made some version of this board for three Easters running now, and it’s evolved every time. The first year, I was so strict about the colors that I almost had a meltdown because the “blue” jelly beans looked teal. My husband just laughed, ate one, and said, “Tastes like Easter to me.” He was right. It’s supposed to be fun, not perfect!
One of my favorite memories is the year my niece, who was four at the time, “helped” me. Her job was to place the marshmallow chicks. She created an entire narrative for them, marching them in a line from the yellow zone to “visit” the blue macarons. We left her little procession right where it was. It was the most charming part of the whole board.
The biggest lesson? Things will get messy. Sprinkles will end up on the floor. A cookie might break. Just pop it in your mouth (the chef’s treat!) and keep going. The mess is part of the memory. This board is less about rigid recipe rules and more about embracing creativity, color, and the sweet, simple joy of sharing.
Your Questions, Answered!
Q: How far in advance can I assemble this board?
A: For the best texture, I recommend assembling it no more than 2-3 hours before serving. Anything with frosting (cookies, cupcakes) can get soft, and candies might bleed color if they get warm. You can, however, do all your shopping, baking
Final Thoughts
As I put the finishing touches on this board, dusting it with one last sprinkle of pastel nonpareils, I can’t help but smile. It’s more than just sugar and pretty colors, isn’t it? It’s about gathering around something beautiful. It’s about watching my niece’s face light up as she claims the biggest macaron. It’s about my husband sneaking a jelly bean when he thinks I’m not looking. It’s the laughter, the “oohs” and “ahhs,” and the quiet moments of connection that happen when you’re sharing something sweet.
This board is my love letter to those moments, inspired by my grandma’s kitchen and written in buttercream and candy. It’s a reminder that the best recipes aren’t always about complicated techniques, but about creating a feeling. A feeling of welcome, of celebration, of simple, unadulterated joy.
So this Easter, don’t stress over the perfect ham or the most elaborate side dish. Take an hour, gather your pastels, and build this edible piece of art. Let it be the centerpiece that sparks conversation and fills bellies with sweetness. Let it be the thing that makes your people feel loved. Because, friend, that’s what this is all about.
From my kitchen to yours, have a beautifully sweet and joy-filled Easter.
Happy Grazing,
Olivia


