
Easter Bunny Sprinkle Bars: Your New Favorite Spring Treat
Hey there, friend! Come on in, grab an apron, and let’s make something that tastes like a sunbeam and a hug had a delicious baby. I’m talking about my absolutely irresistible Easter Bunny Sprinkle Bars. If the mere thought of soft, buttery sugar cookie dough packed with joyous pastel sprinkles, topped with a cloud of vanilla frosting and even more colorful sparkle makes your heart do a little happy dance, then you are in exactly the right kitchen.
This is the recipe I turn to when I want to create pure, unadulterated joy on a plate. It’s for those moments when you need a show-stopping dessert for your Easter brunch table, a guaranteed hit for the spring bake sale, or just a sweet project to make a regular Tuesday feel like a celebration. The best part? There’s zero rolling, chilling, or fussy cookie cutting involved. We’re making glorious, fuss-free bars. You simply press the dough into a pan, bake it to golden perfection, slather on the frosting, and watch them disappear. It’s the kind of baking that feels creative, not stressful, and the results are always, always met with smiles. So, preheat that oven, and let’s bake up a batch of springtime magic together!
The Sprinkle Jar of Memories
This recipe always takes me right back to my grandma’s linoleum-floored kitchen, the air thick with the scent of melting butter and sugar. She wasn’t a fancy baker, but she was a joyful one. Her signature move was the “sprinkle jar,” a giant glass container filled with every color and shape imaginable. Letting me pick out the sprinkles for whatever we were making was her way of saying, “This is your creation.”
For Easter, it was always the pastel ones—tiny eggs, little bunnies, and soft-colored quins. We’d fold them into cake batter or press them into frosting on cut-out cookies, our fingers stained with food coloring and laughter. These bars capture that exact feeling: the simple, messy, heart-swelling happiness of making something beautiful and sweet with someone you love. Every time I pour a cup of these cheerful sprinkles into the dough, I’m not just adding color; I’m stirring in a big spoonful of that happy memory. It’s my hope that baking these bars becomes a little tradition in your home, too, creating your own sprinkle-jar-worthy moments.
Gathering Your Rainbow: Ingredients & Insights
Here’s what you’ll need to create these soft, chewy masterpieces. I’ve included my little chef notes for each ingredient because knowing the “why” makes you a more confident baker!
For the Sugar Cookie Bars:
- 1 cup (2 sticks) unsalted butter, softened – This is the soul of our bar, giving it that rich, melt-in-your-mouth quality. “Softened” is key! Leave it on the counter for about an hour. It should be cool to the touch but leave a slight indent when you press it. This creams perfectly with the sugar for that essential light, fluffy texture.
- 1 cup granulated sugar – Sweetness and structure. Creaming it with the butter creates tiny air pockets that help our bars rise and become tender, not dense.
- 2 large eggs – They bind everything together and add moisture. Make sure they’re at room temperature to blend smoothly into the creamed butter and sugar without seizing it up.
- 1 tsp pure vanilla extract – The flavor enhancer! It adds a warm, cozy depth that makes the bars taste like they came from a professional bakery.
- 2 ½ cups all-purpose flour – The backbone. I always recommend fluffing your flour in the canister, then spooning it lightly into the measuring cup and leveling it off. No packing! This prevents dry, tough bars.
- 1 tsp baking powder – Our leavening agent. This is what gives the bars their slight lift and soft, cake-like chew. Check the date on yours to make sure it’s active!
- ½ tsp salt – The secret weapon. Salt balances the sweetness and makes all the other flavors pop. Don’t skip it!
- ½ cup pastel sprinkles – The stars of the show! Use “jimmies” or “quins” for best results. Avoid nonpareils (the tiny round balls) in the dough, as they tend to bleed color. Save those for the top! This is your chance to go wild with spring colors.
For the Vanilla Frosting:
- ½ cup (1 stick) unsalted butter, softened – Just like for the bars, soft butter is non-negotiable for a silky-smooth, spreadable frosting.
- 2 cups powdered sugar – Also called confectioners’ sugar. It dissolves beautifully into the butter for a lump-free frosting. I usually sift mine if it seems clumpy.
- 1-2 tbsp milk – Whole milk or even a splash of heavy cream works wonders. Start with one tablespoon and add the second only if needed to reach your perfect spreading consistency.
- ½ tsp vanilla extract – Because vanilla frosting should actually taste like vanilla.
- Pink food coloring (optional) – A drop or two of gel food coloring gives that pretty Easter blush. Gel is better than liquid as it won’t thin out your frosting.
- Extra sprinkles for topping – This is where you go for the gold (or the pastel)! Use any and all sprinkles you love here. The more, the merrier.
Let’s Bake! Step-by-Step Instructions
Follow these simple steps, and you’ll have perfect bars in no time. I’m chatting right alongside you with all my favorite tips!
- Prep Your Stage. Preheat your oven to 350°F (175°C). This ensures it’s perfectly hot and ready when your dough is. Line a 9×13-inch baking pan with parchment paper, leaving a little overhang on the two long sides. This is my #1 kitchen hack for easy removal and clean slicing! Lightly grease any exposed parts of the pan.
- Cream the Butter & Sugar. In a large bowl, use a hand mixer or stand mixer fitted with the paddle attachment to beat the softened butter and granulated sugar together on medium-high speed. We’re not just mixing; we’re creaming. Do this for a good 2-3 minutes, until the mixture is pale yellow, fluffy, and almost looks like frosting. This step incorporates air, which is crucial for texture.
- Add the Wet Team. Beat in the eggs, one at a time, making sure each is fully incorporated before adding the next. Then beat in the vanilla extract. Scrape down the sides of the bowl with a rubber spatula to make sure everything is homogenous.
- Welcome the Dry Ingredients. In a separate bowl, whisk together the flour, baking powder, and salt. With your mixer on low speed, gradually add the dry ingredients to the wet. Mix just until the flour disappears and a soft dough forms. Over-mixing at this stage can lead to toughness, so once you don’t see any dry flour, stop!
- Fold in the Joy. Now, for the fun part! Add your ½ cup of pastel sprinkles to the dough. Use your spatula to gently fold them in until they’re evenly distributed. Try not to over-stir, as the colors might start to streak.
- Press & Prep for Baking. Transfer the dough to your prepared pan. It will be thick! Use lightly floured or buttered fingertips to press it into a smooth, even layer from corner to corner. This ensures even baking.
- Bake to Golden Perfection. Pop the pan into your preheated oven and bake for 20-25 minutes. You’re looking for the edges to be a light golden brown and the top to look set. The center might still seem a tiny bit soft—that’s perfect! It will set up as it cools. Over-baking is the enemy of chewiness.
- The All-Important Cool Down. This is the hardest step: patience! Place the pan on a wire rack and let the bars cool completely in the pan. If you frost them while they’re warm, the frosting will melt into a sad, glazy puddle. I sometimes pop the whole pan in the fridge to speed this up if I’m impatient.
- Whip Up the Frosting. While the bars cool, make your frosting. In a clean bowl, beat the softened butter until it’s creamy and smooth. Gradually add the powdered sugar, a half cup at a time, beating on low at first to avoid a sugar cloud, then increasing speed. Add the vanilla and 1 tablespoon of milk. Beat on medium-high for 2-3 minutes until it’s wonderfully light and fluffy. Add the second tablespoon of milk only if it seems too thick. Tint with food coloring if using.
- Frost & Decorate! Once the bars are completely cool, use an offset spatula or butter knife to spread the frosting evenly over the top. Immediately shower it with your reserved extra sprinkles so they stick beautifully.
- Slice & Savor. Using the parchment paper overhang, lift the entire slab of bars out of the pan and onto a cutting board. Use a sharp knife to slice into squares. For super clean cuts, wipe the knife clean between slices. Then, pour yourself a glass of milk, grab a bar, and take that first glorious bite!
How to Serve These Sprinkled Beauties
Presentation is part of the fun! I love arranging these bars on a simple white platter or a vintage cake stand to let their colors really sing. Stack them up in a little pyramid or line them in rows. For a special Easter treat, place a few pastel-wrapped chocolate eggs in the center of the platter. They’re perfect with a cup of coffee for a spring morning treat, as the sweet finale to a big holiday meal, or packed into little cellophane bags tied with ribbon as the most delightful edible gift. Honestly, they taste best shared with people you love, right in the kitchen where you made them!
Get Creative: Recipe Variations
Love the base recipe? Here are a few fun twists to make it your own:
- Lemon Zest Burst: Add the zest of one large lemon to the cookie dough and a tablespoon of fresh lemon juice to the frosting for a bright, sunny citrus twist.
- Almond Joy: Swap the vanilla extract in both the dough and frosting for pure almond extract. Fold in ½ cup of toasted coconut with the sprinkles for a magic cookie bar vibe.
- Funfetti Cake Batter: Add ½ teaspoon of butter or cake batter extract to the dough and use rainbow sprinkles instead of just pastel. It’s a birthday party in a bar!
- Chocolate Drizzle: Keep the vanilla frosting, but melt ¼ cup of white or semi-sweet chocolate chips and drizzle it artfully over the frosted bars before adding sprinkles.
- Gluten-Free Swap: Use a 1:1 gluten-free all-purpose flour blend (like Bob’s Red Mill) and ensure your sprinkles are certified gluten-free.
Chef’s Notes: From My Kitchen to Yours
This recipe has been my trusty sidekick for years, and it’s evolved in the best ways. I originally made it as a roll-out cookie, but one rushed Easter, I simply pressed the dough into a pan on a whim. The discovery that it was not only easier but also yielded a softer, chewier texture was a total game-changer! Now it’s the only way I make them. A funny kitchen story? The first time I made these, I was so excited I dumped in the entire bottle of sprinkles (probably a cup and a half!). The bars were a riot of color but spread like crazy in the oven because the dough structure was compromised. We still ate them, of course—they were deliciously crunchy on the edges—but I learned that ½ cup is the perfect sprinkle-to-dough ratio for the ideal bake. Remember, baking is part science, part love, and always an adventure. Don’t be afraid to make it your own!
FAQs & Troubleshooting
Q: My bars came out really dry and crumbly. What happened?
A: This usually points to over-measuring the flour or over-baking. Remember to spoon and level your flour, don’t scoop! Also, ovens can vary, so check a minute or two before the minimum bake time. The bars will continue to set as they cool in the pan.
Q: Can I make these ahead of time?
A: Absolutely! You can bake and cool the bar base, wrap the whole pan tightly in plastic wrap, and store it at room temperature for a day. Frost it the day you plan to serve. Frosted bars keep well in an airtight container at room temp for 2-3 days.
Q: My sprinkles bled a lot of color into the dough and frosting. How do I prevent that?
A> This is common with certain types of sprinkles, especially nonpareils (the tiny balls). For the dough, stick to jimmies (the rod-shaped sprinkles) or quins (flat discs), as they hold color better. For the top, you can add sprinkles just before serving if you’re concerned.
Q: Can I freeze these bars?
A> Yes, brilliantly! Freeze the unfrosted baked and cooled bar slab tightly wrapped for up to 2 months. Thaw at room temperature, then frost. You can also freeze frosted bars; place them in a single layer on a baking sheet until solid, then transfer to a container. They might “sweat” a little when thawing, but will still taste amazing.
Easter Bunny Sprinkle Bars : Soft & Chewy Festive Sugar Cookie Bars
Description
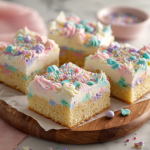
If spring had a flavor, it would taste like these Easter Bunny Sprinkle Bars: buttery, soft sugar cookie bars loaded with pastel sprinkles, topped with a cloud of vanilla frosting, and finished with even more cheerful sprinkles. They’re fuss-free, fun to make, and guaranteed to bring a smile to anyone who bites in. Perfect for Easter brunch, spring celebrations, or just brightening an ordinary day.
Ingredients
For the Sugar Cookie Bars:
-
1 cup (2 sticks) unsalted butter, softened
-
1 cup granulated sugar
-
2 large eggs, room temperature
-
1 tsp pure vanilla extract
-
2½ cups all-purpose flour
-
1 tsp baking powder
-
½ tsp salt
-
½ cup pastel sprinkles (jimmies or quins; avoid nonpareils)
For the Vanilla Frosting:
-
½ cup (1 stick) unsalted butter, softened
-
2 cups powdered sugar, sifted if needed
-
1–2 tbsp milk or heavy cream
-
½ tsp vanilla extract
-
Pink food coloring (optional)
-
Extra sprinkles for topping
Instructions
-
Prep Oven & Pan: Preheat to 350°F (175°C). Line a 9×13-inch pan with parchment paper, leaving a little overhang for easy removal. Lightly grease exposed pan edges.
-
Cream Butter & Sugar: In a large bowl, beat softened butter and sugar for 2–3 minutes until pale and fluffy.
-
Add Eggs & Vanilla: Beat in eggs one at a time, then add vanilla. Scrape the bowl to ensure even mixing.
-
Incorporate Dry Ingredients: In a separate bowl, whisk together flour, baking powder, and salt. Gradually mix into wet ingredients on low speed until just combined.
-
Fold in Sprinkles: Gently fold in ½ cup pastel sprinkles until evenly distributed.
-
Press into Pan: Using lightly floured or buttered fingertips, press dough evenly into the prepared pan.
-
Bake: Bake 20–25 minutes until edges are lightly golden and top looks set. Center may still seem slightly soft. Cool completely on a wire rack.
-
Make Frosting: Beat softened butter until smooth. Gradually add powdered sugar, then vanilla and 1 tbsp milk. Beat 2–3 minutes until fluffy. Add a second tbsp of milk if needed and tint with food coloring if desired.
-
Frost & Decorate: Spread frosting over cooled bars. Immediately top with extra sprinkles.
-
Slice & Serve: Lift bars from pan using parchment overhang. Slice into squares with a sharp knife, wiping between cuts for clean edges.
Notes
-
Use jimmies or quins in the dough to prevent color bleeding.
-
Avoid over-baking for soft, chewy bars.
-
Frost after cooling to keep frosting from melting.
-
Make-ahead: Bake bars in advance, store at room temp, and frost on serving day.
-
Freezing: Freeze unfrosted bars up to 2 months. Frost after thawing.
Nutritional Information (Approximate)
Per bar (based on 18 bars): Calories: ~240 | Fat: 12g | Saturated Fat: 7g | Cholesterol: 50mg | Sodium: 85mg | Carbohydrates: 32g | Sugar: 22g | Protein: 2g
Final Thoughts
And there you have it, sweet friend—a pan full of pure, sprinkle-dusted joy that’s guaranteed to make any spring day feel like a celebration. These Easter Bunny Sprinkle Bars are everything I hope a dessert can be: incredibly easy to make, impossibly pretty to look at, and so delicious that they disappear before you’ve even had a chance to sneak a second one (though I fully support going back for thirds).
What I adore most about this recipe is how it captures the very essence of springtime—that feeling of sunshine warming your skin after a long winter, of flowers bursting into color, of gathering with the people you love most. Every time I slice into these bars, with their soft, buttery centers and that cloud of pastel-frosted perfection, I’m reminded that the simplest pleasures are often the sweetest. There’s no complicated technique here, no fancy equipment required. Just good old-fashioned baking made with love and a generous helping of sprinkles.


