Easter Morning Magic, Made Easy: Introducing Bunny Cinnamon Rolls!
Is there anything better than the smell of something sweet baking in the oven on a lazy morning? Now, imagine that heavenly scent of cinnamon and sugar wafting through your house on Easter Sunday, mingling with the excitement of little ones hunting for eggs. That’s the exact feeling I wanted to bottle up and share with you today. But here’s my chef’s secret: creating that magical, memory-filled moment doesn’t have to mean waking up at dawn and wrestling with yeast dough. Not today, my friend!
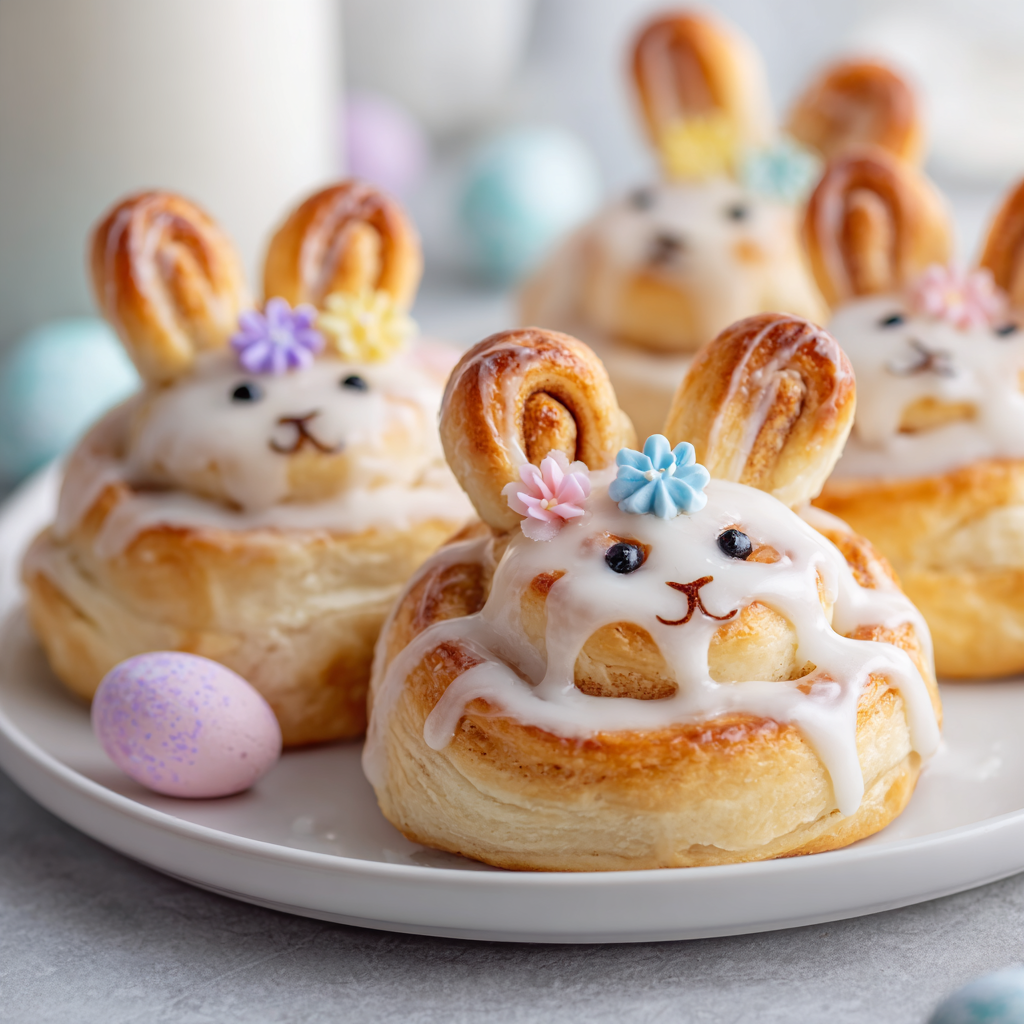
I’m thrilled to share my absolute favorite last-minute Easter brunch idea: these impossibly cute Easter Bunny Cinnamon Rolls. We’re taking a brilliant shortcut (a trusty can of refrigerated dough) and transforming it with just a few clever twists into a whole family of adorable bunny faces. They’re quick, crowd-pleasing, and so simple that you can literally make them with one cup of coffee in your system. Whether you’re hosting a big spring gathering, want a fun project to do with kids, or just need a dose of edible joy on your table, these bunnies are here to deliver. They’re sweet, soft, and decorated with a simple “flower crown” of icing and sprinkles that just screams spring. Let’s put on our favorite aprons and make a breakfast that’s as fun to look at as it is to eat!
The Year of the Lopsided Bunny & A Kitchen Epiphany
This recipe was born out of a happy kitchen disaster, as the best ones often are. A few Easters ago, I ambitiously promised my then five-year-old niece, Chloe, that we would make “special bunny bread” from scratch. Well, life happened, and I found myself the night before with zero time for a dough to rise. Panic set in! But as I stared at a can of cinnamon rolls in my fridge (my secret weeknight treat), I had a wild idea. What if we just… shaped them?
Chloe and I unrolled the dough on my flour-dusted counter, giggling as we attempted to fashion ears from the trimmings. Our first bunny looked more like a sleepy hamster, and the second one’s ears were comically different sizes. But her eyes lit up like I’d just performed actual magic. “Aunt Liv, they’re perfect!” she declared. That moment of pure, unfiltered joy—the mess, the laughter, the proud way she presented our lopsided bunnies to the family—stuck with me. It reminded me that the heart of cooking isn’t perfection; it’s connection, creativity, and the shared smile when you pull something wonderfully whimsical out of the oven. Now, these bunnies are our non-negotiable Easter tradition, and I can’t wait for you to start your own.
Your Bunny-Making Toolkit: Simple Ingredients, Big Flavor
Here’s everything you need to bring these cute characters to life. I’ve included my chef insights and swaps so you can bake with confidence, no matter what’s in your pantry.
- 1 can (typically 12.4 oz) refrigerated cinnamon roll dough (with included icing) – This is our glorious shortcut! I like the classic “grands” size for nice, plump bunny faces. Chef’s Insight: The dough is perfectly portioned and forgiving, making it ideal for shaping. If your can has 8 rolls, you get 8 bunnies!
- Non-stick spray or a dab of butter for the pan – A quick spritz ensures your bunnies slide off the baking sheet with ease, keeping their cute faces intact.
- All-purpose flour, for dusting (just a pinch!) – This is our secret weapon for handling the dough without stickiness. A light sprinkle on your hands and work surface makes shaping a breeze.
- Edible icing flowers or pastel sprinkles (optional, but highly recommended!) – This is where the “flower crown” magic happens. Icing flowers are found in the baking aisle and instantly make these look professional. Substitution Tip: No flowers? Use pastel sprinkles, colored sugar, or even a few mini chocolate chips for eyes and a nose for a different kind of cute!
- Optional: A dash of cinnamon or orange zest – Want to zhuzh up the flavor? Before rolling, you can sprinkle a tiny bit of extra cinnamon on the dough. A little grated orange zest mixed into the icing is also a sunny, spring-like twist!
Step-by-Step: Shaping Your Sweet Bunny Brigade
Follow these simple steps, and in less than 30 minutes, you’ll have a whole basket of baked bunny goodness. I’ve packed each step with my personal tips to guarantee success.
- Preheat & Prep: Fire up your oven to 350°F (or to the temperature specified on your dough package – they’re the experts!). While it warms, line a baking sheet with parchment paper or give it a light coat of non-stick spray. This little step is a game-changer for easy cleanup and no-stick baking. Chef’s Hack: If you don’t have parchment, a silicone baking mat works wonders.
- Unroll & Meet Your Dough: Pop open the can (that satisfying *thwump* never gets old!) and separate the rolls. Place them on a very lightly floured surface. Now, here’s the fun part: gently unroll each cinnamon roll about halfway. You’ll see the beautiful cinnamon swirl. We’re creating the bunny’s head from the larger, coiled portion. My Tip: Don’t unroll it completely—just enough to have a “tail” of dough to work with for the ears.
- Shape the Face & Ears: Take the main, coiled part of the unrolled dough and simply coil it back into a circle, tucking the end underneath. This is your bunny’s face. Now, look at the remaining dough “tail.” Pinch off a small piece (about 1-inch long) and split it in half. Roll each half into a little rope, then form each rope into a loop, pinching the ends together. Place these loop-ears on top of the bunny head, pressing gently to attach. Don’t stress perfection—charming and handmade is the goal! Visual Cue: It should look like a round face with two looped antennae on top.
- Bake to Golden Perfection: Carefully place your shaped bunnies on the prepared baking sheet, giving them about 2 inches of space to puff up. Slide them into your preheated oven and bake for 12-15 minutes, or until they’re a gorgeous, deep golden brown. Chef’s Secret: Ovens vary, so start checking at 10 minutes. The golden color and a firm, springy touch are your best indicators.
- Ice & Create Flower Crowns: The moment they’re out of the oven, spread the included icing over the warm bunnies. The heat will make the icing melt into every nook, creating a delicious glaze. Now, immediately sprinkle on your edible icing flowers or pastel sprinkles to make their festive flower crowns. Do this while the icing is wet so the decorations stick. Step back and admire your adorable edible art!
How to Serve Your Easter Bunnies
Presentation is half the fun! Arrange your bunnies on a festive platter or a wooden board. For a full spring brunch spread, I love pairing them with fresh fruit salad, crispy bacon or savory breakfast sausages to balance the sweetness, and a big pot of coffee or orange juice. They’re the star of the table, so let them shine! Serve them warm for that ultimate soft, gooey experience.
Get Creative: Bunny Roll Variations
Once you’ve mastered the basic bunny, try one of these fun twists!
- Nutty Bunny: Before baking, press a few chopped pecans or walnuts into the dough for a crunchy texture.
- Fruity Bunny: Add a few dried cranberries or raisins to the cinnamon filling before you re-coil the face.
- Citrus Glaze: Mix a teaspoon of fresh lemon or orange zest into the canned icing for a bright, springy flavor.
- Chocolate Chip Bunny: Press mini chocolate chips into the warm icing for eyes and a smile after baking.
- “Carrot Patch” Bunnies: Add a drop of orange food coloring to the icing and a tiny sprinkle of green sprinkles or coconut on top to look like a carrot!
Chef’s Notes: From My Kitchen to Yours
This recipe has become my go-zero-stress Easter staple, and over the years, I’ve learned to embrace the unique personality of each bunny. One year, I was chatting so much with my sister that I accidentally gave a bunny one giant ear and one tiny ear. We named him “Radar” and he was the family favorite! The dough is incredibly forgiving, so if an ear falls off during transfer, just press it back on—it will fuse as it bakes. I also love making a double batch and freezing the un-baked shaped bunnies on a sheet pan, then transferring them to a bag. On Easter morning, I pop them straight from the freezer into the oven (adding a few extra minutes). Fresh, hot bunnies with zero morning effort? That’s my kind of holiday magic.
FAQs & Troubleshooting: Your Questions, Answered
Q: My dough is super sticky and hard to shape. Help!
A: This is common! Simply dust your fingers and the work surface with a tiny amount of all-purpose flour. Don’t go overboard, but just enough to prevent sticking. You can also chill the dough in the can for 15 minutes before starting.
Q: The ears keep falling off my bunnies. What am I doing wrong?
A: Make sure you’re pressing them firmly onto the head. You can also use a tiny dab of water on the ends of the ear loops to act as “glue” before pressing. Once baked, they’ll be firmly attached.
Q: Can I make these ahead of time?
A> Absolutely! For the best texture, I recommend shaping the bunnies the night before, covering the baking sheet tightly with plastic wrap, and refrigerating. In the morning, let them sit at room temp while the oven preheats, then bake as directed. You can also bake, cool completely, and store in an airtight container for 1 day, then briefly warm in the microwave before icing.
Q: I can’t find edible icing flowers. What else can I use?
A> Get creative! Pastel M&Ms, seasonal Easter sprinkles, colored sanding sugar, or even a simple drizzle of extra icing in a zig-zag pattern looks beautiful. The goal is festive and fun!

Easter Bunny Cinnamon Rolls : Cute, Quick, and Crowd-Pleasing
Description
Bring the magic of Easter morning to life with these quick, no-stress Bunny Cinnamon Rolls! Using a can of refrigerated cinnamon roll dough, you can transform simple rolls into cute bunny faces with minimal effort and maximum smiles. Perfect for brunch, a kids’ activity, or a spring dessert centerpiece.
Ingredients
-
1 can (12.4 oz) refrigerated cinnamon roll dough (with icing)
-
Non-stick spray or butter, for the pan
-
All-purpose flour, for dusting
-
Edible icing flowers or pastel sprinkles (optional, for “flower crowns”)
-
Optional flavor boosters: cinnamon, orange or lemon zest, mini chocolate chips
Instructions
1️⃣ Preheat & Prep
-
Preheat oven to 350°F (or per dough package instructions).
-
Line a baking sheet with parchment or lightly grease with non-stick spray.
2️⃣ Unroll & Shape Dough
-
Separate the rolls and unroll each about halfway. The coiled part becomes the bunny’s face.
-
Tuck the end underneath to form a round, smooth head.
3️⃣ Make Ears
-
Pinch off ~1-inch of remaining dough, split in two, roll into ropes, and form loops.
-
Attach looped ears to the top of the face, pressing gently. Don’t worry about perfect symmetry!
4️⃣ Bake
-
Space bunnies ~2 inches apart on the baking sheet.
-
Bake 12–15 minutes until golden brown. Check at 10 minutes for visual cues: deep golden color and springy touch.
5️⃣ Ice & Decorate
-
Spread included icing over warm bunnies.
-
Immediately top with edible flowers or pastel sprinkles for a festive “flower crown.”
Notes
-
Sticky dough? Dust hands and work surface lightly with flour.
-
Falling ears? Press firmly and use a tiny dab of water to “glue” before baking.
-
Make-ahead: Shape bunnies and refrigerate overnight. Bake in the morning. Or freeze unbaked shaped bunnies and bake from frozen, adding a few minutes.
-
Decorations: No flowers? Use pastel sprinkles, colored sugar, mini M&Ms, or simple icing drizzle.
Nutritional Information (Per Bunny, Approximate)
Calories: 180 | Total Fat: 6g | Carbohydrates: 29g | Sugar: 12g | Protein: 2g
Note: Nutrition is estimated based on standard canned dough and will vary by brand.
Final Thoughts
And there you have it—a basketful of edible joy, ready to hop straight onto your Easter table. These Bunny Cinnamon Rolls are proof that holiday magic doesn’t require a chef’s hat or hours of labor. Sometimes, it’s found in a simple tube of dough, a playful twist, and the shared laughter that comes from creating something charming together.
This recipe is more than just a sweet treat; it’s a memory in the making. It’s about the smile on your family’s faces when they see their breakfast smiling back. It’s about turning an ordinary morning into a small, sweet celebration. Whether your bunnies are perfectly symmetrical or delightfully lopsided like my dear “Radar,” they carry the same spirit of love, creativity, and springtime joy.
So this Easter, give yourself the gift of ease. Let the oven do the work while you sip your coffee and enjoy the moment. Embrace the sprinkle of flour on the counter and the gleam of excitement in your loved ones’ eyes. You’re not just baking cinnamon rolls—you’re crafting a warm, delicious tradition that might just become the highlight of your holiday.
From my kitchen (and Chloe’s) to yours, I wish you a morning filled with sweetness, laughter, and the simple, heartwarming magic of homemade happiness.
Happy Easter, and happy baking!