
The Ultimate Double Chocolate Muffin: A Healthier, Happier Treat
Hello, my fellow food lovers! Olivia here, welcoming you back to my cozy kitchen corner. Is there anything in the world that smells more like a warm hug than something chocolatey baking in the oven? I don’t think so. That rich, comforting aroma has a magical way of making a house feel like a home, of turning an ordinary Tuesday into a tiny celebration.
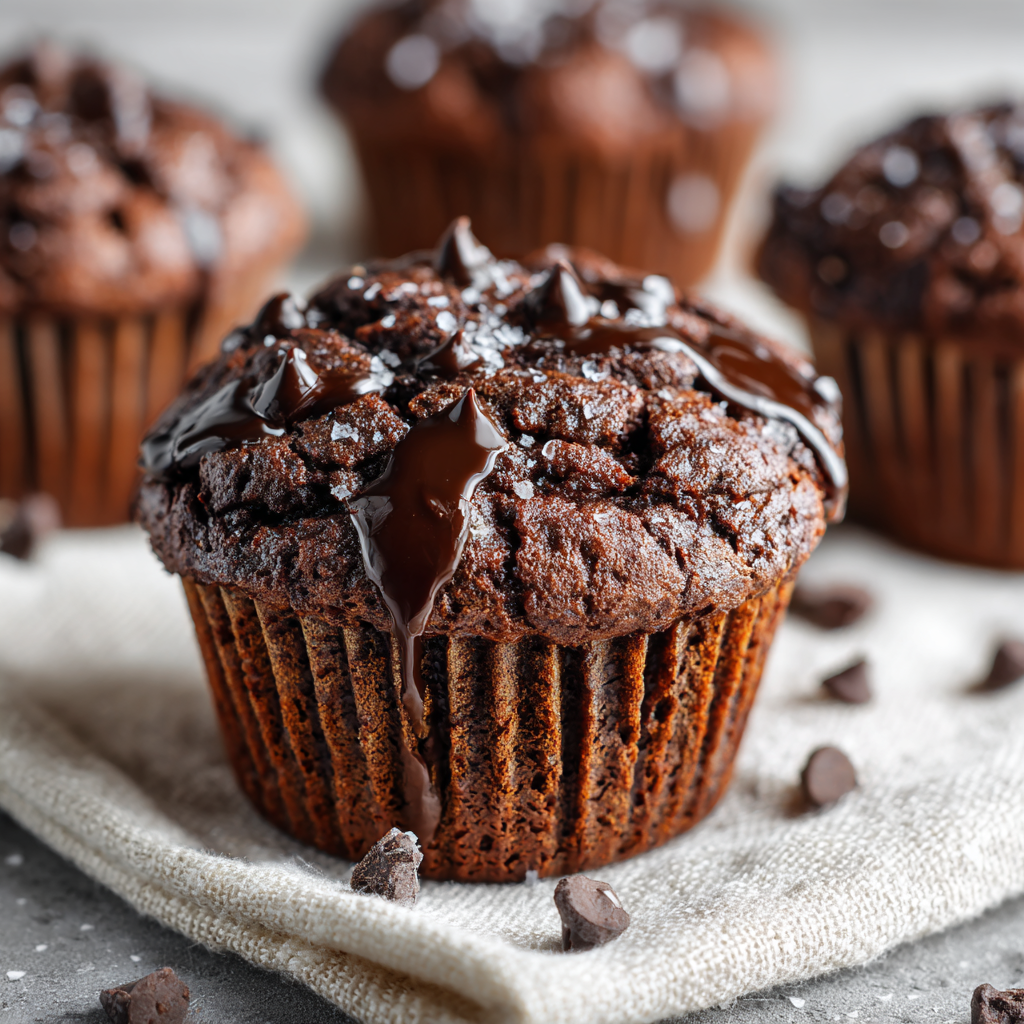
Today, we’re tackling a classic that holds a special place in my heart (and my recipe box): the Double Chocolate Muffin. But this isn’t just any muffin. This is my go-to, feel-good-about-indulging version. We’re talking about a muffin so incredibly rich, fluffy, and decadently chocolatey that you’ll do a double-take when I tell you it’s made with some clever, healthier swaps. We’re using Greek yogurt for a protein-packed, moist crumb, a smart sweetener to keep things light, and a secret weapon—a dash of instant coffee—to make that chocolate flavor sing like a superstar.
Whether you’re a busy parent needing a quick, satisfying breakfast, someone looking for a post-workout treat that actually tastes like a treat, or just a person who believes chocolate is a valid food group (you’re my people), this recipe is for you. It’s simple, forgiving, and designed to make you feel like a rockstar in the kitchen. So, tie on your favorite apron—the messy one with all the character—and let’s bake some joy!
A Chocolate-Fueled Memory
My love for these muffins started not in a fancy bakery, but at my Grandma Jo’s worn Formica kitchen table. Every Sunday after church, she’d have a batch of something warm waiting. Her version was a more traditional, sugar-laden affair, but the spirit was the same. It was our ritual. I’d clamber onto a stool, she’d hand me a muffin still warm from the oven, and we’d sit there, nibbling and chatting about everything and nothing.
I can still see the way the chocolate would smear on my fingers and the crumbly bits would dot the plate. It wasn’t about the recipe itself; it was about the connection. It was the simple, profound act of sharing food made with love. When I started tweaking recipes to fit a more balanced lifestyle, this was one of the first I had to “Olivia-fy.” I wanted to capture that exact same feeling of pure, unadulterated comfort and joy, but in a way I could enjoy any day of the week without the guilt. This recipe is my homage to those Sunday mornings—a little healthier, but every bit as full of heart.
Gathering Your Muffin-Making Magic
Here’s everything you’ll need to create a dozen little pockets of chocolate heaven. Don’t worry if you’re missing an item or two; I’ve included my favorite swaps and chef insights so you can bake with confidence!
- 65g Greek Yogurt (low fat): This is our magic ingredient for incredible moisture and a protein boost! It replaces oil or extra butter, giving the muffins a wonderfully tender crumb. Chef’s Insight: If you only have full-fat, that’s totally fine—it will be even richer! For a dairy-free version, unsweetened applesauce or a plant-based yogurt works beautifully.
- 60g Butter (melted): For that irreplaceable, rich flavor. Melting it first ensures it incorporates evenly into the batter. Substitution Tip: Coconut oil (refined if you don’t want a coconut taste) is a great one-to-one swap here.
- 250 ml Skim Milk & 1 tbsp White Vinegar: Together, these create a fantastic homemade buttermilk substitute! The acid from the vinegar reacts with the baking soda, giving our muffins a fantastic lift and a light, fluffy texture. Chef’s Insight: No skim milk? Any milk you have on hand will work perfectly.
- 2 Large Eggs: Our trusty binders, giving the muffins structure and stability.
- 2 tsp Vanilla Extract: The ultimate flavor enhancer. It makes the chocolate taste more, well, chocolatey! Always use pure vanilla if you can.
- 2 tsp Instant Coffee: Wait, don’t skip this! I promise you won’t taste coffee. This is my favorite chef hack for amplifying the depth of chocolate flavor. It’s like turning up the volume on your favorite song.
- 30g Unsweetened Cocoa Powder: The foundation of our chocolate flavor. I use a natural, unsweetened cocoa powder for the best results.
- 240g All-Purpose Flour: The backbone of our muffin. For a gluten-free version, a 1:1 gluten-free flour blend works wonderfully.
- 1 tsp Baking Powder & 1/2 tsp Baking Soda: Our dynamic leavening duo! The baking soda specifically reacts with our “buttermilk” to create those beautiful air pockets.
- Pinch of Salt: Crucial for balancing the sweetness and making all the flavors pop.
- 90g Stevia or Preferred Sweetener: I use a stevia blend that measures cup-for-cup like sugar. Feel free to use the same amount of coconut sugar, regular sugar, or your favorite granulated sweetener.
- 60g Sugar-Free Chocolate Chips: Because double chocolate means double the fun! Using sugar-free keeps the overall sugar count low, but regular semi-sweet chips are a delicious alternative.
Let’s Get Baking: Your Step-by-Step Guide to Muffin Perfection
Ready to see some magic happen? Follow these steps, and you’ll be pulling the most gorgeous, domed, chocolatey muffins out of your oven in no time. I’ve sprinkled in all my best tips to ensure your success!
- Preheat and Prep. First things first, get that oven roaring hot to 450°F (232°C). This initial high heat is the secret to getting a beautiful, domed top on your muffins! While it’s heating, line your muffin tin with paper liners or give it a very light greasing. Chef’s Hack: If you want easy removal, I love using these parchment paper liners—they never stick!
- Make Your “Buttermilk.” In a small bowl or liquid measuring cup, combine your skim milk and white vinegar. Give it a quick stir and then let it sit for about 5 minutes. You’ll see it start to thicken and curdle slightly—that’s exactly what we want! This simple step adds so much tenderness.
- Combine the Wet Team. In a large mixing bowl, grab a whisk and get to work on the eggs, Greek yogurt, vanilla extract, and melted butter. Whisk it until it’s completely smooth and homogenous. You’re building the base of your batter here, so a little arm workout is good for you! Chef’s Tip: Make sure your melted butter has cooled slightly so it doesn’t accidentally cook the eggs when you mix it in.
- Bring the Team Together. Pour your newly created “buttermilk” and your sweetener of choice into the wet ingredient bowl. Whisk it all together until the sweetener has mostly dissolved. Don’t worry if it looks a little split—it will all come together in the end.
- Whisk the Dry Crew. In a separate, medium-sized bowl, add your flour, cocoa powder, instant coffee, baking powder, baking soda, and that all-important pinch of salt. Whisk them together thoroughly. Chef’s Insight: This isn’t just mixing; you’re aerating the dry ingredients and ensuring the leavening agents are evenly distributed, which prevents any bitter pockets of baking soda.
- The Grand Merger (Don’t Overmix!). This is the most critical step! Add the dry ingredients to the wet ingredients. Now, put down that whisk and pick up a spatula. Gently fold the mixture together. You want to mix until the flour streaks have *just* disappeared. A few lumps are totally fine—I promise! Overmixing is the enemy of a tender, fluffy muffin, as it develops the gluten and can make them tough.
- Fold in the Chocolate Chips. Once your batter is just combined, sprinkle in your chocolate chips and give it just 2-3 more folds to distribute them evenly.
- Divide and Conquer. Using a spoon or a trigger-release ice cream scoop (my absolute favorite tool for this job!), divide the batter evenly among the 12 muffin cups. I like to fill them almost to the top for a nice, big muffin top.
- The Two-Temperature Bake. Place the muffin tin in the preheated 450°F oven and set your timer for 5 minutes. This initial blast of high heat gives the muffins a powerful rise. Then, without opening the oven door (this is key to not letting the heat escape!), reduce the temperature to 375°F (190°C). Bake for another 15 minutes. They’re done when a toothpick inserted into the center comes out with a few moist crumbs attached, but not wet batter.
- The Cool Down. Let the muffins cool in the hot pan for 5 minutes. This allows them to set up so they don’t fall apart when you take them out. Then, carefully transfer them to a wire rack to cool completely. I know it’s hard, but try to let them cool a bit before diving in—the flavor really settles in!
How to Serve These Chocolatey Wonders
Honestly, these muffins are glorious all on their own, still slightly warm from the oven. But if you want to make them extra special, here are a few of my favorite ways to serve them. For a simple breakfast, I’ll just grab one with my coffee. For a more decadent dessert, I love warming one up for 15 seconds and topping it with a dollop of Greek yogurt whipped with a touch of vanilla, or a drizzle of melted peanut butter. Serving them at a brunch? Place them on a beautiful cake stand—they look so impressive and welcoming!
Get Creative! Fun Flavor Twists
Once you’ve mastered the base recipe, the fun really begins! Here are a few ways to mix things up:
- Chocolate Orange Bliss: Add the zest of one large orange to the wet ingredients. The combination is a classic for a reason—it’s absolutely divine!
- Mint Chocolate Chip: Swap the vanilla extract for 1 tsp of peppermint extract. It’s like a cool, refreshing dessert in muffin form.
- Peanut Butter Lover’s: Swirl 1/2 cup of creamy peanut butter into the batter right before portioning it out. Or, press a few peanut butter chips in with the chocolate chips.
- Double Berry Chocolate: Fold in 1/2 cup of frozen raspberries or chopped strawberries along with the chocolate chips. The tart berries cut through the richness perfectly.
- Fully Vegan: Use plant-based yogurt, a flax egg, vegan butter, and your favorite plant-based milk. It works like a charm!
Olivia’s Chef’s Notes & Kitchen Confessions
This recipe has been a living, evolving thing in my kitchen for years. The instant coffee tip was a complete accident—I once grabbed the wrong jar while making my morning cup and thought, “Well, let’s see what happens.” Best kitchen mistake ever! My husband, who is my official taste-tester, couldn’t believe how much more chocolatey they tasted.
I also have a funny confession: I am the world’s messiest muffin batter divider. No matter how many tools I use, I always end up with batter on my nose. It’s part of the charm, I think! Over time, I’ve learned to embrace the imperfections. If your muffins aren’t perfectly domed, or if one has more chips than the other, it just means they’re homemade with love. And honestly, that’s what makes them taste the best.
Your Muffin Questions, Answered!
I’ve gotten so many wonderful questions about this recipe over the years. Here are the most common ones to help you troubleshoot!
Q: My muffins didn’t dome. What went wrong?
A: The dome is all about that initial high heat! Make sure your oven is fully preheated to 450°F before the muffins go in. Also, resist the urge to open the oven door during the first part of the baking process. If your leavening agents (baking powder/soda) are old, they may have lost their potency, which can also lead to flat muffins. It’s a good idea to test them every few months.
Q: The batter seems really thick. Is that normal?
A: Yes! This is a thick batter, and that’s intentional. A thicker batter helps create those beautiful, tall muffin tops and a fluffy interior. If you find it’s too thick to work with, you can add one extra tablespoon of milk to loosen it up slightly.
Q: Can I make these as mini muffins or a loaf?
A: Absolutely! For mini muffins, reduce the initial bake time to 3 minutes at 450°F, then 7-9 minutes at 375°F. For a loaf, bake at 350°F (175°C) for 50-60 minutes, but note that the texture will be more cake-like. Always use the toothpick test to check for doneness.
Q: How should I store these, and can I freeze them?
A> These muffins freeze like a dream! Let them cool completely, then store them in a freezer-safe bag or container for up to 3 months. To enjoy, just thaw at room temperature or pop one in the microwave for 20-30 seconds. For short-term storage, an airtight container at room temperature for 2-3 days is perfect.

Double Chocolate Muffins
Description
Say hello to The Ultimate Double Chocolate Muffins—a bakery-style treat with a wholesome twist! Rich, fluffy, and bursting with chocolatey goodness, these muffins taste indulgent but are secretly made with better-for-you ingredients like Greek yogurt, stevia, and a touch of instant coffee to make that cocoa flavor sing. Perfect for breakfast, dessert, or a snack that feels like a hug in muffin form, they’ll fill your kitchen with the most irresistible aroma and your heart with pure joy. One bite and you’ll see: healthy baking never tasted this good.
Ingredients
-
65g Greek yogurt (low-fat or full-fat)
-
60g melted butter (or coconut oil)
-
250ml skim milk + 1 tbsp white vinegar (homemade buttermilk)
-
2 large eggs
-
2 tsp vanilla extract
-
2 tsp instant coffee
-
30g unsweetened cocoa powder
-
240g all-purpose flour (or 1:1 gluten-free blend)
-
1 tsp baking powder + ½ tsp baking soda
-
Pinch of salt
-
90g stevia or preferred granulated sweetener
-
60g sugar-free chocolate chips
Instructions
-
Preheat & Prep: Heat oven to 450°F (232°C). Line a 12-cup muffin tin.
-
Make Buttermilk: Stir vinegar into milk and let sit 5 minutes until slightly thickened.
-
Mix Wet Ingredients: Whisk together yogurt, melted butter, eggs, vanilla, and coffee until smooth. Add sweetener and buttermilk; whisk again.
-
Combine Dry Ingredients: In another bowl, mix flour, cocoa, baking powder, baking soda, and salt.
-
Fold Gently: Add dry to wet ingredients, folding just until combined. Don’t overmix!
-
Add Chocolate Chips: Gently fold in chips.
-
Bake: Divide batter among cups (almost full). Bake 5 min at 450°F, then lower to 375°F (190°C) and bake 15 more minutes.
-
Cool & Enjoy: Let cool 5 min before transferring to a rack.
Notes
-
Chocolate Orange: Add zest of 1 orange to the batter.
-
Mint Magic: Swap vanilla for 1 tsp peppermint extract.
-
Berry Burst: Fold in ½ cup raspberries or strawberries.
-
Peanut Butter Dream: Swirl ½ cup peanut butter into the batter before baking.
Nutrition
- Calories: 165 cal Per Slice
- Sugar: 3g
- Fat: 7g
- Carbohydrates: 18g
- Protein: 6.5g
Nutritional Information (Per Muffin)
Please note: This is an estimate and will vary based on the specific brands of ingredients you use.
- Calories: 165
- Protein: 6.5g
- Fat: 7g
- Carbohydrates: 18g
- Sugar: 3g (using sugar-free chips and stevia)
- Fiber: 2g
Final Thoughts: A Batch of Comfort, Baked Just for You
As the last muffin finds its place on the cooling rack and the warm, chocolate-scented air begins to settle, I hope you feel a deep sense of accomplishment and anticipation. You haven’t just baked a batch of muffins; you’ve created a dozen little promises of joy.
This recipe is more than a list of ingredients and steps; it’s an invitation to savor life’s simple pleasures without compromise. It’s proof that a healthier choice doesn’t have to mean sacrificing flavor or that warm, comforting feeling we crave. With each bite—so moist, so deeply chocolatey—you’re enjoying a treat that loves you back, fueling your body and soul.
Whether this muffin becomes your new quick breakfast hero, a post-workout reward, or the centerpiece of your own cozy kitchen moments, I hope it brings you as much happiness as it has brought me and my family. It carries the spirit of my Grandma Jo’s table into our modern lives, a delicious bridge between cherished tradition and mindful living.
So, go on, pour yourself a cup of coffee or tea, break open that steaming muffin, and savor the moment. You’ve earned it.
Happy Baking!


