

Crispy Pizza Chips: Your 15-Minute Ticket to Snack Paradise
Hey there, friend! Welcome back to my kitchen. Is it just me, or is there something magical about that moment when a snack craving hits? You know the one. It’s not quite dinner time, but your stomach is staging a polite rebellion. The popcorn seems a little…meh. The chips in the pantry are whispering, but not shouting. You want something with pizzazz, something that feels like a treat but doesn’t require a culinary degree or an hour of prep.
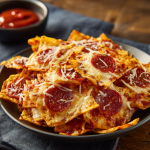
Well, pull up a stool, because I have the absolute perfect solution, and it’s sitting in your fridge and pantry right now. Today, we’re turning the humble tortilla into a crunchy, cheesy, flavor-exploding masterpiece: Crispy Pizza Chips. This isn’t just a recipe; it’s a 15-minute snack adventure. We’re talking golden, crispy vessels loaded with gooey mozzarella, zesty sauce, and all your favorite pizza toppings, baked to bubbly perfection. They’re perfect for game day crowds, last-minute movie nights, or just treating yourself after a long day. So, tie on that (probably messy) apron with me, and let’s create some instant joy!
A Slice of Nostalgia: Where This Recipe Was Born
This recipe has its roots in two of my favorite things: childhood nostalgia and kitchen improvisation. Growing up, Friday nights were sacred. They were for homemade pizza—the kind where my dad would stretch the dough, my mom would artfully arrange the toppings, and my sister and I would fight over who got to sprinkle the extra cheese. The smell of baking pizza is literally the scent of happiness for me.
But as an adult, sometimes you want that hit of pizza flavor without the commitment of making dough. One desperate, snack-less afternoon, staring at a pack of tortillas and some leftover marinara, I had a “what if?” moment. What if I treated a tortilla like a blank, crispy canvas? I cut, sauced, cheesed, and baked… and what emerged from the oven was a revelation. They were better than I imagined—craveably crunchy, delightfully messy, and packed with all that familiar, cozy pizza flavor. It was like capturing the soul of my family’s Friday nights in a bite-sized, 15-minute crunch. Now, it’s my go-to secret weapon for instant satisfaction, and I’m so thrilled to share it with you.
Your Flavor Toolkit: What You’ll Need
Grab these simple ingredients, and let’s talk about why each one matters and how you can make it your own!
- 4 Corn or Flour Tortillas: This is our crispy foundation! Corn tortillas give a heartier, more rustic chip with a distinct corn flavor. Flour tortillas bake up a bit lighter and flakier, almost like a thin-crust pizza. I love both—use what you have! For extra sturdiness with lots of toppings, go flour. For a gluten-free, robust bite, go corn.
- 1 Cup Thick Pizza or Marinara Sauce: The flavor anchor! The key word here is THICK. A watery sauce will make your chips soggy. I use a good-quality jarred pizza sauce or a chunky, slow-simmered marinara. Chef’s Hack: If your sauce is on the thinner side, simmer it in a pan for 5-10 minutes to reduce and concentrate the flavor and texture.
- 1 Cup Shredded Mozzarella: The glorious, melty glue! Pre-shredded bags are convenient, but for the best melt, buy a block of low-moisture mozzarella and shred it yourself. The anti-caking agents in pre-shredded cheese can sometimes inhibit that perfect ooze. Feel free to mix in other cheeses like provolone for tang, cheddar for sharpness, or a sprinkle of Parmesan for a salty, umami kick.
- 1 Cup Toppings of Choice: This is your playground! We’re using about a cup total. Think:
- Pepperoni: Classic! For extra crisp, chop it into small bits.
- Bell Peppers or Onions: Chop them finely so they cook quickly.
- Black Olives or Jalapeños: For briny or spicy pops of flavor.
- Cooked Italian Sausage or Ham: Fantastic for a heartier chip.
- Mushrooms: Slice them super thin!
- 1 tsp Italian Herbs (Oregano/Basil): The aromatic soul. Dried oregano is my MVP here—it wakes up beautifully in the oven’s heat. If you have fresh basil, tear it over the chips after baking for a vibrant finish.
- 1 tsp Garlic Powder: Our flavor booster. It distributes evenly and gives that “what is that delicious taste?” background note. Granulated garlic works too!
- ½ tsp Crushed Red Pepper Flakes (Optional): The friendly fire. I always add these because I love a little heat, but it’s totally optional for spice-sensitive folks.
Let’s Get Crispy: Your Step-by-Step Guide
Ready? This is where the magic happens, fast! Follow these steps for guaranteed chip perfection.
- Preheat & Prep: Fire up your oven to 400°F (200°C). This high heat is the secret to maximum crispiness without burning the cheese. While it heats, line a large baking sheet with parchment paper. No parchment? A light spray of cooking oil will work, but parchment is the MVP for easy cleanup and preventing any sticky situations.
- Shape Your Chips: Grab your tortillas. Using a pizza cutter or sharp knife, slice them into triangles (like a pizza!) or into squares for a fun, rustic look. Don’t worry about perfection—this is homemade charm! Pro Tip: Stack 2 tortillas at a time to cut them all in half the work.
- Arrange for Success: Lay your tortilla pieces out on the prepared baking sheet in a single layer. This is non-negotiable! If they’re overlapping, they’ll steam instead of crisp up. Give them a little breathing room. You might need two sheets or to bake in batches.
- Sauce with a Light Hand: Using a spoon, spread a thin layer of your thick sauce over each chip. Think of it as painting a canvas—you want coverage, but you don’t want to glob it on. Too much sauce = a soggy chip. A little goes a long way here to carry the flavor.
- The Topping Tango: Now for the fun part! Sprinkle a generous amount of shredded cheese over each sauced chip. This cheesy blanket will melt and hold everything together. Then, artfully scatter your chosen toppings. Remember, less is more per chip—you want a bit of everything in each bite, not a mountain that will slide off.
- Season to Shine: Finish by sprinkling the Italian herbs, garlic powder, and optional red pepper flakes over the top. This simple step transforms them from “cheesy chips” to “PIZZA chips.”
- Bake to Golden Perfection: Slide the baking sheet into your hot oven. Bake for 10-12 minutes, but keep an eye on them starting at 9 minutes. You’re looking for the cheese to be fully melted and bubbly, and the edges of the tortillas to turn a deep, golden brown. The smell will be incredible!
- The Crucial Cool Down: This might be the hardest step! Let the chips cool on the baking sheet for 3-5 minutes before diving in. This allows the cheese to set slightly and the tortilla to finish crisping up as it cools. Trust me, it’s worth the wait for the perfect crunch.
How to Serve & Savor
Presentation is part of the fun! Slide the whole parchment paper onto a big wooden board or platter for a casual, shareable feel. Pile them high and watch them disappear. For dipping, I love serving a little side bowl of extra warmed marinara sauce or a cool, creamy ranch dressing for dipping. They’re perfect with a cold beer, a glass of fizzy soda, or just your own two hands and a big smile.
Make It Your Own: Flavor Twists & Swaps
The beauty of this recipe is its versatility! Here are a few ways to switch it up:
- BBQ Chicken: Swap pizza sauce for BBQ sauce, use a mozzarella-cheddar blend, and top with finely chopped cooked chicken and red onion.
- Veggie Supreme: Load up with finely chopped mushrooms, bell peppers, red onion, black olives, and spinach. A sprinkle of feta cheese at the end is divine.
- Breakfast Pizza Chips: Use a light schmear of garlic-infused olive oil instead of sauce. Top with cheese, crumbled cooked sausage, and a few dots of ricotta. After baking, a drizzle of hot honey is amazing.
- Spicy Pepperoni & Jalapeño: Use pepperoni slices, fresh jalapeño rounds, and mix some smoked paprika into your garlic powder seasoning.
- Dairy-Free/Deluxe: Use your favorite vegan mozzarella shreds and vegan pepperoni. The flavor from the sauce and seasonings still makes these irresistible!
Olivia’s Kitchen Notes
This recipe has seen many iterations in my kitchen! I’ve learned that the type of tortilla really changes the game—my family is fiercely divided between Team Corn and Team Flour. I’ve also been known to get… overly ambitious with toppings. One time, I added too many juicy fresh tomatoes and learned a valuable lesson about moisture control the hard way (soggy chips, but still tasty!). Now I stick to drier or pre-cooked toppings. These chips also have a funny way of bringing people into the kitchen. The second that cheesy, garlicky aroma hits the air, I suddenly have “helpers” appearing, ready for quality control. It’s my favorite kind of chaos.
Your Questions, Answered!
Q: My chips turned out a little soft/soggy. What happened?
A: The usual culprits are too much sauce or overly wet toppings (like fresh tomatoes or mushrooms that release a lot of water). Ensure your sauce is thick, use a light hand, and pat any wet veggies dry before adding. Also, make sure they’re in a single layer and not overcrowded on the pan, and let them cool completely on the sheet—they crisp up as they cool!
Q: Can I make these ahead of time?
A: They are absolutely best served fresh and warm. However, you can do the prep work ahead! Cut the tortillas, shred the cheese, and prep your toppings. Store them separately in the fridge, then assemble and bake when you’re ready. It cuts the active time down to about 5 minutes!
Q: Can I use pita bread or naan instead of tortillas?
A> Absolutely! Pita or naan would make a delicious, slightly thicker and chewier “chip.” Just cut them into smaller pieces, adjust the baking time slightly (maybe add 1-2 minutes), and keep an eye on them.
Q: How do I store leftovers?
A> While they’re best fresh, you can store cooled leftovers in an airtight container at room temperature for a day. They will lose some crispness. To re-crisp, pop them on a baking sheet in a 350°F oven for 3-5 minutes. Avoid the microwave, as it will make them chewy.
Crispy Pizza Chips : The Ultimate 15-Minute Snack Adventure
Description
These 15-minute Crispy Pizza Chips are the ultimate snack! Crunchy tortilla triangles topped with melty mozzarella, zesty sauce, and your favorite pizza toppings. Perfect for movie nights, game day, or anytime you need a fast, flavorful treat.
Ingredients
Base:
-
4 corn or flour tortillas
-
1 cup thick pizza or marinara sauce
-
1 cup shredded mozzarella cheese
-
1 cup toppings of choice (pepperoni, cooked sausage, veggies, olives, etc.)
Seasoning:
-
1 tsp Italian herbs (oregano/basil)
-
1 tsp garlic powder
-
½ tsp crushed red pepper flakes (optional)
Equipment:
-
Baking sheet
-
Parchment paper or cooking spray
Tips:
-
Use thick sauce to prevent soggy chips.
-
Pre-shred cheese for better melt.
-
Arrange tortilla pieces in a single layer for crispiness.
Instructions
-
Preheat Oven: 400°F (200°C). Line a baking sheet with parchment or lightly oil it.
-
Slice Tortillas: Cut tortillas into triangles or squares.
-
Arrange: Place tortilla pieces in a single layer on the sheet.
-
Sauce & Toppings: Spread a thin layer of sauce on each chip. Top with cheese, your choice of toppings, and seasonings.
-
Bake: 10–12 minutes until cheese is melted, bubbly, and tortilla edges are golden. Watch carefully starting at 9 min.
-
Cool: Let chips cool 3–5 min on the sheet to crisp up before serving.
Notes
-
Prep ahead: cut tortillas, shred cheese, prep toppings separately. Assemble and bake in ~5 min.
-
Leftovers: store in airtight container at room temp up to 1 day. Re-crisp in 350°F oven for 3–5 min. Avoid microwave.
Nutritional Info (Per Serving, 1 of 4)
Calories: 150 | Carbohydrates: 20g | Protein: 5g | Fat: 7g | Sodium: 300mg
Note: This is a rough estimate based on using flour tortillas, part-skim mozzarella, and light sauce. Values will vary significantly with your choice of toppings and ingredients.
Final Thoughts
So there you have it—your ticket from snack-time slump to pure, crispy joy in just 15 minutes. These Crispy Pizza Chips are more than a recipe; they’re a reminder that the best moments often come from simple, playful cooking. They capture the heart of pizza—the gooey cheese, the tangy sauce, the savory toppings—and deliver it in a crunchy, dippable, totally addictive form.
Whether you stick with the classic pepperoni or venture into BBQ chicken or veggie supreme territory, these chips are a celebration of flavor and convenience. They’re proof that you don’t need fancy ingredients or hours in the kitchen to create something truly special. All you need is a tortilla, a little creativity, and the willingness to treat yourself.
I hope these chips bring as much fun and satisfaction to your kitchen as they have to mine. They’ve saved countless snack emergencies, turned ordinary nights into mini celebrations, and always—without fail—drawn a crowd the moment that cheesy, garlicky aroma fills the air.
Now, I’d love to hear from you! Did you go classic or try a wild twist? What’s your ultimate topping combo? Tag me on social or leave a comment—I love seeing your creations.
Until next time, keep your pantry stocked, your oven hot, and never underestimate the power of a good snack.
Happy crunching!
With love,
Olivia


