

The Ultimate Party Bite: Crispy, Cheesy, and Irresistible!
Hello, my friend, and welcome to the kitchen! Is there anything in the world more comforting than a big, steaming bowl of mac and cheese? It’s a hug in a bowl, a taste of pure, unadulterated joy. But what if I told you we could take that cozy feeling and turn it into the most epic, shareable, downright addictive party snack you’ve ever tasted? Get ready, because these Crispy Mac & Cheese Bites are about to become your new secret weapon.
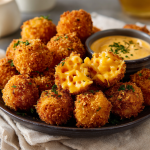
Imagine this: a golden, shatteringly crisp exterior that gives way to a perfectly creamy, ultra-cheesy center. They’re warm, satisfying, and utterly impossible to eat just one. Whether you’re hosting the big game day gathering, need a show-stopping appetizer for your next potluck, or just want to treat yourself to something gloriously fun, these little bites deliver big on flavor and wow-factor.
The best part? They’re surprisingly simple to make. We’re using a from-scratch cheese sauce that comes together in minutes, and the method—a quick chill and a triple coating—ensures every single bite holds its perfect shape. You can go the classic deep-fried route for that ultimate fair-food crunch, or pop them in the air fryer for a lighter version that’s still incredibly delicious. So, tie on your favorite apron (the messy one with all the stories), and let’s create some magic together!
A Messy Apron and a Lifetime of Mac & Cheese Love
My love affair with mac and cheese started in my grandma’s kitchen. She wasn’t a fancy cook, but she was a brilliant one. Her mac and cheese was a legendary affair at our family reunions—a colossal pan baked until the top was bronzed and bubbling, with that one perfect corner piece everyone secretly fought over. I’d stand on a stool next to her, “helping” by slowly sprinkling in the shredded cheese, and she’d always let me have the first taste from the spoon. It was our ritual.
The idea for these bites actually came from a happy kitchen accident years later. I’d made a huge pot of stovetop mac and cheese for a cozy night in, but my eyes were bigger than my stomach, and I had a whole lot of leftovers. Not one to let good food go to waste, I scooped the cold mac and cheese into little mounds, breaded them, and fried them up for a quick lunch. The first bite was a revelation! It was all the nostalgic flavor of my grandma’s recipe, but transformed into this fun, handheld, perfectly portioned delight. It was a messy, cheesy, glorious moment that I just knew I had to perfect and share with all of you.
Gathering Your Cheesy Arsenal
Here’s everything you’ll need to create these little bites of heaven. I’ve included some of my favorite chef insights and substitutions so you can make this recipe your own!
- 1 lb elbow macaroni – The classic choice! Its small, tubular shape holds the cheese sauce beautifully. Chef’s Insight: Be sure to cook it just to al dente—it will continue to cook a bit in the sauce and again when we fry, so we don’t want it mushy.
- ¼ cup unsalted butter – The rich, flavorful base for our roux. Using unsalted lets us control the seasoning perfectly.
- ¼ cup + 1 cup all-purpose flour – The first ¼ cup is for the roux (which thickens our sauce), and the extra cup is for our coating station. Substitution Tip: For a gluten-free version, use a 1:1 GF flour blend for both the roux and the coating.
- ½ tsp ground black pepper – A must for cutting through the richness of the cheese.
- 1 tsp fine sea salt – Essential for enhancing all the flavors. If you’re using table salt, start with ¾ tsp as it’s more potent.
- ½ cup whole milk – This creates our luscious sauce. Chef’s Insight: Whole milk gives the best creamy texture, but 2% will work in a pinch. Avoid skim milk, as the sauce can become thin.
- 3 cups shredded sharp cheddar cheese – The star of the show! I highly recommend shredding your own cheese from a block. Pre-shredded cheese is coated in anti-caking agents that can make your sauce grainy and less smooth.
- 2 large eggs, beaten – Our “glue” that helps the breadcrumbs stick.
- 2 cups Panko breadcrumbs – The secret to that incredible, ultra-crispy, shattering crust! Panko is lighter and flakier than traditional breadcrumbs. Substitution Tip: For a different flavor, try mixing in some grated Parmesan cheese with the Panko.
- Oil for frying – Canola, vegetable, or peanut oil are all great, neutral-flavored options with a high smoke point.
Let’s Get Cooking: Building the Bites, Step-by-Step
Ready to roll up your sleeves? Follow these steps, and you’ll be a mac and cheese bite master in no time. I’ve packed each step with my best tips and tricks to ensure your success!
Step 1: The Pasta Foundation
Cook your elbow macaroni in a large pot of well-salted boiling water according to the package directions, but aim for al dente. We want a little bite left in the pasta! Once cooked, drain it well but do not rinse. Rinsing washes away the starch that helps the sauce cling to every nook and cranny. Set it aside while you work on the magic sauce.
Step 2: Crafting the Creamy Cheese Sauce
In the same large pot (less dishes to wash—you’re welcome!), melt the butter over medium heat. Once it’s foaming, sprinkle in the ¼ cup of flour and immediately start whisking. Cook this roux for a full minute; you’re toasting the flour to get rid of that raw taste. Now, slowly stream in the milk while whisking constantly. This is the key to a lump-free sauce! Keep whisking until the mixture thickens slightly, about 2-3 minutes. Turn the heat down to low, and now for the fun part: gradually add your shredded cheddar, stirring until it’s completely melted and dreamily smooth. Season with the salt and pepper. Taste it! This is your moment. Adjust the seasoning if needed.
Step 3: The Big Chill (This Step is Non-Negotiable!)
Add the drained pasta back into the pot with your glorious cheese sauce. Stir everything together until every single piece of macaroni is coated in cheesy goodness. Now, here’s the pro move: spread the mac and cheese out onto a baking sheet or large plate to help it cool down much faster. Once it’s cool enough to handle, pop the whole tray into the refrigerator for at least 30 minutes, or until completely cold. This firms up the mixture, making it possible to form into balls without it sticking to your hands like edible glue.
Step 4: Forming and Freezing for Stability
Using a cookie scoop or two tablespoons, portion out the cold mac and cheese. Roll each portion into a tight, compact ball in the palms of your hands. Place them on a parchment-lined baking sheet. Once they’re all rolled, slide the entire tray into the freezer for 15-20 minutes. This short freeze is our second secret weapon—it ensures the bites stay perfectly round and don’t fall apart during the coating and frying process.
Step 5: The Coating Station Trio
Set up your breading assembly line! You’ll need three shallow bowls: one with the 1 cup of flour, one with the beaten eggs, and one with the Panko breadcrumbs. Working with a few bites at a time, roll each one in the flour (this helps the egg adhere), then dip it completely in the beaten egg, and finally, roll it generously in the Panko, pressing gently to make sure the crumbs stick. Place the coated bites back on the baking sheet.
Step 6: The Grand Finale: Frying to Perfection
For Deep Frying: Pour oil into a heavy-bottomed pot or Dutch oven to a depth of about 2-3 inches. Heat it to 350°F (use a thermometer for accuracy!). Carefully lower a few bites into the hot oil using a slotted spoon—don’t overcrowd the pot. Fry for 2-3 minutes, turning occasionally, until they’re a deep, golden brown and gorgeous. Drain on a wire rack set over a baking sheet (this keeps them crispy on all sides).
For Air Frying (My Lighter Go-To): Arrange the bites in a single layer in your air fryer basket, giving them a little space. Spritz or brush them lightly with oil. Air fry at 375°F for 8-10 minutes, flipping halfway through, until they’re golden and hot all the way through.
How to Serve These Golden Gems
Presentation is part of the fun! I love serving these bites piled high on a rustic wooden board or in a beautiful shallow bowl. For dipping, you can’t go wrong with classic marinara sauce or a cool, creamy ranch. But for a real flavor upgrade, try a sriracha mayo (just mix sriracha with mayonnaise to your preferred spice level) or a drizzle of warm buffalo sauce. Scatter some fresh chopped chives or parsley over the top for a pop of color and freshness. Watch them disappear—I guarantee they’ll be the first thing to go!
Get Creative! Flavor Twists & Swaps
Once you’ve mastered the classic, the world is your oyster! Here are a few of my favorite ways to mix things up:
- Bacon & Jalapeño: Fold ½ cup of cooked, crumbled bacon and ¼ cup of finely diced pickled jalapeños into the mac and cheese before chilling.
- Buffalo Chicken: Add 1 cup of shredded cooked chicken tossed in ¼ cup of buffalo sauce to the mix. Serve with blue cheese dressing for dipping.
- Lobster Mac Bites: For a luxurious twist, fold in 1 cup of chopped cooked lobster meat and a pinch of Old Bay seasoning.
- Gluten-Free & Lighter: Use your favorite gluten-free pasta and a 1:1 GF flour blend. For the coating, use gluten-free Panko.
- Three-Cheese Bliss: Swap 1 cup of the cheddar for a mix of Gruyère and Gouda for a more complex, nutty flavor.
Olivia’s Chef’s Notes & Kitchen Confessions
This recipe has truly evolved in my kitchen over the years. The first time I tried it, I was impatient and skipped the chilling step. Let’s just say I ended up with more of a “mac and cheese abstract art sculpture” than neat little bites. It was delicious, but not pretty! That’s how I learned that the chill is non-negotiable—it’s the difference between frustration and flawless, fun cooking.
Another confession: I am a huge advocate for the “make-ahead.” You can completely assemble these bites up through the coating step and freeze them solid on the baking sheet. Once frozen, transfer them to a zip-top bag. Then, you can fry or air fry them straight from the freezer—just add a couple extra minutes to the cooking time. It’s the ultimate hack for stress-free entertaining!
Your Questions, Answered!
Q: My cheese sauce split/got greasy. What happened?
A: This usually happens if the heat is too high when you add the cheese. Cheese hates high, direct heat! Always turn the heat to low before adding it, and stir until it’s just melted. If it does split, a tiny splash of milk or lemon juice and vigorous whisking can sometimes bring it back together.
Q: Can I bake these instead of frying or air frying?
A: You can! Place the coated bites on a greased baking sheet, spray them generously with cooking spray, and bake in a 425°F oven for 15-20 minutes, flipping halfway. They won’t be *quite* as uniformly crispy as the fried versions, but they’ll still be delicious.
Q: My bites are falling apart in the oil! Help!
A> This is almost always a temperature issue. Either the oil isn’t hot enough (causing the bites to soak up oil and disintegrate) or the mac and cheese mixture wasn’t cold enough. Always use a thermometer to ensure your oil is at 350°F, and don’t skimp on that initial chill and the 20-minute freezer time.
Q: How do I store and reheat leftovers?
A> Store any leftover bites in an airtight container in the fridge for up to 3 days. To reheat, the air fryer is your best friend! Pop them in at 375°F for 3-4 minutes until hot and re-crisped. The oven (at 400°F for about 10 minutes) works well too. Avoid the microwave, as it will make them soft.
Crispy Mac & Cheese Bites
Description
Get ready to turn your favorite comfort food into the star of every party! These Crispy Mac & Cheese Bites take everything you love about classic mac and cheese—creamy, cheesy, cozy goodness—and wrap it in a golden, ultra-crispy shell. Each bite is a little pocket of heaven: crunchy outside, molten cheesy inside, and absolutely irresistible. Whether you’re deep-frying for that perfect crunch or air-frying for a lighter twist, these bites are pure joy in snack form. Perfect for game nights, holidays, or anytime you want to wow your guests.
Ingredients
-
1 lb elbow macaroni (cooked al dente)
-
¼ cup unsalted butter
-
¼ cup + 1 cup all-purpose flour (divided)
-
½ cup whole milk
-
3 cups shredded sharp cheddar cheese
-
1 tsp salt
-
½ tsp black pepper
-
2 large eggs (beaten)
-
2 cups Panko breadcrumbs
-
Oil for frying (or spray for air fryer)
Instructions
-
Cook Pasta: Boil macaroni just to al dente. Drain and set aside.
-
Make Cheese Sauce: Melt butter, whisk in ¼ cup flour, cook 1 min. Gradually add milk, whisking until thick. Stir in cheese, salt, and pepper until smooth.
-
Combine & Chill: Mix sauce with pasta. Spread on a tray and chill for 30 min until firm.
-
Form & Freeze: Roll cold mac into balls. Freeze 15–20 min for stability.
-
Coat: Dredge in flour, dip in egg, then roll in Panko.
-
Cook:
-
Fry: Heat oil to 350°F (175°C). Fry 2–3 min until golden.
-
Air Fry: 375°F (190°C) for 8–10 min, flipping halfway.
-
-
Serve Hot: Pair with marinara, ranch, or spicy sriracha mayo!
Notes
Chill time = perfect shape. Don’t skip it!
Mix in bacon, jalapeños, or lobster for extra flair.
Freeze before frying for make-ahead magic.
Nutrition
- Calories: 120 cal Per Bite
- Fat: 8g
- Carbohydrates: 9g
- Protein: 5g
Quick Nutrition Note
Please remember, I’m a home cook, not a dietitian! The nutritional information provided is a rough estimate per bite (based on frying and yielding 24 bites) and can vary greatly based on specific ingredients, portion sizes, and cooking methods. It’s always best to calculate your own based on the exact products you use if you have specific dietary needs.
Final Thoughts: A Legacy of Joy, One Bite at a Time
And there you have it! From a humble, comforting classic to a spectacular party snack, these Crispy Mac & Cheese Bites are more than just a recipe—they’re a testament to the joy of cooking and the magic of a simple, happy accident.
They carry the warmth of my grandma’s kitchen, the fun of a modern party, and the satisfaction of creating something truly special with your own hands. Whether you choose the decadent crunch of deep-frying or the clever ease of the air fryer, you’re not just making an appetizer; you’re creating edible memories. You’re crafting those little moments of shared “Mmmms!” and wide-eyed delight that make gathering with loved ones so precious.
So go forth, get a little messy, and share these golden bites of cheesy bliss. I have a feeling this recipe will find a special place in your own kitchen story, creating new traditions and happy accidents of your own.
Now, tell me—which flavor twist are you most excited to try?
Happy cooking!


