
Creamy Chocolate Hummus: Your New Favorite Healthy Dessert Dip (Ready in 5 Minutes!)
Hey friends, Olivia here! Let’s be real for a second. How many times have you stared into the fridge at 9 PM, craving something decadently chocolatey but also feeling that little nudge of, “Hey, maybe I should be a bit nicer to my body tonight”? You’re torn between a spoonful of straight-up frosting and a sad, plain apple. I’ve been there more times than I can count, usually covered in a light dusting of flour and determination.
Well, what if I told you there’s a magical, delicious middle ground? A dessert that feels like you’re diving into a bowl of brownie batter but is actually packed with plant-based protein and fiber? Enter my hero: Creamy Chocolate Hummus. I know, I know. “Chocolate” and “hummus” in the same sentence might make you do a double-take. But trust me—this isn’t your savory, garlicky lunch spread. This is a smooth, rich, swoon-worthy dessert dip that’s about to revolutionize your snack game.
Imagine the creamiest, most chocolatey dip you can think of. Now imagine it takes just five minutes to make, requires zero baking, and uses simple, wholesome ingredients you probably already have in your pantry. That’s the magic we’re creating today. It’s perfect for dipping strawberries, pretzels, or graham crackers, spreading on toast, or (my personal favorite) eating straight from the spoon with zero shame. It’s kid-friendly, party-perfect, and so good for you that you can enjoy it completely guilt-free. So, tie on your apron (the messy one is fine—that’s where the love is!), and let’s make dessert dreams come true.
The Skeptic’s Guide to Chocolate Hummus: A Kitchen Story
I’ll never forget the first time I served this to my best friend, Maya. We were having one of our classic “girls’ night in” sessions, which always involves a mountain of snacks and a lot of solving the world’s problems. I brought out a bowl of this glossy, dark chocolate hummus surrounded by a rainbow of fruit. She took one look, raised a perfectly sculpted eyebrow, and said, “You’ve finally lost it, Bennett. You put beans in dessert.”
I just smiled and handed her a strawberry. “Try it. For me.” With the skepticism of someone about to eat a mystery cafeteria meal, she dipped. The silence that followed was punctuated only by the sound of her crunching the berry. Then her eyes went wide. “Okay. What is this sorcery?” she mumbled, already reaching for a pretzel rod. Ten minutes later, the bowl was half empty, and she was texting her husband to tell him to “bring more strawberries STAT.” That’s the power of this recipe. It turns skeptics into believers, one delicious dip at a time. It’s now a non-negotiable staple at all our gatherings, and the story never fails to make me laugh. It reminds me that the best kitchen adventures often start with a little bit of weird and a whole lot of delicious.
Your Kitchen Cast: What You’ll Need
Here’s the beautiful part: this recipe is a pantry superhero. No fancy, hard-to-find ingredients here. Let’s break down what goes into this creamy dream and why each one matters.
- 1 (15 oz) can chickpeas, drained and rinsed – The star of the show! Don’t worry, you won’t taste them. They provide an incredibly creamy, protein-packed base. Chef’s Insight: For the absolute smoothest texture, take an extra 30 seconds to pop the skins off the chickpeas by gently pinching them. It’s a game-changer! Canned is perfect for convenience, but if you cook your own from dry, that works too.
- ¼ cup unsweetened cocoa powder – This is where the deep, rich chocolate flavor comes from. Use a good-quality one for the best taste. Chef’s Tip: Don’t sub with hot chocolate mix—it has sugar and other additives that will throw off the flavor and sweetness.
- ¼ cup pure maple syrup – Our natural sweetener. It adds a lovely, subtle caramel note that plays so nicely with chocolate. Substitution Tip: Agave nectar, date syrup, or even honey (if not vegan) work beautifully here. Start with ¼ cup and add more to taste after blending.
- 2 tbsp nut butter – The secret weapon for richness and to help emulsify everything into silkiness. I love tahini for a more neutral, classic hummus background, or almond butter for a slight marzipan note. Peanut butter gives it a “peanut butter cup” vibe! Allergy Alert: Sunflower seed butter is a perfect nut-free swap.
- 2 tbsp plant milk – This is our texture tuner. I use unsweetened almond or oat milk. Chef’s Hack: Start with 2 tbsp, but have more on standby. The amount you need can depend on your chickpeas and nut butter. Add a splash at a time until you hit that perfect, dip-able consistency.
- 1 tsp pure vanilla extract – The flavor enhancer. It rounds out all the other ingredients and makes the chocolate taste even more chocolatey. Never skip the vanilla!
- 1 pinch of salt – Crucial! Salt makes flavors pop. It balances the sweetness and heightens the chocolate. Think of it like in a chocolate chip cookie.
- Optional: 2–3 tbsp mini vegan chocolate chips – For a fun, textural surprise and extra chocolatey pockets. I like mini chips because they distribute better, but regular work too!
Let’s Make Magic: The 5-Minute Method
Ready? This is so easy, you’ll have it memorized after one try. Let’s walk through it step-by-step, with all my favorite kitchen hacks along the way.
Step 1: The Great Rinse. Open your can of chickpeas and dump them into a colander. Give them a really good rinse under cold water. This washes away the starchy liquid (aquafaba) they’re packed in, which can give a beany aftertaste if left on. While you’re rinsing, feel free to do the “skin popping” trick I mentioned—it’s a mini meditation that leads to ultimate creaminess! Shake off the excess water and let them drain for a moment.
Step 2: The Processor Party. Grab your food processor. (A high-speed blender works in a pinch, but you may need to stop and scrape more often). Add all of your ingredients to the bowl: the rinsed chickpeas, cocoa powder, maple syrup, nut butter, plant milk, vanilla, and that all-important pinch of salt. Hold off on the chocolate chips for now—they’re the grand finale.
Step 3: Blend to Bliss. Pop the lid on securely and start blending! Start on low, then ramp up to high. Let it run for a good 60 seconds. Stop, take off the lid, and use a spatula to scrape down the sides and any bits hiding at the bottom. This is the key to a uniformly smooth hummus. Put the lid back on and blend again for another 60-90 seconds. Pause and check. Does it look like the world’s smoothest, most luscious brownie batter? If it seems a little thick or grainy, add one more tablespoon of plant milk and blend again. Repeat until it’s perfectly silky.
Step 4: Taste & Tweak (The Best Part!). This is where you make it yours. Grab a clean spoon and have a taste. Want it sweeter? Add another half tablespoon of maple syrup and blend for 10 seconds. Want it more chocolatey? You can add another teaspoon of cocoa powder (just know it might thicken it up). Need it creamier? Another splash of milk! Adjust until it makes your taste buds sing.
Step 5: The Fun Mix-In. If you’re using the chocolate chips, now’s the time. Transfer the hummus to a mixing bowl and fold them in gently with your spatula. This ensures they stay whole and give you those little bursts of chocolate. If you just pulse them in the processor, they’ll get chopped up.
Step 6: Serve or Savor. You can absolutely dive in right now—it’s delicious at room temperature. But for the best flavor and a slightly thicker texture, I love popping it in an airtight container in the fridge for at least 30 minutes. This lets the flavors really get to know each other and marry into something spectacular.
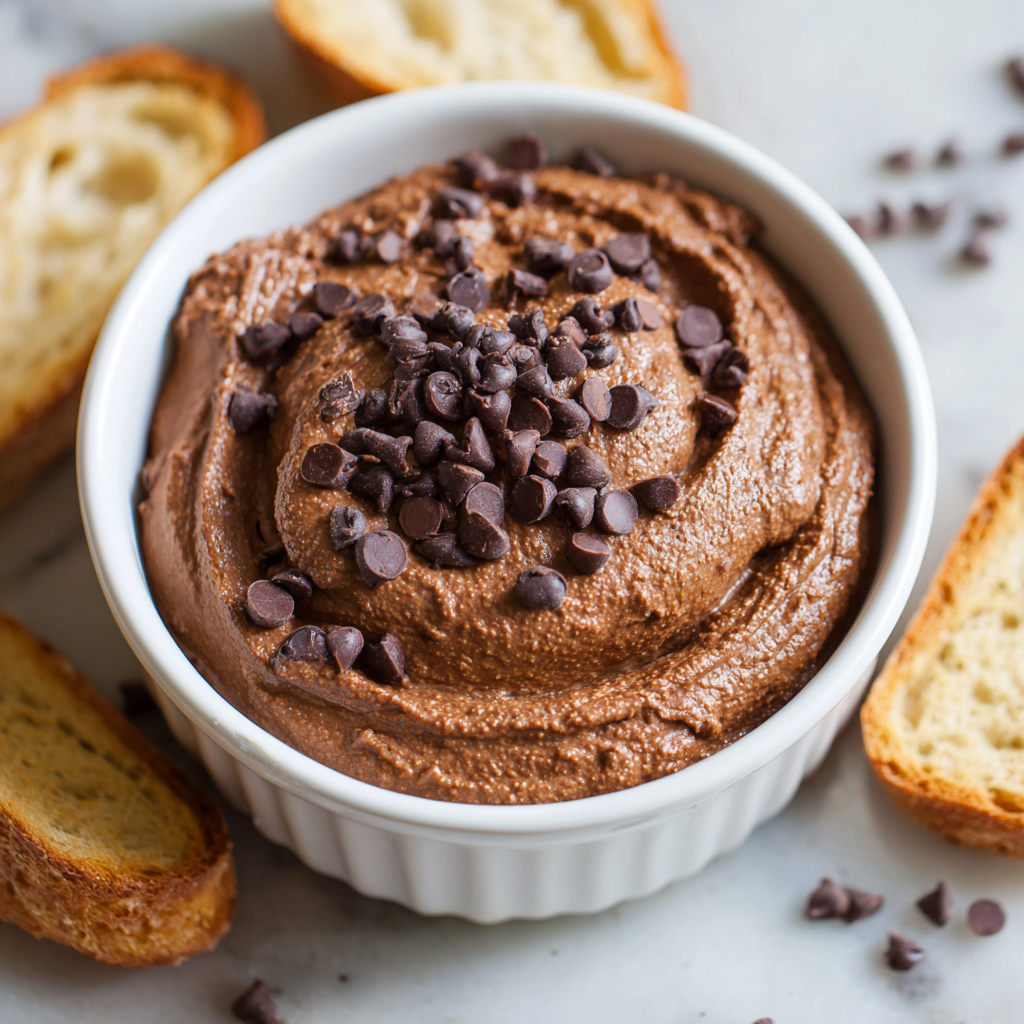
How to Serve & Swoon
Presentation is half the fun! I love serving this in a shallow, beautiful bowl. For a rustic look, use the back of a spoon to make a few decorative swirls on top. A tiny drizzle of extra maple syrup and a sprinkle of flaky sea salt or cacao nibs makes it look like it came from a fancy café. Now, surround it with an array of dippers! My go-to lineup includes: fresh strawberry halves, apple slices, banana coins, pretzel rods or twists, graham crackers, rice cakes, or even shortbread cookies. For a next-level breakfast, spread it thickly on whole-wheat toast or swirl it into your morning oatmeal. The possibilities are endless!
Get Creative: Flavor Twists & Swaps
Once you’ve mastered the basic recipe, the kitchen playground opens up! Here are a few of my favorite riffs:
- Mocha Madness: Add 1-2 teaspoons of instant espresso powder or finely ground coffee to the food processor. It deepens the chocolate flavor incredibly.
- Orange Dream: Add the zest of one small orange and a drop of orange extract along with the vanilla. A classic, elegant chocolate-orange combo.
- Peppermint Patty: Swap the vanilla for ¼-½ teaspoon of peppermint extract. Perfect for the holidays!
- Cookie Dough Delight: After blending, fold in a handful of vegan mini chocolate chips and a tablespoon or two of oat flour or almond flour. It thickens it up to a more authentic “cookie dough” texture.
- Protein Power-Up: Add a scoop of your favorite chocolate or vanilla plant-based protein powder. You may need an extra splash of milk to compensate for the dryness.
Olivia’s Kitchen Notes
This recipe has been on quite a journey in my kitchen! The first version I ever made was… well, let’s just say it had the texture of slightly sweet cement. I learned that the liquid components are everything—don’t be afraid to add that extra milk to get it moving in the processor. Also, I used to skip the salt, thinking “it’s a dessert, why salt?” BIG mistake. That one pinch is the difference between “yum” and “WOW.”
A funny story: My husband, who is a self-proclaimed “savory hummus purist,” once caught me eating this straight from the food processor bowl. He gave me the same side-eye Maya did. I handed him the spatula. He licked it. Then he took the bowl. Moral of the story? Don’t judge a dip by its main ingredient. This one’s a heart-stealer.
Your Questions, Answered!
Q: My hummus is grainy, not smooth. What did I do wrong?
A: Don’t worry! This is usually one of two things. First, your food processor might just need more time. Keep blending, stopping to scrape, and blending again. It can take a few minutes to get perfectly smooth. Second, chickpea skins. If you didn’t peel them, they can contribute to a grainier texture. Next time, try the skin-popping trick, or simply blend for a bit longer—the power of persistence!
Q: Can I make this without a food processor or blender?
A: Honestly, to get that signature creamy-smooth texture, a food processor or high-speed blender is essential. A regular blender might work if you’re patient and scrape constantly. Mashing by hand won’t give you the right consistency—it’ll be more like a chunky chocolate chickpea mash (which… might have its own rustic charm, but it’s not this dip!).
Q: How long does it keep in the fridge?
A> Stored in an airtight container, it stays fresh and delicious for up to 5-7 days. The flavor actually gets better after the first day! You may notice it thickens in the fridge. If it gets too thick for your liking, just stir in a teaspoon of plant milk to loosen it up before serving.
Q: Is it really sweet enough with only ¼ cup of maple syrup?
A> For most adults, yes! The natural sweetness of the maple syrup combined with the rich chocolate creates a perfectly balanced, not-too-sweet dessert. But sweetness is so personal! This is why the “taste and tweak” step is vital. For a kid’s party or a bigger sweet tooth, feel free to add another tablespoon. You’re the boss of your blender!

Creamy Chocolate Hummus : Healthy Dessert Dip in 5 Minutes
Description
Hey friends! If you’ve ever wanted something rich and chocolatey but still light enough to enjoy without guilt, this Creamy Chocolate Hummus is for you. It’s smooth, sweet, and tastes like brownie batter—yet it’s made with simple pantry ingredients and packed with plant-based goodness. Best of all, it comes together in just 5 minutes with no baking required. Perfect for snacking, sharing, or sneaking spoonfuls straight from the bowl.
Ingredients
-
1 (15 oz / 425 g) can chickpeas, drained and rinsed
-
¼ cup unsweetened cocoa powder
-
¼ cup pure maple syrup (or to taste)
-
2 tablespoons nut butter (tahini, almond butter, or peanut butter)
-
2 tablespoons plant milk (almond, oat, or soy), plus more as needed
-
1 teaspoon vanilla extract
-
1 small pinch of salt
-
Optional: 2–3 tablespoons mini chocolate chips
Instructions
-
Rinse the chickpeas well under cold water and drain thoroughly.
-
Add all ingredients (except chocolate chips) to a food processor or high-speed blender.
-
Blend until very smooth, scraping down the sides as needed. If it’s too thick, add 1 tablespoon of plant milk at a time until creamy.
-
Taste and adjust sweetness or cocoa if needed.
-
Stir in chocolate chips if using.
-
Serve immediately, or chill for 30 minutes for a thicker texture.
Notes
-
For extra smooth hummus: Gently remove the skins from the chickpeas before blending.
-
Don’t skip the salt: It enhances the chocolate flavor and balances sweetness.
-
Sweetness is personal: Start with ¼ cup maple syrup and add more if needed.
-
Storage: Keep in an airtight container in the fridge for up to 5–7 days. Stir in a splash of milk if it thickens.
Nutritional Info (A Note from Olivia)
While I’m not a dietitian, I love knowing that what I’m eating fuels my body and my joy. This recipe is a fantastic source of plant-based protein and fiber from the chickpeas, and using natural sweeteners and cocoa powder means you’re avoiding refined sugars and processed ingredients. It’s a treat you can feel genuinely good about. A standard 2-tablespoon serving has approximately: ~100 calories, 3g protein, 14g carbs, 4g fat, and 3g fiber. Remember, this is an estimate—the exact numbers can vary based on your specific ingredients and any adjustments you make!
Final Thoughts
There’s something quietly profound about making cabbage rolls from scratch. In our fast-paced world, taking the time to carefully peel, fill, and roll each bundle is a deliberate act of care—for yourself and for anyone you share them with. This isn’t just cooking; it’s creating edible heirlooms.
These rolls carry the weight of history and the warmth of personal stories, like the ones from my Nana’s kitchen. They teach us patience (yes, even when a leaf tears), reward our effort with incredible flavor, and fill our homes with an aroma that promises comfort. They’re proof that the most satisfying meals often come from humble ingredients treated with respect and a little bit of love.
Whether you’re recreating a family tradition or starting a new one, you’re not just making dinner. You’re crafting an experience—a cozy, hearty, and deeply nourishing centerpiece for the table. So, embrace the process, enjoy the simmering anticipation, and take pride in that first perfect bite. You’ve earned it.
Here’s to the classics. May they always have a place in our hearts and on our tables.
With a full heart and an even fuller baking dish,
Olivia


