The Pie That Steals the Show: Cranberry Cream Cheese Crumb Pie
Hey there, friend! Come on in, grab an apron, and let’s get one thing straight: life is too short for boring desserts. Especially during the holidays. Am I right? I’m talking about that moment when you walk into a gathering, your offering held proudly in your hands, and you just know it’s going to be the star of the table. The one that sparks “oohs” and “aahs,” the one that has people quietly sneaking a second sliver when they think no one is looking. That, my friend, is the magic we’re creating today.
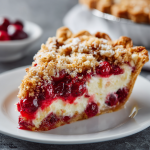
I’m so excited to share with you my all-time favorite holiday showstopper: Cranberry Cream Cheese Crumb Pie. But wait—we’re not just making one. We’re making two. Because one is for sharing, and the other is for, well… let’s call it “quality control.” This pie is a symphony of textures and tastes. We’re talking a flaky, buttery crust, a layer of silky-smooth, tangy cream cheese filling, a vibrant, tart cranberry swirl, and a glorious, golden-brown pecan crumb topping that adds the perfect crunch.
It’s sweet, it’s tangy, it’s creamy, and it’s crisp—all in one unforgettable bite. And because I love you, we’re taking it up a notch with a zesty kiss of orange and the warm, toasty goodness of chopped pecans. This isn’t just a recipe; it’s a memory in the making. So, preheat your oven and let’s create some kitchen magic together!
A Slice of Thanksgiving Memory
This pie has a special place in my heart, and it all goes back to my Great-Aunt Clara. Aunt Clara was a force of nature in the kitchen—all flour-dusted cardigans and a laugh that could be heard over the hum of a dozen mixing bowls. One notoriously chaotic Thanksgiving, when the turkey was taking forever and the potatoes were threatening to boil over, she quietly pulled me aside and handed me a bowl of vibrant red cranberry filling. “Here, Liv,” she whispered with a wink. “The real magic happens on the dessert table.”
We assembled this very pie together, her hands guiding mine as we sprinkled on the crumb topping. She taught me that the best recipes aren’t just about the ingredients; they’re about the stories we bake into them. That year, amidst the chaos, this pie was our calm, creative sanctuary. And when we finally served it, its stunning red-and-white layers and crunchy top became an instant legend in our family. Now, every time I make it, I smell the scent of that busy kitchen and feel Aunt Clara’s joyful spirit right there with me, reminding me that dessert is always a good idea.
Gathering Your Pie-Making Crew (A.K.A. The Ingredients)
Here’s your shopping list! Don’t be intimidated by the layers—each component is simple to make, and I’ve included all my best tips and tricks for each ingredient. This recipe makes two 9-inch pies, perfect for feeding a crowd or stocking your freezer with future joy.
For the Pie Crust
- 2 pre-made pie crusts: Look for the ones you can unroll in the refrigerated section. They’re a fantastic shortcut that saves so much time! Of course, if you have a favorite from-scratch recipe, feel free to use it—you’re the boss of your pie.
For the Creamy Dreamy Layer
- 16 oz (two 8 oz blocks) cream cheese, softened: This is non-negotiable—softened is the key word here! Take it out of the fridge at least an hour before you start. Room temp cream cheese blends into a silky-smooth filling with no lumps. Chef’s Insight: If you forget, you can gently warm it in the microwave for 15-second intervals, but be careful not to melt it!
- 28 oz (two 14 oz cans) sweetened condensed milk: This is our sweetener and the base for that luxuriously thick, creamy texture. It’s the secret to a no-bake-style filling that sets up beautifully.
- ½ cup lemon juice, freshly squeezed: The acid here is crucial! It reacts with the condensed milk and cream cheese to thicken the filling and cut through the sweetness with a bright, tangy punch. Bottled juice works in a pinch, but fresh is always best for flavor.
- Zest of 1 orange: This is our flavor upgrade! The bright, citrusy oils in the zest add a fresh, aromatic dimension that pairs magically with the cranberry. Substitution Tip: No orange? A teaspoon of orange extract works, or just leave it out for a classic version.
For the Tart & Tangy Cranberry Layer
- 2 cans (16 oz each) whole berry cranberry sauce: Using the canned “whole berry” sauce gives us the best texture with little bursts of fruit. It’s a huge time-saver and delivers fantastic flavor. Chef’s Insight: If you only have jellied, it will work, but you’ll lose that lovely berry texture.
- 4 Tbsp cornstarch: Our thickening agent hero! It absorbs the liquid from the cranberry sauce as it bakes, preventing a runny layer and giving us a perfect, sliceable consistency.
- 2 Tbsp light brown sugar: A little extra sweetness to balance the tart cranberries, and the molasses notes in the brown sugar add a lovely depth. Substitution Tip: You can use all granulated sugar if that’s all you have.
- ½ tsp cinnamon (optional): My little secret for a whisper of warm, cozy spice in the background. It’s subtle but so good!
For the Golden, Buttery Crumb Topping
- ½ cup salted butter, melted: Melted butter binds our crumb ingredients and creates those irresistible, craggy clusters. I prefer salted for a hint of savory contrast, but unsalted works fine too.
- ⅔ cup all-purpose flour: The base of our crumble, providing structure.
- 4 Tbsp light brown sugar: For sweetness and that classic, almost caramel-like crumb flavor.
- ½ cup chopped pecans: This is the crunch and depth upgrade! They toast up beautifully in the oven. Substitution Tip: Not a nut fan? Swap for old-fashioned oats for a different kind of crunch, or simply leave them out.
Let’s Build This Masterpiece! (Step-by-Step)
Ready? This is where the fun begins. I’ll walk you through every step, just like I would if we were side-by-side in my kitchen. Let’s do this!
- Preheat and Prep. First things first, get that oven hot and ready! Preheat your oven to 350°F (175°C). Take your two pie crusts and fit them into your 9-inch pie pans. I like to give the edges a little crimp with my fingers or a fork—it makes it look extra pretty and homemade. No need to pre-bake (or blind bake) them; they’ll cook to perfection right along with the filling. Chef’s Hack: Place your pie pans on a large baking sheet lined with foil. This makes them easier to move in and out of the oven and catches any potential bubbly drips!
- Create the Creamy Layer. In a large mixing bowl, add your softened cream cheese. Using a hand mixer or a stand mixer with the paddle attachment, beat it on medium speed until it’s completely smooth and lump-free. This is the most important step for a silky texture—don’t rush it! Now, pour in the sweetened condensed milk and beat again until the two are fully combined and gloriously smooth. Scrape down the sides of the bowl to make sure everything is incorporated. Finally, with the mixer on low, stream in the lemon juice and add the orange zest. The mixture will thicken up slightly right before your eyes—that’s the magic happening! Divide this creamy goodness evenly between your two waiting pie crusts. Use a spatula to smooth the tops.
- Whip Up the Cranberry Layer. Grab a medium bowl—no mixer needed here! Dump in both cans of whole berry cranberry sauce. Add the cornstarch, brown sugar, and cinnamon (if using). Stir it all together with a spoon or spatula until the cornstarch has completely dissolved and everything is well-mixed. Now, carefully spoon this crimson beauty over the cream cheese layer. I like to drop it by spoonfuls and then gently spread it to cover the entire surface. Try not to mix the layers; we want those beautiful, distinct stripes.
- Make the Magical Crumb Topping. In another medium bowl, combine the flour, brown sugar, and chopped pecans. Pour the melted butter over the top. Now, get your hands in there (it’s the best tool!) and mix it together until the butter is fully absorbed and the mixture starts to form small, pebbly clumps. This is your crumb topping! Sprinkle it evenly over the two cranberry-covered pies. Don’t be shy—pile it on!
- Bake to Golden Perfection. Carefully transfer your pies (on that baking sheet, remember?) to the preheated oven. Bake for 55-60 minutes. You’ll know they’re done when the edges of the filling are set and the crumb topping is a deep, golden brown, and your kitchen smells like a holiday dream. The center might still have a very slight jiggle—that’s okay! It will continue to set as it cools. Chef’s Hack: If your crumbs are browning too quickly, you can loosely tent the pies with aluminum foil for the last 15 minutes of baking.
- The Hardest Part: Let It Cool! I know, I know. The temptation to dive in is REAL. But patience is a virtue, especially in pie-making. Remove the pies from the oven and place them on a wire rack to cool completely to room temperature. This will take a few hours. For the cleanest, most picture-perfect slices, I highly recommend chilling them in the refrigerator for at least 4 hours, or even overnight. The filling firms up beautifully, making it a dream to slice.
How to Serve Your Stunning Pie
Presentation is part of the fun! Once your pie is chilled and set, use a sharp, thin-bladed knife to slice it. Wipe the knife clean between cuts for pristine pieces. I love serving this on a simple white plate to let those gorgeous red and white layers pop. A dollop of freshly whipped cream or a small scoop of vanilla bean ice cream on the side is absolute heaven—the cool, creamy element against the tangy, rich pie is a match made in dessert paradise. For a festive touch, garnish with a few fresh cranberries and a sprig of mint.
Make It Your Own! (Recipe Variations)
Feel like playing? This recipe is wonderfully adaptable! Here are a few of my favorite twists:
- Lemon-Lover’s Delight: Swap the orange zest for lemon zest and add a teaspoon of lemon extract to the creamy layer for an extra zing.
- Chocolate Craver’s Twist: Sprinkle ½ cup of mini chocolate chips between the cream cheese and cranberry layers. Trust me on this one.
- Nut-Free & Extra Crunchy: Replace the pecans in the topping with an equal amount of old-fashioned rolled oats for a lovely, nut-free crunch.
- Ginger Snap: Add ¼ cup of finely chopped crystallized ginger to the cranberry layer for a warm, spicy kick.
- Festive Gluten-Free: Use a gluten-free pie crust and swap the all-purpose flour in the topping for a 1:1 gluten-free flour blend.
Olivia’s Kitchen Notes & Stories
This recipe has been on quite a journey with me! The first time I made it, I was so excited that I poured the cranberry layer on while the cream cheese was still a bit lumpy. Let’s just say the texture was… “rustic.” I learned the hard way that taking the time to get that cream cheese perfectly smooth is the secret to a luxurious mouthfeel.
Over the years, I’ve added the orange zest and pecans, and it’s become our definitive family holiday version. It’s also a fantastic make-ahead dessert. I often bake both pies the day before a big event. One for the party, and one for us to enjoy more slowly over the weekend (or to gift to a neighbor—it makes people so happy!). Don’t be afraid to make this recipe your own; that’s the true joy of home cooking!
Your Pie Questions, Answered!
I’ve gotten a lot of questions about this pie over the years. Here are the most common ones to ensure your baking success!
Q: My filling is a bit runny when I slice it. What happened?
A: This usually means the pie needed more time to cool and set. This pie relies on the chemical reaction between the acid (lemon juice) and the dairy to thicken, and that process continues as it chills. The cornstarch also needs time to fully set. The golden rule is: cool completely, then chill. If you’re still having issues, you can add an extra tablespoon of cornstarch to the cranberry layer next time.
Q: Can I use fresh or frozen cranberries instead of canned sauce?
A: You can, but it’s a bit more work! You’ll need to make a homemade cranberry sauce first. Simmer 12 oz of fresh or frozen cranberries with 1 cup of sugar and ½ cup of water (or orange juice!) until the berries burst and the sauce thickens, about 10-15 minutes. Let it cool completely before adding the cornstarch and proceeding with the recipe as written.
Q: Why did my crumb topping sink into the filling?
A: This can happen if the crumb topping is too fine or if the filling is too loose when you add it. Make sure your crumb mixture has good-sized pebbles and clumps. Also, ensure your creamy layer is thick and smooth before adding the cranberry layer—a runny base can cause the crumbs to sink. Sprinkling it on evenly and gently is key!
Q: Can I freeze this pie?
A> Absolutely! This pie freezes beautifully. Bake and cool it completely, then wrap it tightly in two layers of plastic wrap and one layer of aluminum foil. Freeze for up to 3 months. Thaw overnight in the refrigerator before serving.
Cranberry Cream Cheese Crumb Pie
Instructions
-
Preheat Oven to 350°F (175°C). Fit pie crusts into two 9-inch pans and crimp edges. Place both on a foil-lined baking sheet to catch drips.
-
Make the Creamy Layer:
Beat softened cream cheese until completely smooth. Add sweetened condensed milk and mix until glossy. Blend in lemon juice and orange zest—the filling will thicken beautifully. Divide evenly between crusts and smooth the tops. -
Mix the Cranberry Layer:
In a bowl, combine cranberry sauce, cornstarch, brown sugar, and cinnamon. Spoon gently over the cream layer, spreading evenly without blending the layers. -
Prepare the Crumb Topping:
Mix flour, brown sugar, and pecans in a bowl. Pour melted butter over and mix until clumps form. Sprinkle generously over both pies. -
Bake:
Bake 55–60 minutes, until the topping is golden and the edges are set. If the crumbs brown too fast, tent loosely with foil for the last 15 minutes. -
Cool Completely:
Cool at room temp, then chill for at least 4 hours (overnight is best) for clean, perfect slices.
Notes
-
Lemon-Lover’s Twist: Swap orange zest for lemon zest and add a teaspoon of lemon extract.
-
Chocolate Layer: Add ½ cup mini chocolate chips between the cream and cranberry layers.
-
Nut-Free Crunch: Replace pecans with ½ cup rolled oats.
-
Ginger Snap: Add ¼ cup chopped crystallized ginger to the cranberry mixture.
-
Gluten-Free: Use a gluten-free pie crust and flour substitute for the topping.
Nutrition
- Calories: 290 cal Per Slice
- Sugar: 25g
- Fat: 15g
- Carbohydrates: 35g
- Protein: 4g
Nutritional Information*
*Estimated for 1 slice (1/24 of the total recipe)
- Calories: ~290
- Total Fat: 15g
- Saturated Fat: 8g
- Carbohydrates: 35g
- Sugar: 25g
- Protein:</strong
Final Thoughts: A Bowl Full of Joy
And there you have it, my friend—more than just a recipe, but a bowl full of sunshine, nostalgia, and pure, uncomplicated joy. This Creamy Ambrosia Salad Deluxe is proof that the best recipes are the ones that do more than just fill our bellies; they connect us to cherished memories while giving us the freedom to create new ones.
Whether you stick to this recipe exactly or add your own creative twist, you’re not just making a side dish or a dessert. You’re weaving a little bit of magic into your meal. You’re creating that moment of shared delight around the table, the happy silence that falls when everyone takes that first, creamy, fruity, crunchy bite.