

Your New Favorite Holiday Treat: Homemade Cranberry Bliss Bars
Hey there, friend! Can you smell it? That magical, cozy aroma of brown sugar, cinnamon, and orange zest wafting from the oven? It’s officially the season for baking, and I can’t think of a better way to kick it off than with a batch of my all-time favorite, copycat Cranberry Bliss Bars.
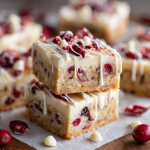
If you’ve ever stood in line at a certain coffee shop during the holidays, mesmerized by those gorgeous, frosted triangle bars studded with red cranberries, you know exactly what I’m talking about. They’re a seasonal icon for a reason! But let me let you in on a little secret: the homemade version? It’s about a thousand times better. We’re talking a buttery, chewy blondie base that’s perfectly spiced, loaded with sweet white chocolate and tart dried cranberries, and then slathered with a tangy cream cheese frosting that just sends everything over the top.
I’m a firm believer that the best holiday treats are the ones that feel like a hug from the inside. They should be festive, yes, but more importantly, they should be shareable, giftable, and absolutely irresistible. These bars check every single box. They look stunning on a platter, they make your kitchen smell like a winter wonderland, and they have this incredible balance of flavors and textures that just makes people’s eyes light up. So, tie on your favorite apron (the messy one with all the stories!), and let’s bake some magic together. I promise, this is one recipe that’s going to become a yearly tradition in your home, just like it is in mine.
A Sweet Slice of Memory
My love affair with these bars started long before I ever tried to bake them myself. Every December, my best friend, Sarah, and I had a tradition. We’d brave the holiday mall crowds, not for the shopping, but for the ritual. Our mission: secure the last two Cranberry Bliss Bars from the coffee kiosk, find a semi-quiet corner, and dissect our entire year between decadent bites. We’d talk about school, dreams, and which one of us was definitely going to marry a Backstreet Boy (it was a tight race). That frosted, cranberry-topped triangle became more than a treat; it was a symbol of our friendship, a sweet, once-a-year indulgence that marked the start of the holidays.
The year we graduated college, Sarah moved across the country. That December felt a little quieter, a little less sparkly. I missed our tradition. So, I decided if the Cranberry Bliss Bar couldn’t come to us, I would bring it to us—from my kitchen. I spent a weekend tweaking and testing, determined to capture that exact feeling in a recipe. When I finally nailed it, I packed up a whole batch and shipped it to her. The text I got? “Tastes even better than the original. Our tradition lives on!” Now, baking these bars is my way of sending a little piece of home, a little piece of my heart, to the people I love. And I’m so excited to share that feeling with you.
Gathering Your Ingredients
Part of the joy of baking from scratch is getting to know your ingredients. Here’s everything you’ll need, along with a few of my chef-y insights to help you understand the “why” behind the “what.”
For the Bars:
- 1 cup (2 sticks) unsalted butter, softened – Using unsalted butter lets you control the salt level perfectly. “Softened” is key here! You should be able to press your finger into it easily. If it’s too cold, your batter will be lumpy; if it’s melted, the texture of the bars will be greasy.
- 1½ cups brown sugar, packed – Brown sugar is non-negotiable for that deep, molasses-y flavor and chewy texture. Pack it firmly into your measuring cup for accuracy.
- 2 large eggs – Always use large eggs for baking. They should be at room temperature to emulsify beautifully with the butter and sugar, creating a smooth, light batter.
- 1 teaspoon vanilla extract – The flavor foundation. Use pure vanilla extract if you can—it makes a difference!
- 1 tablespoon orange zest – This is the secret weapon! The bright, citrusy oil from the zest cuts through the sweetness and makes the cranberry flavor pop. Use a microplane for the finest zest.
- 2 cups all-purpose flour – The structure of our bars. For a lighter texture, fluff your flour with a spoon before scooping and leveling it off with a knife.
- 1½ teaspoons ground cinnamon – Warm, cozy, and essential for that holiday spice vibe.
- ½ teaspoon baking powder – Our leavening agent, giving the bars a little lift.
- ½ teaspoon salt – Balances all the sweetness and enhances every other flavor. Trust me, don’t skip it.
- ¾ cup dried cranberries – The star of the show! Their tartness is a perfect contrast to the sweet white chocolate.
- ¾ cup white chocolate chips – Look for a good quality brand. You can also chop up a bar of white chocolate for more irregular, melty pockets.
For the Frosting & Topping:
- 8 oz cream cheese, softened – Full-fat cream cheese will give you the creamiest, most stable frosting. Again, softening is crucial for a lump-free spread.
- 1 cup powdered sugar – Sift it! This one little step prevents a gritty frosting.
- ½ teaspoon vanilla extract – A little extra flavor for the frosting.
- Optional: 1–2 teaspoons orange juice or zest – For an extra citrus kick in the frosting. I highly recommend it!
- ½ cup dried cranberries, chopped – For a beautiful, festive topping.
- ½ cup white chocolate chips, melted – For that gorgeous, professional-looking drizzle.
Let’s Bake! Step-by-Step Instructions
Ready to create some magic? Follow these steps, and don’t skip my little commentary—it’s where all the best kitchen hacks live!
Step 1: Preheat and Prep. Start by preheating your oven to 350°F (175°C). This is Baking 101, but it’s so important! An oven that’s fully up to temperature ensures your bars bake evenly. While it heats, line a 9×13-inch baking pan with parchment paper, leaving a little overhang on two sides. This is my #1 pro-tip for easy removal! You can also lightly grease the pan if you don’t have parchment, but the parchment is a game-changer for clean slices.
Step 2: Cream the Butter and Sugar. In a large bowl, use an electric mixer (or some serious elbow grease with a wooden spoon) to cream together the softened butter and packed brown sugar. Beat it for a good 2-3 minutes, until the mixture is pale, fluffy, and well-combined. This step isn’t just about mixing; it’s about incorporating air into the batter, which helps create a lighter texture. Don’t rush it!
Step 3: Add the Wet Ingredients. Crack in the eggs one at a time, beating well after each addition so they fully incorporate. Then, mix in the vanilla extract and that glorious tablespoon of orange zest. At this point, your batter should be smooth, fragrant, and look absolutely dreamy.
Step 4: Whisk the Dry Ingredients. In a separate, medium-sized bowl, whisk together the flour, cinnamon, baking powder, and salt. Why whisk? It evenly distributes the baking powder and salt so you don’t get any bitter pockets in your finished bars.
Step 5: Combine Wet and Dry. Gradually add the dry flour mixture to the wet butter mixture. Mix on low speed just until the flour disappears. The key word here is *gradually*—it prevents a flour cloud from erupting in your kitchen! And once it’s combined, STOP MIXING. Overmixing is the enemy of tender bars.
Step 6: Fold in the Goodies. Switch to a spatula for this part. Gently fold in the ¾ cup of dried cranberries and ¾ cup of white chocolate chips. Folding, rather than beating, ensures they are evenly distributed without crushing them or overworking the batter.
Step 7: Bake to Perfection. Spread the thick batter evenly into your prepared pan. I like to use an offset spatula for this, but the back of a spoon works just fine. Pop it into the preheated oven and bake for 22-25 minutes. You’ll know it’s done when the edges are golden brown and the center is just set. It might look a tiny bit soft in the middle—that’s perfect! It will continue to set as it cools. Overbaking is the number one mistake here; we want chewy, not cakey or dry.
Step 8: The All-Important Cool Down. This is critical! Place the pan on a wire rack and let the bars cool completely. I mean, completely-completely. If you spread warm frosting on a warm base, you’ll have a delicious but soupy mess. Patience, my friend!
Step 9: Whip Up the Frosting. Once the bars are cool, beat the softened cream cheese, sifted powdered sugar, and vanilla (and optional orange juice/zest) together until smooth and creamy. Taste it. Go on, you deserve it. Isn’t it heavenly?
Step 10: Frost and Decorate. Spread the frosting evenly over the cooled bars. Now, for the finishing touches! Sprinkle the chopped dried cranberries all over the top. Then, melt the remaining ½ cup of white chocolate chips (do this in 15-second bursts in the microwave, stirring in between) and use a fork or a piping bag to drizzle it back and forth over the cranberries. It’s what makes them look so professional!
Step 11: Chill and Slice. For the cleanest cuts, pop the whole pan into the refrigerator for at least an hour. This sets the frosting and makes slicing a breeze. When you’re ready, use a sharp knife to cut the large rectangle into smaller squares, and then cut each square diagonally to create those signature triangles.
How to Serve Your Masterpiece
Presentation is part of the fun! These bars are rich, so I like to cut them into smaller triangles. Arrange them on a beautiful wooden board or a festive platter. They are the ultimate holiday cookie exchange star, the perfect treat to bring to a potluck, or a gorgeous addition to a brunch spread next to some scones and fruit. I love packaging them in clear cellophane bags tied with a ribbon for the most delicious homemade gifts. Pair them with a cup of coffee, a glass of cold milk, or even a sweet dessert wine. However you serve them, get ready for the compliments to roll in!
Get Creative! Recipe Variations
Feel free to make these bars your own! Here are a few of my favorite twists:
- Lemon Bliss: Swap the orange zest for lemon zest and add a teaspoon of poppy seeds to the batter for a bright, sunny variation.
- Nutty Delight: Add ½ cup of chopped pecans or walnuts to the batter along with the cranberries for a delightful crunch.
- Ginger Spice: Add 1 teaspoon of ground ginger and ¼ teaspoon of ground cloves to the dry ingredients for a deeper, spicier flavor profile.
- Dark Chocolate Twist: Not a white chocolate fan? Use dark or semi-sweet chocolate chips instead for a more intense chocolate flavor.
- Gluten-Free: Substitute the all-purpose flour with a 1:1 gluten-free baking blend. I’ve had great success with this swap!
Chef’s Notes: From My Kitchen to Yours
This recipe has evolved so much since that first batch I shipped to Sarah. I initially thought more spice was better, but I learned that the cinnamon should be a warm background note, not the main event. And the orange zest? That was a happy accident after I zested an orange for a cocktail and decided to throw it in. It was a revelation! The biggest lesson, though, is to not stress. Baking is supposed to be joyful. So what if your drizzle is a little messy? That’s called “rustic charm.” Did you forget to sift the powdered sugar? The frosting will still taste amazing. The real secret ingredient in these bars, and in all my recipes, is the love and fun you pour into them. So put on some holiday music, pour yourself a drink, and enjoy the process. That’s what homemade is all about.
FAQs & Troubleshooting
Q: My bars came out really cakey and dry. What happened?
A: The most common culprit here is overbaking or overmixing. Remember, you want to take the bars out when the center is *just* set and might even look a tiny bit underdone. They continue to cook from residual heat as they cool. Also, once you add the flour, mix only until it’s combined. Overmixing develops the gluten in the flour, leading to a tougher, more cake-like texture.
Q: Can I make these bars ahead of time?
A: Absolutely! They are fantastic make-ahead treats. You can bake and frost the bars, then cover the pan tightly with plastic wrap and store them in the refrigerator for up to 3 days. I actually think the flavors get even better after a day! You can also freeze them (without the frosting) for up to 2 months. Thaw overnight in the fridge and then frost before serving.
Q: My frosting is too runny. How can I fix it?
A: A runny frosting usually means the cream cheese was too warm or you added a bit too much liquid (like orange juice). The easiest fix is to pop the bowl of frosting into the refrigerator for 20-30 minutes to firm up. If it’s still too soft, you can gently beat in a little more sifted powdered sugar, a tablespoon at a time, until it reaches a spreadable consistency.
Q: Why is it so important for the butter, eggs, and cream cheese to be softened?
A> Great question! Room-temperature ingredients emulsify much more easily, creating a smooth, homogenous batter and frosting. If your butter is too cold, you’ll have lumps; if your cream cheese is cold, your frosting will be grainy. To soften quickly, you can place sticks of butter or blocks of cream cheese on a plate for 30-60 minutes. For eggs, place them in a bowl of warm water for 5-10 minutes. Never use a microwave for softening, as it can easily melt them unevenly.
Cranberry Bliss Bars
Description
There’s something about the holidays that makes kitchens feel magical. The scent of brown sugar, cinnamon, and citrus filling the air, warm mugs in hand, laughter echoing from every corner—these are the moments worth savoring. And what better way to kick off the festive season than with Cranberry Bliss Bars? Inspired by those iconic coffee shop treats, this homemade version takes the classic flavors—chewy blondie, tart cranberries, sweet white chocolate, and tangy cream cheese frosting—to the next level. They’re perfect for sharing, gifting, or simply enjoying a cozy bite by the fire.
Ingredients
For the Bars:
-
1 cup (2 sticks) unsalted butter, softened
-
1½ cups packed brown sugar
-
2 large eggs, room temperature
-
1 teaspoon vanilla extract
-
1 tablespoon orange zest
-
2 cups all-purpose flour
-
1½ teaspoons ground cinnamon
-
½ teaspoon baking powder
-
½ teaspoon salt
-
¾ cup dried cranberries
-
¾ cup white chocolate chips
For the Frosting & Topping:
-
8 oz cream cheese, softened
-
1 cup powdered sugar, sifted
-
½ teaspoon vanilla extract
-
Optional: 1–2 teaspoons orange juice or zest
-
½ cup dried cranberries, chopped
-
½ cup white chocolate chips, melted
Instructions
-
Preheat & Prep: Preheat oven to 350°F (175°C). Line a 9×13-inch baking pan with parchment paper, leaving overhang for easy removal.
-
Cream Butter & Sugar: Beat the softened butter and brown sugar for 2–3 minutes until pale and fluffy.
-
Add Wet Ingredients: Beat in eggs, one at a time, followed by vanilla and orange zest.
-
Mix Dry Ingredients: In a separate bowl, whisk flour, cinnamon, baking powder, and salt.
-
Combine Wet & Dry: Gradually mix dry ingredients into wet until just combined. Avoid overmixing.
-
Fold in Cranberries & Chocolate: Gently fold in dried cranberries and white chocolate chips.
-
Bake: Spread batter in prepared pan. Bake 22–25 minutes, until edges are golden and center is just set. Let cool completely.
-
Make Frosting: Beat cream cheese, powdered sugar, vanilla, and optional orange juice/zest until smooth.
-
Frost & Decorate: Spread frosting over cooled bars. Sprinkle chopped cranberries and drizzle melted white chocolate over top.
-
Chill & Slice: Refrigerate for at least 1 hour. Cut into squares, then diagonally into triangles.
Notes
-
Softened Ingredients: Make sure butter, eggs, and cream cheese are at room temperature for smooth mixing.
-
Don’t Overbake: The bars should be slightly soft in the center when you remove them—they’ll firm up as they cool.
-
Storage: Store in the fridge for up to 3 days or freeze unfrosted bars for up to 2 months. Frost after thawing.
-
Nutrition
- Calories: 280 cal per bar
- Sugar: 26g
- Fat: 14g
- Carbohydrates: 36g
- Protein: 3g
Nutritional Information
Please note: This is an approximate calculation and can vary based on specific ingredients used.
Servings: 20 bars
Approximate Nutrition per Bar: Calories: ~280, Fat: 14g, Carbohydrates: 36g, Sugar: 26g, Protein: 3g
Final Thoughts
Baking these Cranberry Bliss Bars is an experience—a chance to slow down, create something beautiful, and share a piece of your heart. This recipe proves that the best holiday magic often comes from our own kitchens. So tie on that apron, embrace the process, and get ready to make someone’s day a little sweeter. You’ve got this! Now, go forth and bake some bliss.


