
The Coziest Brunch Treat You’ll Make This Year
Is there anything better than the smell of something sweet and spiced baking in the oven? It’s a universal signal for comfort, for slowing down, for gathering around the table with people you love. That warm, cinnamon-y scent has a magical way of turning an ordinary morning into a small celebration. And if you’re anything like me, that’s the kind of kitchen magic I live for.
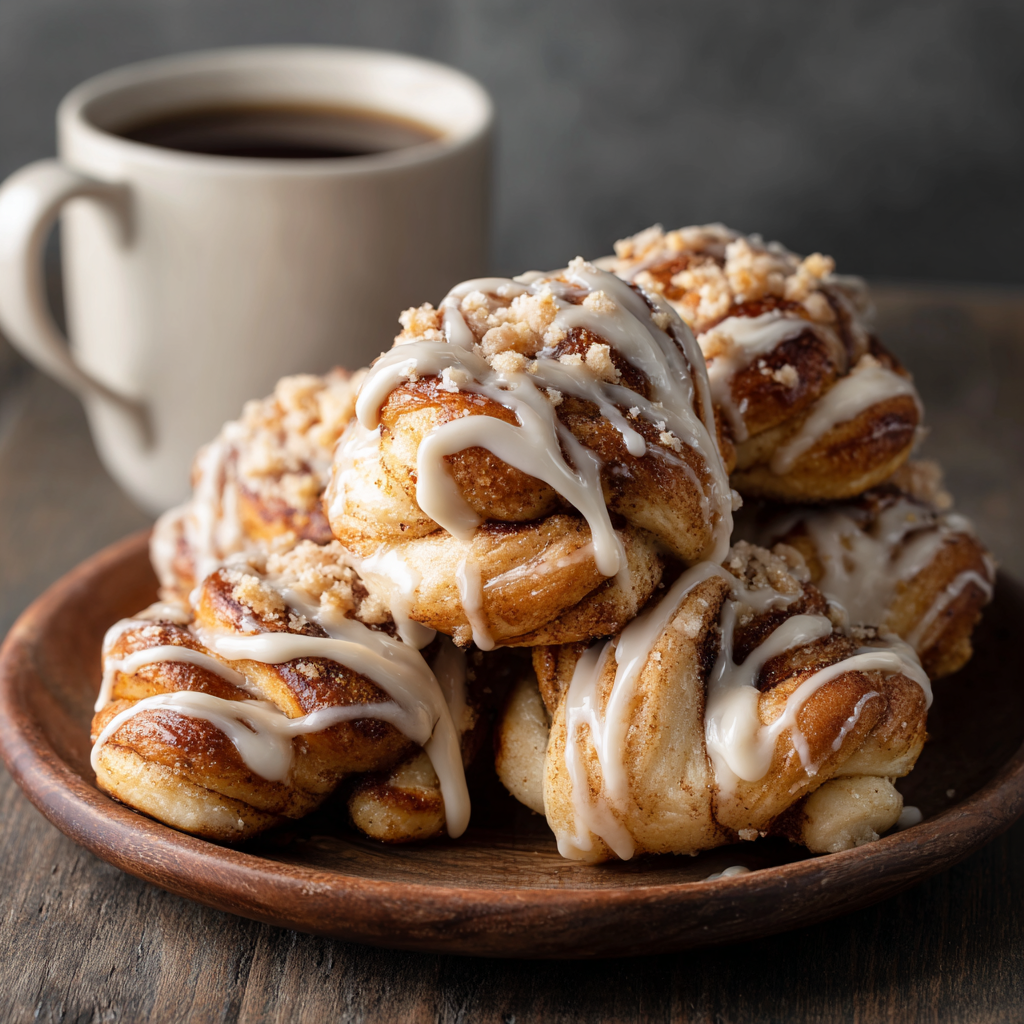
Today, we’re making that magic together with a recipe that holds a special place in my heart and on my brunch table: Fluffy Cinnamon Knots with a sophisticated Coffee Icing. These aren’t just any cinnamon rolls. They’re soft, buttery, twisted into adorable little knots, and drizzled with a glaze that tastes like your favorite latte decided to become a frosting. It’s the perfect grown-up twist on a classic comfort food.
I know yeast dough can feel a little intimidating if you’re new to it, but I promise, we’re going to walk through every step together. My goal is to demystify the process and show you just how achievable (and fun!) it is to create these beautiful, bakery-worthy treats right in your own kitchen. So, tie on your favorite apron, put on a pot of coffee for sipping, and let’s bake something that will make your entire home smell absolutely incredible.
A Knotty Situation & A Sweet Tradition
This recipe takes me right back to my grandmother’s kitchen, a place that always smelled of yeast and wisdom. She was the queen of “a little of this, a pinch of that,” and her cinnamon knots were legendary at our family’s holiday brunches. I remember one Christmas Eve, I decided I was a big enough kid to help her shape the dough. With flour up to my elbows and a serious look of concentration, I proceeded to create what can only be described as… abstract art. Some were lopsided, others were more “blob” than “knot,” and a few were tied so tight they probably wouldn’t have baked through.
Instead of fixing them, my grandma just laughed her warm, rumbling laugh and said, “Olivia, the best part about food made by hand is that it’s never perfect. It has personality.” She baked every single one of my funny-looking knots, and when they came out of the oven, puffed and golden, she declared them the best batch yet. That lesson stuck with me: it’s the love and the effort that makes food special, not perfection. So, don’t you worry if your first knot isn’t picture-perfect. Its unique shape is just part of its story.
Gathering Your Ingredients
Before we start, let’s get organized! Baking is a science, but a fun one. Having everything measured and ready to go (this is called mise en place) makes the process feel like a relaxing dance rather than a frantic race. Here’s what you’ll need.
For the Dough:
- 2 ¾ cups all-purpose flour: The backbone of our knots. I like to fluff the flour in the bag before scooping and leveling it off with a knife for the most accurate measure. For a slightly more tender crumb, you can swap one cup with bread flour.
- 2 ¼ tsp instant yeast (1 packet): Our little miracle worker! Instant yeast is my hero because you can mix it right in with the dry ingredients—no proofing required. Just make sure it’s not expired for the best rise.
- 2 tablespoons granulated sugar: This sweetens the dough just a touch and gives the yeast a snack to get started on.
- 1/2 teaspoon salt: Crucial for balancing the sweetness and enhancing all the flavors. Don’t skip it!
- 3/4 cup warm milk: The key word is warm, not hot. Think baby-bottle temperature (around 110°F/43°C). Too hot and it will kill the yeast; too cold and it won’t wake it up. Whole milk gives the richest flavor, but 2% works great too.
- 1/4 cup unsalted butter, melted: For that irresistible, tender texture and buttery taste. Using unsalted lets you control the salt level in the recipe.
- 1 large egg: This adds richness and helps create a beautiful, soft structure in the baked knots.
For the Cinnamon-Sugar Filling:
- 1/4 cup unsalted butter, softened: Softened is key here! It should be spreadable straight from the fridge. I leave mine out for about 30-60 minutes before I start. This will make spreading it over the dough a dream.
- 1/3 cup light brown sugar: I prefer brown sugar for its deep, molasses-like flavor that pairs so perfectly with cinnamon. It also creates a slightly gooier filling. In a pinch, granulated sugar works, but you’ll lose that caramel note.
- 1 tablespoon ground cinnamon: Use the good stuff! The aroma should be strong and sweet. This is the star of the show, so don’t be shy.
For the Coffee Icing:
- 1 cup powdered sugar: Also known as confectioner’s sugar. It creates that smooth, drizzle-able glaze we’re after.
- 1 tablespoon brewed coffee (strong): This is our “grown-up” twist! Using strongly brewed coffee instead of just milk or water gives the icing a fantastic, robust flavor. The coffee flavor will be subtle, not overpowering.
- 1–2 teaspoons milk, as needed: This is your control for consistency. Start with the coffee and add milk a teaspoon at a time until it’s perfectly drizzle-able.
- Pinch of salt: A tiny pinch balances the sweetness of the powdered sugar and makes the coffee flavor pop. Trust me on this one!
Let’s Get Baking: Step-by-Step Instructions
Ready to make some magic? Follow these steps, and you’ll have a tray of gorgeous, fragrant cinnamon knots in no time.
Step 1: Make the Dough. In a large bowl, whisk together your flour, instant yeast, sugar, and salt. This ensures the yeast and salt are evenly distributed. Create a little well in the center and pour in the warm milk, melted butter, and crack in the egg. Use a wooden spoon or a dough hook on your stand mixer to bring everything together into a shaggy mass. Once it’s combined, it’s time to knead! Turn it out onto a lightly floured surface and knead for 5-7 minutes (or 4-5 minutes in a mixer with a dough hook on medium-low) until the dough is soft, smooth, and slightly elastic. Chef’s Hack: The dough should feel like a soft earlobe—it might be a little tacky, but it shouldn’t stick to your clean hands excessively. If it does, add a tablespoon of flour at a time until it’s manageable.
Step 2: First Rise. Shape your lovely, smooth dough into a ball. Place it back in the bowl (I give the bowl a quick swipe of butter or oil to prevent sticking) and cover it with a clean kitchen towel or plastic wrap. Find a warm, draft-free spot for it to rest. On top of the oven (while it’s off!) is often a good spot. Let it rise for about 1 hour, or until it has doubled in size. Don’t rush this step—this is where the flavor and airy texture develop!
Step 3: Roll & Fill. Once your dough is beautifully puffed, punch it down gently to release the air. Turn it out onto a lightly floured surface and roll it into a roughly 12×18-inch rectangle. Try to keep the thickness as even as possible. Now, take your softened butter and spread it evenly over the entire surface, leaving just a half-inch border along one of the long edges. This border will help us seal the dough later. In a small bowl, mix your brown sugar and cinnamon, then sprinkle it evenly over the buttered dough.
Step 4: Fold, Cut & Tie the Knots! This is the fun part! Carefully fold the dough in half lengthwise, so you now have a long, skinny 6×18-inch rectangle. The unbuttered edge should help it seal. Gently press it down. Using a sharp knife, a pizza cutter, or a bench scraper, cut this strip into 12 even pieces (about 1.5 inches wide each). Now, take one strip and gently twist it a few times. Then, tie it into a loose knot, just like you’re tying a simple knot in a rope. Don’t pull it too tight—it needs a little room to expand. Tuck the ends under. Chef’s Hack: If a strip tears a little, don’t panic! Just press it back together. The dough is very forgiving.
Step 5: Second Rise. Place your adorable little knots on a parchment-lined baking sheet, giving them about an inch or two of space to grow. Cover them lightly with that same kitchen towel and let them rise again for 20-30 minutes. They won’t double this time, but they should look nice and puffy. Meanwhile, preheat your oven to 375°F (190°C).
Step 6: Bake to Golden Perfection. Once puffed, place the baking sheet in your preheated oven and bake for 15-18 minutes. You’re looking for a beautiful golden brown color on top. Your kitchen will smell like heaven at this point. Chef’s Hack: For an extra-soft top, you can brush the knots with a little melted butter as soon as they come out of the oven. It adds a beautiful sheen, too!
Step 7: The Grand Finale – Coffee Icing! While the knots are baking, whisk together your powdered sugar, strong coffee, and that all-important pinch of salt. Start with one teaspoon of milk and add more only if needed to reach a drizzle-able consistency. You want it thick but able to run off a spoon. Let the knots cool for just 5-10 minutes on the pan—you want them warm, but not piping hot, so the icing doesn’t just melt into a puddle. Drizzle that gorgeous coffee icing over the warm knots in a zig-zag pattern. And there you have it!
Serving Your Masterpiece
Presentation is part of the fun! I love serving these knots on a big, rustic wooden board or a beautiful ceramic platter. They are an absolute star at brunch, so pair them with savory favorites like a frittata or crispy bacon to balance the sweetness. Of course, they are best enjoyed warm, with a fresh cup of coffee (naturally!) or a cold glass of milk. The joy is in pulling apart the soft, swirly layers and seeing that cinnamon sugar glisten.
Get Creative: Recipe Variations
Once you’ve mastered the basic knot, the world is your oyster! Here are a few of my favorite twists:
- Apple Pie Knots: Add 1/2 cup of finely chopped, peeled apple to the cinnamon-sugar filling.
- Orange Zest Glaze: Swap the coffee icing for a simple glaze made with powdered sugar, orange zest, and a few teaspoons of fresh orange juice.
- Pecan Sticky Knots: Before the second rise, sprinkle the bottom of your baking pan with a mixture of 1/2 cup chopped pecans, 1/4 cup brown sugar, and 2 tbsp melted butter. Place the knots on top and bake as directed. Invert the pan after baking for a gooey, sticky topping.
- Vegan Version: Use plant-based milk and butter, and a “flax egg” (1 tbsp ground flaxseed mixed with 3 tbsp water, let sit for 5 mins).
Chef’s Notes & Kitchen Confessions
This recipe has evolved so much since my first lopsided attempts in my grandma’s kitchen. I’ve learned that the temperature of your kitchen can really affect the rise time—if it’s a cold day, it might take longer, and that’s okay! I also used to be terrified of over-kneading, but I’ve found a soft, smooth dough is more forgiving than we think. My biggest kitchen confession? I once completely forgot the salt in the dough. They baked up fine but tasted… bland and a bit sweet. It was a powerful reminder of how important that little half-teaspoon truly is! So learn from my mistakes, and don’t skip the salt. Most importantly, have fun with it. The messy counter and flour-dusted apron are all signs of a kitchen filled with love.
Your Questions, Answered!
Q: My dough didn’t rise very much. What went wrong?
A: The most common culprits are old yeast or liquid that was too hot. Always check the expiration date on your yeast. If you’re unsure if it’s active, you can test it by dissolving it in the warm milk with a pinch of the sugar from the recipe. If it doesn’t get foamy after 5-10 minutes, it’s time for a new packet. Also, ensure your milk is just warm to the touch, not scalding hot.
Q: Can I make these the night before?
A> Absolutely! This is a great trick for easy mornings. After you’ve shaped the knots and placed them on the baking sheet, cover them tightly with plastic wrap and pop them in the fridge overnight. The cold slows the yeast down. In the morning, take the pan out, let them sit on the counter for about 45-60 minutes to come to room temperature and finish rising, then bake as directed. The slow rise in the fridge can even develop more flavor!
Q: My icing is too runny/thick. How can I fix it?
A> Icing consistency is easily adjustable! If it’s too runny, simply whisk in a little more powdered sugar, a tablespoon at a time, until it thickens up. If it’s too thick and won’t drizzle, add more liquid (milk or coffee) just a teaspoon at a time until it reaches your desired consistency. Remember, you can always add more, but you can’t take it out!
Q: Can I use active dry yeast instead of instant?
A> You can! The method just changes slightly. For active dry yeast, you’ll want to “proof” it first. Warm your milk to the specified temperature, pour it into a bowl, and stir in the yeast and the sugar from the recipe. Let it sit for 5-10 minutes until it’s foamy. Then, add this mixture to your flour and salt, along with the butter and egg, and proceed with the recipe as written.
Cinnamon Knots with Coffee Icing : Fluffy, Buttery & Perfect for Brunch
Description
Fluffy Cinnamon Knots with Coffee Icing
Prep Time: 25 minutes
Rise Time: 1 hour 30 minutes
Cook Time: 15–18 minutes
Total Time: ~2 hours 15 minutes
Ingredients
For the Dough
-
2 ¾ cups all-purpose flour
-
2 ¼ tsp instant yeast (1 packet)
-
2 tbsp granulated sugar
-
½ tsp salt
-
¾ cup warm milk (110°F / 43°C)
-
¼ cup unsalted butter, melted
-
1 large egg
For the Cinnamon Filling
-
¼ cup unsalted butter, softened
-
⅓ cup light brown sugar
-
1 tbsp ground cinnamon
For the Coffee Icing
-
1 cup powdered sugar
-
1 tbsp strong brewed coffee
-
1–2 tsp milk, as needed
-
Pinch of salt
Instructions
In a large bowl, whisk together flour, instant yeast, sugar, and salt.
Add warm milk, melted butter, and egg. Mix until a shaggy dough forms.
Knead 5–7 minutes by hand (or 4–5 minutes in a stand mixer) until smooth and slightly elastic.
Shape the dough into a ball. Place it in a lightly greased bowl, cover, and let rise for 1 hour, or until doubled in size.
Punch down the risen dough.
Roll into a 12×18-inch rectangle on a lightly floured surface.
Spread softened butter over the dough, leaving a ½-inch border on one long edge.
Mix brown sugar and cinnamon; sprinkle evenly over the butter.
Fold the dough in half lengthwise (making a 6×18-inch rectangle).
Press lightly to seal.
Cut into 12 strips (about 1.5 inches wide).
Twist each strip and tie into a loose knot, tucking ends underneath.
Place knots on a parchment-lined baking sheet.
Cover and let rise 20–30 minutes, until puffy.
Meanwhile, preheat oven to 375°F (190°C).
Bake for 15–18 minutes, until golden brown.
Optional: Brush warm knots with a little melted butter after baking.
In a bowl, whisk powdered sugar, coffee, pinch of salt, and milk (as needed) until smooth and drizzle-able.
Drizzle over warm (not hot) knots.
Notes
Yeast was expired, or milk was too hot/cold.
Icing too runny:
Add more powdered sugar.
Icing too thick:
Add milk or coffee 1 teaspoon at a time.
Using active dry yeast:
Proof in warm milk with the sugar first (5–10 minutes until foamy).
Nutritional Information (Per Knot)
Please note: This is an estimate and can vary based on specific ingredients used.
- Calories: ~230
- Fat: 8g
- Carbohydrates: 36g
- Protein: 4g
- Sugar: 15g
Final Thoughts
So there you have it—the secret to turning an ordinary morning into a cozy, cinnamon-scented celebration. These Fluffy Cinnamon Knots are more than just a recipe; they’re an invitation to slow down, get your hands a little dusty with flour, and create something truly special.
Remember, your knots don’t need to be perfect. Whether they’re a little lopsided or uniquely abstract, they will be delicious because you made them. That’s the real magic. So, don your apron, embrace the process, and get ready to enjoy the coziest, most rewarding brunch treat you’ll make this year. Happy baking!


