
Your New Favorite Holiday Tradition: Christmas Tree Macarons
Hello, my friends, and welcome back to the kitchen! Can you smell it? That crisp, chilly air is finally starting to feel a little bit magical, isn’t it? For me, the holiday season truly begins not with the first snowfall, but with the first batch of festive baking. It’s that moment when my countertops disappear under a blizzard of powdered sugar, my kitchen smells like vanilla and warm butter, and my apron is… well, let’s just say it’s seen better days!
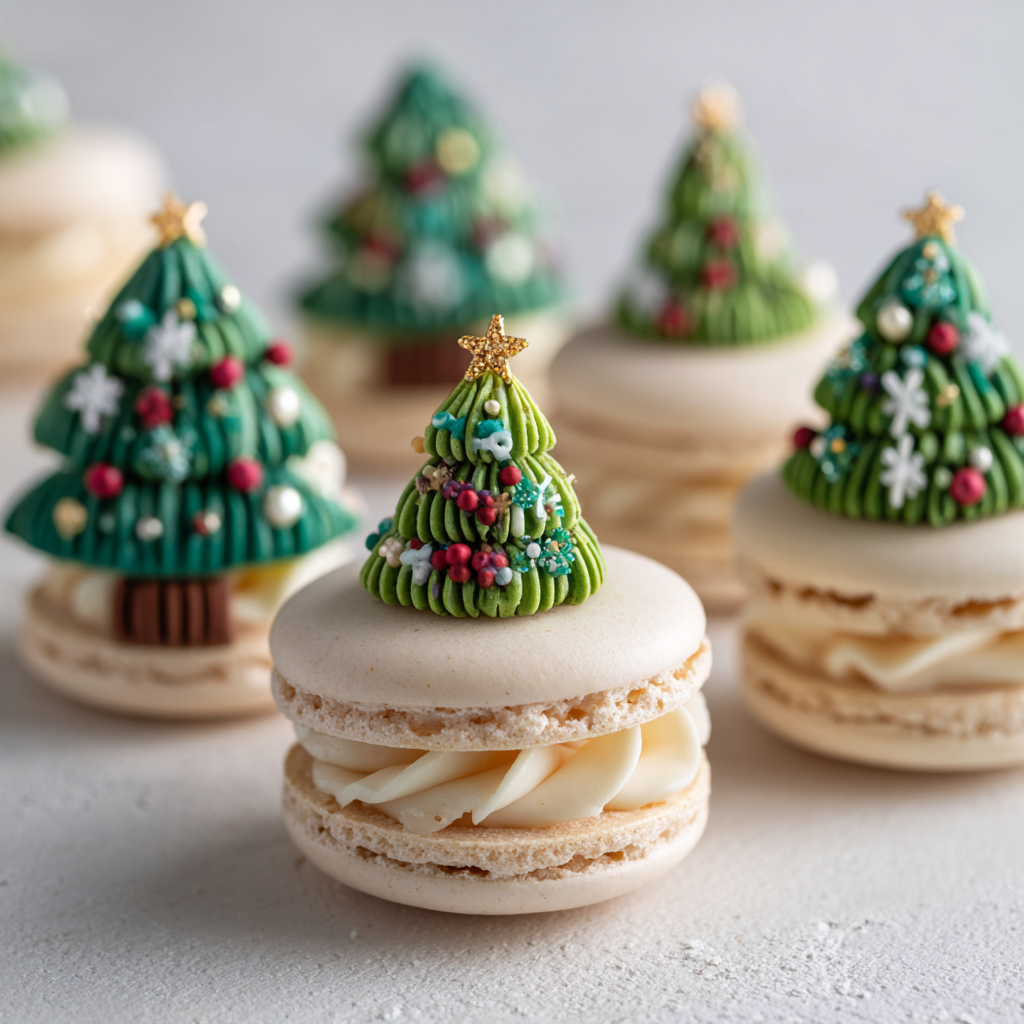
If you’ve ever scrolled through Pinterest or Instagram during the holidays and gasped at those impossibly perfect, adorable Christmas tree macarons, wondering if you could ever make something so beautiful, I’m here to tell you: you absolutely can. These aren’t just cookies; they’re tiny, edible works of art that spark joy. They’re chewy, delicate, and filled with the smoothest vanilla buttercream—a treat that’s as fun to make as it is to eat (and to gift!). So, put on your favorite holiday playlist, grab your piping bag, and let’s create some magic together. I promise to guide you through every step with all my best tips and tricks. This is going to be delicious.
A Kitchen Full of Memories (and a Few Lopsided Trees)
My love affair with macarons started not in a fancy Parisian patisserie, but in my Nana’s wonderfully chaotic kitchen. She was a fearless baker, the kind who’d eyeball a cup of flour and somehow produce the most incredible pastries. One particularly memorable Christmas Eve, she decided we were going to tackle macarons. Back then, they seemed like the Mount Everest of baking—intimidating and full of potential pitfalls. Our first batch? Let’s just say they were more like festive green puddles than trees. We laughed until we cried, scooped the “macaron spread” onto spoons, and declared it the world’s most expensive cookie batter.
But Nana never saw a kitchen failure, only a lesson learned. We tried again. And again. When that first tray of perfect, footed, vibrant green shells came out of the oven, we did a happy dance right there on her checkerboard linoleum floor. Now, every year when I pipe these little trees, I’m right back in her kitchen, surrounded by love, laughter, and the unwavering belief that you can create something wonderful with a little patience and a lot of heart. That’s the spirit I want to bring to your kitchen today.
Gathering Your festive Toolkit: The Ingredients
Here’s everything you’ll need to create these holiday showstoppers. Precision is key with macarons, so I highly recommend using a kitchen scale for the dry ingredients. It makes a world of difference!
For the Macaron Shells (Yields ~12 Christmas Trees / 24 Shells)
- 100g almond flour: The foundation of our macaron! You want super-fine flour for a smooth top. Give it a quick blitz in a food processor if it seems coarse, and always sift it.
- 100g powdered sugar (confectioners’ sugar): This sweetens the shells and contributes to their structure. Sift it with the almond flour to avoid any lumps.
- 75g egg whites, at room temperature: This is non-negotiable! Room temp egg whites whip up much higher and stronger. Separate your eggs a few hours ahead of time. For a pro tip, you can even “age” them by covering and leaving them in the fridge for 24 hours.
- 75g granulated sugar: This is what we’ll be adding to the egg whites to make our beautiful, stable meringue.
- Green gel food coloring: Use gel, not liquid! Liquid coloring can throw off your batter’s consistency. Gel gives you vibrant color without adding extra moisture.
- Optional: ½ tsp matcha powder or a few drops of pistachio extract: This is my little chef’s secret! A bit of matcha adds a lovely, subtle flavor and deep green color. Pistachio extract enhances that nutty, festive taste beautifully.
For the Vanilla Buttercream Filling
- 100g (about ½ cup) unsalted butter, softened: Softened to room temperature so it whips up light and fluffy. If it’s too cold, you’ll have a lumpy frosting; too melted, and it will be runny.
- 150g powdered sugar: Sifted! Unless you enjoy a dust cloud of sugar in your kitchen. Sifting ensures a silky-smooth buttercream.
- 1–2 tbsp heavy cream or whole milk: This loosens the frosting to the perfect piping consistency. Start with one tablespoon and add more as needed.
- 1 tsp pure vanilla extract: The classic flavor. For a holiday twist, you could use…
- Optional: ¼ tsp peppermint extract or ½ tsp pistachio flavoring: Peppermint is such a festive pairing with the sweet vanilla! Just a little goes a long way.
For the Dazzling Decorations
- Melted white chocolate or royal icing: Your “glue” for the sprinkles! White chocolate sets firm and adds a nice flavor. Royal icing dries hard and is great for intricate details.
- Assorted edible sprinkles: Think snowflakes, pearls, stars, and nonpareils. This is where you can really let your personality shine!
- Optional: Fondant for tiny bows, mini red candies (like M&Ms) for tree trunks, edible glitter: Go all out! A tiny fondant bow on top or a red candy at the base for a “trunk” is just adorable.
Let’s Get Baking: Step-by-Step Instructions
Take a deep breath. We’ve got this. Read through all the steps once before you begin. Organization is your best friend when making macarons!
Step 1: Prep Your Station. Line two baking sheets with parchment paper or silicone macaron mats. If you’re using parchment, you can even draw small Christmas tree templates on the other side to use as a guide for piping. Fit a piping bag with a small round tip (I like a #6 or #8). Have your green gel coloring ready to go.
Step 2: Sift, Sift, Sift! In a medium bowl, whisk together your almond flour and powdered sugar. Then, sift the mixture at least twice. Yes, twice! This is the most crucial step for getting those perfectly smooth, flawless macaron tops. Any large bits of almond left behind can be discarded.
Step 3: The Meringue Magic. In a very clean, completely grease-free bowl, pour in your room-temperature egg whites. Using a hand mixer or stand mixer with the whisk attachment, whip on medium speed until they become foamy and frothy. Now, gradually—a little at a time—add the granulated sugar. Once all the sugar is in, increase the speed to high and whip until you get stiff, glossy peaks. The meringue should stand straight up when you lift the whisk. This is when you add your green gel coloring and any optional flavor extracts. Whip for another 10-15 seconds to fully incorporate.
Step 4: The Macaronage. This is the fancy term for folding the dry ingredients into the meringue. Add about one-third of the almond flour mixture to the meringue and gently fold it in using a spatula. Once incorporated, add the rest. Now, you’re going to fold and press the batter against the side of the bowl. You’re looking for a lava-like consistency. Test it often: scoop up some batter with your spatula and let it drizzle back into the bowl. The ribbon of batter should hold its shape for a few seconds before melting back into the rest. Be careful not to overmix, or it will be too runny!
Step 5: Pipe Your Trees! Transfer your batter to your prepared piping bag. Hold the bag perpendicular to the baking sheet and pipe your tree shapes. I start with a wider base and pull up to a point for the top. If you drew templates, pipe right over them. Don’t worry if they’re not perfect—they have character! Once all trees are piped, firmly tap the baking sheets on your counter 3-4 times. This releases any trapped air bubbles and helps prevent cracked shells.
Step 6: The Patient Part: Resting. Let the piped macarons sit out at room temperature for 30-45 minutes. They are ready to bake when you can gently touch the surface and it feels dry and no batter sticks to your finger. This step is essential for forming the signature “foot” of the macaron.
Step 7: Bake to Perfection. While the macarons are resting, preheat your oven to 300°F (150°C). Bake one sheet at a time in the center of the oven for 14-16 minutes. They are done when they have a firm shell and don’t wiggle when you gently touch the top. Let them cool completely on the baking sheet before you even think about moving them. They are very delicate when warm!
Step 8: Make the Buttercream. While the shells are cooling, make your filling. In a bowl, beat the softened butter on medium speed until it’s completely smooth and pale. Gradually add the sifted powdered sugar on low speed until combined, then crank the speed back up to medium-high and beat for 2-3 minutes until fluffy. Add the vanilla and 1 tbsp of cream. Beat again. If it’s too thick, add the remaining cream a teaspoon at a time until it’s a pipeable consistency.
Step 9: Assemble & Decorate! Match your shell pairs by size. Pipe a small dollop of buttercream onto the flat side of one shell and gently sandwich it with its partner. Now for the fun part! Melt your white chocolate gently. Using a fork or a small piping bag, drizzle it over the assembled macarons to look like snow. Immediately add your sprinkles and decorations before the chocolate sets. Let them sit until the chocolate is firm.
How to Serve Your edible Evergreens
Presentation is everything with these cuties! Arrange them on a beautiful platter or a cake stand for your holiday dessert table. They look stunning nestled amongst some fresh rosemary sprigs—it looks like a mini forest and smells amazing! For gift-giving, place them in clear cellophane bags tied with a ribbon, or in a festive holiday cookie box lined with parchment paper. They’re a gift from the heart that anyone would be thrilled to receive.
Mix It Up! Fun Recipe Variations
Feel like playing? Here are a few ways to put your own spin on this classic:
- Chocolate Peppermint: Add 1 tbsp of cocoa powder to the buttercream and use peppermint extract instead of vanilla. Decorate with crushed candy canes!
- Pistachio Joy: Use pistachio extract in the shells and buttercream. For a gorgeous look, roll the sides of the filled macarons in finely chopped pistachios.
- Funfetti Fun: Fold a tablespoon of festive holiday sprinkles into the buttercream for a pop of color and crunch inside.
- Gingerbread Spice: Add a teaspoon of gingerbread spice blend to the dry ingredients for a warmly spiced shell.
- Dairy-Free/Vegan: Use aquafaba (the liquid from a can of chickpeas) in place of egg whites (reduce ¾ cup aquafaba down to 75g) and vegan butter for the frosting.
Olivia’s Chef Notes & Kitchen Confessions
I’ve made these more times than I can count, and my process is always evolving. One year, in a fit of over-enthusiasm, I added way too much green coloring. My macarons were a shockingly neon green, and the batter was so wet they never formed a skin. We called them The Grinch’s Revenge and they were still delicious, if not a little ugly! So, remember: gel coloring is your friend.
Another tip: don’t throw away your “failures!” Even lopsided or cracked shells can be saved. Crumble them up and use them as a topping for ice cream or hot chocolate—it’s a next-level dessert hack. The most important ingredient, always, is joy. If you’re having fun, it will show in your baking.
Macaron FAQs & Troubleshooting
Q: My macarons have no feet! What happened?
A: The “foot” is that cute ruffly edge. If it’s missing, the most common culprits are: 1) The batter was overmixed and became too runy, or 2) They didn’t rest long enough to form a proper skin before baking. Next time, make sure your batter is that perfect lava consistency and wait until the tops are completely dry to the touch.
Q: Why are my macaron shells hollow?
A: Hollows can be tricky! It’s often due to over-whipped meringue (making it too dry and unstable) or oven temperature that’s a bit too high. Try reducing your oven temperature by 5-10 degrees next time and make sure you’re whipping to stiff, but still glossy and smooth, peaks—not until it’s clumpy and dry.
Q: My shells are cracked on top. Help!
A: Cracks usually mean there were trapped air bubbles that couldn’t escape. This is why tapping the tray so firmly is so important! Really bang that tray on the counter. Also, ensure you’re not under-mixing your batter; if the dry ingredients aren’t fully incorporated, it can cause cracking too.
Q: Can I make these ahead of time?
A: Absolutely! In fact, macarons are often better the next day. This process, called “maturing,” allows the shells to absorb moisture from the filling, making them even more deliciously chewy. Store them in an airtight container in the fridge for up to 5 days. Let them come to room temperature for about 30 minutes before serving for the best texture and flavor.

Christmas Tree Macarons (Holiday Edition)
- Total Time: 1 hr 45 mins
Description
Delicate, chewy, and filled with silky vanilla buttercream, these little Christmas tree macarons are edible ornaments that bring sparkle to any holiday table. They look like a bakery masterpiece but are absolutely doable at home—with a little patience, precision, and holiday cheer. Decorated with sprinkles, chocolate “snow,” and edible glitter, they’re as fun to make as they are to share.
Ingredients
For the Shells (~24 shells / 12 macarons):
-
100g almond flour, sifted
-
100g powdered sugar
-
75g egg whites, room temp (aged if possible)
-
75g granulated sugar
-
Green gel food coloring
-
Optional: ½ tsp matcha or a few drops pistachio extract
For the Filling:
-
100g unsalted butter, softened
-
150g powdered sugar, sifted
-
1–2 tbsp heavy cream or milk
-
1 tsp vanilla extract
-
Optional: ¼ tsp peppermint or ½ tsp pistachio flavoring
For Decorating:
-
Melted white chocolate or royal icing
-
Assorted sprinkles (stars, pearls, snowflakes)
-
Optional: edible glitter, fondant bows, mini red candies
Instructions
-
Prep – Line baking sheets with parchment or macaron mats. Fit a piping bag with a small round tip.
-
Sift Dry Mix – Combine almond flour + powdered sugar. Sift twice for smooth shells.
-
Whip Meringue – Beat egg whites until foamy, then gradually add granulated sugar. Whip to stiff, glossy peaks. Tint with gel coloring.
-
Macaronage – Fold dry mix into meringue until batter flows like lava. It should ribbon and melt back in after a few seconds.
-
Pipe Trees – Pipe tree shapes onto sheets. Tap trays firmly to release air bubbles.
-
Rest – Let piped shells sit 30–45 min until a dry skin forms.
-
Bake – Bake at 300°F (150°C) for 14–16 min. Cool completely on trays.
-
Make Buttercream – Beat butter until smooth, add powdered sugar gradually, then cream + vanilla. Whip until fluffy.
-
Assemble – Pipe buttercream onto one shell, sandwich with another.
-
Decorate – Drizzle white chocolate, add sprinkles and glitter before it sets.
- Prep Time: 45 mins
- Cook Time: 15 mins/batch
Nutritional Information (Approximate, per Macaron)
Calories: 150kcal | Carbohydrates: 16g | Protein: 2g | Fat: 9g | Saturated Fat: 4g | Cholesterol: 15mg | Sodium: 10mg | Sugar: 14g
Final Thoughts: Your Holiday Masterpiece Awaits
And there you have it! From a hopeful bowl of meringue to a platter of dazzling, edible Christmas trees, you’ve created something truly special. Remember, my first batch was a puddle, and my Nana’s kitchen was a glorious mess—so if your trees are a little lopsided or your first attempt isn’t quite Pinterest-perfect, give yourself a huge pat on the back anyway. You took on a baking challenge and filled your home with the unmistakable scent of holiday spirit and warm butter.
These macarons are more than just a treat; they’re a conversation starter, a heartfelt gift, and a beautiful new tradition. They carry the magic of the season in every bite—a little bit of patience, a dash of whimsy, and a whole lot of love.
So light a candle, pour yourself a cup of cocoa, and admire your handiwork. You didn’t just bake cookies; you created joy. And that, my friends, is the sweetest success of all.


