

Your New Favorite Holiday Treat: Christmas Cookie Cake Balls!
Hello, my friend! Can you smell that? It’s that time of year again. The air is crisp, the lights are twinkling, and my kitchen is officially covered in a light dusting of powdered sugar and holiday cheer. If you’re anything like me, your favorite holiday memories aren’t just about the big presents or the perfect tree—they’re about the moments gathered around the table, the laughter that echoes from the kitchen, and the joy of sharing something you made with your own two hands. That’s the magic I live for, and today, we’re creating a big batch of it.
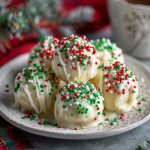
We’re talking about Christmas Cookie Cake Balls, and let me tell you, these little orbs of joy are about to become your secret weapon for the season. Imagine this: soft, crumbly sugar cookie, mashed together with sweet vanilla frosting, rolled into a perfect bite, and then dunked in a luxurious coat of creamy white chocolate. They’re like if a cookie and a cake pop had a beautiful, sprinkle-covered holiday baby. The best part? They are unbelievably easy. You don’t need to be a pastry chef or have hours to spare. With just a few simple ingredients and a whole lot of love, you can whip up a batch of these that will have everyone begging for the recipe. So, tie on your favorite festive apron, put on some holiday tunes, and let’s make some magic together!
A Sweet Slice of Christmas Memory
I have to share a little story with you. The very first time I made a version of these cake balls, it was a complete kitchen disaster that turned into one of our most beloved family traditions. I was about ten years old, “helping” my grandma in her wonderfully chaotic kitchen on Christmas Eve. We were behind schedule, as one often is, and we had a batch of sugar cookies that… well, let’s just say they got a little too friendly with the bottom of the oven. They were burnt on the edges and a tad too crisp for Santa’s liking.
My grandma, who never let a single thing go to waste, looked at those cookies, looked at me, and declared, “Well, Olivia, we’re not throwing these out. We’re just going to turn them into something new!” She crumbled those cookies into a bowl, mixed in some frosting from a jar, and let me roll the sticky, sweet mixture into lopsided little balls. We dipped them in the only chocolate we had—a half-eaten bar of semi-sweet—and decorated them with the red and green sprinkles I was supposed to be saving for the cut-out cookies. They were messy, imperfect, and absolutely delicious. Now, every year, we intentionally “mess up” a batch of cookies just to make them. It’s our funny, sweet little reminder that sometimes the best things in life—and in the kitchen—come from happy accidents and a willingness to get a little creative.
Gathering Your Merry Ingredients
The beauty of this recipe is its beautiful simplicity. You likely have most of this in your pantry right now! Here’s what you’ll need to create about two dozen little bites of heaven.
- 1 box vanilla or sugar cookie mix (baked and cooled) – This is our fantastic shortcut and the base of our cake balls. I love using a classic sugar cookie mix for its soft, sweet crumb. Chef’s Insight: Bake the cookies according to the package directions, but let them get just a *hint* golden brown. We want them soft, not crispy! Let them cool completely before crumbling. No mix? No problem! You can absolutely use your favorite homemade sugar cookie recipe—you’ll need about 3 cups of crumbled cookies.
- ½ cup vanilla frosting – This is the “glue” that holds our cake balls together and adds a wonderful moisture and sweetness. Substitution Tip: Use store-bought for ultimate ease, or your favorite homemade buttercream! Cream cheese frosting also works beautifully for a slightly tangy twist. If you’re out of vanilla, chocolate or even strawberry frosting would be a fun, colorful surprise inside!
- 1 bag (12 oz) white chocolate chips or white candy melts – This is our gorgeous, creamy coating. Chef’s Insight: I have a slight preference for high-quality white chocolate chips (like Ghirardelli or Guittard) for their superior flavor, but candy melts are fantastic because they set harder and are more forgiving for beginners. They also come in vibrant colors if you want to get really creative!
- Red and green sprinkles – The festive finishing touch! Substitution Tip: Use jimmies, nonpareils, sanding sugar, crushed candy canes, or even a drizzle of dark chocolate for decoration. This is where your personality can shine!
Let’s Get Rolling: Your Foolproof Steps to Success
Ready to get your hands a little messy? This is the fun part! Follow these steps, and you’ll have perfect cake balls in no time.
- Crumble and Combine: Take your completely cooled cookies and place them in a large mixing bowl. Now, get crumbing! You can use your hands (my preferred method for feeling connected to the food!), a pastry cutter, or even the back of a fork. You want fine, even crumbs—no big chunks! Once you have a bowl of beautiful sandy crumbs, plop in that half-cup of frosting. Start mixing with a spatula and then, I promise, you’ll want to switch to using your hands. Mix and squish until no dry crumbs remain and the mixture holds together when you pinch it. It should feel like a soft, slightly sticky dough.
- Roll and Rest: Now, let’s portion them out. I use a small cookie scoop (about 1 tablespoon size) to keep them all uniform, but a regular spoon works just fine. Scoop up some mixture and roll it between your palms to form a smooth, 1-inch ball. Pro Chef Hack: If the mixture is too sticky to handle, pop it in the fridge for 15 minutes. It will firm up beautifully. Place each rolled ball on a baking sheet lined with parchment paper or a silicone mat. Once they’re all rolled, this is the most important step: FREEZE THEM for 15-20 minutes. Don’t skip this! This firms them up, making them much, much easier to dip without falling apart in the warm chocolate.
- Melt the Magic: While the balls are chilling, melt your coating. You can use a double boiler, but I’m a fan of the microwave for speed and fewer dishes. Place your white chocolate or candy melts in a microwave-safe bowl. Heat on 50% power in 30-second intervals, stirring vigorously between each burst. This is key! Heating on low power and stirring prevents the chocolate from seizing and becoming a grainy mess. Stop heating when just a few small lumps remain—the residual heat will melt them as you stir. You want it smooth and pourable.
- The Big Dip: Take your tray of firm cake balls out of the freezer. Now, let’s dip! I like to use a fork or a specialty dipping tool. Drop a ball into the melted chocolate. Use your fork to gently roll it around until it’s completely coated. Lift it out, let the excess chocolate drip off by gently tapping the fork on the edge of the bowl, and then carefully slide it back onto your parchment-lined tray. Work relatively quickly here!
- Sprinkle Immediately! This is a race against the clock. The chocolate shell sets fast. The moment you place a dipped ball back on the tray, shower it with your festive sprinkles. If you wait even 30 seconds, the chocolate will start to set and the sprinkles won’t stick. Get the whole tray dipped first, then go back and sprinkle? Nope! Do it one by one. Trust me on this. It’s worth it for that perfect festive coverage.
- Set and Serve: Once all your cake balls are beautifully dressed in their chocolate and sprinkles, let them set completely. You can leave them at room temperature if your kitchen isn’t too warm, or pop the whole tray in the refrigerator for about 15 minutes to speed up the process. The chocolate will become firm to the touch.
How to Serve These Holiday Gems
Presentation is part of the fun! For a casual family treat, simply pile them high on a beautiful holiday platter. If you’re gifting them or serving them at a party, I love placing each one in a mini paper cupcake liner—it makes them look professional and keeps fingers clean. Arrange them in a festive cookie tin between layers of parchment paper for the perfect homemade gift. They also look stunning stacked on a cake stand as the centerpiece of your dessert table. However you serve them, be prepared for them to disappear quickly!
Mix It Up! Fun Flavor Variations
The basic formula is your canvas—paint it with flavor! Here are a few of my favorite twists:
- Peppermint Bliss: Use a chocolate cookie mix instead of vanilla. Add ¼ teaspoon of peppermint extract to the cookie crumb and frosting mixture. Dip in dark chocolate and top with crushed candy canes.
- Gingerbread Spice: Use a gingerbread cookie mix. Add a pinch of extra cinnamon and nutmeg to the crumbs. Dip in white chocolate and decorate with a single cinnamon red hot candy.
- Confetti Funfetti: Use a funfetti cake mix, baked and cooled into cookies! Use vanilla frosting and white chocolate coating, and roll the balls in rainbow sprinkles for a birthday-themed treat.
- Lemon Berry: Use a lemon cookie mix. Add a teaspoon of lemon zest to the crumbs. Dip in white chocolate and top with a tiny piece of freeze-dried raspberry for a tangy, vibrant pop.
- Nutty Delight: Stir ¼ cup of very finely chopped toasted pecans or almonds into the crumb mixture before adding the frosting for a lovely crunch.
Olivia’s Chef Notes & Kitchen Confessions
Over the years, I’ve made approximately one million of these cake balls (a slight exaggeration, but it feels true!), and I’ve learned a thing or two. First, embrace the mess. Your hands will get covered in chocolate and sprinkles will find their way to every corner of your kitchen. It’s part of the charm! Second, if your first few dips are messy, don’t stress. The first one is always the “chef’s treat” for quality control (a.k.a., eating immediately). You’ll get the hang of it.
This recipe has evolved from my grandma’s salvage operation into my go-to holiday gift. I now double, even triple, the batch and set up a decorating station with my kids. We have bowls of different sprinkles, crushed candies, and even edible glitter. It’s become less about the perfect treat and more about the time we spend together, laughing and creating. That, to me, is the real recipe.
Your Questions, Answered!
Q: My cake ball mixture is too wet and sticky! What did I do wrong?
A: This usually means you had a particularly moist batch of cookies or added a *scant* too much frosting. Don’t panic! Just add a tiny bit more of your cookie crumbs (if you have any left) or even a tablespoon of crushed graham cracker or vanilla wafer crumbs to help soak up the extra moisture. If it’s beyond saving, just pop the whole mixture in the fridge for 20-30 minutes; it will be much easier to handle.
Q: My white chocolate is clumpy and thick, not smooth. How can I fix it?
A> Ah, seized chocolate! It happens to the best of us, usually from overheating or a single drop of water getting in the bowl. The best fix is prevention: use a completely dry bowl and melt slowly. If it’s already seized, try adding a tiny bit of solid vegetable shortening (like Crisco) or coconut oil (about ½ teaspoon at a time) and stir vigorously over low heat. This can sometimes bring it back to a dippable consistency.
Q: Can I make these ahead of time?
A> Absolutely! They are fantastic make-ahead treats. Once set, store them in a single layer in an airtight container in the refrigerator for up to 1 week. You can also freeze them for up to 3 months! Just thaw in the refrigerator overnight before serving.
Q: Why did my cake balls crack after dipping?
A> This is almost always a temperature shock issue. If your cake balls are too cold (straight from the freezer into very warm chocolate), the expansion can cause tiny cracks. The sweet spot is a firm but not rock-hard cake ball. Let them sit out of the freezer for just a minute or two before dipping if this happens.
Christmas Cookie Cake Balls
- Total Time: 25 minutes
Description
These little bites of holiday magic are soft, sweet, and oh-so-festive! Crumbled sugar cookies mixed with creamy frosting are rolled into perfect bites, dipped in smooth white chocolate, and showered in sprinkles. They’re the ultimate no-fuss treat—easy enough for kids to help with, fancy enough for gifting, and guaranteed to vanish from your dessert table.
Ingredients
-
1 box vanilla or sugar cookie mix (baked & cooled)
-
½ cup vanilla frosting (store-bought or homemade)
-
1 bag (12 oz) white chocolate chips or candy melts
-
Red & green sprinkles (or crushed candy canes, sanding sugar, etc.)
Instructions
-
Crumble cookies into fine crumbs in a large bowl.
-
Mix in frosting until a soft, sticky dough forms.
-
Roll into 1-inch balls; place on parchment-lined tray. Freeze 15–20 min.
-
Melt chocolate in 30-sec bursts at 50% power, stirring until smooth.
-
Dip chilled balls in chocolate, coat fully, and let excess drip off.
-
Sprinkle immediately before chocolate sets.
-
Set at room temp (20–30 min) or refrigerate (15 min) until firm.
Notes
-
If the mixture feels too sticky, chill briefly before rolling.
-
Always sprinkle right after dipping—chocolate sets fast!
-
For variety: try gingerbread crumbs + white chocolate, chocolate cookies + peppermint, or even fill the centers with a surprise candy.
- Prep Time: 25 min
Nutritional Information*
*Please note: This is an estimated nutritional breakdown based on the specific ingredients listed and a yield of 24 cake balls. It will vary based on the specific brands of cookie mix, frosting, and chocolate you use.
Per cake ball (approx.): Calories: 120 | Fat: 6g | Saturated Fat: 3.5g | Carbohydrates: 16g | Sugar: 12g | Protein: 1g | Fiber: 0g | Sodium: 80mg
Prep Time: 10 minutes | Chill Time: 20 minutes | Total Time: 30 minutes | Yield: About 24 balls
Final Thoughts: Share the Joy
And there you have it! Your very own batch of Christmas magic, ready to be shared and savored. These Christmas Cookie Cake Balls are more than just a dessert; they’re a conversation starter, a gift from the heart, and a delicious testament to the fact that the best memories are often the imperfect ones.
So, as you look at your finished platter of sprinkle-dusted delights, I hope you feel a deep sense of pride—not just for creating something incredibly tasty, but for taking a moment to create joy. This holiday season, may your home be warm, your heart be full, and your kitchen be filled with the sweet, happy mess of making memories.


