

Chocolate Dump Cake: Your New Secret Weapon for Ridiculously Easy Dessert Magic
Hey there, friend! Come on in, grab an apron (a clean one, or… you know what, any apron will do), and get ready for a story that ends with the most decadent, soul-warming, chocolate-filled hug you can imagine. I’m talking about the legendary, the infamous, the downright magical Chocolate Dump Cake.
We’ve all been there. It’s 4 PM on a Tuesday, the week is already feeling long, and a serious chocolate craving hits you like a freight train. Or maybe it’s Sunday night, family is coming over, and you promised to bring dessert but… life happened. You don’t have the bandwidth for creaming butter and sugar, sifting flour, or washing a mountain of bowls. I see you, I feel you, and I am here to tell you: the solution is here, and it’s gloriously simple.
This cake is my not-so-secret secret. It’s the dessert I make when I want to impress without the stress. It’s the recipe I pass to new cooks with a wink, because it guarantees success and cheers. With a name as unpretentious as “dump cake,” you know it’s going to be straightforward. You literally dump a few pantry staples into a dish, walk away, and the oven works its alchemy. What emerges is a wonder: a rich, fudgy, pudding-like base with a crackly, brownie-like top, all swimming in pools of melted chocolate chips. It’s comfort in a 9×13 pan, and it’s about to become your best friend. Let’s make some magic, the easy way.
The Cake That Saved (Many) Evenings
I have to laugh thinking about the first time I made a dump cake. It was years ago, during my “everything must be from scratch” phase (we’ve all been there!). My best friend showed up at my door with a diaper bag, a toddler on her hip, and that exhausted-but-smiling look only moms understand. “I need chocolate,” she declared. “And I need it in 10 minutes or less.”
I panicked. My from-scratch brownies took an hour! Then I remembered a crumpled, butter-stained recipe card my grandma had given me, titled simply “Chocolate Dump.” I was skeptical. It felt like cheating. But with a skeptical friend and a now-crying toddler as my audience, I had nothing to lose.
Five minutes later, the cake was in the oven. We sat at the kitchen island, sipping tea, watching through the glass door as this bizarre, unmixed concoction started to bubble and transform. The smell was insane—like a chocolate factory had exploded in my kitchen. When we scooped out warm, gooey spoonfuls into bowls, topped with vanilla ice cream, we were silent for a full minute. Then she looked at me and said, “This is the best thing you’ve ever made me.” It was a lesson I’ve never forgotten: the goal isn’t complexity; it’s connection. And sometimes, the simplest tools create the coziest, most memorable moments.
Gathering Your Chocolate Arsenal
The beauty here is in the short, sweet list. Here’s what you’ll need and why each one is a star player:
- 1 box (approx. 15.25 oz) chocolate cake mix – This is our dry foundation. Chef’s Insight: Don’t get fancy here; the classic, cheap “devil’s food” or “dark chocolate” mix works perfectly. It provides the structure and that familiar cake flavor. For a fun twist, try a chocolate fudge or German chocolate mix (just ignore any included frosting packets!).
- 1 (3.9 oz) box instant chocolate pudding mix – The SECRET WEAPON! This is what creates that luxurious, custardy layer beneath the cakey top. It’s the reason this dessert is so rich and fudgy. Instant is key—cook-and-serve won’t work the same way.
- 2 cups milk – Whole milk will give you the creamiest result, but 2% works great too. This activates the pudding mix. Sub Tip: For an ultra-decadent version, swap in half-and-half or even full-fat canned coconut milk for a dairy-free, incredibly lush alternative.
- 1½ cups chocolate chips – The molten chocolate pockets! I use semi-sweet for a perfect balance, but this is your playground. Chef’s Choice: A mix of dark chocolate chunks and milk chocolate chips is divine. Mini chips distribute more evenly, while large chunks create glorious chocolate lava pockets.
- ½ cup (1 stick) unsalted butter, sliced into thin pats – The golden crown. As the butter melts over the dry cake mix, it creates that irresistible crumbly, crisp topping. Pro Tip: Using cold butter and slicing it thinly ensures even distribution and melting. If you only have salted butter, that’s fine—it will just add a hint of salty contrast to all the sweet.
The “Dump & Bake” Magic Act
Ready? This is the easiest dance you’ll ever do in the kitchen. Preheat your oven to 350°F (175°C). Grease your trusty 9×13-inch baking dish well with butter, cooking spray, or a swipe of oil. Let’s go!
- Create the Pudding Base. In your greased dish (yep, right in the pan—less mess!), whisk together the dry instant pudding mix and the milk. Whisk for a good 30-60 seconds until it’s smooth and starting to thicken slightly. You’re building your flavor foundation right in the serving vessel. “No bowl? No problem!”
- The Great Dump (Part 1). Here’s where you have to trust the process. Take your dry cake mix and sprinkle it evenly over the top of the pudding layer. Use your fingers or a spoon to break up any huge clumps, but otherwise, just let it rain down in a pretty, even blanket. Now, here is the most important instruction: DO NOT STIR. I mean it! Don’t whisk it, don’t fold it, don’t even think about mixing. This separation of layers is what creates the magical dual-texture result.
- The Chocolate Chip Blanket. Take your chocolate chips and scatter them generously and evenly over the dry cake mix. This is the layer that will become your melty, gooey treasure. Pretend you’re sowing chocolate seeds for a fantastic harvest.
- The Buttery Crown. Take your thinly sliced pats of cold butter and distribute them as evenly as you can over the entire surface. Try to cover most of the dry mix. It’s like putting little butter blankets on every square inch. This step is crucial for getting that gorgeous, golden-brown, crisp topping.
- Bake to Bubbly Perfection. Slide the dish into your preheated oven. Now, walk away. Seriously, set a timer for 35 minutes and resist the urge to open the oven door. You’ll know it’s done when the top is set, looks crackly and dry (not powdery), and the edges are bubbling with dark, fragrant chocolate lava. It might look a bit uneven—that’s part of its charm! A toothpick inserted won’t come out clean, and that’s perfect. You’re aiming for a fudgy cake, not a dry one. Total bake time is usually 35-40 minutes.
- The (Brief) Torture of Waiting. Remove the pan from the oven. I know, the smell is incredible. But let it sit for at least 15-20 minutes before diving in. This allows the molten chocolate and pudding layers to settle into a creamy, sliceable (well, scoopable) bliss. It will still be gloriously warm.
How to Serve This Chocolate Masterpiece
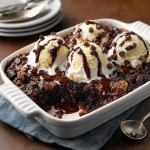
This cake begs to be served warm and cozy. I like to scoop it straight from the pan into bowls—embrace its rustic, “cobbler-style” beauty. The non-negotiable partner? A giant scoop of vanilla ice cream. The hot/cold, fudgy/creamy contrast is life-changing. A dollop of freshly whipped cream and a tiny sprinkle of flaky sea salt is my gourmet move. For a brunch twist, a spoonful of raspberry or strawberry compote cuts the richness beautifully. Serve it with a big spoon and lots of napkins!
Make It Your Own: Delicious Dump Cake Twists
The basic formula is your canvas! Get creative:
- Cookies & Cream: Use a white or yellow cake mix, vanilla pudding, and dump a cup of crushed Oreos on top with the butter.
- Peanut Butter Cup: Use chocolate cake mix, add 1 cup peanut butter chips with the chocolate chips, and drizzle ¼ cup of melted peanut butter over the top before adding the butter.
- Black Forest: Use chocolate cake mix, cherry pie filling as your first “dump” layer (skip the pudding/milk), then top with cake mix, chocolate chips, and butter.
- Gluten-Free/Dairy-Free: Use a certified GF chocolate cake mix, dairy-free instant pudding with coconut milk, vegan chocolate chips, and a plant-based butter stick. It works like a dream!
- Salted Caramel Pretzel: Sprinkle ½ cup crushed pretzels and ½ cup caramel bits over the cake mix before adding the butter for a sweet-salty-crunchy wonder.
Olivia’s Kitchen Notes & Stories
Over the years, this recipe has been my steadfast companion. I’ve made it in beach rental ovens, for last-minute school bake sales (where it always disappears first), and as a “welcome to the neighborhood” gift. The funniest thing? People always ask for the “complicated” recipe, and their jaws drop when I tell them it’s a dump cake.
One time, I was filming a quick video of the “dump” process for my stories and got so excited talking that I accidentally used the cook-and-serve pudding mix. The result was… interesting. Much soupier, but still delicious! It just reinforced the rule: instant pudding is key for the right set. My other evolution? I sometimes add a teaspoon of espresso powder to the dry cake mix to deepen the chocolate flavor, or a splash of vanilla to the milk. But the classic version never fails. It’s proof that good food doesn’t have to be hard. It just has to be made with joy (and a lot of chocolate).
Your Dump Cake Questions, Answered!
Q: My cake turned out super soupy in the middle, even after cooling. What happened?
A: This usually means it needed more bake time. Ovens vary! If the top looks set but it’s very jiggly, give it another 5-10 minutes. Also, double-check you used instant pudding, not cook-and-serve. Finally, make sure you’re using the right size pan—a smaller dish will make the layers too thick to set properly.
Q: Can I mix everything together instead of layering?
A: You can, but you’ll lose the magical two-texture effect! The layering is what creates the pudding-bottom/cakey-top dynamic. If you mix it, you’ll get a more uniform, heavier cake. Trust the dump method!
Q: What’s the best way to store leftovers?
A: Cover the pan tightly with foil or plastic wrap and keep it at room temp for up to 2 days, or in the fridge for up to 4. Reheat individual servings in the microwave for 20-30 seconds to bring back that gooey, just-baked warmth.
Q: I don’t have a 9×13 pan. Can I use something else?
A: A deep 10-inch oven-safe skillet or a 3-quart ceramic baking dish works wonderfully. Just avoid shallow pans, as the cake bubbles up while baking. Adjust bake time slightly if the surface area is significantly different.
Chocolate Dump Cake : Rich, Gooey, and Amazingly Easy
Description
This is the ultimate “throw it together” dessert that looks impressive but is effortless. Layers of instant chocolate pudding, rich chocolate cake mix, chocolate chips, and butter bake into a fudgy, crackly, chocolate-filled masterpiece that everyone will love.
Ingredients
-
1 box (15.25 oz) chocolate cake mix (dry, any brand)
-
1 box (3.9 oz) instant chocolate pudding mix
-
2 cups milk (whole or 2%)
-
1½ cups chocolate chips (semi-sweet, or mix of milk & dark)
-
½ cup (1 stick) unsalted butter, sliced into thin pats
Instructions
-
Preheat oven: 350°F (175°C). Grease a 9×13-inch baking dish.
-
Make pudding layer: In the prepared dish, whisk together instant pudding mix and milk until smooth and slightly thickened.
-
Layer the cake mix: Sprinkle the dry chocolate cake mix evenly over the pudding. Do not stir.
-
Add chocolate chips: Scatter them evenly over the cake mix.
-
Top with butter: Place thin pats of butter evenly across the surface.
-
Bake: 35–40 minutes, until the top is crackly and edges are bubbling. The center may jiggle slightly—this is perfect.
-
Cool slightly: Let sit 15–20 minutes before serving to let layers set.
-
Serve: Scoop into bowls and top with vanilla ice cream or whipped cream, if desired.
Notes
-
Use instant pudding, not cook-and-serve, for the proper fudgy layer.
-
Don’t stir the layers—this is what creates the cake/pudding dual texture.
-
Thin slices of cold butter ensure an evenly golden, crisp top.
-
Optional: Add espresso powder to intensify chocolate flavor.
Nutritional Information*
*Please note: Nutritional info is an estimate based on standard ingredients and will vary with substitutions.
Per Serving (1 of 12): Calories: ~390 | Protein: 4g | Carbohydrates: 45g | Fat: 22g
Prep Time: 5 minutes | Cook Time: 35-40 minutes | Total Time: 45 minutes | Servings: 12
Final Thoughts: The Beauty of Effortless Joy
So there you have it—the recipe that redefines “easy” and reimagines what it means to bake something wonderful. This Chocolate Dump Cake is more than a dessert; it’s a permission slip. Permission to embrace simplicity, to choose joy over perfection, and to believe that something extraordinary can come from the most humble, no-fuss beginnings.
In a world that often feels complex and demanding, this cake is a delicious rebellion. It’s a reminder that the heart of cooking isn’t found in intricate techniques or a mountain of dishes—it’s found in the shared moment around the table, the contented silence that falls when something warm and chocolatey is served, and the pure, uncomplicated pleasure of a craving satisfied.
It proves that magic doesn’t require a wand, just a warm oven and a willingness to trust the process. That layered “dump” isn’t a shortcut; it’s the secret. It’s the alchemy that transforms a few pantry staples into a texture wonderland—creamy, fudgy, crackly, and molten, all in one spoonful.
Keep this recipe in your back pocket. Let it be your secret weapon for spontaneous gatherings, your comfort on a tough day, and your guaranteed smile-maker for anyone lucky enough to get a scoop. Because the best kind of baking doesn’t just fill your kitchen with a heavenly smell—it fills your home with warmth and your people with happiness.


