The Cookie That Feels Like a Hug: Introducing Chocolate Crinkle Cookies
Hello, my fellow flavor lovers! Olivia here, apron dusted with a fresh layer of powdered sugar and my kitchen smelling like a cocoa-dusted dream. Have you ever seen a cookie so stunningly beautiful, so perfectly imperfect with its snowy-white cracks against a dark, fudgy canvas, that you almost don’t want to eat it? I said almost. Because the moment you bite into a Chocolate Crinkle Cookie, all bets are off.
These aren’t just cookies; they’re edible magic. They’re the showstoppers on any holiday cookie platter, the star of the bake sale, and the secret weapon for turning a regular Tuesday into something special. With a crisp, sugared shell that gives way to an unbelievably soft, brownie-like center, they deliver a one-two punch of rich chocolate and pure, unadulterated joy. The best part? They look like you spent hours in a fancy pastry kitchen, but the truth is, they’re wonderfully simple to make. We’re talking about a dough that comes together in one bowl (hello, easy cleanup!) and requires just one secret, non-negotiable step for that iconic crinkle: patience. So, preheat your ovens and grab your favorite mixing bowl. We’re about to bake up a batch of pure, chocolatey happiness.
A Snowy Day & A Lesson in Patience
My love affair with crinkle cookies started one blustery December afternoon at my grandmother’s house. I was about ten, buzzing with that specific kind of holiday energy that can only be cured by a serious baking project. I saw the picture in her worn, splattered cookbook: these dramatic, crackled cookies that looked like they’d been dusted with fresh snow. I was ready to dive right in, but my grandma placed a gentle hand on my shoulder. “The magic,” she whispered, “happens in the waiting.” She taught me that the chilling time wasn’t a delay; it was part of the recipe’s story. As the dough rested in the fridge, we’d sip hot chocolate and watch the real snow fall outside. When we finally rolled the firm, cold dough balls and watched them emerge from the oven, transformed into these breathtaking, crackled masterpieces, I understood. The best things in life—and in baking—are worth the wait. Every time I make these, I’m right back in her warm, cinnamon-scented kitchen.
Gathering Your Chocolate Crinkle Cookie Crew
Here’s your shopping list for fudgy perfection! This is a simple, pantry-friendly recipe, but each ingredient plays a starring role.
- 1 cup unsweetened cocoa powder: This is the soul of your cookie! I use a natural, non-alkalized cocoa powder for a deep, intense chocolate flavor. Don’t substitute Dutch-processed here, as it reacts differently with the baking powder and can affect the rise and color.
- 2 cups granulated sugar: Sweetness, of course, but sugar also helps create that beautifully crisp exterior and contributes to the chewy texture.
- ½ cup vegetable oil: This is our key to an incredibly moist and fudgy center! It creates a denser, richer crumb than butter would. You can use canola or melted coconut oil as a 1:1 substitute.
- 4 large eggs: Our binding agents and the key to that lovely structure. Make sure they’re at room temperature for a smoother, more emulsified dough.
- 2 teaspoons vanilla extract: The classic flavor enhancer. It rounds out the chocolate and adds a warm, aromatic depth.
- 2 cups all-purpose flour: The foundation of our cookie. For a slightly more tender bite, you can swap in 1 cup of all-purpose and 1 cup of cake flour.
- 2 teaspoons baking powder: Our leavening agent! This is what gives the cookies their lift and helps create those iconic cracks as they expand in the oven.
- ½ teaspoon salt: Do not skip this! Salt is a flavor superhero that makes the chocolate taste richer and more complex.
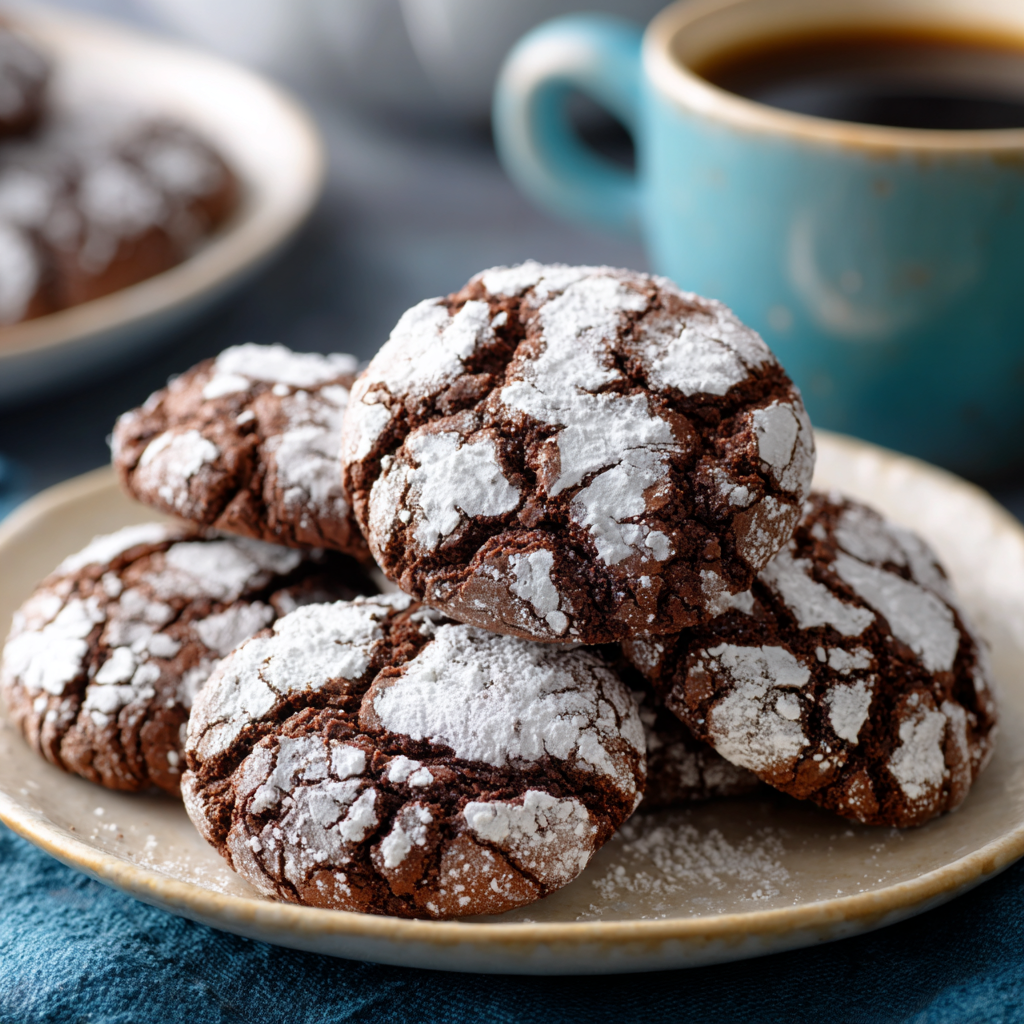
- ¾ cup powdered sugar (for rolling): The “snow” on our cookie landscape! Roll the dough balls generously for that beautiful, high-contrast finish.
Let’s Bake! Your Step-by-Step Guide to Crinkle Perfection
Ready to create some magic? Follow these steps, and you’ll be a crinkle cookie pro in no time. I’ve sprinkled in all my favorite chef hacks to ensure your success.
- Create the Chocolate Base: In a large bowl, vigorously whisk together the unsweetened cocoa powder, granulated sugar, and vegetable oil. You’ll get a thick, sandy, almost fudge-like mixture. This is normal and smells amazing! Chef’s Hack: Really whisk for a full minute here. This initial step helps dissolve the sugar a bit and ensures your cookies won’t be grainy.
- Incorporate Eggs & Vanilla: Add the eggs one at a time, whisking well after each addition until the mixture becomes glossy and smooth. This patience ensures each egg is fully emulsified. Stir in the vanilla extract. Your batter should now look like a luxurious, pourable brownie batter.
- Combine Dry Ingredients: In a separate, medium bowl, whisk together the flour, baking powder, and salt. This isn’t just mixing; it’s aerating your dry ingredients and ensuring the baking powder is evenly distributed for an even rise.
- Bring the Dough Together: Gradually add the dry ingredients to the wet chocolate mixture. I like to switch to a spatula or wooden spoon for this part. Stir until just combined and no dry streaks of flour remain. Do not overmix! Overworking the dough can lead to tough cookies.
- The All-Important Chill: Cover the bowl with plastic wrap and chill the dough for at least 3 hours, or ideally, overnight. This is non-negotiable. Chilling firms up the dough, preventing the cookies from spreading into flat puddles in the oven. It also deepens the chocolate flavor and is the secret to getting those perfect, dramatic cracks.
- Preheat & Prep: When you’re ready to bake, preheat your oven to 350°F (175°C). Line your baking sheets with parchment paper. Trust me, this is a lifesaver for easy cleanup and preventing any sticking.
- Roll & Sugar Coat: Use a small cookie scoop (about 1 tablespoon) to portion the dough. Roll each portion into a smooth, tight ball between your palms. Now, roll each ball generously in the powdered sugar. You want a thick, snowy coating. Chef’s Hack: For an extra-thick, crackly sugar coating, roll the balls in granulated sugar first, then in the powdered sugar. The granulated sugar absorbs some moisture, allowing the powdered sugar to stay bright white and not melt away completely.
- Bake to Perfection: Place the dough balls about 2 inches apart on your prepared baking sheets. They need space to spread and crinkle! Bake for 10-12 minutes. The cookies are done when the edges are set and the centers still look soft and slightly underbaked. They will firm up as they cool. This is the key to a fudgy center!
- Cool & Devour: Let the cookies cool on the hot baking sheet for at least 5 minutes before transferring them to a wire rack to cool completely. This allows them to set up properly. Then, pour a glass of milk and enjoy the fruits of your (patient) labor!
How to Serve These Chocolatey Gems
Presentation is part of the fun! Pile these crinkle cookies high on a rustic wooden board or a vintage cake stand for a gorgeous visual impact. They’re a dream alongside a mug of strong coffee, a cold glass of milk, or even as a decadent topping for a scoop of vanilla bean ice cream. For the holidays, I love tucking them into cellophane bags tied with a ribbon as the most delicious homemade gift.
Get Creative! Fun Flavor Twists
Once you’ve mastered the classic, try these fun variations to mix things up!
- Peppermint Crinkle: Add 1 teaspoon of peppermint extract along with the vanilla and roll the dough balls in crushed candy canes mixed with the powdered sugar.
- Orange Zest Infusion: Add the zest of one large orange to the dough for a bright, citrusy twist that cuts through the richness beautifully.
- Espresso Power: Whisk 1-2 tablespoons of instant espresso powder into the dry ingredients for a mocha-flavored cookie that will wake up your taste buds.
- Gluten-Free Swap: Substitute the all-purpose flour with a 1:1 gluten-free baking blend for a treat everyone can enjoy.
- S’mores Style: After baking, press a mini marshmallow into the center of each warm cookie and drizzle with melted chocolate.
Olivia’s Kitchen Notes & Stories
This recipe has been my faithful friend for years, and it’s evolved in tiny ways. I used to be impatient with the chill time (we’ve all been there!), and my cookies would spread into sad, flat disks. Learning to respect the chill was a game-changer. One time, I accidentally used melted butter instead of oil, and while they were still tasty, they lost that distinctively fudgy, brownie-like quality that makes this recipe so special. The oil is key! And a funny story: I once brought a batch to a party, and a friend spent a full five minutes convinced I’d bought them from a professional bakery. That’s the power of the crinkle—it makes you look like a total rockstar.
Your Crinkle Cookie Questions, Answered!
Let’s tackle some common hiccups so your baking journey is smooth sailing.
- Q: My cookies didn’t crack much. What went wrong?
A: The most common culprit is not chilling the dough long enough. The dough needs to be very cold so the outside sets quickly in the oven, forcing the expanding interior to crack through the powdered sugar shell. Next time, chill it overnight! Also, make sure your baking powder is fresh. - Q: Can I freeze the dough?
A: Absolutely! This is a fantastic make-ahead trick. You can freeze the shaped, powdered-sugar-rolled dough balls on a tray, then transfer them to a freezer bag. Bake straight from the freezer, adding 1-2 minutes to the baking time. - Q: My powdered sugar disappeared/ melted into the cookies.
A: This usually happens if the dough is too warm or sticky when rolled. Ensure it’s thoroughly chilled. The “double-sugar” method I mentioned (rolling in granulated sugar first) creates a barrier that helps the powdered sugar stay put and visible. - Q: The cookies are too cakey, not fudgy. Help!
A: This can happen if you over-measure the flour. The best way to measure flour is to spoon it into your measuring cup and level it off with a knife, rather than scooping directly from the bag, which can pack in too much. Also, be careful not to overbake them!

Chocolate Crinkle Cookies : Fudgy, Rich, and Dusted with Sweetness
Description
These Chocolate Crinkle Cookies look like they came straight out of a magical winter bakery — dark and fudgy inside, dusted in bright white “snow” outside. They’re simple to make, rich with chocolate, and full of nostalgia. The only real secret? Patience.
Ingredients
Dry Ingredients
-
2 cups all-purpose flour
-
2 teaspoons baking powder
-
½ teaspoon salt
Wet Ingredients
-
1 cup unsweetened cocoa powder
-
2 cups granulated sugar
-
½ cup vegetable oil
-
4 large eggs (room temperature)
-
2 teaspoons vanilla extract
For Rolling
-
¾ cup powdered sugar
-
Optional: extra granulated sugar for the “double roll” trick
Instructions
1. Make the Chocolate Base
In a large bowl, whisk together:
-
Cocoa powder
-
Granulated sugar
-
Vegetable oil
Whisk for a full minute for the smoothest, non-grainy cookies.
2. Add Eggs & Vanilla
Add eggs one at a time, whisking well after each addition.
Stir in the vanilla.
The mixture should look glossy and brownie-like.
3. Mix Dry Ingredients
In another bowl, whisk together:
-
Flour
-
Baking powder
-
Salt
This helps your cookies rise evenly.
4. Combine Wet & Dry
Add the dry ingredients to the chocolate mixture gradually.
Switch to a spatula and mix until just combined.
Do not overmix.
5. Chill the Dough (Important!)
Cover the bowl and refrigerate for at least 3 hours, or overnight for the best flavor and cracks.
The dough must be very cold before baking.
6. Prep for Baking
Preheat the oven to 350°F (175°C).
Line baking sheets with parchment paper.
7. Shape & Coat the Cookies
Scoop 1 tablespoon of dough and roll into balls.
Roll each ball in:
-
Granulated sugar (optional but recommended)
-
Powdered sugar (thick coating)
This gives the cookies that bright, snowy look.
8. Bake
Place balls 2 inches apart.
Bake for 10–12 minutes.
The edges should be set, but the centers should still look soft — they’ll firm as they cool.
9. Cool & Enjoy
Let cookies rest on the baking sheet for 5 minutes, then transfer to a cooling rack.
Notes
-
Chill thoroughly → best cracks + prevents spreading
-
Fresh baking powder → good rise
-
Don’t overbake → keeps centers fudgy
-
Double sugar roll → brighter white cracks
Nutritional Information*
*This is an estimate for your convenience.
Per Cookie: Calories: 110 | Fat: 4g | Carbohydrates: 18g | Sugar: 12g | Protein: 2g | Fiber: 1g
Final Thoughts
So, there you have it—the not-so-secret recipe for a cookie that feels like a warm, chocolatey embrace. From that first magical sight of snowy cracks in the oven to the rich, fudgy bite that follows, Chocolate Crinkle Cookies are more than just a dessert; they’re a experience. They teach us that a little patience yields beautiful results, and that the simplest ingredients can create something truly spectacular.
Whether you’re carrying on a family tradition, starting a new one of your own, or simply treating yourself to a moment of baking therapy, I hope this recipe brings as much joy to your kitchen as it has to mine. It’s a reminder that the best things in life are often sweet, a little messy, and always worth sharing.
Now, I’d love to hear from you! Did you stick with the classic or try a fun twist? Share your crinkle cookie creations with me on social media using #LivsCookieCrinkles. Happy baking!
With love and a sprinkle of sugar,
Olivia
“`