

Chocolate Bark with Sprinkles: Your New Go-To for Sweet, Shareable Joy
Hey there, friend! Come on in, pull up a stool. Can you smell that? It’s the warm, deeply comforting scent of melting chocolate—a smell that promises good things are just minutes away. Today, we’re not just making a dessert; we’re crafting a moment. We’re creating Chocolate Bark with Sprinkles, and I can’t wait to share it with you.
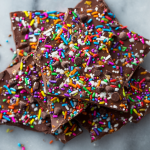
This isn’t just a recipe; it’s a blank canvas for joy. Imagine a thick slab of glossy, crisp chocolate that gives the most satisfying *snap* when you break it. Now, picture it studded with a confetti explosion of colorful sprinkles that seem to hold little sparks of light. It’s whimsical, it’s incredibly easy, and it’s utterly irresistible. Whether you need a last-minute hostess gift, a fun project with kids on a rainy afternoon, or just a purely-for-you treat that feels celebratory, this bark is your answer. It requires zero fancy skills, just a willingness to embrace a little sweetness and a lot of color. So, tie on that apron (the messy one is always the best), and let’s turn a handful of simple ingredients into pure, breakable, shareable magic.
A Little Sparkle in Grandma’s Kitchen
This recipe always takes me right back to my grandma’s linoleum-tiled kitchen. She wasn’t a “fancy” baker, but she was a generous one. Her version of bark was usually made with leftover chocolate from other baking projects, melted down in her chipped double-boiler (which was really just a bowl over a pot).
I’d stand on my designated step-stool, utterly mesmerized as she poured the molten chocolate onto a sheet of wax paper. Then came the best part: the Topping Ceremony. She’d let me raid her baking cabinet—a treasure trove of rainbow jimmies, silver dragées (which we’d carefully pick off before eating, of course), crushed peppermints from Christmas, and always, always, a handful of salty peanuts. “Life needs both sweet and salt, Livvy,” she’d say with a wink. That act of scattering toppings felt less like cooking and more like making art. Breaking the hardened slab into jagged pieces and stacking them on her old floral plate felt like we’d created something priceless. It taught me that the most memorable food isn’t about perfection; it’s about the feeling you stir into it. Every time I make bark now, I feel that same spark of childhood creativity, and I hope you will too.
Gathering Your Sparkly Supplies
Here’s the beautiful part: you only need a couple of core ingredients to make magic happen. The rest is pure creative play.
- 12 oz Semi-Sweet or Dark Chocolate Chips or Bars: This is your canvas! I love semi-sweet for its classic, balanced flavor. Using high-quality chocolate (check the label for cocoa butter) gives you a glossier finish and better snap. Chef’s Insight: If using a bar, chop it roughly so it melts evenly. For a dairy-free version, ensure your chocolate is labeled as such.
- ½ tsp Coconut Oil: This is my secret weapon! Just a tiny bit adds incredible shine and helps the bark harden with that perfect, crisp snap. Don’t worry, you won’t taste it. Substitution Tip: If you don’t have coconut oil, you can use a tiny bit of vegetable shortening, or simply omit it—the bark will still be delicious, just slightly less glossy.
- A Big Handful of Colorful Sprinkles: The star of the show! Use jimmies, quins, nonpareils—whatever makes you happy. Chef’s Insight: For the brightest color, add sprinkles *immediately* after spreading the chocolate so they sink in just slightly.
- Your Signature Toppings (Optional but Encouraged!): This is where you make it yours.
- Crushed Pretzels: For that iconic sweet & salty crunch.
- Toasted Nuts (pecans, almonds): Adds sophistication and texture.
- Mini Marshmallows: For a rocky road vibe.
- Dried Fruit (cranberries, apricots): A chewy, tart contrast.
- Flaky Sea Salt: A must if you’re a salt fiend like me!
Let’s Make Some Magic: Step-by-Step
Ready? This is so much fun. We’re going to melt, spread, sprinkle, and set. Easy as… well, bark!
- Prep Your Space. Line a standard baking sheet with parchment paper. Don’t use wax paper if you can avoid it, as it can sometimes stick. Smooth out any wrinkles for a nice even back for your bark. Chef Hack: Have all your toppings measured and ready in little bowls before you melt the chocolate. Once the chocolate is ready, you’ll want to move quickly!
- Melt with Care. Combine the chocolate and coconut oil in a heatproof bowl. You can melt it two ways:
- Double Boiler Method (My Favorite): Place the bowl over a saucepan with about an inch of simmering water, making sure the bottom of the bowl doesn’t touch the water. Stir gently and constantly until it’s a smooth, glossy pool. This method gives you the most control and prevents scorching.
- Microwave Method (Easiest): Heat in 30-second bursts on medium power, stirring thoroughly between each burst. Stop when there are just a few small lumps and stir until they melt—the residual heat will finish the job. Key Tip: Do NOT overheat! Burnt chocolate is bitter and grainy.
- The Pour and Spread. Pour your beautiful melted chocolate onto the center of your prepared parchment. Use an offset spatula or the back of a spoon to spread it out into a rustic, uneven rectangle or circle, about ¼ inch thick. Chef’s Commentary: Don’t aim for perfection here! The uneven edges and varying thickness make the broken pieces look more artisanal and interesting. If the chocolate is being stubborn and pulling back, just let it sit for 30 seconds to warm the parchment slightly, then try again.
- The Sprinkle Extravaganza! This is the moment. Immediately after spreading, while the chocolate is still wet and shiny, shower your toppings over the surface. Start with sprinkles, then add any chunkier items like pretzels or nuts. Press larger pieces in gently so they adhere. Go wild! Pro Tip: If adding flaky sea salt, do it last, just a light sprinkle. The contrast is everything.
- The Patient Wait. Now, let your creation set. You can leave it at cool room temperature for about 1-2 hours, or pop the whole tray into the refrigerator for 20-30 minutes until rock solid. Chef Hack: Chilling is faster, but letting it set slowly at room temp can prevent “bloom” (those white streaks) which is harmless but less glossy.
- The Best Part: The Break. Once completely hardened, lift the parchment off the tray. Place the giant slab of bark on your counter. Using your hands, break it into random, jagged, beautiful pieces. Some big, some small—variety is the spice of life! Fun Note: Letting kids help with this step is highly recommended. The *crack* is so satisfying.
Sharing the Sweetness: How to Serve
Presentation is part of the fun! Pile the broken pieces high on a simple white platter or in a rustic wooden bowl to let the colors pop. For gifting, stack chunks in a clear cellophane bag tied with baker’s twine, or tuck them into a pretty mason jar with a ribbon. It’s perfect as a standalone sweet treat alongside coffee after dinner, crumbled over ice cream for next-level sundaes, or simply arranged on the counter for friends to graze on during a game night. It’s an edible party!
Make It Your Own: Endless Twists
The basic formula is your playground. Here are a few of my favorite riffs:
- Peppermint Crunch: Use dark chocolate and top with crushed candy canes or peppermint candies. A holiday classic!
- Tropical Escape: Use white chocolate, and top with chopped dried pineapple, mango, coconut flakes, and macadamia nuts.
- S’mores Bark: Use milk chocolate. Immediately after sprinkling on mini marshmallows, use a kitchen torch to lightly toast them (or briefly broil, watching CLOSELY!). Finish with crushed graham crackers.
- Superfood Bark: Use dark chocolate, and top with goji berries, chopped pistachios, pumpkin seeds, and a drizzle of tahini after it sets.
- Cookie Dough Bark: Use milk chocolate, and scatter small blobs of edible cookie dough (egg-free, of course!) and mini chocolate chips over the top.
Olivia’s Kitchen Notes & Stories
This recipe has been my kitchen therapy more times than I can count. I’ve made it in a frenzy for forgotten school bake sales (it always saves the day), as edible thank-you notes for neighbors, and once, memorably, after a particularly rough day when I just needed to smash something. The therapeutic *crack* of breaking that slab was almost as good as eating it!
Over time, I’ve learned to embrace the “mistakes.” That one time I was talking too much and let the chocolate start to set before adding sprinkles? I learned to work faster (and that a light press with a spatula can embed them). The time I used cheap chocolate that seized up? It taught me the value of a good ingredient list. Every batch is a little lesson and a lot of joy. Don’t stress about making it look “perfect.” The charm is in its handmade, whimsical, break-as-you-please spirit.
Your Questions, Answered
Q: My chocolate got thick and grainy when I melted it. What happened?
A: Ah, that’s “seized” chocolate! It usually means a tiny bit of steam or water got into the chocolate during melting. Chocolate and water are frenemies. To rescue it, try stirring in a teaspoon of neutral oil (like vegetable or more coconut oil) until it smooths out. Prevention is best: ensure all bowls and utensils are completely dry.
Q: Why does my bark have white streaks on it after it sets?
A> That’s called “bloom.” It’s simply the cocoa butter separating and rising to the surface. It’s 100% safe to eat and doesn’t affect flavor! It’s often caused by temperature changes (like moving warm chocolate in and out of the fridge too quickly). To minimize it, let it set at room temperature if you have the time.
Q: How do I store this, and how long does it last?
A> Store it in an airtight container at cool room temperature for up to 2 weeks, or in the fridge for a month (let pieces come to room temp for best snap). You can freeze it for up to 3 months! Just layer it between parchment in a container to prevent sticking.
Q: Can I use white or milk chocolate instead?
A> Absolutely! Just note that white and milk chocolate are more delicate and can burn more easily. Melt them on lower heat and consider adding the ½ tsp of coconut oil to help them set firmly.
Chocolate Bark with Sprinkles : A Sweet, Shiny, Snap-and-Share Treat
Description
If you’re looking for a dessert that’s fast, fun, and guaranteed to make people smile, Chocolate Bark is the answer. With just a few ingredients and almost no effort, you can create a colorful, crunchy treat that feels festive any day of the week. It’s perfect for gifting, parties, movie nights, or just a quick kitchen project when you want something sweet and creative.
Ingredients
Base
-
12 oz semi-sweet or dark chocolate chips or chopped chocolate
-
½ tsp coconut oil (optional for shine and a crisp snap)
Toppings
-
Colorful sprinkles (jimmies, nonpareils, quins — any kind you love)
-
Optional mix-ins (choose your favorites):
-
Crushed pretzels
-
Toasted nuts
-
Mini marshmallows
-
Dried fruit (cranberries, apricots, etc.)
-
Flaky sea salt
-
Instructions
1. Prepare Your Tray
Line a baking sheet with parchment paper. Set your toppings nearby so you can add them quickly later.
2. Melt the Chocolate
You can melt it one of two ways:
Double-Boiler Method:
-
Place chocolate and coconut oil in a heatproof bowl set over a pot with a little simmering water.
-
Stir until smooth.
Microwave Method:
-
Heat chocolate in 30-second bursts on medium power, stirring between each.
-
Stop when mostly melted and stir until completely smooth.
3. Spread the Chocolate
Pour the melted chocolate onto the center of your parchment-lined tray.
Use a spatula or spoon to spread it into a rectangle or circle about ¼ inch thick.
4. Add the Toppings
While the chocolate is still glossy and soft, add your sprinkles and any extra toppings.
Press larger pieces (like nuts or pretzels) gently to help them stick.
5. Let It Set
Let the bark harden at room temperature for 1–2 hours, or refrigerate for 20–30 minutes.
6. Break Into Pieces
Once firm, lift the chocolate from the tray and break it into uneven pieces.
Serve or store in an airtight container.
Notes
-
Use good-quality chocolate for better flavor and a cleaner snap.
-
Avoid getting water into the chocolate — it can cause it to seize.
-
Add toppings immediately after spreading so they embed properly.
-
For extra shine, let the bark set at room temperature rather than in the fridge.
-
If adding flaky sea salt, sprinkle lightly — a little goes a long way.
Quick Nutrition & Prep Details
Prep Time: 10 mins | Chill Time: 20-30 mins | Total Time: 40 mins
Servings: Makes about 10 generous pieces (or 20 smaller nibbles!)
Dietary Info: Naturally Vegetarian. To make it Gluten-Free, ensure your chocolate and toppings are certified GF.
Estimated Nutrition per Piece (with sprinkles only): ~150 calories, 9g fat, 16g carbs, 1g fiber, 13g sugar, 1g protein. (Varies widely with toppings.)
Final Thoughts
What we’ve made here is more than just chocolate—it’s a little container for joy. In under an hour, with almost no rules and a whole lot of color, you’ve created something that can sweeten an ordinary Tuesday, turn a gathering into a celebration, or carry a memory across generations.
Chocolate bark doesn’t ask for perfection. It celebrates whim, creativity, and the simple act of making something with your hands. It’s a reminder that some of the best things in life—and in the kitchen—are also the easiest. They don’t require precision, just presence. A willingness to melt, pour, sprinkle, and break.
So, as you pack this bark into jars, pile it onto plates, or sneak a piece straight from the tray, remember: you’re not just sharing a treat. You’re sharing a feeling. That spark of childhood wonder from a grandma’s kitchen, the satisfaction of creating something beautiful, and the pure, uncomplicated happiness of sweet, shareable joy.
Now, go break off a piece. Listen to that snap. Taste the chocolate. See the sprinkles sparkle. You’ve just made a little bit of magic—and it’s meant to be shared.
“`


