

Hey, Let’s Make Magic in a Tortilla!
Okay, let’s be real for a second: Is there anything more universally beloved than a hot, crispy quesadilla oozing with melty cheese? That satisfying crunch, the burst of savory filling, the way it somehow feels like a hug from the inside… pure comfort food gold. If your weeknights feel like a chaotic race against the clock (mine totally do!), this Chicken Quesadilla recipe is about to become your shiny culinary knight in shining armor.
Picture this: tender, seasoned chicken mingling with sweet, caramelized peppers and onions, all held together by a glorious blanket of Monterey Jack that stretches for miles. It’s the kind of meal that makes everyone magically appear in the kitchen, noses twitching. “Is it ready yet?” chorus included! The best part? We’re talking seriously simple here. No fancy techniques, no hours of prep – just straightforward, delicious results in about 30 minutes flat.
I developed this version after years of tweaking – it’s the ultimate crowd-pleaser, whether you’re feeding hungry kids, hosting a casual game night, or just treating yourself after a long day. Forget the sad, floppy quesadillas of yore; we’re going for GOLDEN, CRISPY perfection every single time. So, grab your favorite skillet, put on that messy apron (a badge of honor, I say!), and let’s turn simple ingredients into something seriously unforgettable together. Ready to get that cheese melting?
My First Quesadilla Fiasco (And Why I’m Glad It Happened!)
My love affair with quesadillas started… well, a little disastrously. Picture me, age 19, in my first tiny apartment kitchen, determined to impress my college roommate with my “culinary skills.” I had grand visions of a Mexican fiesta. I grabbed some pre-cooked chicken, dumped a mountain of cheese onto a tortilla, threw it in a pan, and promptly walked away to chat. Big mistake! I returned to smoke billowing, a charred hockey puck stuck stubbornly to the pan, and cheese leaking everywhere like a culinary crime scene. My roommate burst out laughing – and honestly, so did I! It was a glorious, messy failure.
But that fiasco taught me the golden rules I swear by now: patience, layering, and medium heat are non-negotiable. It also cemented that quesadillas aren’t just food; they’re connection. We ended up scraping off the salvageable bits, laughing hysterically, and ordering pizza. But the *idea* of that perfect, crispy, cheesy bite stuck with me. Now, every time I make these chicken quesadillas, especially when friends gather around the stove waiting impatiently, I remember that smoky first attempt. It’s a reminder that cooking is about the joy, the shared moments (even the messy ones!), and the journey to getting it gloriously right. This recipe? It’s my redemption arc, perfected just for you!
Your Quesadilla Toolkit: Simple Ingredients, Big Flavor
Gathering your ingredients is half the fun! Here’s exactly what you need for those perfectly balanced, crispy-edged chicken quesadillas. Don’t stress about exact precision – cooking should feel joyful, not rigid!
- 4 cups shredded cooked chicken breast: This is your superstar! Leftover rotisserie chicken is a genius shortcut (my weeknight MVP). No leftovers? Simply poach or bake 2 large chicken breasts until cooked through (165°F), then shred. Want more flavor? Use thighs! They’re juicier.
- 4 tsp taco seasoning: Your flavor bomb! Use your favorite store-bought blend (check for salt content) or whip up a quick homemade mix (chili powder, cumin, garlic powder, onion powder, oregano). Chef’s Tip: Blooming it with the chicken makes the spices sing!
- 1 tsp paprika: Adds subtle smokiness and beautiful color. Smoked paprika is a game-changer if you love that campfire vibe! Sweet paprika works too.
- 1 red bell pepper & 1 green bell pepper, thinly sliced: Color, crunch, and sweetness! The combo is classic. Feel free to use orange or yellow bells, or even poblano for mild heat. Thin slices ensure they soften quickly.
- 1 medium yellow onion, thinly sliced: The aromatic base that gets beautifully sweet when sautéed. Red onion adds a sharper bite if you prefer.
- 4 cups freshly shredded Monterey Jack cheese: MELTABILITY QUEEN! Pre-shredded cheese contains anti-caking agents that can make it grainy. Trust me, shredding your own off the block makes a silkier, gooier melt. Can’t find Jack? Oaxaca, mild cheddar, or a Mexican blend are great subs.
- 8 large flour tortillas (8-10 inch): The vessel! Use sturdy burrito-size tortillas. Corn tortillas work too but are more delicate (use two per quesadilla). Warm them slightly before filling for extra flexibility.
- 4 tbsp unsalted butter: Our crispy-edge secret weapon! Butter gives superior browning and flavor compared to oil. Salted butter works too, just adjust added salt.
- Salt and pepper to taste: Essential seasoning layers. Season your veggies well while sautéing!
Let’s Build Some Quesadilla Magic: Step-by-Step
Alright, team, fire up that skillet! This isn’t just about assembling; it’s about building layers of flavor and achieving that perfect crispy-cheesy harmony. Follow these steps, and you’ll be a quesadilla wizard in no time.
- Sizzle Those Veggies: Grab your trusty large skillet (non-stick or cast iron works great) and place it over medium heat. Add 1 tbsp of the butter. Once it melts and sizzles gently (not furiously!), toss in the sliced bell peppers and onion. Season generously with salt and pepper. Now, here’s the key: Don’t rush this! Sauté, stirring occasionally, for 5-7 minutes. You want them softened but still have a bit of bite, with those beautiful caramelized golden edges. That sweetness is flavor gold! Remove them to a bowl. Chef’s Hack: Wipe out the pan quickly with a paper towel between steps. It prevents burnt spice bits later!
- Spice Up That Chicken: Using the same skillet (no need to wash it thoroughly!), add the shredded chicken. Sprinkle over the taco seasoning and paprika. Stir everything together constantly for just 2-3 minutes. You’re not cooking the chicken through (it’s already cooked!), you’re warming it up and waking up the spices, letting their flavors coat every strand. That heat releases the oils in the spices – hello, flavor town! Remove the chicken to another bowl. Pro Tip: Taste a tiny bit! Does it need more seasoning? Adjust now.
- Prep Your Station (Mise en Place is Key!): Lower the skillet heat to medium (crucial for even browning without burning). Shred your cheese (if you haven’t already), and have your tortillas, butter, chicken, veggies, and cheese bowls lined up near the stove. This “assembly line” setup makes building quesadillas super fast and prevents frantic searching!
- Build & Fold: Add a small pat of butter (about 1/2 tbsp) to the skillet and swirl to coat. Place one tortilla flat in the pan. Working quickly, sprinkle about 1/4 cup of cheese evenly over HALF of the tortilla. This first cheese layer is your “glue.” Next, add a generous scoop of the seasoned chicken (about 1/2 cup), followed by a layer of the sautéed veggies (about 1/4 cup). Top it all off with another 1/4 cup (or slightly more!) of cheese. This top cheese layer melts down, sealing everything inside. Carefully fold the bare half of the tortilla over the filling, creating a perfect half-moon. Golden Rule: Cheese on bottom, filling, cheese on top = no filling escapees!
- The Golden Sear: Let the quesadilla cook undisturbed for 2-3 minutes. Peek underneath – you’re looking for a beautiful, even golden brown. Use a large spatula to carefully flip it over. If you’re nervous, slide the spatula fully underneath for support. Cook the other side for another 2-3 minutes until equally golden and you hear that glorious sizzle of melting cheese. Chef’s Secret: Gently press down with the spatula occasionally – it helps the filling meld and ensures maximum crispy contact.
- Rest & Repeat: Slide your masterpiece onto a cutting board. Resist the urge to cut immediately! Let it rest for 1-2 minutes. This lets the cheese set slightly so it doesn’t all gush out when you slice. While it rests, add another pat of butter to the skillet and start building the next quesadilla. Repeat until all your delicious half-moons are done!
- Slice & Serve: Use a sharp knife or pizza cutter to slice each quesadilla into 3-4 wedges. This makes them easy to handle and dip! Serve immediately while they’re piping hot and irresistibly crispy.
Dipping is Mandatory: Serving Up the Goodness
Presentation is simple but oh-so-satisfying! Arrange those gorgeous golden wedges slightly overlapping on a large platter or individual plates. The star of the show is that melty cheese peeking out! Now, the fun part: DIPPERS! Offer bowls of your favorite accompaniments. Classic salsa (pico de gallo for freshness or a smooth roasted salsa for depth) is non-negotiable. Cool, creamy sour cream balances the heat (if you added any spice). And a big bowl of chunky, vibrant guacamole? Pure heaven. Feeling fancy? A quick squeeze of fresh lime juice over the platter adds a bright zing, or sprinkle with chopped fresh cilantro. This is finger food at its finest – no forks needed, just pure, delicious enjoyment!
Make It Your Own: Delicious Quesadilla Twists
Once you master the basic blueprint, the world is your quesadilla oyster! Get creative and tailor it to your mood or dietary needs:
- Vegetarian Fiesta: Swap the chicken for a can of rinsed black beans (smashed slightly) and corn kernels (fresh, frozen, or roasted). Add a pinch of cumin to the beans for extra flavor!
- Southwest Kick: Add 1/2 cup corn kernels (roast them first for extra smokiness!) and a finely diced jalapeño (seeds removed for less heat) to the veggie sauté. Use Pepper Jack cheese instead of Monterey Jack for a spicy punch.
- BBQ Chicken Twist: Replace the taco seasoning and paprika with 1/3 cup of your favorite BBQ sauce mixed into the warm chicken. Add a handful of thinly sliced red onion (raw for bite) inside the quesadilla with the chicken. Cheddar cheese works great here!
- Breakfast-for-Dinner: Scramble 4 eggs! Skip the taco seasoning. Layer the cooked scrambled eggs, cooked breakfast sausage or bacon bits, sautéed peppers/onions, and cheese. Serve with salsa!
- Lighter Option: Use low-fat cheese, reduce the butter by half (spritz the pan lightly with oil instead), and load up extra veggies. Use whole-wheat tortillas. Serve with Greek yogurt instead of sour cream.
Olivia’s Quesadilla Chronicles: Lessons from a Cheesy Frontline
Oh, the stories these quesadillas could tell! Like the time I tried to flip one too enthusiastically and sent a shower of cheesy chicken across the stovetop. (My dog was *very* pleased that day). Or the countless Sunday afternoons where my nieces and nephews crowd around, each demanding their “special one” – extra cheese, no peppers, just chicken… the negotiation is half the fun! This recipe has truly evolved. I started with just chicken and cheese (solid, but basic). Then came the peppers and onions for sweetness and texture. The paprika was a later addition for that smoky depth, and switching to fresh-shredded cheese? A total game-changer I learned from a taco truck chef who winked and said, “The block is your friend, señora.” The biggest lesson? Don’t fear the mess. A little cheese on the pan, a rogue pepper slice on the counter – it’s all part of the delicious, imperfect, shared joy of cooking. These quesadillas are more than food; they’re my edible love language for busy weeknights and happy gatherings. I hope they become that for you too!
Print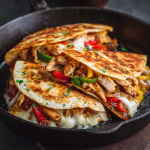
Chicken Quesadillas Recipe
- Total Time: 30 mins
Description
Let’s talk comfort food that actually fits into your schedule. These golden, crispy Chicken Quesadillas are the 30-minute dinner your weeknight chaos didn’t know it needed. Juicy seasoned chicken, caramelized peppers and onions, and gooey Monterey Jack cheese all folded into a buttery tortilla crisped to perfection? Yes, yes, and YES. No oven, no fancy tools – just a skillet and some serious flavor.
Ingredients
-
4 cups shredded cooked chicken
-
4 tsp taco seasoning
-
1 tsp paprika
-
1 red + 1 green bell pepper, thinly sliced
-
1 medium yellow onion, thinly sliced
-
4 cups shredded Monterey Jack cheese
-
8 large flour tortillas (8–10”)
-
4 tbsp unsalted butter
-
Salt & pepper to taste
Instructions
-
Sauté Veggies (5–7 mins)
Melt 1 tbsp butter in skillet over medium heat. Cook peppers and onions until soft and golden. Season with salt & pepper. Set aside. -
Flavor the Chicken (3 mins)
In the same pan, add chicken with taco seasoning and paprika. Stir until warmed and coated. Remove from heat. -
Assembly Line Time
Lower heat. Add ½ tbsp butter to skillet. Place tortilla flat, layer cheese, chicken, veggies, then more cheese on half the tortilla. Fold and press gently. -
Sear to Gold (5–6 mins total)
Cook 2–3 mins per side until crisp and melty. Repeat with remaining tortillas. -
Slice & Serve
Let rest 1–2 mins before slicing into wedges. Serve hot with salsa, sour cream, or guacamole.
Notes
-
Use freshly shredded cheese for best melt.
-
For extra heat, swap in Pepper Jack or add diced jalapeño.
-
Vegetarian? Try beans, corn, and extra cheese.
-
Make it BBQ-style: sub taco seasoning for BBQ sauce and use cheddar.
- Prep Time: 10 mins
- Cook Time: 20 mins
Nutrition
- Calories: 620 cal Per Serving
- Fat: 38g
- Carbohydrates: 34g
- Protein: 37g
-
Final Thoughts: The Quesadilla Philosophy
Quesadillas are more than food—they’re a mindset. They teach us that:
-
Simplicity Shines – Few ingredients, done well, beat complexity.
-
Imperfection is Delicious – Even “failed” flips taste great.
-
Versatility is Power – Adaptable to cravings, cultures, and pantries.
-
Joy is Shared – Few things bond people like pulling apart a cheesy wedge.
So here’s to the humble quesadilla: may your tortillas always be crispy, your cheese stretchy, and your kitchen full of laughter. Now go forth and melt some magic!
-


