
Cheesy Chicken Enchiladas with Creamy Sauce – Comfort Food in Just 45 Minutes
For Those Nights When Only a Warm, Cheesy Hug Will Do
Hey friends! Olivia here, apron on and spatula in hand. Can you smell it? That incredible aroma of warming spices, sizzling chicken, and bubbling cheese that seems to wrap you up in a cozy blanket the second you walk through the door. If your soul (and your stomach) is calling out for that kind of comfort, you and I are on the exact same page today.
I’m about to share one of my all-time, no-fail, crowd-pleasing recipes: Cheesy Chicken Enchiladas with a dreamy, velvety Creamy Sauce. This is the dish I make when I need a guaranteed smile from my family, when I’m tasked with feeding a hungry group of friends, or honestly, when I just want to treat myself to something that tastes like a hug from the inside. The best part? We’re not talking about a project that takes all day. We’re talking 45 minutes, start to golden-bubbly finish. It’s faster than ordering takeout and about a million times more satisfying.
This recipe is all about big flavor with minimal fuss. We’re using simple, wholesome ingredients, a few clever shortcuts (hello, pre-cooked chicken!), and a sauce that’s so good you’ll want to eat it with a spoon. Forget dry, bland enchiladas. These are plump, juicy, and smothered in a creamy, slightly tangy sauce that makes every single bite sing. So, preheat your oven, grab your favorite baking dish, and let’s turn your kitchen into the coziest Mexican restaurant in town.
The Enchilada That Started It All
This recipe takes me straight back to my first tiny apartment kitchen. It was about the size of a postage stamp, with one wobbly burner that had a mind of its own. My then-boyfriend (now husband), Mark, and I were broke, tired from work, and craving something that felt like a celebration. We pooled our change for ingredients and decided to tackle enchiladas for the first time.
I remember the chaotic joy of it—shredding chicken with two forks because we didn’t have a mixer, trying to roll overstuffed tortillas that kept splitting, and creating a “cream sauce” that was really just sour cream and hope. When we pulled that steaming, cheesy pan out of our ancient oven, we felt like culinary geniuses. We ate straight from the pan, sitting on the floor because we didn’t have a kitchen table yet, and declared it the best thing we’d ever made. This recipe is the polished, foolproof, deliciously creamy version of that memory. It’s proof that the best meals aren’t about perfection; they’re about the joy you stir into them.
Your Flavor Line-Up: Simple, Wholesome, & Flexible
Here’s everything you’ll need. I’ve added my little notes and swaps so you can make this work with what you’ve got!
For the Enchilada Filling:
- 2 cups cooked, shredded chicken: The ultimate time-saver! I use a rotisserie chicken from the store when I’m in a pinch. Leftover grilled or baked chicken works beautifully, too. For a vegetarian twist, swap in black beans or sautéed mushrooms.
- 1 small onion, chopped: This builds our flavor base. Yellow or white onion is perfect here. No onion? A teaspoon of onion powder stirred into the chicken will do in a pinch.
- 1 tbsp olive oil: For sautéing. Any neutral oil works.
- 1 tsp ground cumin: That warm, earthy, essential Mexican flavor. Don’t skip it!
- 1 tsp chili powder: I use a basic, mild chili powder blend. If you only have cayenne, use ¼ tsp unless you love serious heat.
- Salt and pepper to taste: Season as you go. Taste your filling before you roll!
- 8 flour tortillas (8-inch): I love flour for their pliability and soft texture. For a gluten-free version, use your favorite corn tortillas—just warm them briefly in a dry skillet first so they don’t crack when you roll.
- 2 cups shredded cheddar cheese + 1 cup shredded Monterey Jack: I like this blend for its perfect melt and flavor. A Mexican cheese blend is a fantastic one-bag solution. Pre-shredded is fine for convenience, but a block you shred yourself will melt even creamier.
For That Legendary Creamy Sauce:
- 1 cup sour cream: The tangy backbone of our sauce. For a lighter option, full-fat plain Greek yogurt works wonderfully and adds protein.
- 1 cup heavy cream (or half-and-half): Heavy cream gives us that luxurious, velvety texture. Half-and-half makes a slightly lighter but still delicious sauce. For a dairy-free version, try canned coconut milk (full-fat).
- ½ cup chicken broth: Thins the sauce to the perfect pouring consistency and adds depth. Vegetable broth works too.
- 1 tsp garlic powder: Quick, easy flavor. You can sauté 2 fresh minced garlic cloves with the onion if you prefer.
- 1 tsp smoked paprika: My secret weapon! It gives a subtle smokiness that makes the sauce taste like it simmered for hours.
- ½ tsp cayenne pepper (optional): Just a hint for a gentle kick. Omit if sensitive to spice.
- Salt to taste: Brings all the flavors together.
For the Grand Finale (Garnish!):
- ½ cup salsa: A quick spoonful over the top adds a fresh, bright contrast to the creamy richness. Use your favorite—mild, medium, or hot!
- Fresh cilantro, chopped: That pop of green and fresh herbal flavor is *chef’s kiss*. If you’re a cilantro-hater, a sprinkle of green onions is lovely.
Let’s Build Some Enchilada Magic, Step-by-Step
Ready? Let’s do this! I’m walking you through each step with all my favorite tips to ensure enchilada excellence.
Step 1: Oven Ready, Pan Set. First things first, crank that oven to 375°F (190°C). This is our target for golden, bubbly perfection. Take your 9×13-inch baking dish and give it a light coating of non-stick spray or a brush of oil. This is our enchilada landing pad, and we don’t want anything sticking to the show later.
Chef’s Quick Tip: If your baking dish is looking a little worse for wear, I sometimes lay down a thin, first layer of sauce (just a spoonful or two) before placing the rolled tortillas. It’s extra insurance against sticking and adds flavor to the bottom layer.
Step 2: Sizzle & Season Your Filling. Heat the olive oil in a large skillet over medium heat. Add your chopped onion and let it cook until it’s soft and translucent—about 3-4 minutes. You’re not looking for color, just sweetness. Now, add your shredded chicken, cumin, chili powder, salt, and pepper. Stir it all together and let it cook for another 2-3 minutes. This quick fry in the spices wakes them up and makes your kitchen smell incredible. Take the skillet off the heat.
Chef’s Quick Tip: Taste your filling right now! This is your chance to adjust the seasoning. Want more cumin? Add it! Need more salt? Go for it. The filling should taste delicious on its own.
Step 3: The Art of the Roll. Now, let’s assemble. Set up a little station: your skillet of filling, your tortillas, your baking dish, and a bowl with about 2 cups of your mixed cheeses (we’re saving the rest for the top). Take one tortilla, spoon a generous line of the chicken mixture down the center, and top with a hearty pinch of cheese. Don’t be shy, but don’t overstuff—you should be able to roll it snugly without the filling bursting out the sides. Roll it up tightly and place it seam-side down in your prepared dish. Repeat with the remaining tortillas, packing them in snugly side-by-side.
Chef’s Quick Tip: If using corn tortillas, warm 4-5 at a time between damp paper towels in the microwave for 30 seconds. This makes them flexible and prevents cracking. Life-changing hack!
Step 4: Whisk Up the Creamy Dream Sauce. This is where the magic happens. In a medium saucepan, combine the sour cream, heavy cream, and chicken broth. Whisk them together over medium heat. Add the garlic powder, smoked paprika, cayenne (if using), and a pinch of salt. Keep whisking gently! We want to warm it through and let it thicken slightly, which takes about 5-7 minutes. You’ll know it’s ready when it coats the back of a spoon. Do not let it boil vigorously—a gentle simmer is perfect. A boil could cause the dairy to separate.
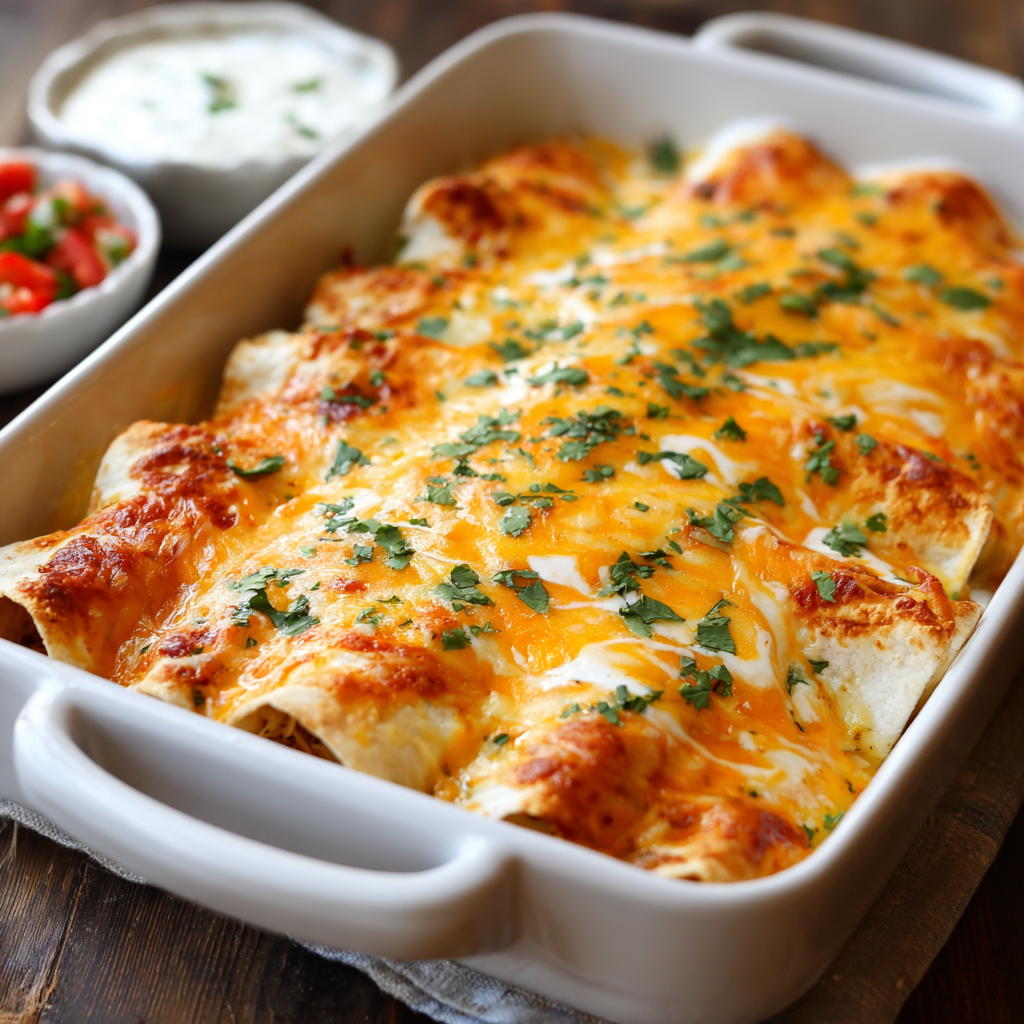
Step 5: The Smother & Cheese Blanket. Once your sauce is silky and thickened, carefully pour it evenly over all your rolled enchiladas. Use a spoon to guide it into any gaps. Now, take the remaining cheese and sprinkle it over the top in an even, glorious layer. This is the cheesy crown that will get all golden and delicious in the oven.
Step 6: Bake to Bubbly Perfection. Slide your masterpiece into the preheated oven. Bake for 20-25 minutes, until the cheese is fully melted, the edges are just starting to turn golden, and the sauce is bubbling around the sides. Your kitchen will smell like heaven.
Step 7: The Crucial Rest. I know, I know. It’s tempting to dive right in. But trust me, let it rest for 5 minutes after pulling it from the oven. This allows the sauce and filling to settle, making the enchiladas much easier to serve without everything oozing out. Use this time to chop your cilantro and get your salsa ready.
Plating Up Your Masterpiece
Slide a spatula under two enchiladas and gently transfer them to a plate. Spoon a little of the extra sauce from the dish over the top. Add a dollop of cool, chunky salsa for a fresh contrast and a generous sprinkle of bright green cilantro. For the full comfort food experience? Serve with a simple side of Mexican rice, a crisp green salad with lime vinaigrette, or a pile of tortilla chips for scooping up every last bit of that creamy sauce. Don’t forget a cold beer or a zesty margarita!
Mix It Up! Your Enchilada, Your Rules
This recipe is a fantastic canvas. Here are a few of my favorite twists:
- Green Chile & Lime: Add a 4-oz can of diced green chiles to the chicken filling and the zest of one lime to the creamy sauce. So bright and flavorful!
- Tex-Mex Beef: Swap the chicken for a pound of ground beef (browned and drained). Use taco seasoning instead of the cumin/chili powder.
- Spinach & Artichoke (Vegetarian): Sauté a bunch of fresh spinach and mix it with a can of drained artichoke hearts, cream cheese, and the Monterey Jack. Use vegetable broth.
- Buffalo Chicken: Toss the shredded chicken in ½ cup of buffalo sauce before filling. Use a blue cheese dressing mixed with a little cream for the sauce. Game day favorite!
Olivia’s Kitchen Notes
This recipe has been a living, evolving thing in my kitchen for over a decade. The smoked paprika in the sauce? That was a happy accident when I ran out of regular paprika. The rotisserie chicken shortcut? A revelation during my son’s soccer season. The truth is, the best recipes grow with you.
I’ve made these for new moms, for grieving friends, and for my kid’s “please can my whole team come over?” nights. They never fail to bring people together. My biggest piece of advice? Make the recipe exactly as written the first time. Then the next time, make it your own. That’s how you build kitchen confidence and create food that tells your story. And if you have a tortilla tear or a sauce that looks a little curdled (we’ve all been there!), just sprinkle on extra cheese and call it “rustic.” It will still taste amazing.
Your Questions, Answered
Q: Can I make these enchiladas ahead of time?
A: Absolutely! Assemble the enchiladas (roll, place in dish, add sauce and cheese), cover tightly with plastic wrap or foil, and refrigerate for up to 24 hours. When ready to bake, let the dish sit on the counter for 20-30 minutes while the oven preheats, then bake as directed, adding maybe 5-10 extra minutes since it’s starting cold.
Q: My sauce seemed to separate or get grainy. What happened?
A: This usually means the heat was too high. Dairy sauces prefer gentle, patient heat. If this happens, don’t panic! Remove it from the heat and whisk in a tablespoon of cold broth or cream vigorously. It won’t be *perfectly* silky, but it will still taste great. Next time, keep the heat at a steady medium-low.
Q: Can I freeze baked or unbaked enchiladas?
A: For best results, freeze them before baking. Assemble in a freezer-safe dish, cover with several layers of plastic wrap and foil. Freeze for up to 2 months. Thaw overnight in the fridge before baking as usual. You can freeze them after baking, but the texture of the tortillas can become a bit mushy upon reheating.
Q: My tortillas are cracking when I roll them. Help!
A: This is so common! For flour tortillas, microwaving the stack for 20-30 seconds under a damp paper towel will steam them and make them pliable. For corn tortillas, the damp-paper-towel-in-the-microwave trick is essential, or you can quickly fry them in hot oil for 10 seconds per side to soften.

Cheesy Chicken Enchiladas with Creamy Sauce : Comfort Food in Just 45 Minutes
Description
Comfort food at its finest! Tender chicken, warm spices, and a creamy, velvety sauce wrapped in soft tortillas and topped with melty cheese. Perfect for family dinners, weeknight meals, or any time you need a cozy, cheesy hug.
Ingredients
For the Filling:
-
2 cups cooked, shredded chicken (rotisserie or leftover baked/grilled chicken)
-
1 small onion, chopped
-
1 tbsp olive oil
-
1 tsp ground cumin
-
1 tsp chili powder
-
Salt & pepper, to taste
-
8 flour tortillas (8-inch; for gluten-free, use corn tortillas and warm briefly)
-
2 cups shredded cheddar cheese + 1 cup shredded Monterey Jack
For the Creamy Sauce:
-
1 cup sour cream (or full-fat Greek yogurt)
-
1 cup heavy cream (or half-and-half)
-
½ cup chicken broth (or vegetable broth)
-
1 tsp garlic powder
-
1 tsp smoked paprika
-
½ tsp cayenne pepper (optional)
-
Salt, to taste
For Garnish:
-
½ cup salsa
-
Fresh cilantro, chopped (or green onions if preferred)
Instructions
-
Preheat & Prep:
-
Preheat oven to 375°F (190°C).
-
Lightly grease a 9×13-inch baking dish. Optional: spread a spoonful of sauce on the bottom to prevent sticking.
-
-
Cook the Filling:
-
Heat olive oil in a skillet over medium heat. Sauté onions 3–4 min until soft.
-
Add chicken, cumin, chili powder, salt, and pepper. Cook 2–3 min. Taste and adjust seasoning.
-
-
Assemble Enchiladas:
-
Place a line of chicken filling in each tortilla, top with a pinch of cheese, roll, and place seam-side down in the baking dish.
-
-
Make the Creamy Sauce:
-
In a saucepan over medium heat, whisk together sour cream, heavy cream, and broth.
-
Add garlic powder, smoked paprika, cayenne (if using), and salt. Warm 5–7 min until slightly thickened. Avoid boiling.
-
-
Smother & Cheese:
-
Pour sauce evenly over enchiladas, then sprinkle remaining cheese on top.
-
-
Bake:
-
Bake 20–25 min until cheese is melted, edges golden, and sauce bubbling.
-
-
Rest & Serve:
-
Let sit 5 min before serving. Garnish with salsa and chopped cilantro.
-
Notes
-
Corn Tortillas: Warm under damp paper towels in the microwave or fry 10 sec per side to prevent cracking.
-
Green Chile & Lime: Add 4-oz diced green chiles to filling; zest 1 lime into sauce.
-
Tex-Mex Beef: Substitute 1 lb ground beef for chicken; use taco seasoning.
-
Spinach & Artichoke (Vegetarian): Sauté spinach and mix with artichokes, cream cheese, and Monterey Jack; use vegetable broth.
-
Buffalo Chicken: Toss chicken in ½ cup buffalo sauce; mix cream with blue cheese dressing.
Quick Nutritional Breakdown
Please note: This is an estimate for 1 enchilada (of 8), calculated using the ingredients as written. Actual values will vary based on specific brands and modifications.
- Calories: ~485
- Protein: 28g
- Carbohydrates: 22g
- Fat: 32g
Prep Time: 15 min | Cook Time: 30 min | Total Time: 45 min | Servings: 8 enchiladas
Final Thoughts
There you have it—a warm, bubbling pan of comfort, ready to grace your table in less than an hour. These Cheesy Chicken Enchiladas are more than just a meal; they’re an experience. From the moment you start sautéing onions to that final sprinkle of cilantro, you’re building layers of flavor and love that everyone around your table will taste.
This recipe is a testament to the power of simple ingredients combined with care. It’s forgiving enough for a weeknight but special enough for a gathering. Whether you’re recreating the cozy nostalgia of your own kitchen memories or making new ones with friends and family, this dish delivers satisfaction in every creamy, cheesy, perfectly spiced bite.
Remember, the best cooking comes from making a recipe your own. Don’t be afraid to play with the fillings, adjust the spice level, or garnish with abandon. The goal isn’t perfection—it’s a delicious, shared moment of comfort.


