
Your New Favorite Weeknight Hero is Here!
Hey there, friend! Come on in, pull up a stool, and let’s get something incredibly delicious bubbling on the stove. If you’ve ever had one of those days where you’re craving something deeply comforting, wildly satisfying, but the very thought of a towering pile of dishes makes you want to just order a pizza… well, you and I are kindred spirits. And that’s exactly why I’m so thrilled to share this recipe with you today.
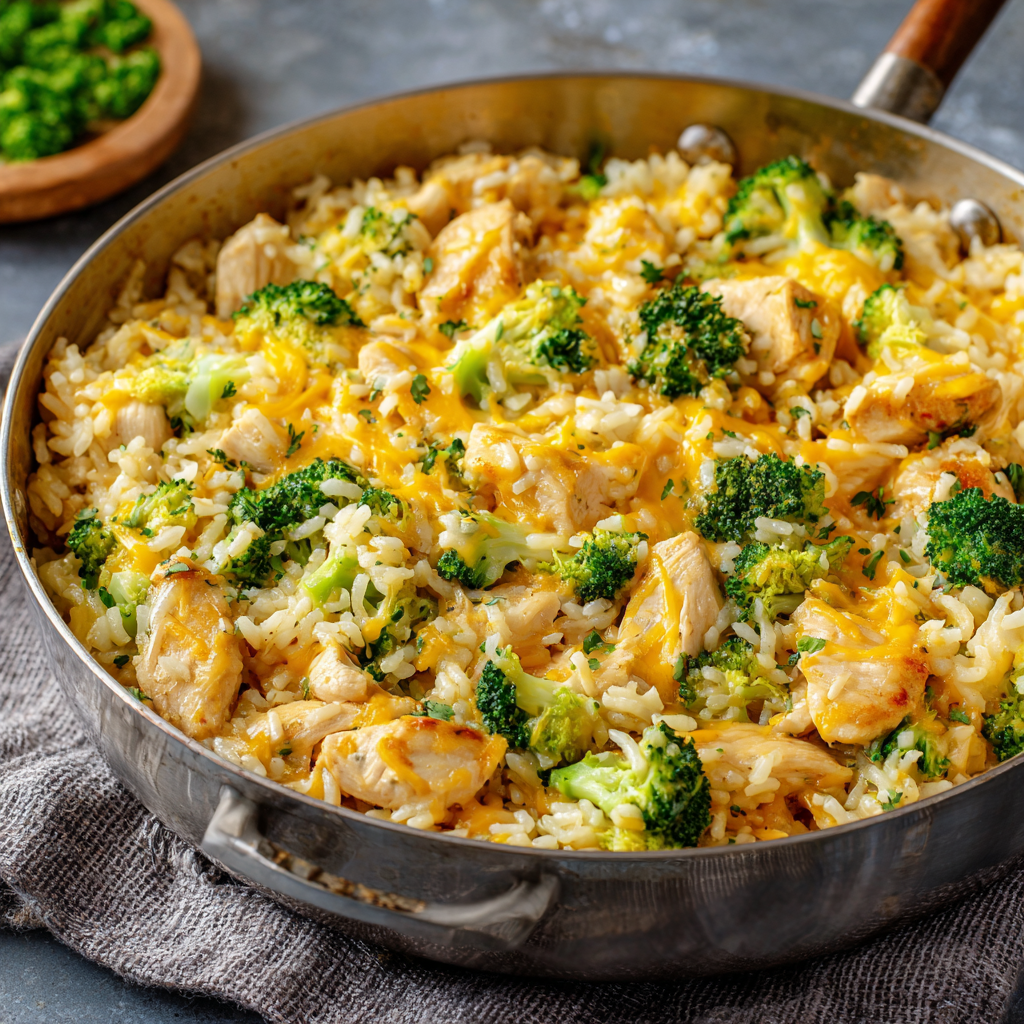
This Cheesy Chicken Broccoli Rice is the undisputed champion of my weeknight dinner roster. It’s a glorious, creamy, one-pot wonder that feels like a warm hug in a bowl. We’re talking juicy, tender chicken, fluffy rice, vibrant green broccoli, and a sauce so luxuriously cheesy it should probably be illegal. The best part? (Besides the cheese, obviously.) The entire magical, flavor-packed journey happens in a single pot. That’s right—minimal cleanup for maximum reward.
This isn’t just a recipe; it’s a solution. It’s for the busy parent, the tired professional, the student on a budget, or anyone who believes that good food should bring joy, not stress. It’s hearty, nourishing, and has this incredible ability to make everyone at the table light up. So, tie on your favorite apron (the messy one with all the character is totally welcome here), and let’s create some dinnertime magic together.
The Story Behind the Skillet
This recipe will always hold a special place in my heart because it’s woven into the story of my own little family. When my husband and I first moved in together, our culinary repertoire was… limited, to say the least. We had a handful of “fancy” dishes we could manage for guests, but our day-to-day meals were a rotation of pasta, stir-fries, and a lot of hopeful experimentation.
I vividly remember one particularly chaotic Wednesday. I’d gotten home late from work, it was pouring rain, and we were both hangry. The fridge held a random assortment of ingredients: some chicken breasts, a lonely head of broccoli, and a block of cheddar. Desperation, as it often does in the kitchen, became the mother of invention. I threw it all in a pot with some rice and broth, crossed my fingers, and hoped for the best.
What emerged from that pot 30 minutes later was nothing short of a miracle. It was creamy, cheesy, and utterly comforting. We sat at our little IKEA table, steam fogging up the window, and devoured it in contented silence. It was the moment I realized that the best meals aren’t about perfection; they’re about simplicity, heart, and the joy of creating something wonderful out of what you have. This dish became our tradition, our go-to for bad days, good days, and every ordinary day in between.
Gathering Your Cozy Kitchen Crew
One of the things I love most about this recipe is its beautiful flexibility. It’s built on simple, wholesome ingredients that you can easily adapt based on what’s in your pantry or fridge. Here’s your shopping list for cozy perfection:
- 2 lbs Chicken Breasts, cut into bite-sized pieces: I like breasts for their lean, quick-cooking nature, but boneless, skinless chicken thighs are a fantastic swap for even more juicy, flavorful meat.
- 1 small Onion, finely chopped: This is our aromatic base, building a foundation of sweet, savory flavor. A yellow or white onion works perfectly here.
- 2 cloves Garlic, minced: Because is there anything better than the smell of garlic sizzling in a pan? It adds a essential punch of flavor. If you’re in a real pinch, ½ teaspoon of garlic powder will do the trick.
- 3 cups White Long-Grain Rice, rinsed: Chef’s Tip Alert! Rinsing your rice is a non-negotiable step for me. It washes off the excess starch, preventing your beautiful one-pot meal from turning into a gloppy mess. It’s the secret to fluffy, separate grains.
- 4 cups Chicken Stock & 4 cups Water: Using a combination gives us a rich flavor base without being overly salty. For an even deeper flavor, use all chicken stock! If you need a vegetarian version, veggie broth works great.
- 6 cups Broccoli Florets, roughly chopped: Don’t throw away those stalks! Peel the tough outer skin and chop the tender inner core—it’s perfectly delicious and reduces food waste.
- 1 cup Milk: This is our creamy liaison, bringing everything together into a smooth, luscious sauce. Any fat percentage works, and for a richer result, you can even use half-and-half.
- 4 cups Sharp Cheddar Cheese, shredded (divided): I’m a firm believer in shredding your own cheese! Pre-shredded bags contain anti-caking agents that can make your sauce a little grainy. Freshly shredded melts like a dream. I use sharp cheddar for its bold flavor, but a milder cheddar or a Monterey Jack blend would also be lovely.
Let’s Make Some Magic: Your Step-by-Step Guide
Okay, team! It’s go time. Grab your largest, deepest skillet or a Dutch oven with a tight-fitting lid. We’re about to create layers of flavor, all in this one trusty pot.
- Brown That Beautiful Chicken: Heat a tablespoon of olive or avocado oil in your pot over medium-high heat. Pat your chicken pieces dry with a paper towel—this is a little hack for getting a perfect sear instead of steaming. Add the chicken in a single layer (work in batches if you need to!) and cook for 4-5 minutes, just until it’s golden brown on all sides. It doesn’t need to be cooked through yet! We’re just building flavor. Remove the chicken to a clean plate and set it aside. Chef’s Note: Those little browned bits left in the pan? That’s liquid gold. Don’t you dare wash that pan!
- Sizzle Your Aromatics: In that same glorious, flavor-packed pan, add your chopped onion. Cook for 2-3 minutes until it starts to turn translucent and sweet. Now, add the minced garlic and cook for just 30 more seconds until it’s fragrant. You’ll know it’s ready when your entire kitchen smells like heaven. Watchpoint: Don’t let the garlic burn! Burnt garlic turns bitter, and we want pure, savory goodness.
- Toast the Rice & Add the Liquid: Stir in your rinsed rice, letting it toast in the pan for about a minute. This simple step enhances its nutty flavor and helps it stay fluffy. Now, pour in your chicken stock and water. Give everything a good scrape with your wooden spoon to lift all those delicious browned bits from the bottom of the pan. This is called “deglazing,” and it’s the secret to a deeply flavorful sauce. Bring the whole thing to a lively boil.
- The Simmering Stage: Once boiling, reduce the heat to low, cover the pot with its lid, and let it simmer gently for 12-15 minutes. I like to give it one quick stir about halfway through to make sure nothing is sticking to the bottom. You’ll notice the rice starting to absorb the liquid and become tender.
- Bring the Band Back Together: Now for the grand reunion! Uncover the pot and add the broccoli florets and the reserved chicken (along with any juices that accumulated on the plate). Give it a gentle stir, pop the lid back on, and cook for another 5-7 minutes. The broccoli should be bright green and tender-crisp, and the rice should be fully cooked.
- The Big, Cheesy Finale: Turn off the heat. Stir in the milk and 3 cups of your freshly shredded cheddar cheese. Watch in wonder as it melts into the most incredible, creamy sauce, coating every single grain of rice, every piece of chicken and broccoli. Taste it! This is your moment. Does it need a pinch more salt or pepper? Now’s the time to adjust.
- The Golden Crown: Sprinkle the remaining 1 cup of cheese evenly over the top. You can simply cover the pot for 2-3 minutes to let the residual heat melt it, OR, for a show-stopping finish, pop the whole oven-safe skillet under the broiler for 1-2 minutes until the top is bubbly and gloriously golden brown.
Plating Up Your Masterpiece
This dish is a star all on its own, but a little presentation flair never hurts! I love serving it family-style, right from the skillet in the middle of the table—it’s so inviting. Grab some big, shallow bowls and spoon generous helpings into each one. A final sprinkle of freshly chopped parsley or chives adds a pop of color and freshness. If you’re feeling extra (I often am), a little dollop of sour cream or a dash of hot sauce on the side takes it to the next level. All you need is a simple green salad or some crusty bread to sop up every last bit of that cheesy sauce.
Make It Your Own: Delicious Twists & Swaps
The beauty of this recipe is its versatility! Don’t be afraid to play around and make it suit your mood or dietary needs.
- Spice It Up: Add 1 tsp of smoked paprika or a pinch of chili flakes with the onions for a gentle, warming kick.
- Depth of Flavor: Stir in a hearty splash of Dijon mustard or a tablespoon of Worcestershire sauce when you add the milk for a rich, savory complexity.
- Crunchy Topping: Mix ½ cup of panko breadcrumbs with 2 tablespoons of melted butter and the reserved cheese. Sprinkle it on top and broil for a fantastic baked casserole-style crunch.
- Veggie Swap: Swap half the broccoli for cauliflower, or add in some sliced mushrooms or bell peppers when you’re cooking the onions.
- Gluten-Free/Dairy-Free: The recipe is naturally gluten-free! For dairy-free, use your favorite unsweetened plant-based milk and a good melting vegan cheddar cheese.
Olivia’s Kitchen Notebook
Over the years, this recipe has evolved in tiny, delicious ways. I used to cook the broccoli separately and stir it in at the end, but I found that steaming it right on top of the rice is not only easier, it’s better! The broccoli infuses the whole dish with its fresh flavor and doesn’t get waterlogged.
One of my favorite kitchen memories involves this dish. I was making it for my niece’s first sleepover, and I decided to be “fun Aunt Olivia” and let them add a wild mix-in bar with things like corn, bacon bits, and different cheeses. They created a “Rainbow Unicorn” version that was… interesting, to say the least! But they were so proud of their creation, and it just reinforced my belief that cooking should be fun and a little bit messy. So, don’t be afraid to get your own kids or friends involved in the process!
Your Questions, Answered!
I’ve made this dish countless times and have fielded lots of great questions from readers. Here are the most common ones to ensure your success!
Q: My rice is still hard/undercooked. What happened?
A: This usually means there wasn’t quite enough liquid or the heat was too high, causing the liquid to evaporate before the rice could fully cook. Don’t worry! Simply add another ½ to 1 cup of warm broth or water, stir gently, cover, and let it cook on low for another 5-10 minutes. Different brands and ages of rice can absorb liquid differently.
Q: Can I use a different type of rice?
A: You can, but the liquid and cooking times will change! Brown rice needs more liquid (usually a 1:2.5 rice-to-liquid ratio) and a much longer cooking time (closer to 45 minutes). I don’t recommend instant rice as it will turn to mush. Long-grain white rice (like Jasmine or Basmati) is the champion for this recipe.
Q: My dish turned out a bit mushy. How can I prevent that?
A: Mushiness is almost always due to the rice being over-stirred. Rice releases starch as it cooks, and constant stirring agitates it, creating a sticky, gummy texture. Trust the process! Let it simmer covered with only one or two gentle stirs. Also, rinsing your rice thoroughly is your best defense against a gloppy pot.
Q: Can I make this ahead of time or freeze it?
A> Absolutely! It reheats beautifully. Let it cool completely, then store it in an airtight container in the fridge for up to 3 days. Reheat gently on the stovetop with a splash of milk or broth to loosen it up. For freezing, I’d recommend freezing before adding the dairy. Thaw overnight in the fridge and then reheat, stirring in the milk and cheese once it’s hot.

Cheesy Chicken Broccoli Rice : One-Pot Family Favorite
Description
Cheesy Chicken Broccoli Rice
Ingredients
-
2 lbs chicken breasts, cut into bite-sized pieces
-
1 small onion, finely chopped
-
2 cloves garlic, minced
-
3 cups white long-grain rice, rinsed
-
4 cups chicken stock
-
4 cups water
-
6 cups broccoli florets, roughly chopped
-
1 cup milk
-
4 cups sharp cheddar cheese, shredded (divided)
-
1 tbsp olive oil or avocado oil
-
Salt and pepper, to taste
Instructions
-
Cook the Chicken
Heat oil in a large deep skillet or Dutch oven over medium-high heat.
Pat chicken pieces dry, season lightly with salt and pepper, and cook in batches for 4–5 minutes until golden brown on all sides.
Remove chicken from the pan and set aside. -
Cook Onion and Garlic
In the same pan, add the chopped onion. Sauté for 2–3 minutes until soft and translucent.
Add garlic and cook for another 30 seconds, stirring frequently. -
Add Rice and Liquids
Stir in rinsed rice and toast for 1 minute.
Add chicken stock and water, scraping up any browned bits from the bottom of the pan.
Bring to a boil. -
Simmer the Rice
Once boiling, reduce heat to low.
Cover and simmer for 12–15 minutes, stirring once halfway through. -
Add Broccoli and Chicken
Uncover the pot and add broccoli florets and the cooked chicken (plus any juices).
Stir, cover again, and cook for 5–7 minutes, until broccoli is tender and rice is cooked through. -
Make It Cheesy
Turn off the heat. Stir in milk and 3 cups of shredded cheddar cheese until melted and creamy.
Taste and adjust seasoning with salt and pepper as needed. -
Finish and Serve
Sprinkle the remaining 1 cup of cheese on top.
Cover for 2–3 minutes to let it melt, or broil for 1–2 minutes until golden and bubbly.
Serve warm.
Notes
-
Use freshly shredded cheese for the smoothest sauce.
-
If rice is still firm, add ½–1 cup warm broth or water and cook a few more minutes.
-
For a crunchy topping, mix ½ cup panko with 2 tbsp melted butter and broil for 1–2 minutes.
Nutrition
- Calories: 470 cal Per Serving
- Fat: 22 g
- Carbohydrates: 38 g
- Protein: 36 g
Nutritional Information (Approximate, Per Serving)
This is a rough estimate based on the ingredients listed and assuming 8 servings. Values can vary based on specific brands and ingredients used.
- Calories: ~470 kcal
- Protein: 36 g
- Carbohydrates: 38 g
- Fat: 22 g
- Fiber: 4 g
Prep time: 10 minutes | Cook time: 30 minutes | Total time: 40 minutes | Difficulty: Easy | Servings: 6-8
A Final Note from My Kitchen to Yours
Years after that first chaotic, rainy night, this dish is still our steadfast comfort food. It’s been there for birthday dinners, potlucks, and countless ordinary Tuesdays. It’s a reminder that the most cherished recipes aren’t about fancy techniques or expensive ingredients—they’re about the feeling they create.
I hope this recipe finds a place in your own story. I hope it becomes the meal you make when you need a win, when you’re short on time, or when you simply want to gather your people around something warm and wonderful.
Thank you for letting me share one of my favorite stories and meals with you. May your skillet always be full and your heart even fuller.
With love and a dash of cheese,
Olivia


