The No-Bake Marvel That Will Steal Your Heart: Butterfinger Pie
Hey there, friend! Come on in, grab an apron, and let’s get one thing straight: life is just too short for boring desserts. I’m Olivia, and if you’ve spent any time in my kitchen, you know my philosophy is that the best treats are the ones that bring a little bit of magic without a whole lot of stress. You know the feeling—that moment when you take a bite of something so perfectly creamy, so delightfully crunchy, so utterly *moreish* that you just have to close your eyes for a second and savor it. That, my friend, is the magic we’re making today.
We’re talking about my legendary, no-bake, crowd-pleasing Butterfinger Pie. This isn’t just a recipe; it’s your new secret weapon. It’s the pie you bring to the potluck that has everyone asking for the recipe. It’s the dessert you whip up on a weeknight because you deserve a little celebration. It’s the glorious union of a candy bar and a pie, and it requires exactly zero oven time. With a creamy peanut butter base, a cloud of whipped topping, and a symphony of crushed Butterfinger bits in every single bite, this pie is pure, unadulterated joy on a plate. So, let’s skip the fuss and dive straight into the fun part. Get ready to make something spectacular!
A Slice of Sweet Nostalgia
This pie recipe is so much more than a list of ingredients to me; it’s a direct line back to my Grandma June’s linoleum-floored kitchen. Grandma June was the queen of “semi-homemade” before it was even a term. She believed in maximum flavor with minimum fuss, and her dessert table was always the main event at any family gathering. I can still picture her, with a twinkle in her eye, pulling this very pie out of her avocado-green refrigerator. The air would be thick with the scent of roasted turkey and conversation, but all us kids could focus on was that pie.
We’d watch, hypnotized, as she’d slide her pie server through the creamy filling, the crunch of the candy bar giving way with the most satisfying sound. That first bite was a revelation—cold, creamy, sweet, salty, and crunchy all at once. It felt like a secret handshake, a special treat made just for us. Making this pie today still brings back that warm, fuzzy feeling of being in her kitchen, surrounded by love and laughter. It’s a reminder that the best recipes aren’t just about feeding people; they’re about creating moments that stick to your ribs—and your heart—long after the last crumb is gone.
Gathering Your Pie-Making Posse
One of the best things about this recipe is its beautiful simplicity. You only need a handful of key players, and I bet you have a few of them in your pantry right now! Here’s the lowdown on what you’ll need and why each ingredient is a rockstar in this dessert symphony.
- 225g (8 oz) Cream Cheese, softened: This is the rich, tangy backbone of our filling. Chef’s Insight: Please, please let your cream cheese come to room temperature! Trying to beat cold brick-hard cream cheese is a one-way ticket to lumpy-town. If you forget, you can microwave it on low power for 15-second intervals, but patience is your best friend here.
- 1/2 Cup (about 135g) Creamy Peanut Butter: This brings that iconic nutty, salty flavor that pairs so perfectly with Butterfinger. Substitution Tip: You can use crunchy peanut butter for an extra textural punch, or if you have a nut allergy, SunButter (made from sunflower seeds) works surprisingly well as a substitute!
- 1 1/2 Cups (about 180g) Crushed Butterfinger Candy Bars: The star of the show! Chef’s Hack: The easiest way to crush these is to place them in a zip-top bag and use a rolling pin to go to town. You want a mix of fine crumbs and some larger, pea-sized pieces for that signature crunch. Don’t forget to reserve a small handful for the gorgeous topping!
- 1 (8 oz) Container of Whipped Topping (like Cool Whip): This is what gives our pie its dreamy, cloud-like lightness. Substitution Tip: If you’re a from-scratch purist, you can absolutely substitute an equal amount of freshly whipped heavy cream sweetened with a tablespoon or two of powdered sugar. It’s divine!
- 1 Prepared Pie Crust: The trusty vessel for our incredible filling. Chef’s Insight: I’m a huge fan of a classic graham cracker crust for this, as its honeyed sweetness is a perfect match. But a chocolate cookie crust (like Oreo) takes it to a whole new level of decadence. Store-bought is a lifesaver, but a homemade crust is always a lovely touch.
Let’s Build the Magic: Step-by-Step
Ready to create some dessert wizardry? This process is so simple and satisfying. I’ll walk you through each step with my favorite little kitchen hacks to ensure your pie is absolutely perfect.
- The Creamy Base: In a large mixing bowl, beat the softened cream cheese and peanut butter together with a hand mixer (or a stand mixer with the paddle attachment) on medium speed until the mixture is completely smooth, creamy, and lump-free. Chef’s Tip: Scrape down the sides and bottom of the bowl halfway through to make sure everything is perfectly incorporated. This is the foundation, so we want it silky smooth!
- Introduce the Fluff: Now, it’s time to gently fold in the whipped topping. Key word: FOLD. Switch to a spatula for this part. Instead of stirring vigorously (which would deflate all the airy goodness), use a gentle, sweeping motion, turning the bowl as you go. You’re looking for a light and uniform, pale beige mixture. No white streaks should remain.
- The Crunchy Finale: Sprinkle in the majority of your crushed Butterfingers (remember to save that handful for the top!). Gently stir them in until they’re evenly distributed throughout the creamy filling. Chef’s Hack: Don’t over-mix here! We want to preserve as much of that wonderful candy bar crunch as possible.
- The Grand Assembly: Spoon this glorious filling into your waiting pie crust. Use the back of your spoon or an offset spatula to smooth the top into beautiful, swoopy peaks. This isn’t just about looks; those peaks will give our topping something to cling to.
- The Crown Jewel: Take your reserved crushed Butterfingers and sprinkle them artfully over the entire surface. Be generous! This gives the pie a fantastic textural contrast and lets everyone know exactly what deliciousness awaits them.
- The Test of Patience: This is the hardest part, I promise! Carefully transfer the pie to your refrigerator. It needs to chill for at least 2-4 hours, but honestly, overnight is even better. Chef’s Secret: This chilling time is non-negotiable. It allows the flavors to meld and the filling to firm up perfectly, so you get clean, beautiful slices.
How to Serve Your Masterpiece
The moment of truth has arrived! Pull that beautiful pie out of the fridge. For the cleanest slices, dip your sharp knife in hot water and wipe it dry between each cut. Serve up generous wedges on their own for pure, unadulterated bliss. For a little extra pizzazz, a dollop of freshly whipped cream and a tiny extra sprinkle of Butterfinger crumbs on the plate makes it feel extra special. This pie is rich, so a little goes a long way—though I’ve never seen anyone turn down a second sliver!
Make It Your Own: Delicious Twists & Swaps
The beauty of this recipe is its adaptability! Feel free to play around and create your own signature version.
- Chocolate Lover’s Dream: Use a chocolate cookie crust and fold in 1/2 cup of mini chocolate chips along with the Butterfingers.
- Cookie Butter Bliss: Swap the peanut butter for an equal amount of speculoos cookie butter for a warm, spiced flavor that is utterly addictive.
- The “Snickers” Variation: Add a layer of homemade or store-bought caramel sauce at the bottom of the crust before adding the filling. It’s a game-changer!
- Lighter Option: Use Neufchâtel cheese (the lighter cousin of cream cheese), reduced-fat peanut butter, and a light whipped topping. It still tastes incredibly indulgent.
- Mini Pie Party: Instead of one big pie, divide the filling among individual mini graham cracker crusts for adorable, single-serving treats.
From My Kitchen to Yours: A Few Final Thoughts
This recipe has been a part of my life for so long, it’s practically evolved on its own. I remember one time, early in my blogging days, I was filming a video for this very pie and I was so busy chatting to the camera that I completely forgot to add the peanut butter! I just mixed the cream cheese and Cool Whip, poured it in the crust, and was about to top it when I saw the lonely jar of peanut butter sitting on the counter. We had a good laugh, scraped it all back into the bowl, and started over. It was a great reminder that even the “easiest” recipes can have their moments, and it’s always okay to laugh at yourself in the kitchen!
Over the years, I’ve found that using a higher-quality, natural peanut butter (the kind you have to stir) gives it a more intense peanut flavor, but the classic shelf-stable stuff works beautifully and holds its texture a bit better. This pie is a testament to the fact that you don’t need fancy techniques or a dozen obscure ingredients to create something truly memorable. It’s about heart, a little bit of crunch, and a whole lot of yum.
Your Butterfinger Pie Questions, Answered!
I’ve gotten thousands of comments and questions on this recipe over the years, so I’ve gathered the most common ones here to help you out!
Q: My filling is a bit runny. What did I do wrong?
A: This usually happens for one of three reasons: 1) The cream cheese wasn’t fully softened, leading to a less-than-smooth mix. 2) We were a little too vigorous when folding in the whipped topping and deflated it. 3) It just needs more time! The pie absolutely must chill for the full 4 hours, preferably overnight, to set up properly. If it’s still soft, don’t worry—it will still taste amazing, just serve it with a spoon!
Q: Can I freeze Butterfinger Pie?
A: You can! Wrap it tightly in a couple layers of plastic wrap and it will keep for 1-2 months. The texture will be a bit firmer, more like ice cream, when frozen. Let it sit on the counter for 10-15 minutes before slicing for the best texture. The crushed Butterfingers may lose a *little* of their crunch after thawing, but it’s still delicious.
Q: What’s the best way to crush the Butterfingers without making a huge mess?
A: The zip-top bag and rolling pin method is my go-to. For an even easier, less arm-intensive method, you can pulse them a few times in a food processor! Just be careful not to turn them into complete dust—a few pulses is all you need.
Q: Can I make this recipe ahead of time?
A: Absolutely! This pie is the *perfect* make-ahead dessert. It needs that long chill time anyway, so making it the day before you plan to serve it is actually ideal. It allows the flavors to fully develop and makes your party day so much less stressful.
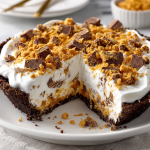
Butterfinger Pie
Description
A creamy, crunchy, peanut-buttery pie that requires no baking—perfect for weeknights, potlucks, or any time you want a dessert that wows!
Ingredients
Filling:
-
225g (8 oz) cream cheese, softened
-
½ cup (135g) creamy peanut butter
-
1½ cups (180g) crushed Butterfinger bars, plus a small handful for topping
-
1 (8 oz) container whipped topping (like Cool Whip)
Crust:
-
1 prepared pie crust (graham cracker or chocolate cookie crust works best)
Instructions
-
Mix cream cheese & peanut butter: Beat together in a large bowl until smooth and lump-free. Scrape the sides of the bowl halfway through.
-
Fold in whipped topping: Use a spatula and gently fold until uniform and airy.
-
Add Butterfinger pieces: Stir in most of the crushed candy, leaving some for garnish. Be gentle to preserve crunch.
-
Assemble pie: Spoon filling into the pie crust and smooth the top. Sprinkle reserved Butterfinger pieces over the surface.
-
Chill: Refrigerate for at least 2–4 hours (overnight is best) to let flavors meld and filling firm up.
-
Serve: Slice with a knife dipped in hot water for clean edges. Optional: add extra whipped topping or a few Butterfinger crumbs per slice.
Tips & Variations:
-
Chocolate Lover: Use a chocolate cookie crust and fold in ½ cup mini chocolate chips.
-
Cookie Butter Swap: Replace peanut butter with speculoos cookie butter.
-
Caramel Layer: Spread caramel sauce on the crust before adding the filling.
-
Mini Pies: Use individual mini crusts for single servings.
-
Lighter Option: Use Neufchâtel cheese, reduced-fat peanut butter, and light whipped topping.
Make-Ahead & Storage:
-
Can be made a day ahead—perfect for stress-free entertaining.
-
Freezes 1–2 months wrapped tightly; let sit 10–15 minutes at room temp before slicing.
Estimated Nutrition (per slice):
Calories: ~480 | Carbs: 47g | Fat: 31g | Protein: 9g
Nutritional Information*
*Please note: This is an estimated nutritional breakdown for one slice, based on the specific ingredients listed. Values can vary based on brands and specific quantities used.
- Calories: ~480 kcal
- Carbohydrates: ~47g
- Fat: ~31g
- Protein: ~9g
Final Thoughts: A Slice of Simple Joy
And there you have it—the secret to a dessert that feels like a hug in pie form. This Butterfinger Pie is more than just a no-bake marvel; it’s a celebration of simplicity, nostalgia, and the pure, uncomplicated joy of a truly delicious treat.
It proves that you don’t need a chef’s expertise or a whole day in the kitchen to create something magical. All you need is a few simple ingredients, a willingness to get a little messy, and the patience to let the fridge do its work. This pie is a love letter to busy weeknights, last-minute gatherings, and those moments when you just deserve something sweet.
I hope this recipe finds its way into your regular rotation, creating its own stories and becoming a requested favorite among your friends and family. May your slices be creamy, your crunch be plentiful, and your kitchen be filled with the same happy, loving energy that this pie has always brought to mine.
Now, go forth and enjoy every last crumb!
With love and a sweet tooth,